Click the “YuDao Source Code” above to select “Set as Star”
What about the front wave or the back wave?
Only the waves that can roll are good waves!
Articles updated daily at 8:55, losing a bit of hair every day…
Source Code Quality Column
-
Original | Java 2020 Super God Road, very liver ~
-
Open source projects with detailed Chinese comments
-
RPC framework Dubbo source code analysis
-
Network application framework Netty source code analysis
-
Message middleware RocketMQ source code analysis
-
Database middleware Sharding-JDBC and MyCAT source code analysis
-
Job scheduling middleware Elastic-Job source code analysis
-
Distributed transaction middleware TCC-Transaction source code analysis
-
Eureka and Hystrix source code analysis
-
Java concurrency source code
Abstract: Original source http://www.iocoder.cn/Jenkins/install/ “YuDao Source Code” welcomes reprinting, please retain the abstract, thank you!
-
1. Overview -
2. Quick Start -
3. Email Notification -
4. DingTalk Notification -
666. Easter Egg
Recommended reading Jenkins articles:
“YuDao Spring Boot Continuous Delivery Jenkins Introduction” “YuDao Spring Cloud Continuous Delivery Jenkins Introduction” corresponding labx-16
1. Overview
Currently, the vast majority of teams in China use Jenkins for continuous integration and continuous delivery. So what is Jenkins? It is introduced in the “Jenkins User Documentation Center” as follows:
Jenkins is an open-source CI&CD software used to automate various tasks, including building, testing, and deploying software.
Jenkins supports various running methods, which can be installed via system packages, Docker, or a standalone Java program.
The official Jenkins has provided a fairly detailed tutorial in the “Jenkins User Documentation Center”, and it has also provided a Chinese translation, which is very friendly. However, considering that friends might want a more convenient quick start tutorial, I wrote this article.
2. Quick Start
In this section, we will build a Jenkins service together and deploy a Spring Boot application to a remote server. The steps are as follows:
-
1. Set up a Jenkins service -
2. Configure Jenkins global tools -
3. Create a Jenkins job. This job fetches the project from Git, builds it using Maven, copies the built jar package to the remote server, and finally starts the Spring Boot application.
Friendly reminder: The following necessary software needs to be installed by friends themselves.
Server where Jenkins is located:
JDK 8+ Maven 3+ Git Remote server:
JDK 8+
2.1 Setting Up Jenkins
2.1 Download
Open the Jenkins download page and choose the desired Jenkins version. Here, we choose the jenkins.war package, which is universal for all operating systems, version 2.204.1.
# Create directory
$ mkdir -p /Users/yunai/jenkins
$ cd /Users/yunai/jenkins

# Download
$ wget http://mirrors.jenkins.io/war-stable/latest/jenkins.war
2.1.2 Start Jenkins Service
Execute the nohup java -jar jenkins.war & command to start the Jenkins service in the background. Since jenkins.war has an embedded Jetty server, there is no need to deploy it in Tomcat or other containers; it can be started directly.
After execution, we can use the tail -f nohup.out command to check the startup log. If we see the following log, it indicates that the startup was successful:
Jenkins initial setup is required. An admin user has been created and a password generated.
Please use the following password to proceed to installation:

e24a2134060f4604b45708904a4f7a25

This may also be found at: /Users/yunai/.jenkins/secrets/initialAdminPassword
By default, Jenkins has an embedded admin user. The username is admin, and the password is randomly generated. Here, we can see a string e24a2134060f4604b45708904a4f7a25 which is the password.
2.2 Jenkins Configuration
2.2.1 Newbie Introduction
By default, Jenkins starts on port 8080. So, we can use a browser to access http://127.0.0.1:8080/ to enter the Jenkins homepage. Since we have not completed the Jenkins introduction at this time, we are redirected to the “introduction” page. As shown below:
Input the admin password, and we enter the “Newbie Introduction” page. As shown below:
As a Jenkins newbie, we certainly choose “Install recommended plugins”. At this time, all we need to do is patiently wait for Jenkins to automatically download the plugins. As shown below:
Since the plugins are downloaded from abroad, the download speed may be relatively slow. You can watch some videos on Bilibili, haha. Of course, it may also happen that the plugin download fails, just click retry and stay calm.
2.2.2 Admin Configuration
After installing the plugins, it will redirect to the “Create the first admin user” interface. As shown below:
Click the “Save and Finish” button to complete the creation of the admin account.
2.2.3 Instance Configuration
After creating the admin account, it will require a re-login. After logging in with the new admin account, it will redirect to the “Instance Configuration” interface. As shown below:
Click the “Save and Finish” button to complete the instance configuration. At this point, by clicking the “Restart” button, we can complete the restart of Jenkins. After that, patiently wait for Jenkins to complete the restart, and we will enter the Jenkins homepage. As shown below:
2.2.4 Additional Security Plugins
Although we have already installed some recommended plugins in “2.2.1 Newbie Introduction”, we still need to install the following plugins:
-
Maven Integration -
Maven Info -
Publish Over SSH -
Extended Choice Parameter -
Git Parameter
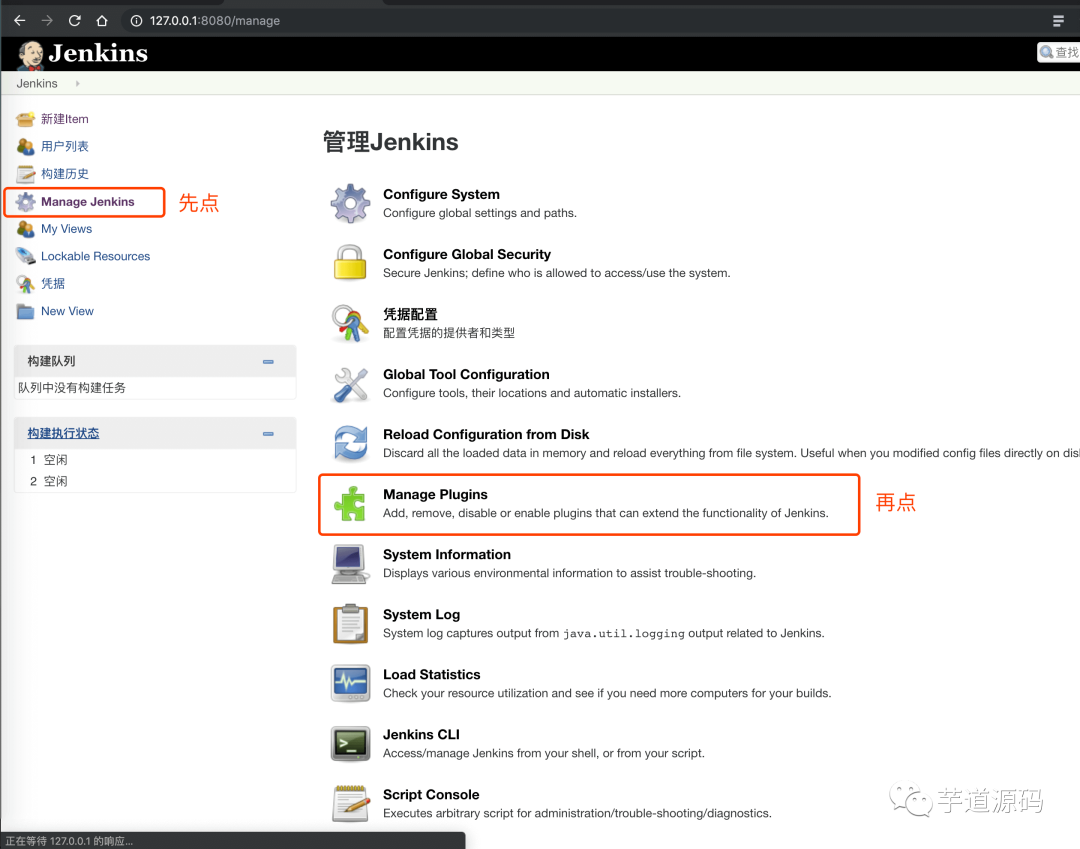
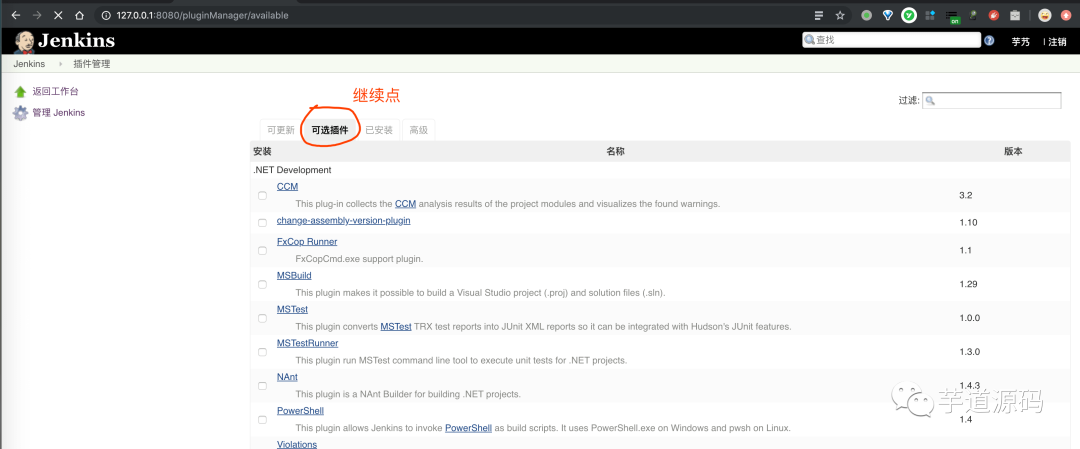
From the Jenkins homepage, follow the path “Manage Jenkins -> Manage Plugins” to enter the “Plugin Management” interface. As shown below:
-
Additional Security Plugins – Step One -
Additional Security Plugins – Step Two
Select the above plugins to install, then click the “Install without restart” button. After that, you will enter the “Installing/Updating Plugins” interface. As shown below:
After that, patiently wait for the plugin installation to complete…
2.2.4 JDK Configuration
From the Jenkins homepage, follow the path “Manage Jenkins -> Global Tool Configuration” to enter the “Global Tool Configuration” interface. As shown below:
Click the “Add JDK” button and uncheck the “Install automatically” option. After that, enter the local JAVA_HOME. As shown below:
After the configuration is complete, click the “Save” button at the bottom.
2.2.5 Maven Configuration
From the Jenkins homepage, follow the path “Manage Jenkins -> Global Tool Configuration” to enter the “Global Tool Configuration” interface. As shown below:
Click the “Add Maven” button and uncheck the “Install automatically” option. After that, enter the local MAVEN_HOME. As shown below:
After the configuration is complete, click the “Save” button at the bottom.
2.2.6 SSH Configuration
Since we will copy the built jar package to the remote server via SSH, we need to configure SSH. Here, we use the username and password authentication method to establish an SSH connection to the remote server.
From the Jenkins homepage, follow the path “Manage Jenkins -> Configure System” to enter the “Configuration” interface, then scroll down to the bottom. As shown below:
Click the “Add” button and then click the “Advanced” button. After that, configure the SSH information for the remote server. As shown below:
After the configuration is complete, click the “Save” button at the bottom.
2.3 Remote Server Configuration
On the remote server, we need to create a directory for deploying the Java project. Each company’s directory specification is different, here I will share my own. Fixed in the /work/projects directory, create a deployment directory for each project. And each project has an independent subdirectory. For example:
$ pwd
/work/projects/lab-41-demo01

$ ls
ls -ls
total 18852
    4 drwxr-xr-x 2 root root     4096 Jan 13 21:21 backup
    4 drwxr-xr-x 2 root root     4096 Jan 13 21:14 build
18840 -rw-r--r-- 1 root root 19288579 Jan 13 21:21 lab-41-demo01.jar
    4 drwxr-xr-x 2 root root     4096 Jan 13 21:16 shell
-
lab-41-demo01directory will hold everything for a project. -
In each sub directory, it is fixed to be divided into the following files/directories: -
lab-41-demo01.jar: The project’sjarpackage. -
builddirectory: The newjarpackage after Jenkins builds the project will be uploaded to thebuilddirectory to avoid overwriting the originaljarpackage, which may cause the Java service to fail to shut down properly. -
backupdirectory: The backup directory for historicaljarpackages. Each time a newjaris used to start the service, the oldjarwill be moved to thebackupdirectory for backup. -
shelldirectory: The script directory. Currently, there is onlydeploy.shscript; let’s take a look together.
The entire deploy.sh script has nearly 200 lines, so we’ll take a look at it as a whole first. Later, friends can click the portal for a complete view. The core code is as follows:
#!/bin/bash
set -e

# Basic
# export JAVA_HOME=/work/programs/jdk/jdk1.8.0_181
# export PATH=PATH=$PATH:$JAVA_HOME/bin
# export CLASSPATH=$JAVA_HOME/jre/lib/rt.jar:$JAVA_HOME/lib/dt.jar:$JAVA_HOME/lib/tools.jar

DATE=$(date +%Y%m%d%H%M)
# Base path
BASE_PATH=/work/projects/lab-41-demo01
# Address of the jar after compilation. During deployment, Jenkins will upload the jar to this directory
SOURCE_PATH=$BASE_PATH/build
# Service name. It is also agreed that the name of the deployed service's jar package is the same.
SERVER_NAME=lab-41-demo01
# Environment
PROFILES_ACTIVE=prod
# Health check URL
HEALTH_CHECK_URL=http://127.0.0.1:8078/actuator/health/

# heapError storage path
HEAP_ERROR_PATH=$BASE_PATH/heapError
# JVM parameters
JAVA_OPS="-Xms1024m -Xmx1024m -XX:+HeapDumpOnOutOfMemoryError -XX:HeapDumpPath=$HEAP_ERROR_PATH"
# JavaAgent parameters. Can be used to configure SkyWalking and other link tracing
JAVA_AGENT=

# Backup function
function backup() {
    // ... code omitted
}

# Transfer latest built code to the project environment
function transfer() {
    // ... code omitted
}

# Stop function
function stop() {
    // ... code omitted
}

# Start function
function start() {
    // ... code omitted
}

# Health check function
function healthCheck() {
    // ... code omitted
}

# Deploy function
function deploy() {
    cd $BASE_PATH
    # Backup original jar
    backup
    # Stop Java service
    stop
    # Deploy new jar
    transfer
    # Start Java service
    start
    # Health check
    healthCheck
}

deploy
-
At the beginning, we define a bunch of variables, friends can understand based on the comments above. -
At the end, we can see the invocation of the #deploy()method to deploy the project. The entire process is divided into 5 steps, corresponding to 5 methods. We’ll look at each method one by one.
① Backup
The #backup() method backs up the original jar package to the backup directory. The code is as follows:
function backup() {
    # If it does not exist, no need to back up
    if [ ! -f "$BASE_PATH/$SERVER_NAME.jar" ]; then
        echo "[backup] $BASE_PATH/$SERVER_NAME.jar does not exist, skipping backup"
    # If it exists, back up to the backup directory, using the time as a suffix
    else
        echo "[backup] Starting backup of $SERVER_NAME ..."
        cp $BASE_PATH/$SERVER_NAME.jar $BASE_PATH/backup/$SERVER_NAME-$DATE.jar
        echo "[backup] Backup of $SERVER_NAME completed"
    fi
}
② Stop
The #stop() method gracefully shuts down the Java process corresponding to the original jar package. The code is as follows:
function stop() {
    echo "[stop] Starting to stop $BASE_PATH/$SERVER_NAME"
    PID=$(ps -ef | grep $BASE_PATH/$SERVER_NAME | grep -v "grep" | awk '{print $2}')
    # If the Java service is running, then close it
    if [ -n "$PID" ]; then
        # Normal shutdown
        echo "[stop] $BASE_PATH/$SERVER_NAME is running, starting kill [$PID]"
        kill -15 $PID
        # Wait for a maximum of 60 seconds until it shuts down.
        for ((i = 0; i < 60; i++))
            do
                sleep 1
                PID=$(ps -ef | grep $BASE_PATH/$SERVER_NAME | grep -v "grep" | awk '{print $2}')
                if [ -n "$PID" ]; then
                    echo -e ".
";
                else
                    echo '[stop] Stopped $BASE_PATH/$SERVER_NAME successfully'
                    break
                fi
      done

        # If normal shutdown fails, then forcibly kill -9 to close
        if [ -n "$PID" ]; then
            echo "[stop] $BASE_PATH/$SERVER_NAME failed, forcibly kill -9 $PID"
            kill -9 $PID
        fi
    # If the Java service is not started, no need to stop
    else
        echo "[stop] $BASE_PATH/$SERVER_NAME is not started, no need to stop"
    fi
}
-
First, get the PID process number corresponding to the Java service. -
Then, first kill -15the corresponding process, trying to shut down the Java service gracefully. Considering that the entire shutdown is a process, we need to wait a while until the Java service shuts down properly.Friendly reminder: The 60 seconds defined here can be modified by friends if they need shorter or longer. Of course, it can also be made into a variable, hehe.
kill -9 the corresponding process to forcibly shut down the Java service.③ Transfer
The #transfer() method will “overwrite” the old jar package with the new jar package from the build directory. The code is as follows:
function transfer() {
    echo "[transfer] Starting to transfer $SERVER_NAME.jar"

    # Delete the original jar package
    if [ ! -f "$BASE_PATH/$SERVER_NAME.jar" ]; then
        echo "[transfer] $BASE_PATH/$SERVER_NAME.jar does not exist, skipping deletion"
    else
        echo "[transfer] Removed $BASE_PATH/$SERVER_NAME.jar completed"
        rm $BASE_PATH/$SERVER_NAME.jar
    fi

    # Copy the new jar package
    echo "[transfer] Getting $SERVER_NAME.jar from $SOURCE_PATH and migrating to $BASE_PATH ...."
    cp $SOURCE_PATH/$SERVER_NAME.jar $BASE_PATH

    echo "[transfer] Transfer of $SERVER_NAME.jar completed"
}
-
Here, we do not directly overwrite because the cpcommand prompts whether to overwrite when overwriting, requiring manual input of theycommand, which obviously cannot meet our automated deployment needs.
④ Start
The #start() method starts the Java service using the new jar package. The code is as follows:
function start() {
    # Before starting, print the startup parameters
    echo "[start] Starting $BASE_PATH/$SERVER_NAME"
    echo "[start] JAVA_OPS: $JAVA_OPS"
    echo "[start] JAVA_AGENT: $JAVA_AGENT"
    echo "[start] PROFILES: $PROFILES_ACTIVE"

    # Start
    BUILD_ID=dontKillMe nohup java -server $JAVA_OPS $JAVA_AGENT -jar $BASE_PATH/$SERVER_NAME.jar --spring.profiles.active=$PROFILES_ACTIVE &
    echo "[start] Started $BASE_PATH/$SERVER_NAME completed"
}
-
Quite simple, the core is to start the Java service through the java -jarcommand using thejarpackage.
⑤ Health Check
The #healthCheck() method checks whether the Java service started successfully through the health check URL. The code is as follows:
function healthCheck() {
    # If a health check is configured, perform health check
    if [ -n "$HEALTH_CHECK_URL" ]; then
        # Health check for a maximum of 60 seconds until health check passes
        echo "[healthCheck] Starting health check through $HEALTH_CHECK_URL address";
        for ((i = 0; i < 60; i++))
            do
                # Request the health check address, only get the status code.
                result=`curl -I -m 10 -o /dev/null -s -w %{http_code} $HEALTH_CHECK_URL || echo "000"`
                # If status code is 200, it means health check passed
                if [ "$result" == "200" ]; then
                    echo "[healthCheck] Health check passed";
                    break
                # If status code is not 200, it means not passed. Sleep for 1 second and retry
                else
                    echo -e ".
";
                    sleep 1
                fi
            done

        # If health check fails, exit the shell script abnormally and do not continue deployment.
        if [ ! "$result" == "200" ]; then
            echo "[healthCheck] Health check failed, deployment may have failed. Check the logs and determine whether it started successfully";
            tail -n 10 nohup.out
            exit 1;
        # If health check passes, print the last 10 lines of logs, possibly for the deployer to see logs.
        else
            tail -n 10 nohup.out
        fi
    # If health check is not configured, sleep for 60 seconds and manually check logs to determine whether it started successfully.
    else
        echo "[healthCheck] HEALTH_CHECK_URL is not configured, starting sleep for 60 seconds";
        sleep 60
        echo "[healthCheck] Sleep for 60 seconds completed, check logs to determine whether it started successfully";
        tail -n 50 nohup.out
    fi
}
-
Like the shutdown of the Java service, the startup of the Java service is also a process. Here, we provide two strategies: 1) Automatically determine whether the application started successfully through the health check URL. 2) In the case of not configuring the health check URL, we sleep for 60 seconds and then check the logs to manually determine whether it started successfully. -
The health check URL uses the healthendpoint provided by Spring Boot Actuator to determine whether the returned status code is 200. If so, it means the application is healthy and has started successfully. Friends unfamiliar with Spring Boot Actuator can refer to the “4. health endpoint” section in the article “YuDao Spring Boot Monitoring Endpoint Actuator Introduction” later. For now, friends can just know this setting. -
Of course, to satisfy friends’ curiosity, I still printed N lines of logs at the end to meet friends’ desire to see the startup logs, haha.
Hehe, although there are 5 steps and less than 200 lines of shell code, it is actually quite simple, hehe.
2.4 Jenkins Deployment Task Configuration
From the Jenkins homepage, click the “New Item” button to enter the Jenkins job creation interface. Enter the job name and select to build a Maven project. As shown below:
Click the “OK” button to enter the job configuration interface. There are quite a few configuration items, as shown below:
2.4.1 Detailed Configuration
Next, let’s take a look at each configuration item one by one.
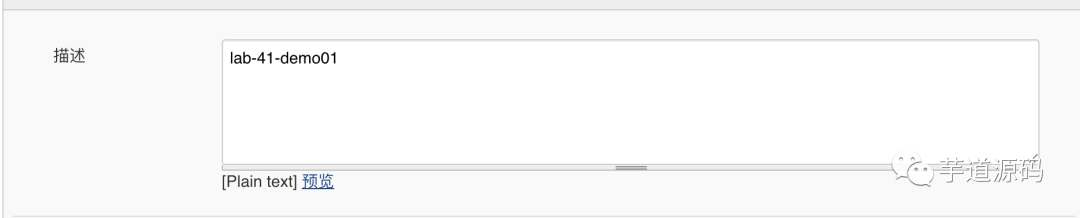
① General
-
Quite simple, just need to configure the description.
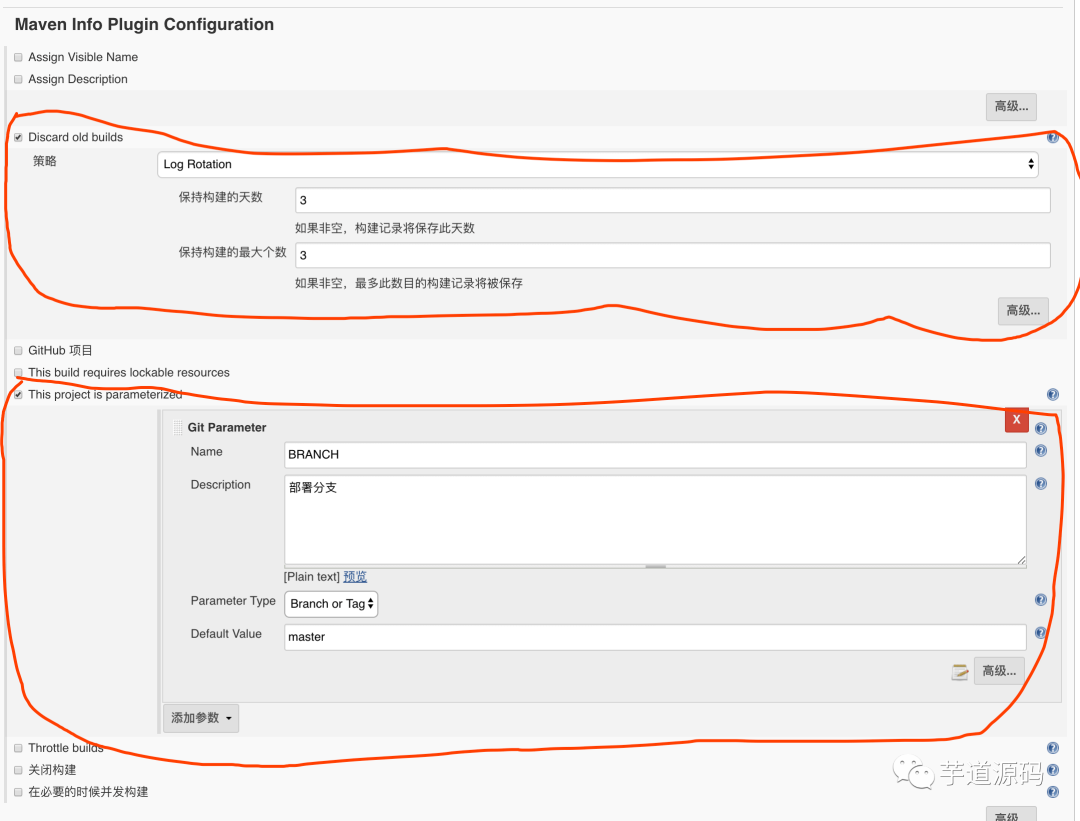
② Maven Info Plugin Configuration
-
Discard old builds configuration item: Set the builds to keep. Since we will constantly rebuild the project, if not set, the disk of the server where Jenkins is located may not be enough. -
This project is parameterized configuration item: Parameterized build. Here, we use the Git Parameter plugin to create a parameter named BRANCH, which is the branch/tag of the Git project. Thus, in future project builds, we can choose the branch/tag of the Git project to build.
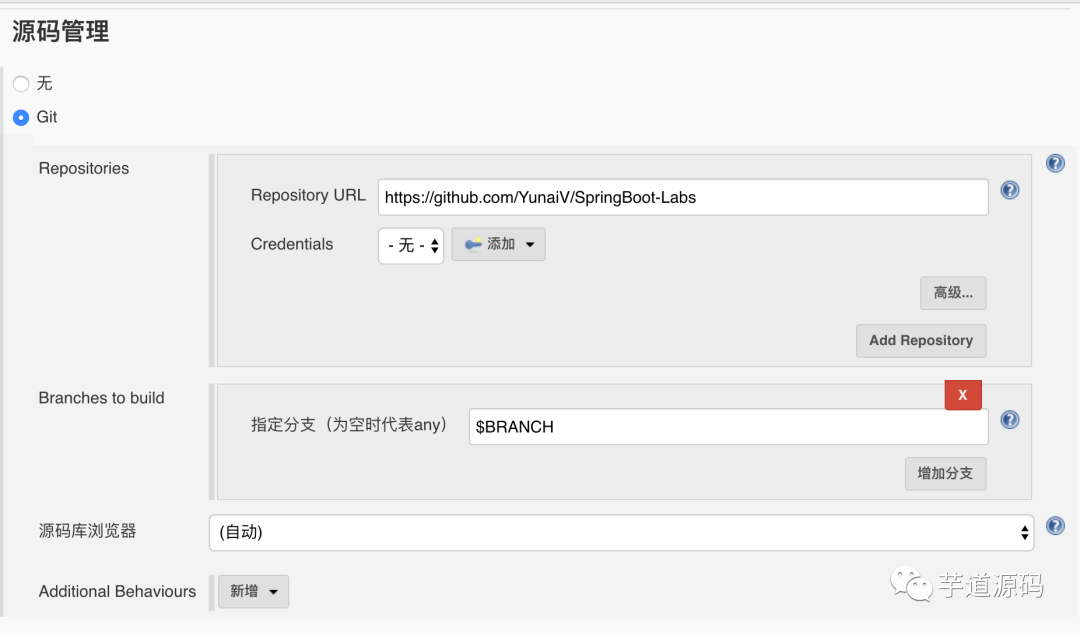
③ Source Code Management
-
Select Git to choose the Git repository. -
Repositories configuration item: Set the Git repository to use. Here you can directly use the https://github.com/YunaiV/SpringBoot-Labs repository, I have prepared the sample project. -
Branches to build configuration item: Set the Git branch/tag to use. Here, we use the build parameter BRANCHconfigured in “② Maven Info Plugin Configuration”.
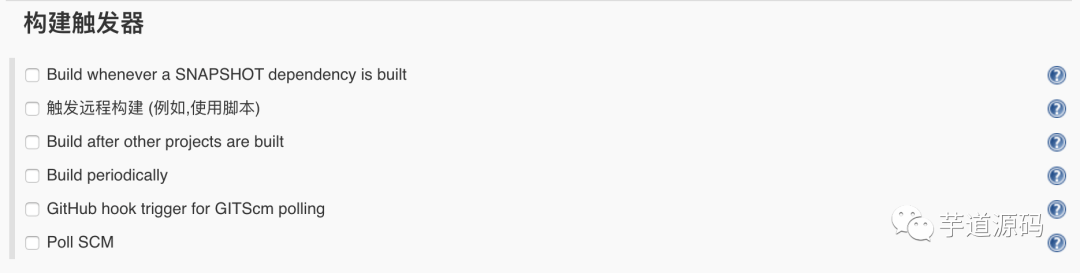
④ Build Triggers
-
No configuration is needed for now, can be ignored.
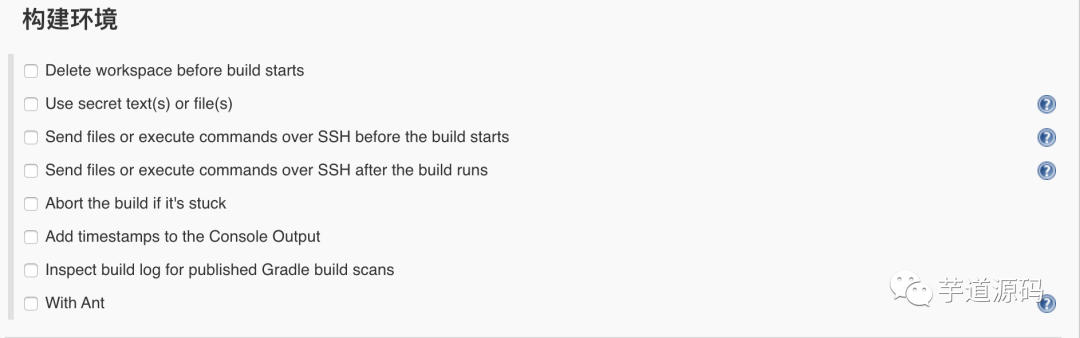
⑤ Build Environment
-
No configuration is needed for now, can be ignored.
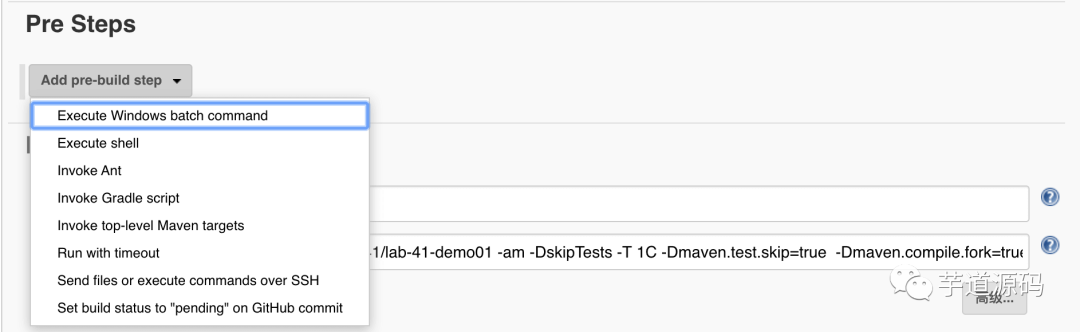
⑥ Pre Steps
-
No configuration is needed for now, can be ignored.
⑦ Build

-
Root POM configuration item: Set the root pom.xmlconfiguration file. Generally, just setpom.xml. -
Goals and options configuration item: Set the Maven build command. -
Here, since we only want to build the lab-41/lab-41-demo01 sub Maven module, we use the -pl lab-41/lab-41-demo01parameter. Other Maven parameters, if you don’t understand, search for them yourself. -
If friends want to build the entire project, consider using clean package -Dmaven.test.skip=truecommand.
⑧ Post Steps

-
No configuration is needed for now, can be ignored.
⑨ Build Settings

-
No configuration is needed for now, can be ignored.
⑩ Post-Build Actions
Click the “Add post-build action” button and select the “Send build artifacts over SSH” option to configure sending the jar package built by Maven to the remote server via SSH and executing the corresponding script to start the Java service. As shown below:
-
Name configuration item: Select the remote server for deployment. Here, we select the server from “2.3 Remote Server Configuration”.
-
Transfer Set Sources files configuration item: Set the files to transfer. Here, we enter
lab-41/lab-41-demo01/target/*.jar, indicating that the jar package built by the lab-41/lab-41-demo01 sub Maven module will be transferred. -
Using lab-41/lab-41-demo01at the beginning is because we are building the lab-41/lab-41-demo01 sub Maven module. -
Using targetin the middle is because the Maven build results are in thetargetdirectory. -
Using *.jarat the end is because we only transfer thejarpackage built by Maven. -
If friends are using clean install -Dmaven.test.skip=truecommand, then configuretarget/*.jarhere. -
Remove prefix configuration item: Set the prefix to remove from the transferred files. Here, we enter
lab-41/lab-41-demo01/target/, indicating that when transferring to the remote server, the file name will only be*.jar. -
Remote directory configuration item: The directory to transfer to the remote server. Here, we enter
/work/projects/lab-41-demo01/build, indicating that it will be transferred to thebuilddirectory of thelab-41-demo01project on the remote server. -
Exec command configuration item: Set the shell command to execute after transferring the file. Here, we enter
cd /work/projects/lab-41-demo01/shell && ./deploy.sh, indicating that the deployment script will be executed to start the Java service. -
Exec in pty configuration item: Must be checked, indicating that a terminal will be simulated to execute the script. 😎 Ahem, if it is not checked, the execution command will time out. The specific reason, I couldn’t find it, but this is how it works.
Friendly reminder: This configuration item needs to click the “Advanced” button in the form it is located to be displayed.
-
Add Server button: If you want to deploy to more remote servers, you can click to configure multiple nodes.
After that, click the “Advanced” button below and select the “Fail the build if an error occurs” option. As shown below:
-
By this option, if an error occurs while executing the shell command, we can mark each deployment of the deployment task as a failure. We will demonstrate this in the “2.4.3 Failure Deployment Example” section.
Now we have completed the configuration of the Jenkins deployment task. Click the “Save” button at the bottom to save the configuration. So nice~
2.4.2 Successful Deployment Example
After clicking the “Save” button, we will enter the details page of the deployment task we configured. As shown below:
Click the “Build with Parameters” menu on the left to perform a parameterized build and deploy the project. As shown below:
Since our https://github.com/YunaiV/SpringBoot-Labs repository only has one master branch, we only have one choice for the BRANCH parameter. Click the “Start Build” button to start the deployment. As shown below:
Click the red circle in the Build History to check this build. Then, click the “Console Output” menu to view the entire build process and see a lot of logs. As shown below:
Patience is key, and finally seeing the following log indicates that the deployment was successful. As shown below:
At this point, we return to the Jenkins homepage and can see that the execution result of this deployment task is successful. As shown below:
2.4.3 Failure Deployment Example
To simulate a failed deployment, we modify the deploy.sh script on the remote server to change the health check URL as follows, which will lead to a health check failure. The code is as follows:
# Health check URL
HEALTH_CHECK_URL=http://127.0.0.1:8078/actuator/health/1
-
This way, since the modified health check URL does not exist, the health check will definitely fail. Thus, the deploy.shscript will eventuallyexit 1, indicating an execution error.
After the modification is complete, rebuild the deployment task, and it will ultimately fail. The console output log is shown below:
At this point, we return to the Jenkins homepage and can see that the execution result of this deployment task is failed. As shown below:
2.5 Summary
By now, we have completed the learning of configuring a Jenkins deployment task. Although the entire process may be a bit lengthy, and I am a bit verbose, but as a “configuration engineer”, practice makes perfect.
Since this article mainly focuses on Jenkins, we did not introduce the packaging of Java projects, etc. Friends can immediately check out the article “YuDao Spring Boot Continuous Delivery Jenkins Introduction”, where I will share more about how to package Spring Boot and how to better integrate with Nginx for health checks during the entire deployment process. You definitely need to see it, haha.
3. Email Notification
Jenkins supports configuring email notifications to send corresponding emails when the build is successful (Success), fails (Fail), or is unstable (Unstable).
Next, we will configure the email notification function based on “2. Quick Start”.
3.1 Global Email Configuration
① From the Jenkins homepage, follow the path “Manage Jenkins -> Configure System” to enter the “Configuration” interface, then scroll down to the “Email Notification” section to configure the email for sending notifications. As shown below:
② However, it should be noted that some email services require the username used for SMTP authentication to be consistent with the sender’s email, such as NetEase 163 email. Therefore, we scroll up to the “Jenkins Location” section to configure the sender’s email. As shown below:
③ After the configuration is complete, click the “Test configuration” button in the “Email Notification” section to test the email sending function. If the test is successful, we will see the prompt "Email was successfully sent" on the interface. At the same time, we will open the received email to see the test email, as shown below:
🔥 After testing, remember to click the “Save” button!
3.2 Email Configuration for Deployment Tasks
Based on “2.4 Jenkins Deployment Task Configuration”, we will modify the email configuration. There are two configuration items in total, let’s take a look at them one by one.
① Build Settings
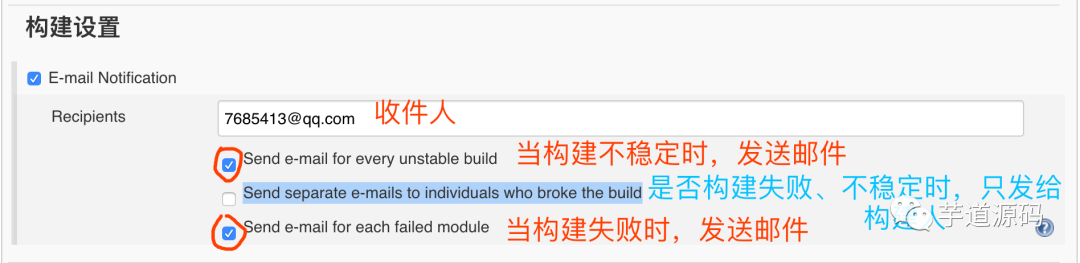
-
This mainly configures the email notification settings for build failures and unstable cases. Generally, the configuration can be done as shown in the figure.
② Post-Build Actions
Click the “Add post-build action” button and select the “Editable Email Notification” option to configure email notifications for successful builds. As shown below:
-
Project Recipient List configuration item: Configure the recipient list, one email per line. 😈 Here, we configured one email, hehe. -
Other configuration items can be temporarily ignored, and friends can configure them themselves later if needed. Additionally, the variables $DEFAULT_RECIPIENTS,$DEFAULT_REPLYTO, etc., are provided by the Extended E-mail Notification plugin. Friends can follow the path “Manage Jenkins -> Configure System” to enter the “Configuration” interface, then scroll down to the “Extended E-mail Notification” section for configuration. As shown below: -
Here we will not configure it for now, just use the default configuration, hehe.
③ Simple Test
🔥 After testing, remember to click the “Save” button! Then, you can perform a deployment test to see the effect of email notifications.
The following is an example of a successful build:
The following is an example of a failed build:
4. DingTalk Notification
Jenkins supports configuring DingTalk notifications, sending corresponding emails when the build is successful (Success), fails (Fail), or is unstable (Unstable).
Next, we will configure the email notification function based on “2. Quick Start”.
4.1 Install Plugin
By default, the Jenkins plugin Dingding Notification Plugin for DingTalk notifications is not secure, so we need to install it. The installation steps are very simple, similar to the “2.2.4 Additional Security Plugins” section, friends can install it themselves. As shown below:
As always, the installation of plugins is relatively slow, so let’s continue to look down.
4.2 Create DingTalk Group Bot
Refer to the “7.5.5.1 Create DingTalk Group Bot” section in the article “YuDao Prometheus + Grafana + Alertmanager Quick Start” to create a DingTalk group bot.
However, it is important to note that the current configuration of DingTalk notifications in Jenkins does not support the **”encrypted” secure method of DingTalk group bots, so friends please use the **”IP address (range)”** security settings. You can check your external network IP at http://ip138.com/.
4.3 DingTalk Configuration for Deployment Tasks
Based on “2.4 Jenkins Deployment Task Configuration”, we will modify the DingTalk configuration. Only one configuration item needs to be modified, haha.
① Post-Build Actions
Click the “Add post-build action” button and select the “DingTalk Notifier Configuration” option to configure DingTalk notifications for successful builds. As shown below:
-
The specific options to choose can be based on your own needs.
② Simple Test
🔥 After the configuration is complete, remember to click the “Save” button! Then, you can perform a deployment test to see the effect of DingTalk notifications.
We currently mainly use DingTalk notifications instead of email notifications, hehe.
666. Easter Egg
The functions provided by Jenkins are still very rich, friends can additionally read the following articles:
-
“Jenkins Reading List” -
“Classic Tutorial on ‘Jenkins + Git + Maven + Shell + Tomcat Continuous Integration'”
In the future, I will also supplement the following content, which is also commonly used functions in Jenkins:
-
Permission Management -
Jenkins Backup -
Jenkins Pipeline -
Jenkins Slave Agent
Welcome to join my knowledge circle, to discuss architecture and exchange source code. To join, long press the QR code below:

Updated source code analysis in the knowledge circle as follows:

Recently updated the “YuDao SpringBoot 2.X Introduction” series, already over 20 articles, covering MyBatis, Redis, MongoDB, ES, sharding, read-write separation, SpringMVC, Webflux, permissions, WebSocket, Dubbo, RabbitMQ, RocketMQ, Kafka, performance testing, etc.
Providing nearly 30,000 lines of code for SpringBoot examples, as well as over 40,000 lines of code for e-commerce microservice projects.
How to get: Click “Read“, follow the public account and reply 666 to receive, more content will be released continuously.
The article is helpful, please read it and share it.
Thank you for your support (*^__^*)