Table of Contents:
1. STM32Cube Ecosystem
2. CubeMX
3. CubeIDE
4. CubeProg
5. Developing with CubeIDE
5.1 STM32CubeIDE Home
5.2 Generating Projects
5.3 Program Download
6. Conclusion
1. STM32Cube Ecosystem
I remember trying out CubeMX when ST first launched it, back then the automatically generated peripheral initialization code had some minor errors. Now, with the iterations and upgrades of this system, the Cube ecosystem has become more complete and easier to use.
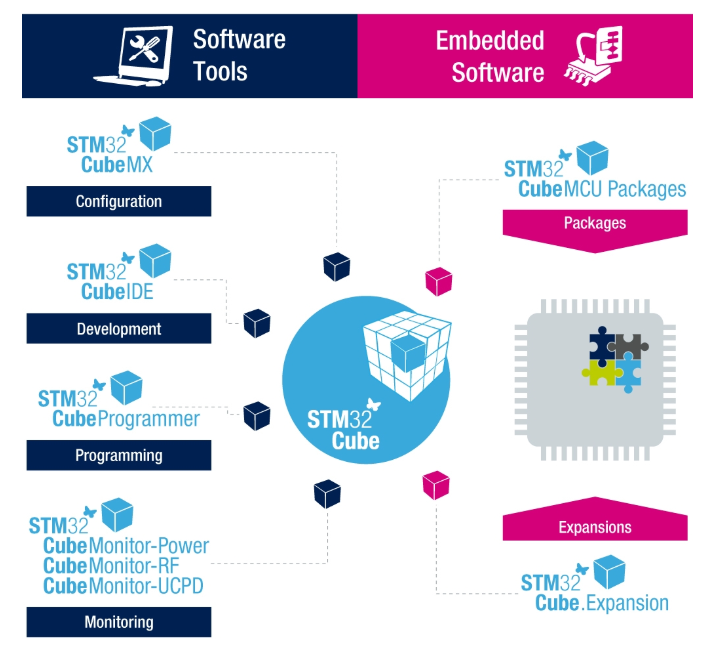
The STM32Cube Ecosystem provided by ST offers a complete set of free development software tools and embedded software packages, which include a series of functions from peripheral configuration to program development, downloading, and system monitoring. As shown in the figure below:
-
STM32 CubeMX can be used to initialize configuration code for almost all STM32 devices. This is a graphical interface configuration software developed based on Java, which can automatically generate the required
Ccode for configuringCortex-M, and can also generate device trees forCortex-Acores that supportLinuxsystems. - STM32 CubeIDE is a free integrated development environment launched by ST, based on Eclipse and the GNU C/C++ open-source toolchain, which can compile and debug code. The official also integrated
STM32 CubeMXinto theIDE, making the configuration and development of the entire software seamless and very convenient. - STM32CubeProgrammer is a software programming tool that supports reading and writing devices and external memory via (JTAG, SWD, UART, USB DFU, I2C, SPI, CAN) methods.
- STM32CubeMonitor is a series of powerful monitoring tools that help developers fine-tune their applications’ behavior and performance in real-time. I haven’t tried this yet, but I guess I will trust the official claims for now.
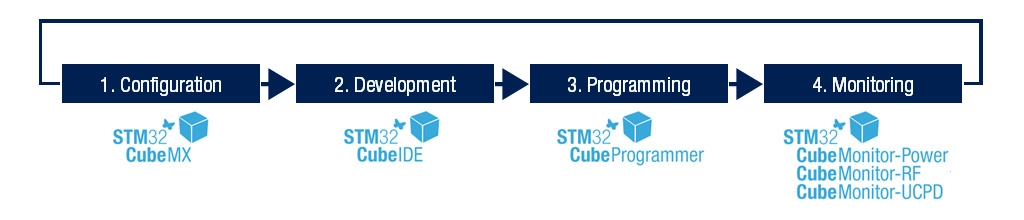
So, using the above ST Cube suite for STM32 software development, there are still many pitfalls to navigate through in practice. The overall process is basically as follows:
-
Step 1: Use
CubeMXto initialize the corresponding chip peripheral functions. - Step 2: Use
CubeIDEfor code editing and debugging. Of course, if you prefer, you can also useIAR,Keil, orVSCode. This is completely a matter of personal preference and habit. However, it is said thatCubeIDEintegratesCubeMX, so isn’t that appealing? Plus, if you want to use thegcccompiler, it saves a lot of configuration hassle. -
Step 3: Use
CubeProgrammerfor program burning, mainly because it supports many protocols, which is impressive. -
Step 4: More functional plugins may be released in the future, but currently, they do not seem very necessary.
2. CubeMX
The installation of STM32 CubeMX is very simple, but you need to submit your email to download it, and you can basically complete it according to the system prompts. Additionally, the code automatically generated by STM32 CubeMX currently supports the official HAL library and LL library. The standard peripheral library that I used to often use has already been abandoned by ST, and the latest STM32F7 no longer supports the standard peripheral library.
At the same time, CubeMX initializes and generates C code projects, and the final project can conform to IAR, Keil MDK, and GCC. So, this is relatively convenient, as you don’t need to manually configure registers according to the manual, nor do you need to port the official standard peripheral library demo. It’s really just click where you don’t know.
- HAL library encapsulation is relatively better, but the code is somewhat verbose. It has good generality and portability, conforming to software engineering design principles, but may sacrifice some efficiency.
- LL library is a bit lower level, and the choice among these depends on personal preference and team needs.
3. CubeIDE
Download and install CubeIDE from the official website. Assuming you have successfully installed and opened the software, you will see:
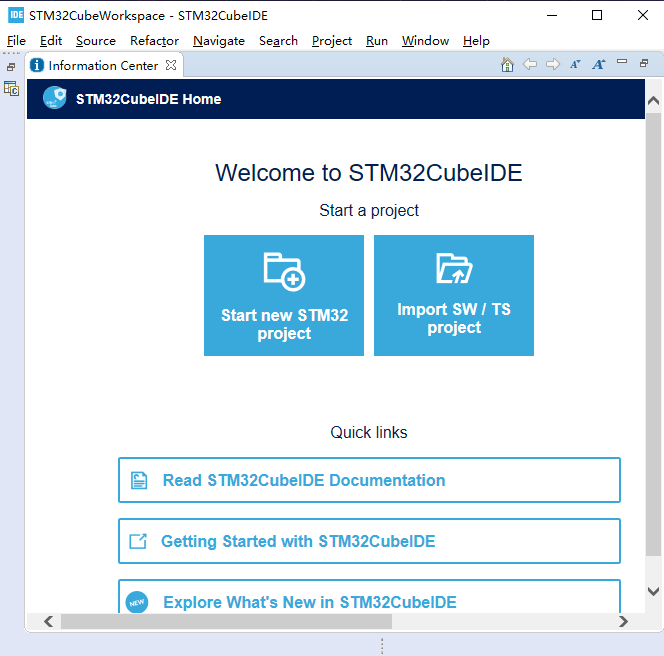
CubeIDE has integrated CubeMX, and you can quickly start a new STM32 project step by step.
4. CubeProg
Overall, after looking at the introduction of STM32 CubeProg, it actually has some advantages. First, this software supports multiple platforms such as: Windows, Linux, macOS, etc. It is developed using Java, which is a plus. Most of these are developed using Java. Additionally, it may have better support for st-link. If you use jlink, using openocd is also fine, but after all, it’s a suite, so I will briefly list some features:
- Supports erasing, reading, and writing
Flash, etc.; - Supports
Motorola S19,HEX,ELF, and binary formats; - Firmware upgrades for
ST-LINK; - Multi-platform:
Windows,Linux,macOS, which is actually the main advantage.
5. Developing with CubeIDE
Use STM32CubeIDE to quickly create an STM32 HAL library project.
(1)STM32CubeIDE Home
Go to the official download page, select the corresponding operating system and version, and download and install it. The download page is shown below:
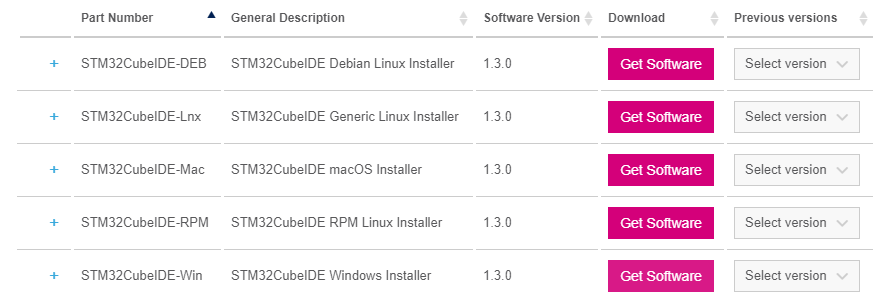
Address: https://www.st.com/en/development-tools/stm32cubeide.html
After installation, opening STM32CubeIDE will directly take you to the home page, where you can start creating or importing STM32 projects, as shown in the figure below:
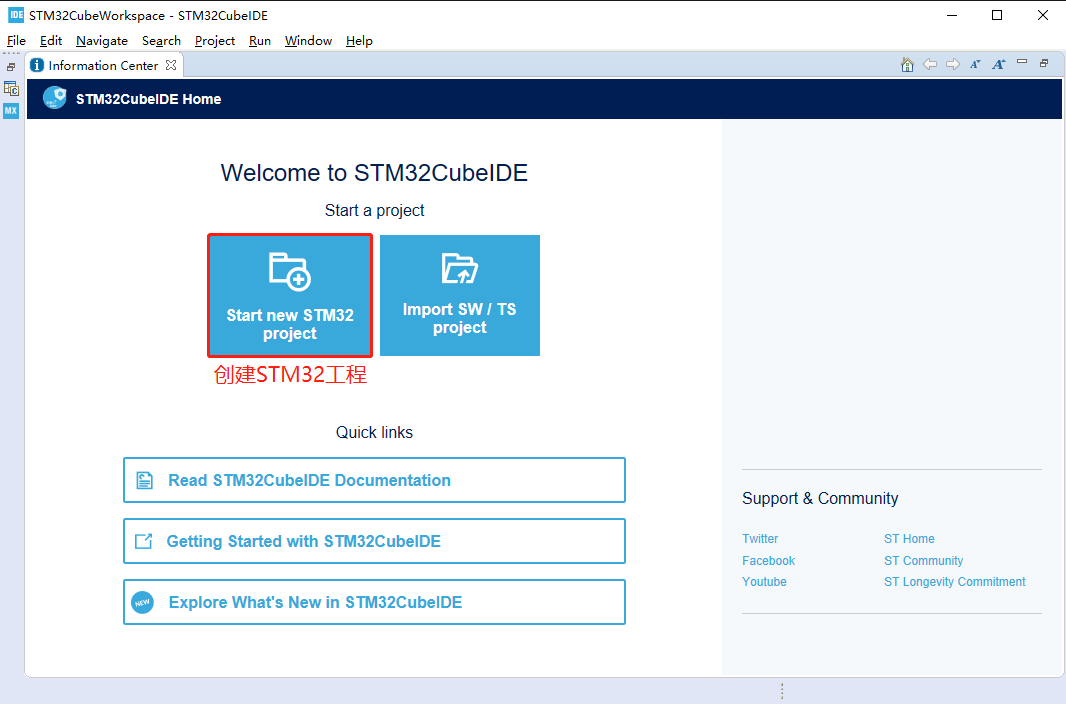
Read STM32CubeIDE Documentationcontains a lot of official documentation; it can help you get started quickly, including:
- Installation tutorial;
- User manual;
(2)Generating Projects
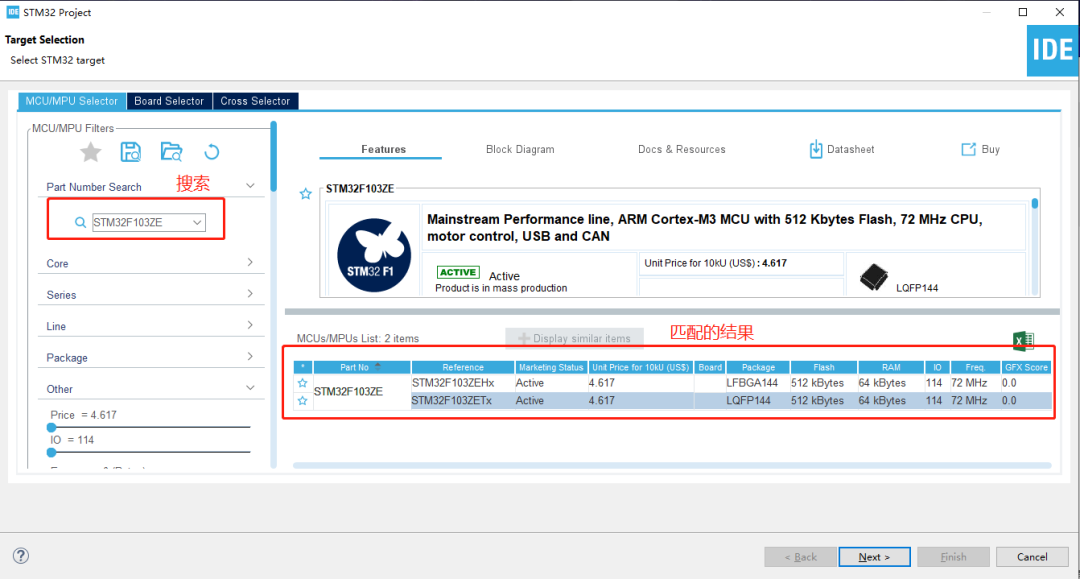
After setting the project name and path, the project creation is basically complete, as shown in the figure below:
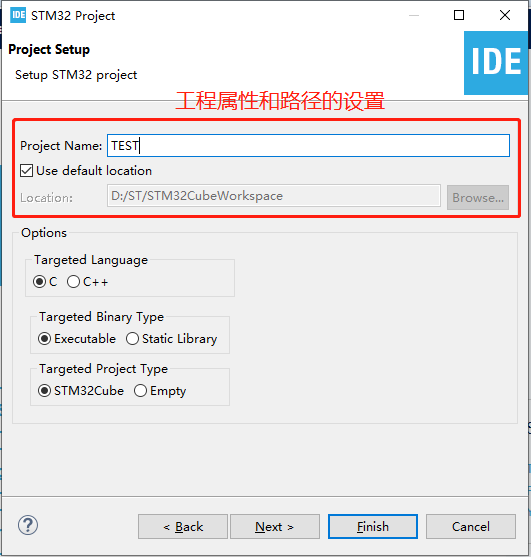
During this period, it may connect to download library files and the corresponding MCU peripheral files, so you need to keep the network stable and wait patiently.
After successfully creating the project, as shown in the figure below:
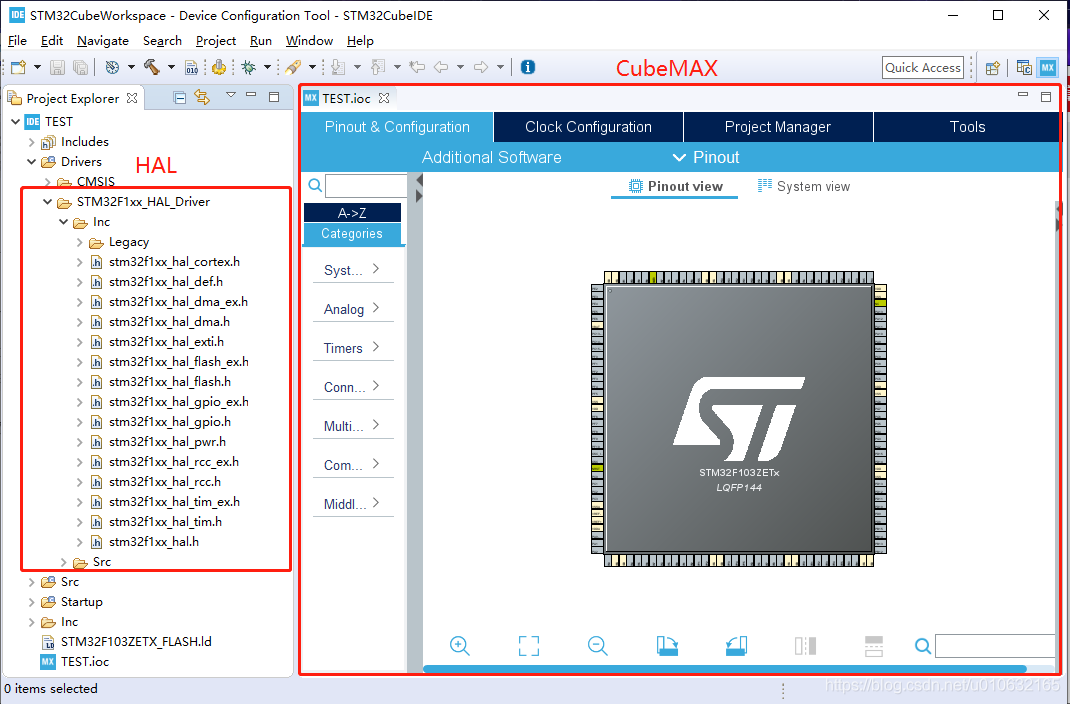
You can see that the left side is the HAL library, and the right side is the configuration interface of CubeMAX. At this point, the project generation is complete, and the next step is to compile and download.
In addition, you can see the TEST.ioc file in the file list, which is the configuration file for CubeMAX, similar to an ini file for some software. CubeMAX mainly saves and loads device configurations through reading and writing this file. You can open it with a text editor to see the specific information, as shown below:
#MicroXplorer Configuration settings - do not modify
FREERTOS.IPParameters=Tasks01
FREERTOS.Tasks01=defaultTask,0,128,StartDefaultTask,Default,NULL
File.Version=6
KeepUserPlacement=false
Mcu.Family=STM32F1
Mcu.IP0=FREERTOS
Mcu.IP1=NVIC
Mcu.IP2=RCC
Mcu.IP3=SYS
Mcu.IPNb=4
Mcu.Name=STM32F103Z(C-D-E)Tx
Mcu.Package=LQFP144
Mcu.Pin0=VP_FREERTOS_VS_CMSIS_V1
Mcu.Pin1=VP_SYS_VS_ND
Mcu.Pin2=VP_SYS_VS_Systick
Mcu.PinsNb=3
Mcu.ThirdPartyNb=0
Mcu.UserConstants=
Mcu.UserName=STM32F103ZETx
MxCube.Version=5.3.0
MxDb.Version=DB.5.0.30
NVIC.BusFault_IRQn=true:0:0:false:false:true:false:false:false
NVIC.DebugMonitor_IRQn=true:0:0:false:false:true:false:false:false
NVIC.HardFault_IRQn=true:0:0:false:false:true:false:false:false
NVIC.MemoryManagement_IRQn=true:0:0:false:false:true:false:false:false
NVIC.NonMaskableInt_IRQn=true:0:0:false:false:true:false:false:false
NVIC.PendSV_IRQn=true:15:0:false:false:false:true:false:false
NVIC.PriorityGroup=NVIC_PRIORITYGROUP_4
NVIC.SVCall_IRQn=true:0:0:false:false:false:false:false:false
NVIC.SysTick_IRQn=true:15:0:false:false:true:true:false:true
NVIC.UsageFault_IRQn=true:0:0:false:false:true:false:false:false
PCC.Checker=false
PCC.Line=STM32F103
PCC.MCU=STM32F103Z(C-D-E)Tx
PCC.PartNumber=STM32F103ZETx
PCC.Seq0=0
PCC.Series=STM32F1
PCC.Temperature=25
PCC.Vdd=3.3
PinOutPanel.RotationAngle=0
ProjectManager.AskForMigrate=true
ProjectManager.BackupPrevious=false
ProjectManager.CompilerOptimize=6
ProjectManager.ComputerToolchain=false
ProjectManager.CoupleFile=false
ProjectManager.CustomerFirmwarePackage=
ProjectManager.DefaultFWLocation=true
ProjectManager.DeletePrevious=true
ProjectManager.DeviceId=STM32F103ZETx
ProjectManager.FirmwarePackage=STM32Cube FW_F1 V1.8.0
ProjectManager.FreePins=false
ProjectManager.HalAssertFull=false
ProjectManager.HeapSize=0x200
ProjectManager.KeepUserCode=true
ProjectManager.LastFirmware=true
ProjectManager.LibraryCopy=1
ProjectManager.MainLocation=Src
ProjectManager.NoMain=false
ProjectManager.PreviousToolchain=
ProjectManager.ProjectBuild=false
ProjectManager.ProjectFileName=TEST.ioc
ProjectManager.ProjectName=TEST
ProjectManager.StackSize=0x400
ProjectManager.TargetToolchain=STM32CubeIDE
ProjectManager.ToolChainLocation=
ProjectManager.UnderRoot=true
ProjectManager.functionlistsort=1-SystemClock_Config-RCC-false-HAL-false
RCC.APB1Freq_Value=8000000
RCC.APB2Freq_Value=8000000
RCC.FamilyName=M
RCC.IPParameters=APB1Freq_Value,APB2Freq_Value,FamilyName,PLLCLKFreq_Value,PLLMCOFreq_Value,TimSysFreq_Value
RCC.PLLCLKFreq_Value=8000000
RCC.PLLMCOFreq_Value=4000000
RCC.TimSysFreq_Value=8000000
VP_FREERTOS_VS_CMSIS_V1.Mode=CMSIS_V1
VP_FREERTOS_VS_CMSIS_V1.Signal=FREERTOS_VS_CMSIS_V1
VP_SYS_VS_ND.Mode=No_Debug
VP_SYS_VS_ND.Signal=SYS_VS_ND
VP_SYS_VS_Systick.Mode=SysTick
VP_SYS_VS_Systick.Signal=SYS_VS_Systick
board=custom
isbadioc=false
You don’t need to worry too much about this, as you can configure it through the graphical interface, and the software will automatically modify this configuration file.
(3)Program Download
You can click the hammer icon directly on the toolbar:

This will quickly build the project, and it will automatically generate the elf file, which is the file that the emulator can burn. You can also view the Build information directly in the window, including errors, as shown below:
12:52:59 **** Incremental Build of configuration Debug for project TEST ****
make -j4 all
arm-none-eabi-gcc "../Drivers/STM32F1xx_HAL_Driver/Src/stm32f1xx_hal_cortex.c" -mcpu=cortex-m3 -std=gnu11 -g3 -DSTM32F103xE -DUSE_HAL_DRIVER -DDEBUG -c -I../Inc -I../Drivers/CMSIS/Device/ST/STM32F1xx/Include -I../Drivers/CMSIS/Include -I../Drivers/STM32F1xx_HAL_Driver/Inc/Legacy -I../Drivers/STM32F1xx_HAL_Driver/Inc -O0 -ffunction-sections -fdata-sections -Wall -fstack-usage -MMD -MP -MF"Drivers/STM32F1xx_HAL_Driver/Src/stm32f1xx_hal_cortex.d" -MT"Drivers/STM32F1xx_HAL_Driver/Src/stm32f1xx_hal_cortex.o" --specs=nano.specs -mfloat-abi=soft -mthumb -o "Drivers/STM32F1xx_HAL_Driver/Src/stm32f1xx_hal_cortex.o"
...
Finished building target: TEST.elf

arm-none-eabi-objdump -h -S  TEST.elf  > "TEST.list"
arm-none-eabi-size   TEST.elf
   text    data     bss     dec     hex filename
   3860      20    8228   12108    2f4c TEST.elf
Finished building: default.size.stdout
Click the bug icon on the toolbar:

To debug:

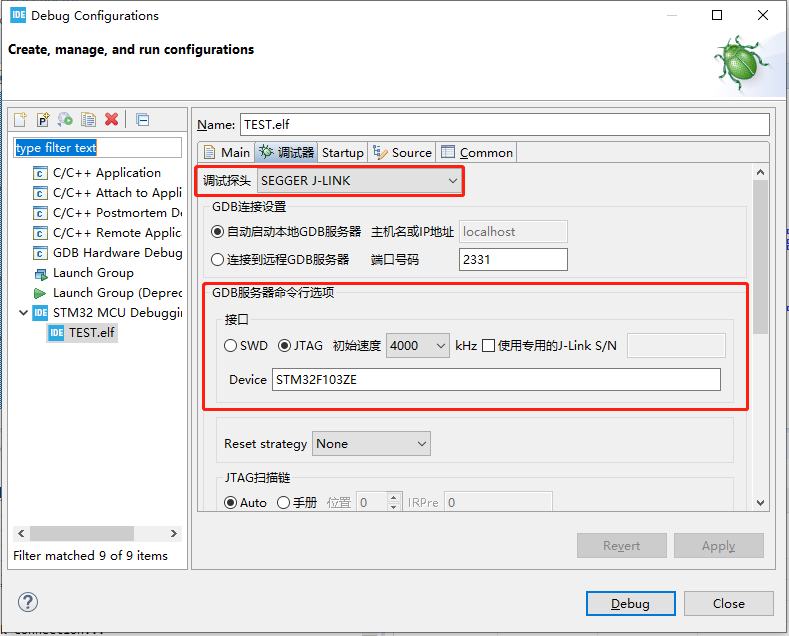
In the menu bar under the Run option, find Debug Configurations, as shown in the figure below, configure the emulator and interface method for debugging, and finally click Debug to download TEST.elf to the target.
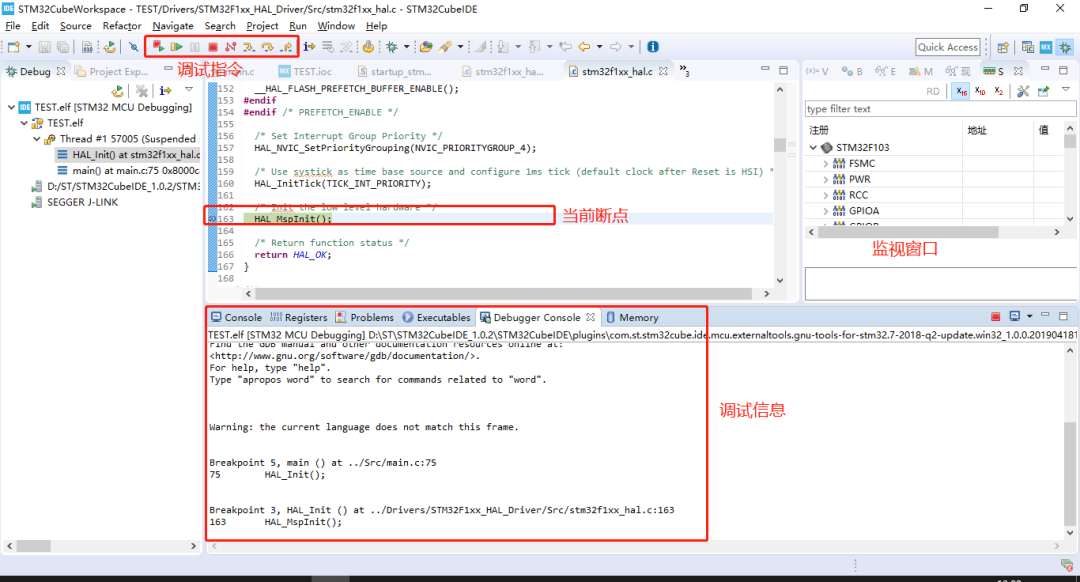
After successfully starting the debug, as shown in the figure below:
6. Conclusion
This article provides a simple introduction and learning about Cube. There are still many pitfalls to navigate, and it is recommended to take a look at the encapsulation of HAL. If necessary, LL can also be considered, as it generally conforms to the CMSIS standards. Additionally, regarding the development environment, if you need to use CubeIDE for development, it has already integrated CubeMAX, so there is no need to download it separately; you can complete everything in a one-stop service. If you only need to generate initialization code, then it is still necessary to install CubeMAX separately.
Source: Uncle Wheat
Friendly Reminder:
Due to recent changes in WeChat public platform push rules, many readers have reported not seeing updated articles in a timely manner. According to the latest rules, it is recommended to frequently click “Recommend Reading, Share, Favorite,” etc., to become a regular reader.
Recommended Reading:
-
Shenzhen Electronics Factory Entrance Exam on “Zhuangzi”, what is the purpose?
-
Awkward! Google’s version of ChatGPT’s debut flopped, losing 717.2 billion overnight
-
Japanese media dissects Huawei phones: self-research ratio rises, hardware surprises
Please click 【View】 to give the editor a thumbs up
