Introduction to the HttpRunner API Testing Framework
1. Overview of HttpRunner
HttpRunner is an open-source API testing tool that supports various network protocols such as HTTP(S), HTTP2, WebSocket, and RPC. It encompasses types of testing including interface testing, performance testing, and digital experience monitoring. It is user-friendly, powerful, and features a rich plugin mechanism with high extensibility.
HttpRunner v4.0 utilizes both Golang and Python programming languages, featuring two relatively independent execution engines that combine the high performance of Golang with the rich ecosystem of pytest.
Official documentation for HttpRunner: https://httprunner.com/docs/introduction/overview/
Advantages of HttpRunner:
Supports integration with tools like HAR, Postman, Swagger, Curl, and JMeter, making it easy to generate and convert test cases.
HttpRunner includes the loguru logging module.
HttpRunner has a built-in locust module, supporting both interface testing and performance testing.
HttpRunner includes the jmespath module, which makes data extraction from large responses more convenient.
Can quickly generate an API testing framework with a single command.
HttpRunner integrates with the pytest framework, allowing you to run HttpRunner scripts using pytest commands.
2. Environment Setup
Install Python: This section does not cover installation details. Install HttpRunner: pip install -i https://pypi.tuna.tsinghua.edu.cn/simple httprunner. Install Allure: pip install -i https://pypi.tuna.tsinghua.edu.cn/simple allure-pytest. Download the Allure report plugin, extract it, and add the path of the allure folder to the environment variable -path: https://repo.maven.apache.org/maven2/io/qameta/allure/allure-commandline/2.13.2/. Check the version of HttpRunner: httprunner -V

Installing hrp
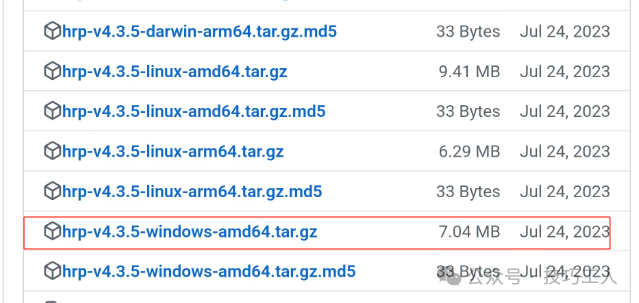
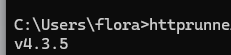
The version of HttpRunner installed via pip only provides the hrun command. The 4.x version introduces an hrp command, which must be downloaded from GitHub: https://github.com/httprunner/httprunner/releases. First, download the corresponding installation package for hrp: I installed version 4.3.5, so I found the corresponding package.
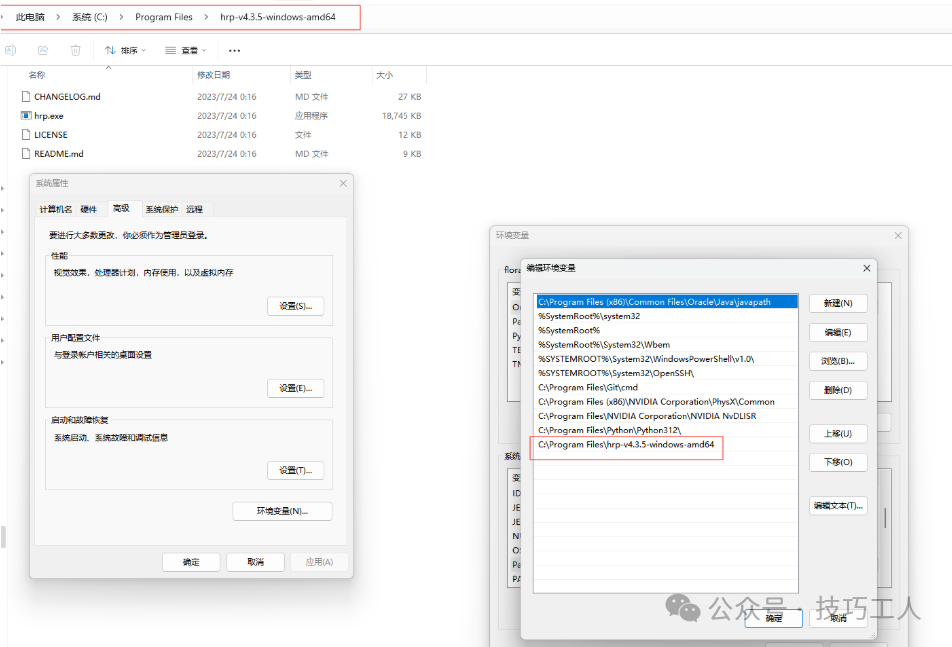
 After downloading, extract it and add the path to the environment variable path.
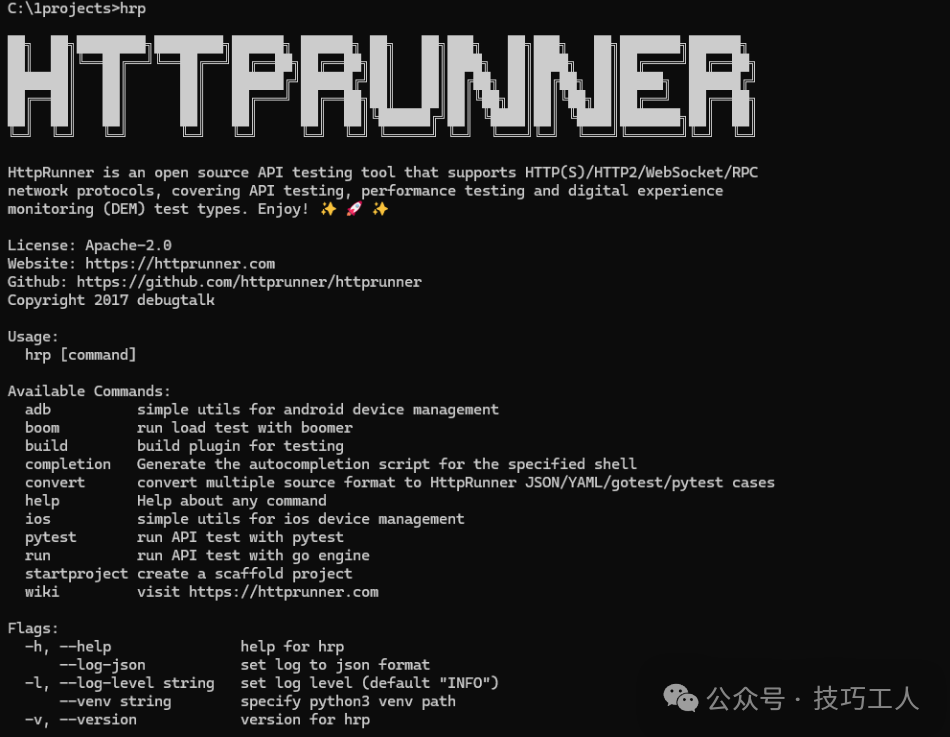
 Reopen cmd and enter
 hrp -v to check the installed version.
 Encountered error:
 TypeError: ForwardRef._evaluate() missing 1 required keyword-only argument: 'recursive_guard'
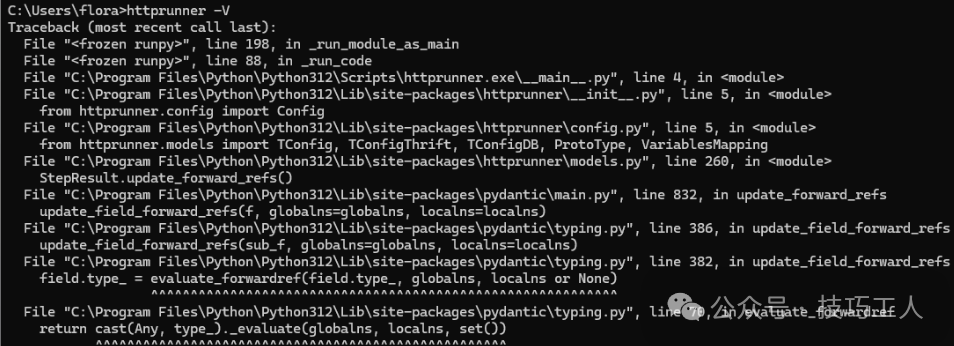 Problem reason:
 ForwardRef._evaluate() added a new parameter ‘recursive_guard’, which is missing in the code at pydantic/v1/typing.py (line 66). This is a bug in Python version 3.12.4. After reading online references, it can be resolved by downgrading Python to version 3.12.3.
3. Generating Scaffolding
Execute the command: hrp startproject [filename] to initialize a project with the specified name.
 Related directory and file descriptions:
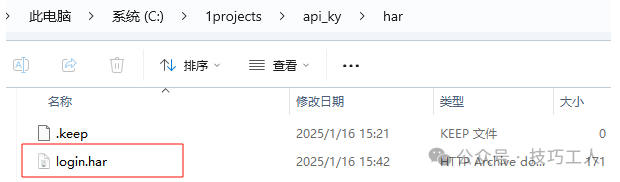
- har: The har folder stores har files, which can be obtained through Charles or other packet capture tools.
- results: Report directory
- testcases: Test case directory, which contains multiple example test cases after successful initialization.
- .env: Environment configuration file
- .gitignore: Git repository ignore file
- debugtalk.py: Auxiliary function file, where you can write functions to implement any custom logic, just register and serve using `funppy`.
- proj.json:
4. Recording Scripts & Generating Test Cases & Running Tests
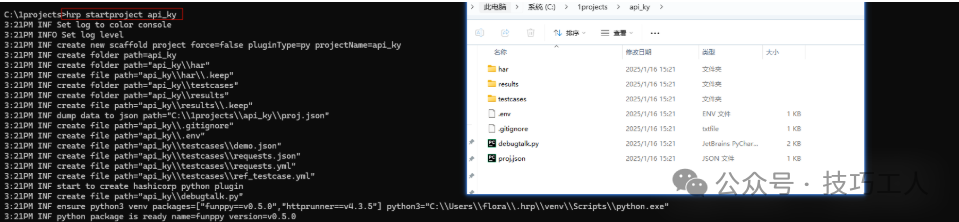
Use Fiddler to capture API requests.<span>Here I used the Filters to only capture requests from a specified domain while filtering out static files like js and css [Using regex: REGEX:(?insx)/[^]*\.(css|ico|jpg|png|gif|bmp|wav|js|jpeg)(\?.*)?$]</span>
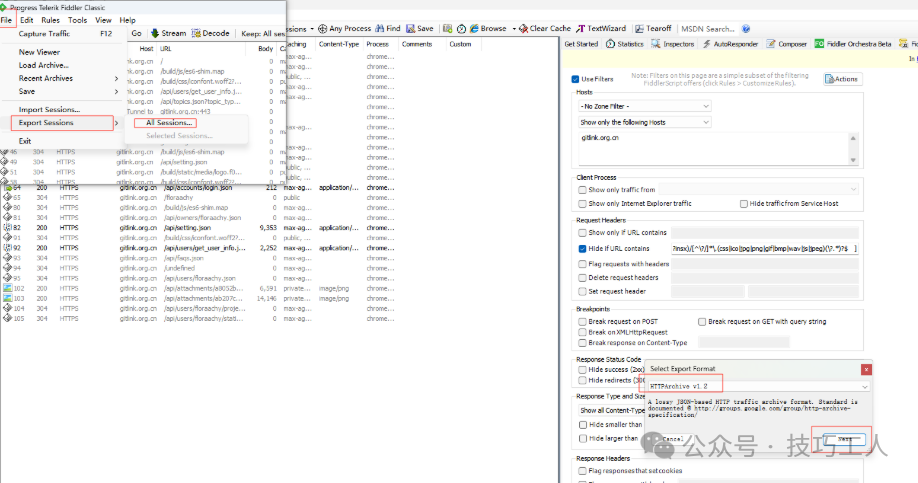
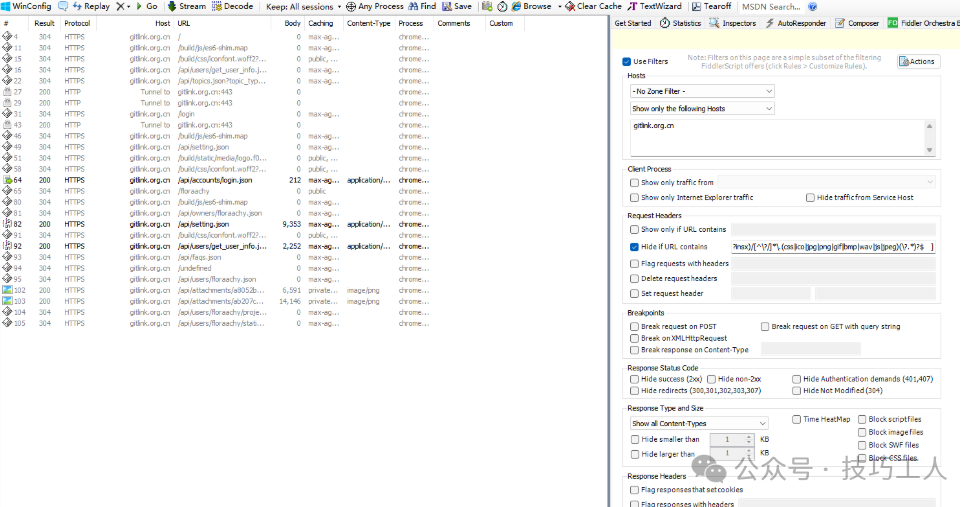 Click File -> Export Sessions -> HTTP Archive v1.2 -> Place the exported .var file into the project’s har directory.
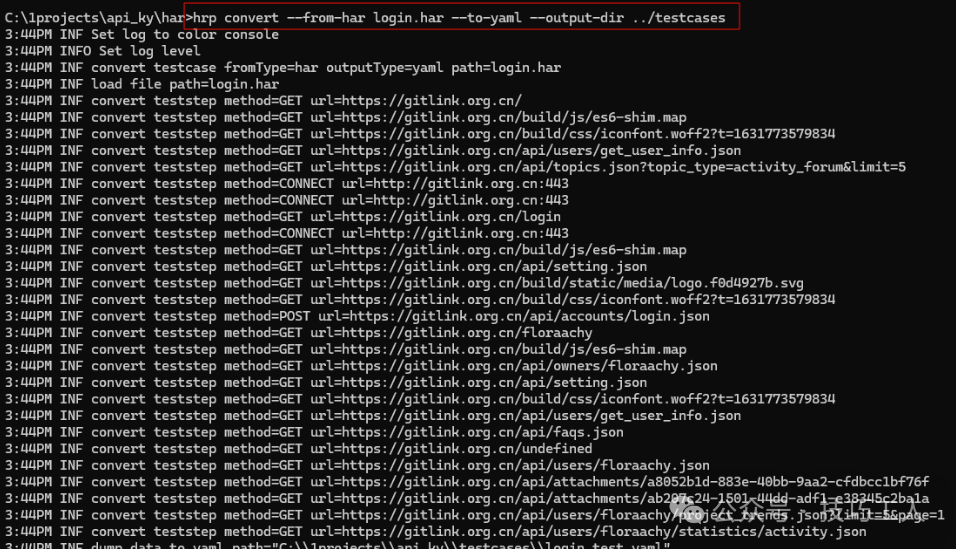
<span>Use the hrp command to convert the .har files in the har directory to yaml files. Command: <code>hrp convert --from-har [har file path] --to-[output type] --output-dir [output directory]. Currently supports the following types: –to-json/–to-yaml/–to-gotest/–to-pytest
 Run tests
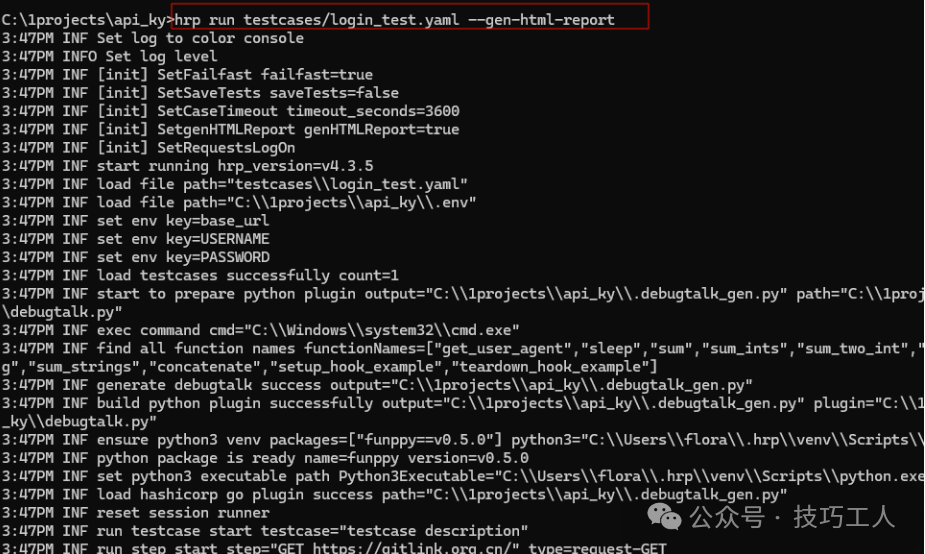
<span>Command: <code>hrp run [specific yaml file] --gen-html-report
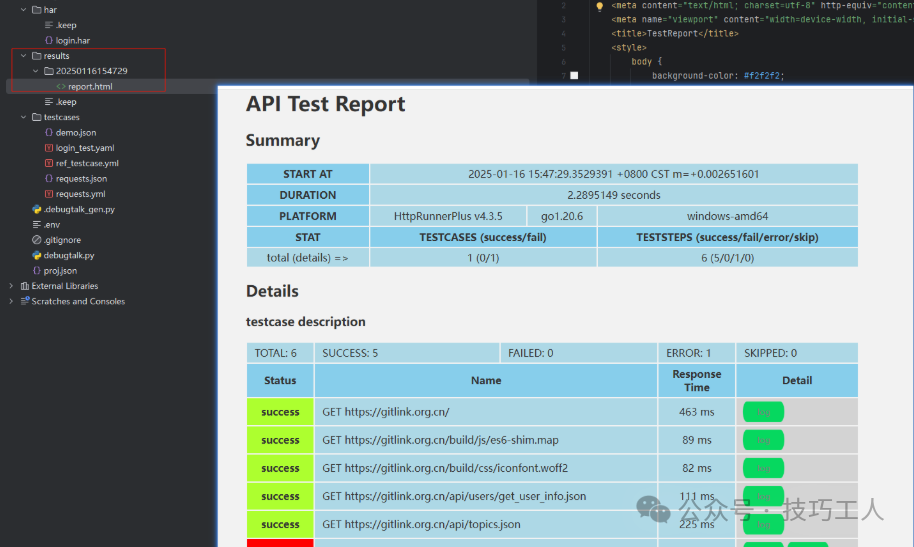
View Test Report
Open the report.html file in the results directory:
HttpRunner Test Case Rules
Test Case (testcase)
A test case should be carefully designed to test a specific functional logic and must include the following points:
Clear testing objectives (achieve a particular software testing objective) Clear input data (inputs) Clear execution conditions (execution conditions) Clear testing procedure description (testing procedure) Clear expected results (expected results) According to the above definition, HttpRunner test cases should be complete and independently executable. From the structure of a test case, it can be divided into two parts: “test script” and “test data”:
Test script: Focuses on describing the business functional logic of the test, including preconditions, test steps, expected results, etc., and can use auxiliary functions (debugtalk.go/debugtalk.py) to implement complex calculation logic. Test data: Focuses on the business data logic corresponding to the test, such as UUID, username defined in the data-driven file, and environment variables like base_url defined in the environment configuration file. By separating test scripts from test data, data-driven testing can be easily implemented, allowing the same business function to be tested under different input data conditions. So how is test data passed into the test script? This requires the use of a bridge between test data and test scripts—case configuration (config). In addition to containing multiple ordered test steps, the test script also includes configuration items for the current test case.
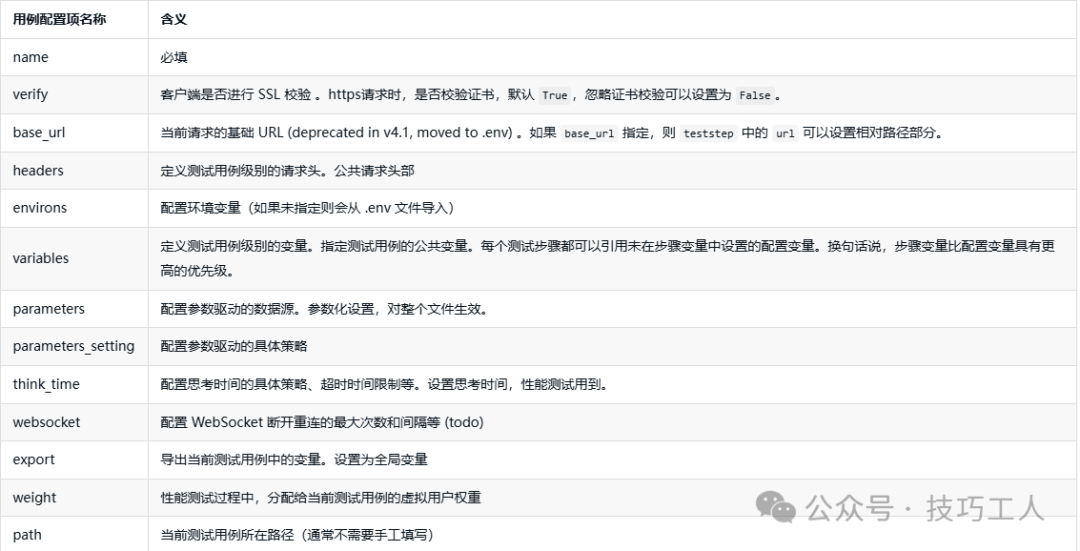
Case Configuration (config)
The configuration items supported by HttpRunner are as follows:
Test Steps (teststep)
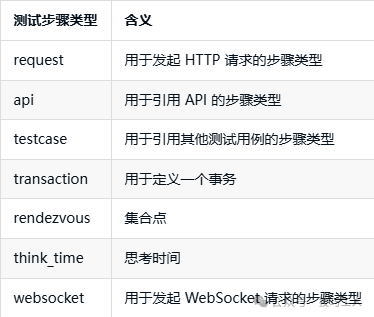
Test steps are the smallest execution unit of a test case, and a test case is an ordered collection of test steps. For interface testing, each test step should correspond to a specific user operation. The test steps supported by HttpRunner are as follows:
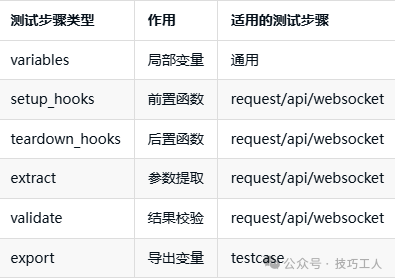
 Each step can add variables, preconditions/postconditions, and related operations for extraction and verification:
Test Case Set (testsuite)
A test case set is an unordered collection of test cases; in simple terms, it is a “bunch” of test cases. Accordingly, HttpRunner supports running a single test case by specifying a single file, as well as running an entire test case set by specifying multiple files or a folder.
Project Root Directory
The project root directory is the directory of the entire test case set. The relative paths in the test cases (for example, referencing the API or test case paths in test steps, or referencing the CSV file paths when using parameter-driven functionality) are based on the project root directory. In HttpRunner v4.0, the project root directory is anchored by proj.json, and by convention, the environment configuration file .env and the auxiliary function definition files debugtalk.py/debugtalk.go are also typically placed in the project root directory.
5. Manually Writing YAML/JSON Test Cases
YAML and JSON are two commonly used formats for defining structured data. There is much debate about the advantages and disadvantages of these two formats. Below, I will compare them based on writing style, functionality, and parsing efficiency:
Writing Style: YAML must use spaces for indentation, and there is no specific requirement for the number of spaces; it just needs to be aligned on the left at the same level. This indentation style is concise and easy to read. For the same test case, a YAML file is usually much shorter than an indented JSON file, allowing users to quickly grasp the overall structure. However, for manually writing YAML test cases, it is crucial to pay attention to left alignment at the same level, as this can easily lead to loading errors. The writing style of JSON frequently uses {} [] and “”, and does not have strict requirements for indentation (though good indentation is still recommended for readability). The excessive additional symbols can reduce the reading and manual writing experience. Functionality: YAML is a superset of JSON, with many additional features that JSON lacks, including comments, extensible data types, relationship anchors, and unquoted strings. The ability to add comments is particularly useful when writing test cases for others to read, while JSON only supports six data types: numbers, strings, booleans, arrays, objects, and null. Parsing Efficiency: JSON is easier for machines to parse compared to YAML, with faster serialization/deserialization speeds. From the comparison above, it is clear that both YAML and JSON have their pros and cons. Users can choose based on their preferences and usage scenarios. However, the two formats are quite similar, and below I will introduce how to manually write test cases using YAML as an example; the same applies to writing JSON test cases, just adapt to JSON syntax rules.
1. Writing Case Configuration (config)
Example:
config:
  name: "Login API"  # Required, specifies the test case name. This will be displayed in the execution log and test report.
  verify: False   # Optional, whether to verify the certificate for HTTPS requests, default is True. Set to False to ignore certificate verification.
  base_url: "https://gitlink.org.cn"  # Optional, if base_url is specified, the url in teststep can be set as a relative path.
  headers: # Optional, common request headers
    content-type: "application/json"
2. Writing Test Steps (teststep)
teststeps:
  -
    name: Send Login Request
    request:  # Request parameters related to the API request
      method: POST
#      url: $base_url/api/accounts/login.json  # Here $base_url will use the value from the .env file
      url: /api/accounts/login.json  # Here it will automatically concatenate the base_url from config with the current url.
      headers:
        Content-Type: application/json
      body:
        autologin: 0
        login: floraachy
        password: ******
    validate:  # Assertions
      - eq: ["status_code", 200]
      - eq: ["body.user_id", 87611]
    extract:  # Parameter extraction
      login: "body.login"
3. Running Tests to Obtain Test Reports
<span>Test case file: testcases/login.yaml hrp run testcases/login.yaml --gen-html-report</span>