Introduction: Are you still struggling with complex Makefiles? Are you worried about cross-platform compilation? CMake is here to save you! As the standard build tool for modern C/C++ projects, CMake makes project management simple and efficient. This article will guide you from scratch to master the core skills of CMake!
🤔 What is CMake? Why use it?
What is CMake?
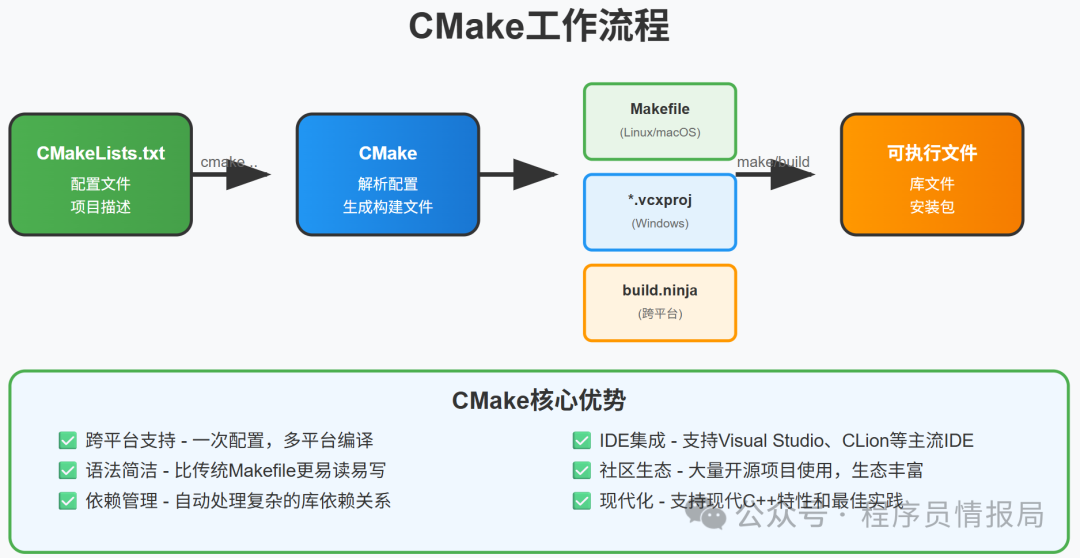
CMake (Cross-platform Make) is a cross-platform build system generator. It does not build projects directly but generates build files suitable for your platform (such as Makefile, Visual Studio project files, etc.).
Why choose CMake?
Pain points of traditional Makefiles:
- • Complex syntax, high learning cost
- • Poor cross-platform support
- • Difficult dependency management
- • Nightmare of maintaining large projectsAdvantages of CMake:✅Cross-platform support– One configuration, multiple platform compilations✅Simplified syntax– Easier to read and write than Makefiles✅Dependency management– Automatically handles library dependencies✅IDE integration– Supports mainstream IDEs✅Community ecosystem – Many open-source projects use it
🛠️ CMake Installation and Environment Configuration
Windows Installation
# Method 1: Download the installer from the official website
# https://cmake.org/download/

# Method 2: Use a package manager
winget install Kitware.CMake
# or
choco install cmake
Linux Installation
# Ubuntu/Debian
sudo apt update
sudo apt install cmake

# CentOS/RHEL
sudo yum install cmake
# or
sudo dnf install cmake

# Compile from source (to get the latest version)
wget https://github.com/Kitware/CMake/releases/download/v3.28.0/cmake-3.28.0.tar.gz
tar -xzf cmake-3.28.0.tar.gz
cd cmake-3.28.0
./bootstrap
make -j4
sudo make install
macOS Installation
# Using Homebrew
brew install cmake

# Using MacPorts
sudo port install cmake
Verify Installation
cmake --version🎯 Your First CMake Project
Let’s start with the simplest “Hello World”!
Project Structure
hello_cmake/
├── CMakeLists.txt
└── main.cpp
Create Source File
main.cpp
#include <iostream>

int main() {
    std::cout << "Hello, CMake World!" << std::endl;
    return 0;
}
Create CMakeLists.txt
# Specify the minimum required version of CMake
cmake_minimum_required(VERSION 3.10)

# Project name and version
project(HelloCMake VERSION 1.0)

# Set C++ standard
set(CMAKE_CXX_STANDARD 17)
set(CMAKE_CXX_STANDARD_REQUIRED ON)

# Create executable file
add_executable(hello_cmake main.cpp)
Build the Project
# Create build directory
mkdir build
cd build

# Generate build files
cmake ..

# Compile the project
cmake --build .

# Run the program
./hello_cmake  # Linux/macOS
# or
hello_cmake.exe  # Windows
🎉 Congratulations! Your first CMake project has successfully run!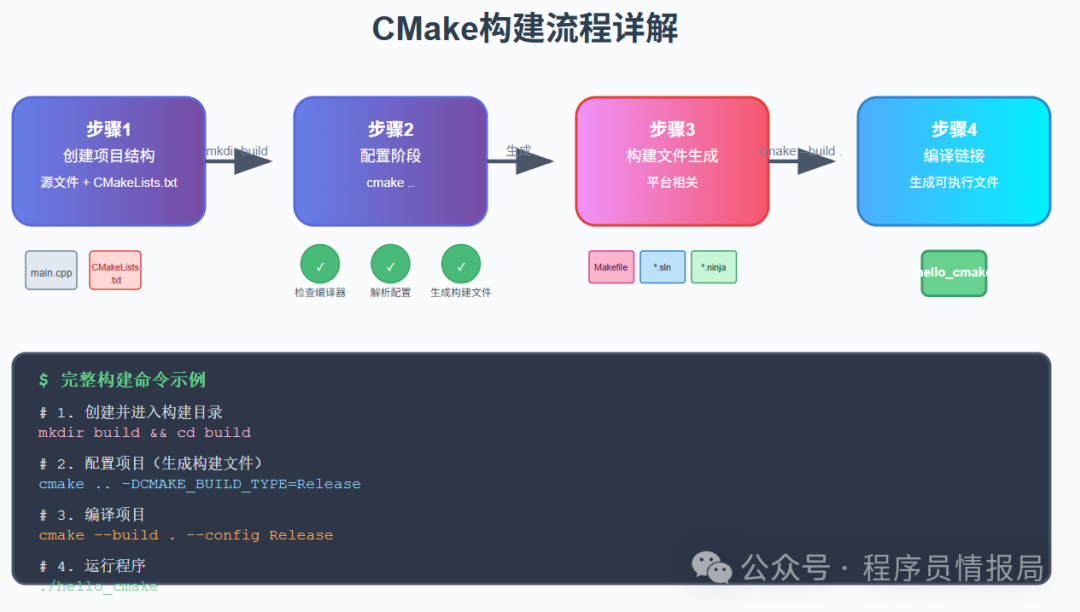
📚 Detailed Explanation of CMake Core Syntax
1. Basic Commands
cmake_minimum_required
# Specify the minimum required version of CMake
cmake_minimum_required(VERSION 3.10)
project
# Define project information
project(MyProject
    VERSION 1.2.3
    DESCRIPTION "My first CMake project"
    LANGUAGES CXX C
)
set
# Set variables
set(CMAKE_CXX_STANDARD 17)
set(SOURCE_FILES main.cpp utils.cpp)
set(MY_COMPILE_FLAGS "-Wall -Wextra -O2")
2. Target Management
add_executable
# Create executable target
add_executable(my_app main.cpp)

# Multiple source files
add_executable(my_app
    main.cpp
    utils.cpp
    config.cpp
)
add_library
# Static library
add_library(mylib STATIC
    lib.cpp
    helper.cpp
)

# Shared library
add_library(mylib SHARED
    lib.cpp
    helper.cpp
)

# Header-only library (only headers)
add_library(mylib INTERFACE)
3. Property Settings
target_link_libraries
# Link libraries
target_link_libraries(my_app mylib)
target_link_libraries(my_app pthread m)
target_include_directories
# Set include directories
target_include_directories(my_app
    PRIVATE include/
    PUBLIC ${CMAKE_CURRENT_SOURCE_DIR}/public_headers/
)
target_compile_options
# Set compile options
target_compile_options(my_app PRIVATE
    -Wall -Wextra -O2
)
4. Variables and Properties
Built-in Variables
# Common built-in variables
message(STATUS "Project Name: ${PROJECT_NAME}")
message(STATUS "Project Version: ${PROJECT_VERSION}")
message(STATUS "Source Directory: ${CMAKE_SOURCE_DIR}")
message(STATUS "Build Directory: ${CMAKE_BINARY_DIR}")
message(STATUS "Current Directory: ${CMAKE_CURRENT_SOURCE_DIR}")
Custom Variables
# Define variables
set(MY_SOURCES main.cpp utils.cpp)
set(MY_HEADERS include/utils.h)

# Use variables
add_executable(my_app ${MY_SOURCES})
🏗️ Practical Case: Building a Multi-file Project
Let’s build a more complex project to practice CMake skills!
Project Structure
calculator/
├── CMakeLists.txt
├── src/
│   ├── main.cpp
│   ├── calculator.cpp
│   └── utils.cpp
├── include/
│   ├── calculator.h
│   └── utils.h
├── lib/
│   └── math_lib/
│       ├── CMakeLists.txt
│       ├── src/
│       │   └── advanced_math.cpp
│       └── include/
│           └── advanced_math.h
└── tests/
    ├── CMakeLists.txt
    └── test_calculator.cpp
Root CMakeLists.txt
cmake_minimum_required(VERSION 3.15)

project(Calculator
    VERSION 2.1.0
    DESCRIPTION "Advanced Calculator Project"
    LANGUAGES CXX
)

# Set C++ standard
set(CMAKE_CXX_STANDARD 17)
set(CMAKE_CXX_STANDARD_REQUIRED ON)

# Set compile options
if(CMAKE_CXX_COMPILER_ID STREQUAL"GNU"OR CMAKE_CXX_COMPILER_ID STREQUAL"Clang")
    set(CMAKE_CXX_FLAGS "${CMAKE_CXX_FLAGS} -Wall -Wextra -O2")
elseif(CMAKE_CXX_COMPILER_ID STREQUAL"MSVC")
    set(CMAKE_CXX_FLAGS "${CMAKE_CXX_FLAGS} /W4 /O2")
endif()

# Include directories
include_directories(include)

# Add subdirectory
add_subdirectory(lib/math_lib)

# Source files
set(SOURCES
    src/main.cpp
    src/calculator.cpp
    src/utils.cpp
)

# Create executable file
add_executable(calculator ${SOURCES})

# Link libraries
target_link_libraries(calculator math_lib)

# Enable testing
enable_testing()
add_subdirectory(tests)

# Install rules
install(TARGETS calculator DESTINATION bin)
install(FILES include/calculator.h DESTINATION include)
Library CMakeLists.txt (lib/math_lib/CMakeLists.txt)
# Math library
set(MATH_LIB_SOURCES
    src/advanced_math.cpp
)

set(MATH_LIB_HEADERS
    include/advanced_math.h
)

# Create static library
add_library(math_lib STATIC ${MATH_LIB_SOURCES})

# Set include directories
target_include_directories(math_lib
    PUBLIC
        $<BUILD_INTERFACE:${CMAKE_CURRENT_SOURCE_DIR}/include>
        $<INSTALL_INTERFACE:include>
)

# Set compile features
target_compile_features(math_lib PUBLIC cxx_std_17)
Test CMakeLists.txt (tests/CMakeLists.txt)
# Find testing framework (optional)
find_package(GTest QUIET)

if(GTest_FOUND)
    # Use Google Test
    add_executable(test_calculator test_calculator.cpp)
    target_link_libraries(test_calculator
        math_lib
        GTest::gtest
        GTest::gtest_main
    )
    add_test(NAME CalculatorTest COMMAND test_calculator)
else()
    # Simple test
    add_executable(simple_test test_calculator.cpp)
    target_link_libraries(simple_test math_lib)
    add_test(NAME SimpleTest COMMAND simple_test)
endif()
Build and Run
# Create build directory
mkdir build && cd build

# Configure project
cmake .. -DCMAKE_BUILD_TYPE=Release

# Compile project
cmake --build . --config Release

# Run tests
ctest

# Install project
cmake --install . --prefix /usr/local
Complex project structure diagram
🚀 Advanced Features of CMake
1. Conditional Compilation
# Set different options based on platform
if(WIN32)
    target_compile_definitions(my_app PRIVATE PLATFORM_WINDOWS)
    target_link_libraries(my_app ws2_32)
elseif(UNIX ANDNOT APPLE)
    target_compile_definitions(my_app PRIVATE PLATFORM_LINUX)
    target_link_libraries(my_app pthread)
elseif(APPLE)
    target_compile_definitions(my_app PRIVATE PLATFORM_MACOS)
endif()

# Set options based on build type
if(CMAKE_BUILD_TYPE STREQUAL"Debug")
    target_compile_definitions(my_app PRIVATE DEBUG_MODE)
    target_compile_options(my_app PRIVATE -g -O0)
else()
    target_compile_definitions(my_app PRIVATE RELEASE_MODE)
    target_compile_options(my_app PRIVATE -O3 -DNDEBUG)
endif()
2. Finding and Using External Libraries
# Find system libraries
find_package(Threads REQUIRED)
target_link_libraries(my_app Threads::Threads)

# Find OpenCV
find_package(OpenCV REQUIRED)
target_link_libraries(my_app ${OpenCV_LIBS})
target_include_directories(my_app PRIVATE ${OpenCV_INCLUDE_DIRS})

# Find Boost
find_package(Boost REQUIRED COMPONENTS system filesystem)
target_link_libraries(my_app Boost::system Boost::filesystem)

# Use pkg-config to find libraries
find_package(PkgConfig REQUIRED)
pkg_check_modules(GTK3 REQUIRED gtk+-3.0)
target_link_libraries(my_app ${GTK3_LIBRARIES})
target_include_directories(my_app PRIVATE ${GTK3_INCLUDE_DIRS})
3. Custom Functions and Macros
# Custom function
function(add_my_executable target_name)
    cmake_parse_arguments(ARG """"SOURCES;LIBS"${ARGN})

    add_executable(${target_name}${ARG_SOURCES})
    target_link_libraries(${target_name}${ARG_LIBS})

    # Set common properties
    set_target_properties(${target_name} PROPERTIES
        CXX_STANDARD 17
        CXX_STANDARD_REQUIRED ON
    )
endfunction()

# Use custom function
add_my_executable(my_app
    SOURCES main.cpp utils.cpp
    LIBS pthread m
)

# Custom macro
macro(set_default_build_type default_type)
    if(NOT CMAKE_BUILD_TYPE)
        set(CMAKE_BUILD_TYPE ${default_type} CACHE STRING
            "Choose the type of build" FORCE)
    endif()
endmacro()

# Use macro
set_default_build_type(Release)
4. Generator Expressions
# Set different compile options based on configuration type
target_compile_options(my_app PRIVATE
    $<$<CONFIG:Debug>:-g -O0 -DDEBUG>
    $<$<CONFIG:Release>:-O3 -DNDEBUG>
)

# Set options based on compiler
target_compile_options(my_app PRIVATE
    $<$<CXX_COMPILER_ID:GNU>:-Wall -Wextra>
    $<$<CXX_COMPILER_ID:MSVC>:/W4>
)

# Conditional linking libraries
target_link_libraries(my_app
    $<$<PLATFORM_ID:Linux>:pthread>
    $<$<PLATFORM_ID:Windows>:ws2_32>
)
❓ Common Issues and Solutions
1. Header File Not Found
Problem: <span>fatal error: 'myheader.h' file not found</span>Solution:
# Method 1: Use target_include_directories
target_include_directories(my_app PRIVATE include/)

# Method 2: Use include_directories (not recommended)
include_directories(include/)

# Method 3: Use absolute path
target_include_directories(my_app PRIVATE
    ${CMAKE_CURRENT_SOURCE_DIR}/include
)
2. Library Linking Failed
Problem: <span>undefined reference to 'function_name'</span>Solution:
# Ensure correct library linking
target_link_libraries(my_app my_library)

# Check library dependencies
target_link_libraries(my_library PUBLIC dependency_lib)

# Link system libraries
find_package(Threads REQUIRED)
target_link_libraries(my_app Threads::Threads)
3. Cross-platform Compilation Issues
Problem: Compilation fails on different platformsSolution:
# Set platform-specific options
if(WIN32)
    # Windows specific settings
target_compile_definitions(my_app PRIVATE _WIN32_WINNT=0x0601)
target_link_libraries(my_app ws2_32 wsock32)
elseif(UNIX)
    # Unix/Linux specific settings
target_link_libraries(my_app pthread)
    if(APPLE)
        # macOS specific settings
target_link_libraries(my_app "-framework CoreFoundation")
    endif()
endif()
4. Version Compatibility Issues
Problem: CMake version incompatibleSolution:
# Set appropriate minimum version requirement
cmake_minimum_required(VERSION 3.10)

# Use version check
if(CMAKE_VERSION VERSION_LESS "3.15")
    message(WARNING "It is recommended to use CMake 3.15 or higher")
endif()

# Conditionally use new features
if(CMAKE_VERSION VERSION_GREATER_EQUAL "3.16")
    # Use features from 3.16+
target_precompile_headers(my_app PRIVATE pch.h)
endif()
🎯 CMake Best Practices
1. Project Structure Recommendations
project/
├── CMakeLists.txt          # Root CMakeLists.txt
├── cmake/                  # CMake modules and scripts
│   ├── FindMyLib.cmake
│   └── CompilerWarnings.cmake
├── src/                    # Source code
├── include/                # Public header files
├── lib/                    # Sub-libraries
├── tests/                  # Test code
├── docs/                   # Documentation
├── scripts/                # Build scripts
└── build/                  # Build directory (gitignore)
2. Naming Conventions
# Target names use lowercase and underscores
add_executable(my_awesome_app main.cpp)
add_library(utility_lib utils.cpp)

# Variable names use uppercase and underscores
set(PROJECT_VERSION_MAJOR 1)
set(SOURCE_FILES main.cpp utils.cpp)

# Custom functions use lowercase and underscores
function(add_compiler_warnings target)
    # ...
endfunction()
3. Modern CMake Writing Style
# ❌ Old style (avoid using)
include_directories(include/)
link_directories(lib/)
add_definitions(-DMYDEFINE)

# ✅ Modern style (recommended)
target_include_directories(my_app PRIVATE include/)
target_link_directories(my_app PRIVATE lib/)
target_compile_definitions(my_app PRIVATE MYDEFINE)
📊 CMake vs Other Build Tools Comparison
| Feature | CMake | Make | Ninja | Bazel | Meson |
| Cross-platform | ✅ | ❌ | ✅ | ✅ | ✅ |
| Learning Curve | Medium | Steep | Simple | Steep | Simple |
| Large Project Support | ✅ | ❌ | ✅ | ✅ | ✅ |
| IDE Integration | ✅ | ❌ | ❌ | ❌ | ✅ |
| Community Ecosystem | Rich | Rich | Average | Average | Average |
| Build Speed | Medium | Fast | Very Fast | Very Fast | Fast |
🔧 Useful CMake Tools and Tips
1. CMake GUI Tool
# Start CMake GUI
cmake-gui

# Or use ccmake (terminal interface)
ccmake .
2. Debugging CMake
# Output debug information
message(STATUS "Variable value: ${MY_VARIABLE}")
message(WARNING "This is a warning")
message(FATAL_ERROR "This is an error")

# Print all variables
get_cmake_property(_variableNames VARIABLES)
foreach(_variableName ${_variableNames})
    message(STATUS "${_variableName}=${${_variableName}}")
endforeach()
3. Performance Optimization
# Parallel compilation
set(CMAKE_BUILD_PARALLEL_LEVEL 4)

# Use Ninja generator (faster)
# cmake -G Ninja ..

# Precompiled headers (CMake 3.16+)
target_precompile_headers(my_app PRIVATE
    <iostream>
    <vector>
    <string>
)
🎉 Conclusion
CMake, as the standard build tool for modern C/C++ projects, is essential for every developer to master. Through this article, you should be able to:✅ Understand the core concepts and advantages of CMake✅ Write basic CMakeLists.txt files✅ Manage complex multi-file projects✅ Utilize advanced features of CMake✅ Troubleshoot common build issues
Next Learning Suggestions:
- 1. Practice Projects – Refactor your existing projects with CMake
- 2. Learn Package Management – Understand package management tools like Conan, vcpkg
- 3. CI/CD Integration – Integrate CMake into continuous integration processes
- 4. In-depth Learning – Study CMake configurations of large open-source projects
💡 Remember: CMake is not just a build tool; it is an important part of the modern C++ development ecosystem. Mastering CMake will double your development efficiency!