
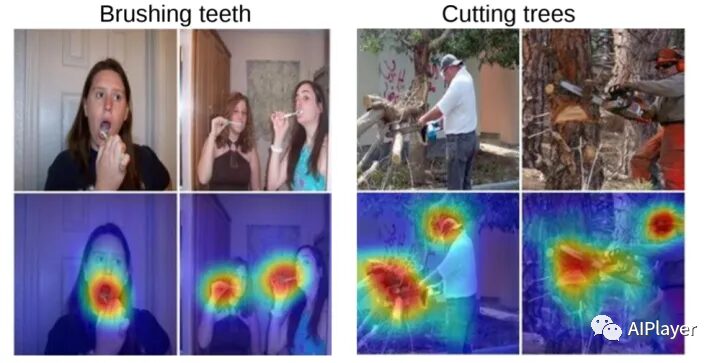
Weakly Supervised Object Localization is used to discover the location of target objects within images. Traditional object detection methods typically require precise bounding box annotations for each training sample, which can be time-consuming and labor-intensive for large-scale datasets. To address this issue, weakly supervised object localization solves the problem by using simpler annotation information.
The core idea of weakly supervised object localization is to use only image-level annotations during training, without the need for precise bounding box information. Typically, each image is provided with a single label indicating whether the target object exists in the image, without providing specific details about the target’s location.
This article will introduce a weakly supervised object localization method based on the CAM algorithm. We will train the MobileNetV1 model using the person_detection example project from tflite-micro in Colab and deploy it on the ESP32 module to achieve human detection and localization based on CAM.
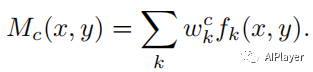
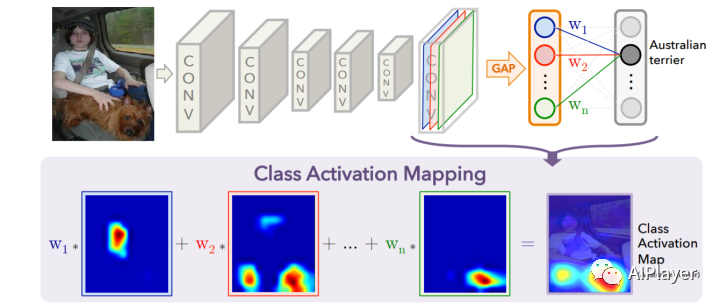
def returnCAM(feature_conv, weight_softmax, class_idx): # generate the class activation maps upsample to 256x256 size_upsample = (256, 256) bz, nc, h, w = feature_conv.shape output_cam = [] for idx in class_idx: cam = weight_softmax[idx].dot(feature_conv.reshape((nc, h*w))) cam = cam.reshape(h, w) cam = cam - np.min(cam) cam_img = cam / np.max(cam) cam_img = np.uint8(255 * cam_img) output_cam.append(cv2.resize(cam_img, size_upsample)) return output_cam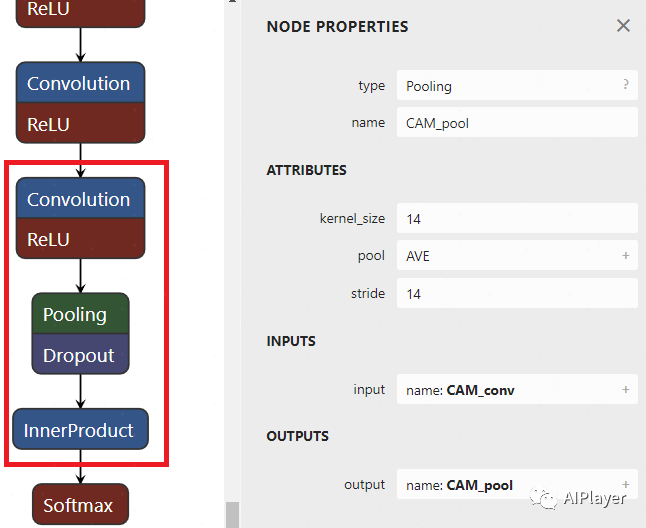
-
Install conda and create myenv environment:
%env PYTHONPATH = # /env/python
!wget https://repo.anaconda.com/miniconda/Miniconda3-py38_4.12.0-Linux-x86_64.sh
!chmod +x Miniconda3-py38_4.12.0-Linux-x86_64.sh
!./Miniconda3-py38_4.12.0-Linux-x86_64.sh -b -f -p /usr/local
!conda update conda -y
import syssys.path.append('/usr/local/lib/python3.8/site-packages')
!conda create -n myenv python=3.6 -y-
Install TensorFlow 1.15 and related packages in the conda myenv environment:
%%shelleval "$(conda shell.bash hook)"
conda activate myenv
pip install tensorflow==1.15
pip install contextlib2
pip install Pillow
pip install tf_slim
pip install matplotlib
pip install ipykernelfrom google.colab import drivedrive.mount('/content/drive')! git clone --depth=1 https://github.com/tensorflow/models.git /content/drive/MyDrive/person_detect
! git clone https://github.com/tensorflow/tensorflow /content/drive/MyDrive/tensorflow
! cd /content/drive/MyDrive/tensorflow && git checkout -f v1.15.0 && cd -# Line 363:
net, end_points = mobilenet_v1_base(inputs, scope=scope, min_depth=min_depth, depth_multiplier=depth_multiplier, conv_defs=conv_defs, final_endpoint='Conv2d_11_pointwise')
# Line 403:
mobilenet_v1_025 = wrapped_partial(mobilenet_v1, depth_multiplier=0.25, global_pool=True)%%shelleval "$(conda shell.bash hook)"
conda activate myenv
python3 /content/drive/MyDrive/person_detect/research/slim/download_and_convert_data.py \ --logtostderr \ --dataset_name=visualwakewords \ --dataset_dir=person_detection_dataset \ --foreground_class_of_interest='person' \ --small_object_area_threshold=0.005%load_ext tensorboard
%tensorboard --logdir /content/drive/MyDrive/person_detect/train%%shelleval "$(conda shell.bash hook)"
conda activate myenv
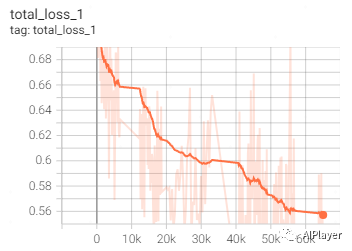
python3 /content/drive/MyDrive/person_detect/research/slim/train_image_classifier.py \ --clone_on_cpu=True \ --alsologtostderr \ --dataset_name=visualwakewords \ --dataset_dir=person_detection_dataset \ --dataset_split_name=train \ --train_image_size=96 \ --use_grayscale=True \ --preprocessing_name=mobilenet_v1 \ --model_name=mobilenet_v1_025 \ --train_dir=/content/drive/MyDrive/person_detect/train \ --save_summaries_secs=300 \ --learning_rate=0.045 \ --label_smoothing=0.1 \ --learning_rate_decay_factor=0.98 \ --num_epochs_per_decay=2.5 \ --moving_average_decay=0.9999 \ --batch_size=96 \ --max_number_of_steps=1000000When you see the output below, it indicates that training has started normally:
I1212 10:05:30.450350 132243531998336 learning.py:760] Starting Queues.INFO:tensorflow:global_step/sec: 0…INFO:tensorflow:Recording summary at step 65033.I1212 10:05:40.968564 132240944121408 supervisor.py:1050] Recording summary at step 65033.INFO:tensorflow:global step 65040: loss = 0.5654 (2.699 sec/step)I1212 10:05:53.332603 132243531998336 learning.py:512] global step 65040: loss = 0.5654 (2.699 sec/step)INFO:tensorflow:global step 65050: loss = 0.5292 (2.627 sec/step)I1212 10:06:09.291543 132243531998336 learning.py:512] global step 65050: loss = 0.5292 (2.627 sec/step)TensorBoard loss:
function ConnectButton(){  console.log("Connect pushed");  document.querySelector("#top-toolbar > colab-connect-button").shadowRoot.querySelector("#connect").click()}
setInterval(ConnectButton,60000);%%shelleval "$(conda shell.bash hook)"
conda activate myenv
python3 /content/drive/MyDrive/person_detect/research/slim/export_inference_graph.py \ --alsologtostderr \ --dataset_name=visualwakewords \ --image_size=96 \ --use_grayscale=True \ --model_name=mobilenet_v1_025 \ --output_file=/content/drive/MyDrive/person_detect/train/person_detection_graph.pb-
Classification Result MobilenetV1/Predictions/Reshape_1 -
Convolution Output MobilenetV1/MobilenetV1/Conv2d_11_pointwise/Conv2D
%%shelleval "$(conda shell.bash hook)"
conda activate myenv
python3 /content/drive/MyDrive/tensorflow/tensorflow/python/tools/freeze_graph.py \ --input_graph=/content/drive/MyDrive/person_detect/train/person_detection_graph.pb \ --input_checkpoint=/content/drive/MyDrive/person_detect/train/model.ckpt-0 \ --input_binary=true \ --output_node_names=MobilenetV1/Predictions/Reshape_1,MobilenetV1/MobilenetV1/Conv2d_11_pointwise/Conv2D \ --output_graph=/content/drive/MyDrive/person_detect/train/person_detection_frozen_graph.pbFirst, create the conversion script file gen_quant_tflite.py:
import tensorflow.compat.v1 as tf
import io
import PIL
import numpy as np
def representative_dataset_gen():
  record_iterator = tf.python_io.tf_record_iterator(path='/content/person_detection_dataset/val.record-00000-of-00010')
  for _ in range(250):    string_record = next(record_iterator)    example = tf.train.Example()    example.ParseFromString(string_record)    image_stream = io.BytesIO(example.features.feature['image/encoded'].bytes_list.value[0])    image = PIL.Image.open(image_stream)    image = image.resize((96, 96))    image = image.convert('L')    array = np.array(image)    array = np.expand_dims(array, axis=2)    array = np.expand_dims(array, axis=0)    array = ((array / 127.5) - 1.0).astype(np.float32)    yield([array])
converter = tf.lite.TFLiteConverter.from_frozen_graph('/content/drive/MyDrive/person_detect/train/person_detection_frozen_graph.pb',['input'],['MobilenetV1/Predictions/Reshape_1','MobilenetV1/MobilenetV1/Conv2d_11_pointwise/Conv2D'])
converter.optimizations = [tf.lite.Optimize.DEFAULT]
converter.representative_dataset = representative_dataset_gen
converter.target_spec.supported_ops = [tf.lite.OpsSet.TFLITE_BUILTINS_INT8]
converter.inference_input_type = tf.int8
converter.inference_output_type = tf.int8
tflite_quant_model = converter.convert()
open("/content/drive/MyDrive/person_detect/train/person_detection_model.tflite", "wb").write(tflite_quant_model)%%shelleval "$(conda shell.bash hook)"
conda activate myenv
python3 /content/drive/MyDrive/person_detect/gen_quant_tflite.py
%%shelleval "$(conda shell.bash hook)"
conda activate myenv
# Install xxd if it is not available
apt-get -qq install xxd
# Save the file as a C source file
xxd -i /content/drive/MyDrive/person_detect/train/person_detection_model.tflite > /content/drive/MyDrive/person_detect/train/person_detect_model_data.ccSince we have changed the model structure, we need to make corresponding modifications when defining op_resolver:
static tflite::MicroMutableOpResolver<7> micro_op_resolver;
micro_op_resolver.AddConv2D(tflite::Register_CONV_2D_INT8());
micro_op_resolver.AddDepthwiseConv2D(tflite::Register_DEPTHWISE_CONV_2D_INT8());
micro_op_resolver.AddReshape();
micro_op_resolver.AddSoftmax(tflite::Register_SOFTMAX_INT8());
micro_op_resolver.AddMul();
micro_op_resolver.AddAdd(tflite::Register_ADD_INT8());
micro_op_resolver.AddMean();<span>preserve_all_tensors=True</span> to retain all intermediate tensors. However, this will increase memory usage and may lead to failure on devices like ESP32. Therefore, we need to handle this through lower-level data structures.<span>tensorflow/lite/schema/schema_generated.h</span> is generated by the <span>schema.fbs</span> file, which defines the data structures during FlatBuffers serialization and deserialization. This file can be found in the TensorFlow source code:<span>.tflite</span> file is actually a FlatBuffers file. We can use the <span>flatc</span> tool to convert the <span>.tflite</span> format to JSON format for analysis.Model { // The types of layers used in this network structure are stored in a list operator_codes: [...] // Specific information for each layer subgraphs: [ { // Relevant parameters needed for the network structure operators: [ { opcode_index: 0, // Index in the `Model.operator_codes` array inputs: [0, 1, 2], // Indices into the `subgraph.tensors` array outputs: [3], // Index in the `Model.outputs` array ... }, ... ], // Contains shape information for input, weight, bias, quantization parameters, and offset values in the buffer data area tensors: [ { name: "input", shape: [1, 64, 64, 3], type: FLOAT32, buffer: 0, // Index in the `Model.buffers` array ... }, { name: "weights", shape: [32, 3, 3, 3], type: FLOAT32, buffer: 1, // Index in the `Model.buffers` array ... }, { name: "bias", shape: [32], type: FLOAT32, buffer: 2, // Index in the `Model.buffers` array ... }, ... ], // Input tensor indices for the entire network inputs: [...], // Output tensor indices for the entire network outputs: [...] }, ... ], // Stores weight, bias, and other data buffers: [ { data: [], // Empty buffer for the input tensor }, { data: [/* binary data for the weights */], }, { data: [/* binary data for the bias */], }, ... ], ...}<span>Model</span>. In the <span>Model</span> table, there is a field called <span>subgraphs</span>, which is an array containing all subgraphs. Each subgraph has a field called <span>operators</span> and a field called <span>tensors</span>, representing the operations and tensors in that subgraph, respectively. Each Conv2D operation has a corresponding entry in the <span>operators</span> array. This entry contains the type of operation (e.g., Conv2D), the indices of the input tensors, and the indices of the output tensors. The weights and biases are stored in the <span>tensors</span> array. Each tensor has a field called <span>buffer</span>, which is an index pointing to the <span>buffers</span> array in the <span>Model</span> table.<span>buffers</span> array contains binary data, which are the values of the weights and biases. In this example, the weights and biases for the Conv2D operation are stored in the 1st and 2nd items of the <span>buffers</span> array. These weights and biases can be read directly from the FlatBuffer without parsing and unpacking.int get_filter_data(const tflite::Model* model, int op_idx, std::vector<float> &filter_data){ // Get the first subgraph through the model, usually there is only one subgraph const tflite::SubGraph* subgraph = model->subgraphs()->Get(0); if (subgraph == nullptr) { return -1; }
const tflite::Operator* conv_op = nullptr; // A subgraph consists of multiple operations, here we get the total number of ops int ops_size = subgraph->operators()->size(); for (int i = 0; i < ops_size; ++i) { // Iterate through all ops to find the node by op index; this op_idx can be seen in netron for the corresponding node location const tflite::Operator* op = subgraph->operators()->Get(i); if (op != nullptr && i == op_idx) { conv_op = op; break; } }
if (conv_op == nullptr) { return -1; }
// conv_op's inputs include 3 input tensors, where filter is the 2nd tensor int weight_tensor_idx = conv_op->inputs()->Get(1);
// Each subgraph records all filter and bias tensors, and weight_tensor_idx refers to the index in the entire tensors // So we can directly get the corresponding tensor by using tensors()->Get(weight_tensor_idx) const tflite::Tensor* weights_tensor = subgraph->tensors()->Get(weight_tensor_idx); if (weights_tensor == nullptr) { return -1; }
// Print the weight tensor's name; the output here is MobilenetV1/Logits/Conv2d_1c_1x1/weights/read MicroPrintf("tensor name = %s\n", weights_tensor->name()->c_str());
// Each Tensor contains quantization parameters, which can be obtained through quantization() const auto* params = weights_tensor->quantization(); if (params == nullptr || params->zero_point() == nullptr || params->scale() == nullptr) { return -1; }
// Since we want to calculate the person's category, the classification index is 1, so it is Get(1) int32_t zero_point = params->zero_point()->Get(1); float scale = (float)(params->scale()->Get(1));
// The buffer() in struct Tensor returns the index in the entire model's buffers uint32_t buffer_index = weights_tensor->buffer(); // Get the corresponding Buffer through the buffer index, then use its data() to get the actual data; here we obtain the quantized weights const uint8_t* quantized_weights_data = model->buffers()->Get(buffer_index)->data()->data(); // Dequantize weights, there are two categories, the 1st is background, the 2nd is person, each category occupies 128, so i starts from data_size/2 int data_size = model->buffers()->Get(buffer_index)->data()->size(); for (int i = data_size / 2; i < data_size; ++i) { filter_data.push_back(scale * ((int8_t)quantized_weights_data[i] - zero_point));); }
return 0;}
std::vector<float> filter_data;
void setup() { ... get_filter_data(model, 26, filter_data);}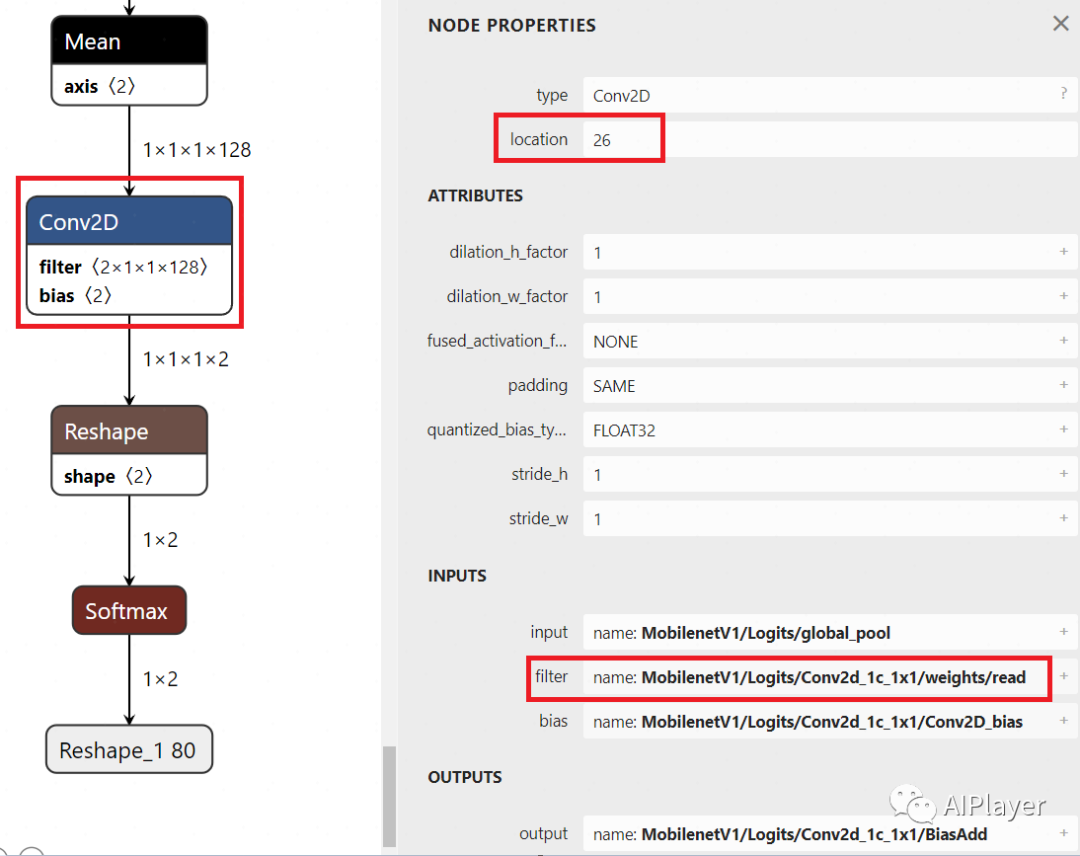
int cam(std::vector<float> &filter_data, int *pos_x, int *pos_y){ // Get the second output tensor of the model and its quantization parameters TfLiteTensor *feature_tensor = interpreter->output(1); uint8_t *quantized_feature_data = feature_tensor->data.uint8; int data_size = feature_tensor->bytes / sizeof(uint8_t); int32_t zero_point = feature_tensor->params.zero_point; float scale = feature_tensor->params.scale;
// Dequantize std::vector<float> feature_data; for (int i = 0; i < data_size; ++i) { feature_data.push_back(scale * ((int8_t)quantized_feature_data[i] - zero_point)); }
// Calculate CAM, using feature_data 6x6x128 and filter_data 1x1x128 to perform dot product, obtaining a 6x6 result std::vector<std::vector<float>> result(6, std::vector<float>(6, 0.0f)); float min_result = 1000; float max_result = -1000; for (int i = 0; i < 6; ++i) { for (int j = 0; j < 6; ++j) { for (int k = 0; k < 128; ++k) { int feature_idx = i * 6 * 128 + j * 128 + k; int filter_idx = k; // weight_tensor's shape is 1x1x128 result[i][j] += feature_data[feature_idx] * filter_data[filter_idx]; } // Record max and min values for subsequent normalization if (result[i][j] > max_result) { max_result = result[i][j]; } if (result[i][j] < min_result) { min_result = result[i][j]; } } }
// Normalize for (int i = 0; i < 6; ++i) { for (int j = 0; j < 6; ++j) { result[i][j] = (result[i][j] - min_result) / (max_result - min_result) * 255; } }
// 6x6 bilinear interpolation to 96x96, while obtaining the coordinates of the maximum value std::vector<std::vector<float> > resized_result(96, std::vector<float>(96, 0.0f)); float scale_x = 6.0f / 96.0f; float scale_y = 6.0f / 96.0f; int max_i = 0; int max_j = 0; float max_value = 0; for (int i = 0; i < 96; ++i) { for (int j = 0; j < 96; ++j) { float src_x = j * scale_x; float src_y = i * scale_y; int x1 = static_cast<int>(src_x); int y1 = static_cast<int>(src_y); int x2 = std::min(x1 + 1, 5); int y2 = std::min(y1 + 1, 5); float dx = src_x - x1; float dy = src_y - y1; resized_result[i][j] = result[y1][x1] * (1 - dx) * (1 - dy) + result[y1][x2] * dx * (1 - dy) + result[y2][x1] * (1 - dx) * dy + result[y2][x2] * dx * dy;
if (resized_result[i][j] > max_value) { max_value = resized_result[i][j]; max_i = i; max_j = j; } } }
*pos_x = max_i; *pos_y = max_j;
return 0;}void loop() { // Get image from provider. if (kTfLiteOk != GetImage(kNumCols, kNumRows, kNumChannels, input->data.int8)) { MicroPrintf("Image capture failed."); }
// Run the model on this input and make sure it succeeds. if (kTfLiteOk != interpreter->Invoke()) { MicroPrintf("Invoke failed."); }
TfLiteTensor* output = interpreter->output(0);
// Process the inference results. int8_t person_score = output->data.uint8[kPersonIndex]; int8_t no_person_score = output->data.uint8[kNotAPersonIndex];
float person_score_f = (person_score - output->params.zero_point) * output->params.scale; int person_score_int = (person_score_f) * 100 + 0.5;
if (person_score_int > 90) { int x = 0, y = 0; cam(filter_data, &x, &y); MicroPrintf("location x=%d, y=%d\n", x, y); } RespondToDetection(person_score, no_person_score);}Past Recommendations