
Click the blue text
Follow us
Author | woshigaowei5146 @CSDN
Editor | 3D Vision Developer Community
Table of Contents
Preparation
Configuration
Testing
Program
Color Recognition Tracking
Face Recognition
Gesture Recognition
Shape Recognition
Barcode Recognition
QR Code Recognition
Troubleshooting
Preparation
-
Raspberry Pi 4B
-
USB Plug-and-Play Camera
Configuration
Install python-opencv, reference: https://blog.csdn.net/weixin_45911959/article/details/122709090
Install numpy, pip3 install -U numpy
Install opencv-python, opencv-contrib-python, reference: https://blog.csdn.net/weixin_57605235/article/details/121512923
Testing
Image:
import cv2

a = cv2.imread("/home/pi/2020-06-15-162551_1920x1080_scrot.png")
cv2.imshow("test", a)
cv2.waitKey()
cv2.destroyAllWindows()
Video:
import cv2

cap = cv2.VideoCapture(0)

while True:
    ret, frame = cap.read()
    cv2.imshow('frame', frame)  # This step is necessary, otherwise the image will not display
    if cv2.waitKey(1) & 0xFF == ord('q'):
        break
# When everything is done, release the capture
cap.release()
cv2.destroyAllWindows()
Program
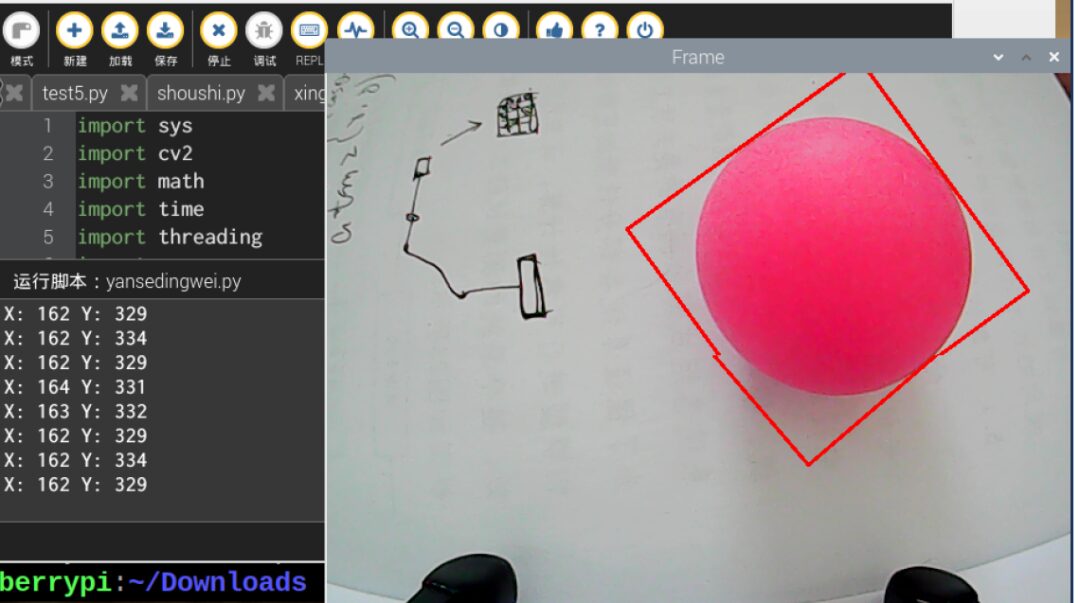
Color Recognition Tracking
import sys
import cv2
import math
import time
import threading
import numpy as np
import HiwonderSDK.yaml_handle as yaml_handle

if sys.version_info.major == 2:
    print('Please run this program with python3!')
    sys.exit(0)

range_rgb = {
    'red':   (0, 0, 255),
    'blue':  (255, 0, 0),
    'green': (0, 255, 0),
    'black': (0, 0, 0),
    'white': (255, 255, 255)
}

__target_color = ('red', 'green', 'blue')
lab_data = yaml_handle.get_yaml_data(yaml_handle.lab_file_path)  # Find the largest contour

# Function to find the largest contour based on area

def getAreaMaxContour(contours):
    contour_area_temp = 0
    contour_area_max = 0
    area_max_contour = None
    for c in contours:  # Iterate through all contours
        contour_area_temp = math.fabs(cv2.contourArea(c))  # Calculate contour area
        if contour_area_temp > contour_area_max:
            contour_area_max = contour_area_temp
            if contour_area_temp > 300:  # Only valid if area is greater than 300, to filter interference
                area_max_contour = c
    return area_max_contour, contour_area_max  # Return the largest contour

detect_color = None
color_list = []
start_pick_up = False
size = (640, 480)

def run(img):
    global rect
    global detect_color
    global start_pick_up
    global color_list

    img_copy = img.copy()
    frame_resize = cv2.resize(img_copy, size, interpolation=cv2.INTER_NEAREST)
    frame_gb = cv2.GaussianBlur(frame_resize, (3, 3), 3)
    frame_lab = cv2.cvtColor(frame_gb, cv2.COLOR_BGR2LAB)  # Convert image to LAB space
    color_area_max = None
    max_area = 0
    areaMaxContour_max = 0
    if not start_pick_up:
        for i in lab_data:
            if i in __target_color:
                frame_mask = cv2.inRange(frame_lab,
                                          (lab_data[i]['min'][0],
                                           lab_data[i]['min'][1],
                                           lab_data[i]['min'][2]),
                                          (lab_data[i]['max'][0],
                                           lab_data[i]['max'][1],
                                           lab_data[i]['max'][2]))  # Perform bitwise operation on original image and mask
                opened = cv2.morphologyEx(frame_mask, cv2.MORPH_OPEN, np.ones((3, 3), np.uint8))  # Opening operation
                closed = cv2.morphologyEx(opened, cv2.MORPH_CLOSE, np.ones((3, 3), np.uint8))  # Closing operation
                contours = cv2.findContours(closed, cv2.RETR_EXTERNAL, cv2.CHAIN_APPROX_NONE)[-2]  # Find contours
                areaMaxContour, area_max = getAreaMaxContour(contours)  # Find maximum contour

                if areaMaxContour is not None:
                    if area_max > max_area:  # Find maximum area
                        max_area = area_max
                        color_area_max = i
                        areaMaxContour_max = areaMaxContour
                if max_area > 500:  # Found maximum area
                    rect = cv2.minAreaRect(areaMaxContour_max)
                    box = np.int0(cv2.boxPoints(rect))
                    y = int((box[1][0]-box[0][0])/2+box[0][0])
                    x = int((box[2][1]-box[0][1])/2+box[0][1])
                    print('X:', x, 'Y:', y)  # Print coordinates
                    cv2.drawContours(img, [box], -1, range_rgb[color_area_max], 2)
                    if not start_pick_up:
                        if color_area_max == 'red':  # Red is the largest
                            color = 1
                        elif color_area_max == 'green':  # Green is the largest
                            color = 2
                        elif color_area_max == 'blue':  # Blue is the largest
                            color = 3
                        else:
                            color = 0
                        color_list.append(color)
                        if len(color_list) == 3:  # Multiple judgments
                            # Take the average
                            color = int(round(np.mean(np.array(color_list))))
                            color_list = []
                            if color == 1:
                                detect_color = 'red'
                            elif color == 2:
                                detect_color = 'green'
                            elif color == 3:
                                detect_color = 'blue'
                            else:
                                detect_color = 'None'

    return img

if __name__ == '__main__':
    cap = cv2.VideoCapture(-1)  # Read camera
    __target_color = ('red',)
    while True:
        ret, img = cap.read()
        if ret:
            frame = img.copy()
            Frame = run(frame)
            cv2.imshow('Frame', Frame)
            key = cv2.waitKey(1)
            if key == 27:
                break
        else:
            time.sleep(0.01)
    cv2.destroyAllWindows()
Effect:
Face Recognition
Utilizes a face dataset trained with Caffe.
import sys
import numpy as np
import cv2
import math
import time
import threading

# Face Detection
if sys.version_info.major == 2:
    print('Please run this program with python3!')
    sys.exit(0)

# Threshold
conf_threshold = 0.6

# Model Location
modelFile = "/home/pi/mu_code/models/res10_300x300_ssd_iter_140000_fp16.caffemodel"
configFile = "/home/pi/mu_code/models/deploy.prototxt"
net = cv2.dnn.readNetFromCaffe(configFile, modelFile)

frame_pass = True
x1 = x2 = y1 = y2 = 0
old_time = 0

def run(img):
    global old_time
    global frame_pass
    global x1, x2, y1, y2

    if not frame_pass:
        frame_pass = True
        cv2.rectangle(img, (x1, y1), (x2, y2), (0, 255, 0), 2, 8)
        x1 = x2 = y1 = y2 = 0
        return img
    else:
        frame_pass = False

    img_copy = img.copy()
    img_h, img_w = img.shape[:2]
    blob = cv2.dnn.blobFromImage(img_copy, 1, (100, 100), [104, 117, 123], False, False)
    net.setInput(blob)
    detections = net.forward()  # Calculate recognition

    for i in range(detections.shape[2]):
        confidence = detections[0, 0, i, 2]
        if confidence > conf_threshold:
            # Convert coordinates of recognized face back to original scale
            x1 = int(detections[0, 0, i, 3] * img_w)
            y1 = int(detections[0, 0, i, 4] * img_h)
            x2 = int(detections[0, 0, i, 5] * img_w)
            y2 = int(detections[0, 0, i, 6] * img_h)
            cv2.rectangle(img, (x1, y1), (x2, y2), (0, 255, 0), 2, 8)  # Draw rectangle around detected face

            X = (x1 + x2) / 2
            Y = (y1 + y2) / 2
            print('X:', X, 'Y:', Y)
    return img

if __name__ == '__main__':
    cap = cv2.VideoCapture(-1)  # Read camera
    while True:
        ret, img = cap.read()
        if ret:
            frame = img.copy()
            Frame = run(frame)
            cv2.imshow('Frame', Frame)
            key = cv2.waitKey(1)
            if key == 27:
                break
        else:
            time.sleep(0.01)
    cv2.destroyAllWindows()
Gesture Recognition
import os
import sys
import cv2
import math
import time
import numpy as np
import HiwonderSDK.Misc as Misc

if sys.version_info.major == 2:
    print('Please run this program with python3!')
    sys.exit(0)

__finger = 0
__t1 = 0
__step = 0
__count = 0
__get_finger = False

# Initial Position
def initMove():
    pass

def reset():
    global __finger, __t1, __step, __count, __get_finger
    __finger = 0
    __t1 = 0
    __step = 0
    __count = 0
    __get_finger = False


def init():
    reset()
    initMove()

class Point(object):  # A coordinate point
    x = 0
    y = 0

    def __init__(self, x=0, y=0):
        self.x = x
        self.y = y

class Line(object):  # A line
    def __init__(self, p1, p2):
        self.p1 = p1
        self.p2 = p2


def GetCrossAngle(l1, l2):
    '''
    Calculate the angle between two lines
    :param l1:
    :param l2:
    :return:
    '''
    arr_0 = np.array([(l1.p2.x - l1.p1.x), (l1.p2.y - l1.p1.y)])
    arr_1 = np.array([(l2.p2.x - l2.p1.x), (l2.p2.y - l2.p1.y)])
    cos_value = (float(arr_0.dot(arr_1)) / (np.sqrt(arr_0.dot(arr_0))
                                            * np.sqrt(arr_1.dot(arr_1))))  # Note: convert to float for calculation
    return np.arccos(cos_value) * (180 / np.pi)


def distance(start, end):
    """
    Calculate the distance between two points
    :param start: Start point
    :param end: End point
    :return: Distance between the two points
    """
    s_x, s_y = start
    e_x, e_y = end
    x = s_x - e_x
    y = s_y - e_y
    return math.sqrt((x ** 2) + (y ** 2))


def image_process(image, rw, rh):  # hsv
    '''
    # Light influence, please modify the range of cb
    # The Cr component of normal yellow people is about 140~160
    Recognize skin color
    :param image: Image
    :return: Binary image after recognition
    '''
    frame_resize = cv2.resize(image, (rw, rh), interpolation=cv2.INTER_CUBIC)
    YUV = cv2.cvtColor(frame_resize, cv2.COLOR_BGR2YCR_CB)  # Convert image to YCrCb
    _, Cr, _ = cv2.split(YUV)  # Split YCrCb
    Cr = cv2.GaussianBlur(Cr, (5, 5), 0)
    _, Cr = cv2.threshold(Cr, 135, 160, cv2.THRESH_BINARY +
                          cv2.THRESH_OTSU)  # OTSU Binarization

    # Opening operation, remove noise
    open_element = cv2.getStructuringElement(cv2.MORPH_RECT, (5, 5))
    opend = cv2.morphologyEx(Cr, cv2.MORPH_OPEN, open_element)
    # Erosion
    kernel = np.ones((3, 3), np.uint8)
    erosion = cv2.erode(opend, kernel, iterations=3)

    return erosion


def get_defects_far(defects, contours, img):
    '''
    Get the farthest point in the convex hull
    '''
    if defects is None and contours is None:
        return None
    far_list = []
    for i in range(defects.shape[0]):
        s, e, f, d = defects[i, 0]
        start = tuple(contours[s][0])
        end = tuple(contours[e][0])
        far = tuple(contours[f][0])
        # Calculate distance between two points
        a = distance(start, end)
        b = distance(start, far)
        c = distance(end, far)
        # Calculate angle between fingers
        angle = math.acos((b ** 2 + c ** 2 - a ** 2) /
                          (2 * b * c)) * 180 / math.pi
        # The angle between fingers is generally not greater than 100 degrees
        # Less than 90 degrees
        if angle <= 75:  # 90:
            # cv.circle(img, far, 10, [0, 0, 255], 1)
            far_list.append(far)
    return far_list


def get_max_coutour(cou, max_area):
    '''
    Find the largest contour
    Calculate based on area, find the maximum, and determine if it is less than the minimum area, if less, abandon
    :param cou: Contours
    :return: Return the largest contour
    '''
    max_coutours = 0
    r_c = None
    if len(cou) < 1:
        return None
    else:
        for c in cou:
            # Calculate area
            temp_coutours = math.fabs(cv2.contourArea(c))
            if temp_coutours > max_coutours:
                max_coutours = temp_coutours
                cc = c
        # Determine the largest area in all contours
        if max_coutours > max_area:
            r_c = cc
        return r_c


def find_contours(binary, max_area):
    '''
    CV_RETR_EXTERNAL - Only extract the outermost contours
    CV_RETR_LIST - Extract all contours and place them in a list
    CV_RETR_CCOMP - Extract all contours and organize them into a two-layer hierarchy: the top layer is the outer boundary of the connected domain, and the inner layer is the inner boundary of the hole.
    CV_RETR_TREE - Extract all contours and reconstruct the entire hierarchy of nested contours
    method  Approximation method (for all nodes, not including using internal approximation CV_RETR_RUNS).
    CV_CHAIN_CODE - Freeman chain code output contour. Other methods output polygon (vertex sequence).
    CV_CHAIN_APPROX_NONE - Translate all points from chain code form to point sequence form
    CV_CHAIN_APPROX_SIMPLE - Compress horizontal, vertical, and diagonal segments, that is, the function only retains the end pixel points;
    CV_CHAIN_APPROX_TC89_L1,
    CV_CHAIN_APPROX_TC89_KCOS - Apply the Teh-Chin chain approximation algorithm. CV_LINK_RUNS - Use a completely different contour extraction algorithm by connecting horizontal fragments of 1.
    :param binary: Input binary image
    :return: Return the largest contour
    '''
    # Find all contours
    contours = cv2.findContours(
        binary, cv2.RETR_EXTERNAL, cv2.CHAIN_APPROX_NONE)[-2]
    # Return the largest contour
    return get_max_coutour(contours, max_area)


def get_hand_number(binary_image, contours, rw, rh, rgb_image):
    '''
    :param binary_image:
    :param rgb_image:
    :return:
    '''
    # 2. Find the position of the fingertips
    # Find contours, return the largest contour
    x = 0
    y = 0
    coord_list = []
    new_hand_list = []  # Get the final fingertip coordinates
    if contours is not None:
        # Perimeter  0.035 Modify according to recognition situation, the better the recognition, the smaller
        epsilon = 0.020 * cv2.arcLength(contours, True)
        # Contour similarity
        approx = cv2.approxPolyDP(contours, epsilon, True)  # cv2.approxPolyDP()'s parameter 2 (epsilon) is a distance value, indicating how close the polygon's contour is to the actual contour, the smaller the value, the more accurate; parameter 3 indicates whether it is a closed curve
        # cv2.polylines(rgb_image, [approx], True, (0, 255, 0), 1)  # Draw polygon
        if approx.shape[0] >= 3:  # More than three points, the minimum polygon is a triangle, a triangle needs three points
            approx_list = []
            for j in range(approx.shape[0]):  # Store all points of the polygon in a list
                # cv2.circle(rgb_image, (approx[j][0][0], approx[j][0][1]), 5, [255, 0, 0], -1)
                approx_list.append(approx[j][0])
            approx_list.append(approx[0][0])  # Append the first point at the end
            approx_list.append(approx[1][0])  # Append the second point at the end
            for i in range(1, len(approx_list) - 1):
                p1 = Point(approx_list[i - 1][0], approx_list[i - 1][1])  # Declare a point
                p2 = Point(approx_list[i][0], approx_list[i][1])
                p3 = Point(approx_list[i + 1][0], approx_list[i + 1][1])
                line1 = Line(p1, p2)  # Declare a line
                line2 = Line(p2, p3)
                angle = GetCrossAngle(line1, line2)  # Get the angle between two lines
                angle = 180 - angle
                if angle < 42:  # Calculate the angle at which the two lines intersect, and less than 37 degrees
                    # cv2.circle(rgb_image, tuple(approx_list[i]), 5, [255, 0, 0], -1)
                    coord_list.append(tuple(approx_list[i]))
        ##############################################################################
        # Remove points between fingers
        # 1. Get the farthest point in the convex hull
        # cv2.drawContours(rgb_image, contours, -1, (255, 0, 0), 1)
        try:
            hull = cv2.convexHull(contours, returnPoints=False)
            # Find convex hull defect points. The returned data is 【start point, end point, farthest point, approximate distance to the farthest point】
            defects = cv2.convexityDefects(contours, hull)
            # Return the coordinates between fingers
            hand_coord = get_defects_far(defects, contours, rgb_image)
        except:
            return rgb_image, 0

        # 2. Remove the farthest points from coord_list
        alike_flag = False
        if len(coord_list) > 0:
            for l in range(len(coord_list)):
                for k in range(len(hand_coord)):
                    if (-10 <= coord_list[l][0] - hand_coord[k][0] <= 10 and
                            -10 <= coord_list[l][1] - hand_coord[k][1] <= 10):  # Compare X, Y axis, remove those that are close
                        alike_flag = True
                        break
                if alike_flag is False:
                    new_hand_list.append(coord_list[l])
                alike_flag = False
            # Get the fingertip coordinates and display
            for i in new_hand_list:
                j = list(tuple(i))
                j[0] = int(Misc.map(j[0], 0, rw, 0, 640))
                j[1] = int(Misc.map(j[1], 0, rh, 0, 480))
                cv2.circle(rgb_image, (j[0], j[1]), 20, [0, 255, 255], -1)
    fingers = len(new_hand_list)
    return rgb_image, fingers


def run(img, debug=False):
    global __act_map, __get_finger
    global __step, __count, __finger
    binary = image_process(img, 320, 240)
    contours = find_contours(binary, 3000)
    img, finger = get_hand_number(binary, contours, 320, 240, img)
    if not __get_finger:
        if finger == __finger:
            __count += 1
        else:
            __count = 0
        __finger = finger
        cv2.putText(img, "Finger(s):%d" % __finger, (50, 480 - 30),
                    cv2.FONT_HERSHEY_SIMPLEX, 1.2, (0, 255, 255), 2)  # Write the number of detected fingers on the image
        return img

if __name__ == '__main__':
    init()
    cap = cv2.VideoCapture(-1)  # Read camera
    while True:
        ret, img = cap.read()
        if ret:
            frame = img.copy()
            Frame = run(frame)
            frame_resize = cv2.resize(Frame, (320, 240))
            cv2.imshow('frame', frame_resize)
            key = cv2.waitKey(1)
            if key == 27:
                break
        else:
            time.sleep(0.01)
    cv2.destroyAllWindows()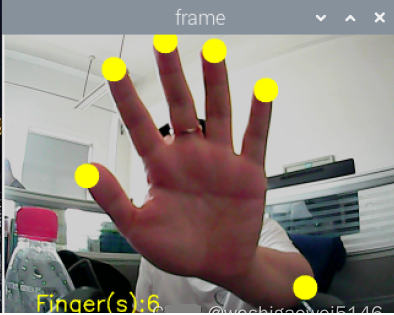
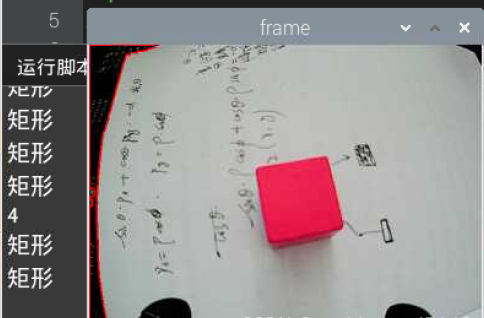
Shape Recognition
import sys
import cv2
import math
import time
import threading
import numpy as np
import HiwonderSDK.tm1640 as tm
import RPi.GPIO as GPIO

GPIO.setwarnings(False)
GPIO.setmode(GPIO.BCM)

color_range = {'red': [(0, 101, 177), (255, 255, 255)], 'green': [(47, 0, 135), (255, 119, 255)], 'blue': [(0, 0, 0), (255, 255, 115)], 'black': [(0, 0, 0), (41, 255, 136)], 'white': [(193, 0, 0), (255, 250, 255)], }

if sys.version_info.major == 2:
    print('Please run this program with python3!')
    sys.exit(0)

range_rgb = {
    'red': (0, 0, 255),
    'blue': (255, 0, 0),
    'green': (0, 255, 0),
    'black': (0, 0, 0),
    'white': (255, 255, 255),
}

# Find the largest contour based on area
# Parameters are the list of contours to compare

def getAreaMaxContour(contours):
    contour_area_temp = 0
    contour_area_max = 0
    area_max_contour = None
    for c in contours:  # Iterate through all contours
        contour_area_temp = math.fabs(cv2.contourArea(c))  # Calculate contour area
        if contour_area_temp > contour_area_max:
            contour_area_max = contour_area_temp
            if contour_area_temp > 50:  # Only valid if area is greater than 50, to filter interference
                area_max_contour = c
    return area_max_contour, contour_area_max  # Return the largest contour

shape_length = 0

def move():
    global shape_length
    while True:
        if shape_length == 3:
            print('Triangle')
            ## Display 'Triangle'
            tm.display_buf = (0x80, 0xc0, 0xa0, 0x90, 0x88, 0x84, 0x82, 0x81,
                              0x81, 0x82, 0x84, 0x88, 0x90, 0xa0, 0xc0, 0x80)
            tm.update_display()
        elif shape_length == 4:
            print('Rectangle')
            ## Display 'Rectangle'
            tm.display_buf = (0x00, 0x00, 0x00, 0x00, 0xff, 0x81, 0x81, 0x81,
                              0x81, 0x81, 0x81, 0xff, 0x00, 0x00, 0x00, 0x00)
            tm.update_display()
        elif shape_length >= 6:
            print('Circle')
            ## Display 'Circle'
            tm.display_buf = (0x00, 0x00, 0x00, 0x00, 0x1c, 0x22, 0x41, 0x41,
                              0x41, 0x22, 0x1c, 0x00, 0x00, 0x00, 0x00, 0x00)
            tm.update_display()
        time.sleep(0.01)

# Run a sub-thread
th = threading.Thread(target=move)
th.setDaemon(True)
th.start()

shape_list = []
action_finish = True

if __name__ == '__main__':
    cap = cv2.VideoCapture(-1)
    while True:
        ret, img = cap.read()
        if ret:
            img_copy = img.copy()
            img_h, img_w = img.shape[:2]
            frame_gb = cv2.GaussianBlur(img_copy, (3, 3), 3)
            frame_lab = cv2.cvtColor(frame_gb, cv2.COLOR_BGR2LAB)  # Convert image to LAB space
            max_area = 0
            color_area_max = None
            areaMaxContour_max = 0

            if action_finish:
                for i in color_range:
                    if i != 'white':
                        frame_mask = cv2.inRange(frame_lab, color_range[i][0], color_range[i][1])  # Perform bitwise operation on original image and mask
                        opened = cv2.morphologyEx(frame_mask, cv2.MORPH_OPEN, np.ones((6, 6), np.uint8))  # Opening operation
                        closed = cv2.morphologyEx(opened, cv2.MORPH_CLOSE, np.ones((6, 6), np.uint8))  # Closing operation
                        contours = cv2.findContours(closed, cv2.RETR_EXTERNAL, cv2.CHAIN_APPROX_NONE)[-2]  # Find contours
                        areaMaxContour, area_max = getAreaMaxContour(contours)  # Find maximum contour
                        if areaMaxContour is not None:
                            if area_max > max_area:  # Find maximum area
                                max_area = area_max
                                color_area_max = i
                                areaMaxContour_max = areaMaxContour
            if max_area > 200:
                cv2.drawContours(img, areaMaxContour_max, -1, (0, 0, 255), 2)

            # Recognize shape
            # Perimeter  0.035 Modify according to recognition situation, the better the recognition, the smaller
            epsilon = 0.035 * cv2.arcLength(areaMaxContour_max, True)
            # Contour similarity
            approx = cv2.approxPolyDP(areaMaxContour_max, epsilon, True)
            shape_list.append(len(approx))
            if len(shape_list) == 30:
                shape_length = int(round(np.mean(shape_list)))
                shape_list = []
                print(shape_length)

            frame_resize = cv2.resize(img, (320, 240))
            cv2.imshow('frame', frame_resize)
            key = cv2.waitKey(1)
            if key == 27:
                break
        else:
            time.sleep(0.01)
    my_camera.camera_close()
    cv2.destroyAllWindows()
The approxPolyDP() function is used to approximate a continuous smooth curve to a polygon.
For example, in the code “approx = cv2.approxPolyDP(areaMaxContour_max, epsilon, True)”, the parameters in parentheses are as follows:
The first parameter “areaMaxContour_max” is the input shape contour;
The second parameter “epsilon” is the distance value, indicating how close the polygon’s contour is to the actual contour; the smaller the value, the more accurate;
The third parameter “True” indicates that the contour is a closed curve.
The output of the cv2.approxPolyDP() function is the vertex coordinates of the approximate polygon, which can be used to determine the shape based on the number of vertices.
Barcode Recognition
First, install pyzbar, pip3 install pyzbar
import cv2
import sys
from pyzbar import pyzbar

if sys.version_info.major == 2:
    print('Please run this program with python3!')
    sys.exit(0)


def run(image):
    # Find barcodes in the image and decode each barcode
    barcodes = pyzbar.decode(image)
    # Loop through detected barcodes
    for barcode in barcodes:
        # Extract the bounding box position of the barcode
        (x, y, w, h) = barcode.rect
        # Draw a rectangle around the barcode in the image
        cv2.rectangle(image, (x, y), (x + w, y + h), (0, 0, 255), 2)

        barcodeData = barcode.data.decode("utf-8")
        barcodeType = barcode.type
        # Draw barcode data and type on the image
        text = "{} ({})".format(barcodeData, barcodeType)
        cv2.putText(image, text, (x, y - 10), cv2.FONT_HERSHEY_SIMPLEX, 0.5, (0, 0, 255), 2)
    return image

if __name__ == '__main__':
    cap = cv2.VideoCapture(-1)  # Read camera
    while True:
        ret, img = cap.read()
        if ret:
            frame = img.copy()
            Frame = run(frame)
            cv2.imshow('Frame', Frame)
            key = cv2.waitKey(1)
            if key == 27:
                break
        else:
            time.sleep(0.01)
    cv2.destroyAllWindows()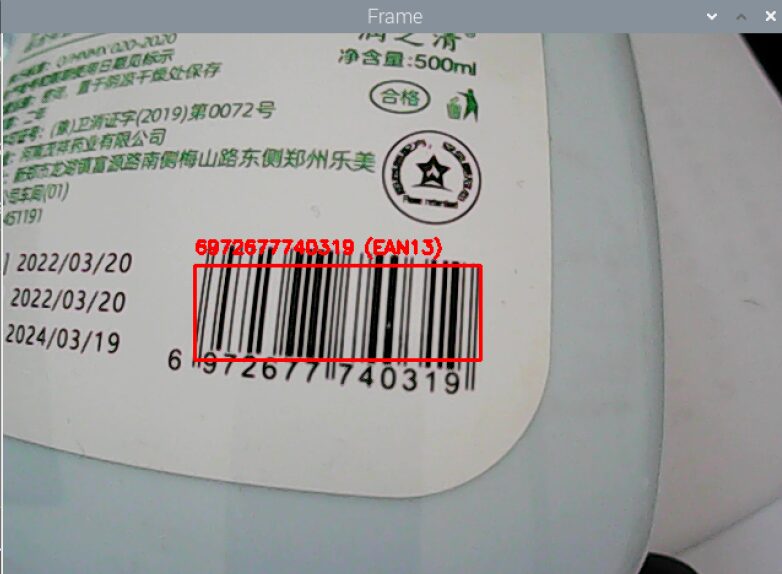
QR Code Recognition
Install apriltag, but the installation failed. Still, the old method is to download locally and then install.
At https://www.piwheels.org/simple/apriltag/, I downloaded apriltag-0.0.16-cp37-cp37m-linux_armv7l.whl.
Use FileZilla to transfer to the Raspberry Pi, open the directory where the whl file is located on the Raspberry Pi, and install the whl file, which shows successful installation.
cd /home/pi/Downloads
sudo pip3 install apriltag-0.0.16-cp37-cp37m-linux_armv7l.whl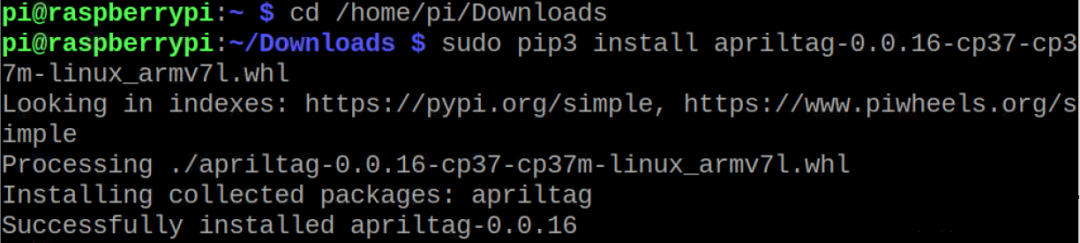
import sys
import cv2
import math
import time
import threading
import numpy as np
import apriltag

# apriltag detection
if sys.version_info.major == 2:
    print('Please run this program with python3!')
    sys.exit(0)

object_center_x = 0.0
object_center_y = 0.0

# Detect apriltag
detector = apriltag.Detector(searchpath=apriltag._get_demo_searchpath())
def apriltagDetect(img):
    global object_center_x, object_center_y
    gray = cv2.cvtColor(img, cv2.COLOR_BGR2GRAY)
    detections = detector.detect(gray, return_image=False)
    if len(detections) != 0:
        for detection in detections:
            corners = np.rint(detection.corners)  # Get four corner points
            cv2.drawContours(img, [np.array(corners, np.int)], -1, (0, 255, 255), 2)
            tag_family = str(detection.tag_family, encoding='utf-8')  # Get tag_family
            tag_id = int(detection.tag_id)  # Get tag_id
            object_center_x, object_center_y = int(detection.center[0]), int(detection.center[1])  # Center point
            object_angle = int(math.degrees(math.atan2(corners[0][1] - corners[1][1], corners[0][0] - corners[1][0])))  # Calculate rotation angle
            return tag_family, tag_id
    return None, None

def run(img):
    global state
    global tag_id
    global action_finish
    global object_center_x, object_center_y
    img_h, img_w = img.shape[:2]
    tag_family, tag_id = apriltagDetect(img)  # apriltag detection
    if tag_id is not None:
        print('X:', object_center_x, 'Y:', object_center_y)
        cv2.putText(img, "tag_id: " + str(tag_id), (10, img.shape[0] - 30), cv2.FONT_HERSHEY_SIMPLEX, 0.65, [0, 255, 255], 2)
        cv2.putText(img, "tag_family: " + tag_family, (10, img.shape[0] - 10), cv2.FONT_HERSHEY_SIMPLEX, 0.65, [0, 255, 255], 2)
    else:
        cv2.putText(img, "tag_id: None", (10, img.shape[0] - 30), cv2.FONT_HERSHEY_SIMPLEX, 0.65, [0, 255, 255], 2)
        cv2.putText(img, "tag_family: None", (10, img.shape[0] - 10), cv2.FONT_HERSHEY_SIMPLEX, 0.65, [0, 255, 255], 2)
    return img

if __name__ == '__main__':
    cap = cv2.VideoCapture(-1)  # Read camera
    while True:
        ret, img = cap.read()
        if ret:
            frame = img.copy()
            Frame = run(frame)
            cv2.imshow('Frame', Frame)
            key = cv2.waitKey(1)
            if key == 27:
                break
        else:
            time.sleep(0.01)
    cv2.destroyAllWindows()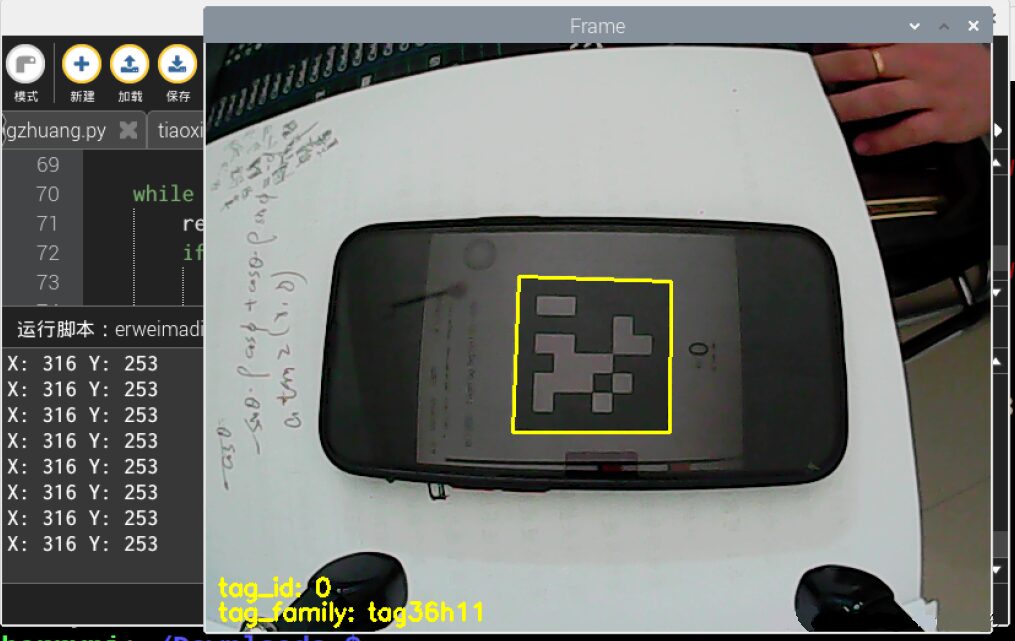
Troubleshooting
module ‘cv2’ has no attribute ‘dnn’
Trying the following commands all had issues, either reporting errors or showing that python-opencv could not be recognized; changing mirrors did not help:
sudo apt install python-opencv
or sudo apt install python3-opencv
sudo apt-get install opencv-python
sudo apt-get install opencv-contrib-python
pip install opencv-contrib-python
pip install opencv-python
Finally, successfully installed by downloading the local file. First, update the Raspberry Pi system and files.
sudo apt-get update
sudo apt-get upgrade
If the download speed is too slow, consider changing the source.
1) Use "sudo nano /etc/apt/sources.list" to edit the sources.list file, comment out all content in the original file, and append the following content:
deb http://mirrors.aliyun.com/raspbian/raspbian/ buster main contrib non-free rpi
deb-src http://mirrors.aliyun.com/raspbian/raspbian/ buster main contrib non-free rpi

Use Ctrl+O to save the file, Ctrl+X to exit.
2) Use "sudo nano /etc/apt/sources.list.d/raspi.list" to edit the raspi.list file, comment out all content in the original file, and append the following content:
deb http://mirrors.tuna.tsinghua.edu.cn/raspbian/raspbian/ buster main
deb-src http://mirrors.tuna.tsinghua.edu.cn/raspbian/raspbian/ buster main

Use Ctrl+O to save the file, Ctrl+X to exit.
3) Execute "sudo apt-get update" command.
4) To speed up Python pip installation, change the Python software source, operation method: open the Raspberry Pi command line, input the command below:
pip config set global.index-url https://pypi.tuna.tsinghua.edu.cn/simple
pip install pip -U
5) Finally, input the command "sudo reboot" to restart the Raspberry Pi.
Download whl files and transfer them to the Raspberry Pi, open https://www.piwheels.org/simple/opencv-python/ on your computer.
Download the whl file corresponding to your python version. I downloaded opencv_python-3.4.10.37-cp37-cp37m-linux_armv7l.whl.
cp37 indicates the python version, armv7 indicates the processor architecture, and Raspberry Pi 4B chooses armv7.
Transfer it using FileZilla to the Raspberry Pi, open the directory where the whl file is located on the Raspberry Pi, and install the whl file, which shows successful installation of opencv-python.
cd /home/pi/Downloads
sudo pip3 install opencv_python-3.4.10.37-cp37-cp37m-linux_armv7l.whl
Reference: https://blog.csdn.net/weixin_57605235/article/details/121512923
ImportError:numpy.core.multiarray failed to import
First uninstall the low version of numpy, then install the new version of numpy, that is:
1.  pip uninstall numpy
2.  pip install -U numpy
From https://blog.csdn.net/qq_25603827/article/details/107824977
Invalid.
pip install numpy --upgrade --forceFrom http://www.manongjc.com/article/38668.html
Invalid.
Check the local numpy version:
pip show numpyWhen we installed opencv-python, the corresponding numpy version is:
So we can downgrade numpy version:
pip install -U numpy==1.14.5 -i https://pypi.mirrors.ustc.edu.cn/simple/From https://zhuanlan.zhihu.com/p/280702247
Invalid.
Finally, successfully used pip3 install -U numpy. So it’s best to use pip3 for python3. There are many attempted methods online, some for upgrading versions, some for downgrading versions, various strange phenomena emerge, and the statements vary, reference:
https://blog.csdn.net/Robin_Pi/article/details/120544691
https://zhuanlan.zhihu.com/p/29026597
1121:error:(-2:Unspecified error) FAILED: fs.is_open(). Can’t open
After searching for a while, I found that there was an extra dot at the beginning.
If you find this useful, please like, bookmark, and share it with friends
Related exciting articlesLinks:
[Previous] Using OpenCV to Explore Face Recognition – Reading Images, Grayscale Conversion, Size Modification, Drawing Rectangles Quick Start
Face Mask Detection (Including Running Code + Dataset) Pytorch + TensorRT + Xavier NX
Image Processing: Using Numpy and OpenCV to Implement Fourier and Inverse Fourier Transform
“A community focused on sharing knowledge about 3D vision”
3D Vision AI Open Platform
The 3D Vision Developer Community has launched a brand new section – 3D Vision AI Open Platform is officially online!
The AI open platform has five major functional sections: 3D face reconstruction, face detection, face comparison, face search, and liveness detection and various tool applications, providing powerful AI data intelligence analysis and scene application experience, building cloud + end integrated services!
Welcome all developers to enter the 3D Vision Developer Community [Open Platform] to experience all functions for free!