Beginners who have just started learning Mitsubishi PLC often encounter scenarios like this during programming:
“Trigger an alarm when the temperature exceeds 50℃”, “Stop the machine when the product count reaches 100”, “Start the motor when the values of two sensors are equal”…
These logical conditions that require “action only when a certain condition is met” cannot be handled by ordinary series or parallel contacts, so we need to call upon the “comparison instructions“.
Today, we will thoroughly explain the comparison instructions in Mitsubishi PLC, teaching beginners everything from “what comparisons are” to “how to program them” in one go!
First, let’s understand: what are comparison instructions for?
In simple terms, comparison instructions act as the “referee” in the PLC—they can automatically determine the relationship between two numbers (greater than, less than, equal to) and then decide whether to turn the circuit on or off based on the result.
For example:If the temperature sensor measures the current temperature as 55℃ (stored in register D10), and we want to trigger an alarm when the temperature > 50℃ (Y0 on), we can use the comparison instruction “D10 > 50”; if the condition is met, Y0 will be activated.
If the value in counter C0 is 100, and we want to stop the machine when C0 = 100 (Y1 off), we can use the comparison instruction “C0 = 100”; if the condition is met, Y1 will be turned off.
Five Common Comparison Instructions in Mitsubishi PLC
In the Mitsubishi FX series, the format of comparison instructions is generally “[Instruction Mnemonic] [Source1] [Source2] [Target]”, and we will focus on the five most commonly used:
|
Instruction Mnemonic |
Function |
Example (When…) |
|
CMP |
Compare two numbers |
CMP D10 K50 M0 → Compare D10 and 50, result indicated by M0~M2 |
|
ZCP |
Check if a number is within a certain range |
ZCP K10 K30 D20 M10 → Check if D20 is between 10 and 30 |
|
> |
The number on the left is greater than the number on the right |
D30 > K200 M20 → When D30 > 200, M20 is activated |
|
< |
The number on the left is less than the number on the right |
C0 < K50 M30 → When C0 < 50, M30 is activated |
|
= |
The number on the left is equal to the number on the right |
D40 = K100 M40 → When D40 = 100, M40 is activated |
Remember: After executing these instructions, the specified “auxiliary relays (M)” will be activated or deactivated, and we can directly use these M contacts to control the output. The symbols > < = can also be prefixed with basic instructions like LD, AND, OR, such as LD = D0 K1, LD <= D1 K3, AND < D3 K5… If the conditions are met, the output will be ON.
Practical Example 1: Using CMP Instruction for Temperature Alarm (Handling Greater Than/Equal To/Less Than)
Scenario: Using a temperature sensor to measure water temperature, with the value stored in D10. Requirements:
– When water temperature < 30℃, green light (Y000) is on;
– When water temperature = 30℃, yellow light (Y001) is on;
– When water temperature > 30℃, red light (Y002) is on.
Programming Steps:
1. Use the CMP instruction to compare D10 and 30: “CMP D10 K30 M0” (M0, M1, M2 will automatically reflect the results);
– Result: When D10 < 30, M0 is activated; when D10 = 30, M1 is activated; when D10 > 30, M2 is activated.
2. Use M0 to control Y000 (green light), M1 to control Y001 (yellow light), and M2 to control Y002 (red light).
LD M8000 // Normally open contact to keep the program running
CMP D10 K30 // Compare D10 (water temperature value) with 30℃
OUT M0 // When D10 > 30, M0 = ON
OUT M1 // When D10 = 30, M1 = ON
OUT M2 // When D10 < 30, M2 = ON
LD M0 // Control for green light
OUT Y000
LD M1 // Control for yellow light
OUT Y001
LD M2 // Control for red light
OUT Y002
Effect:
Water temperature below 30℃ → M0 on → Y000 lights up;
Water temperature at 30℃ → M1 on → Y001 lights up;
Water temperature above 30℃ → M2 on → Y002 lights up.
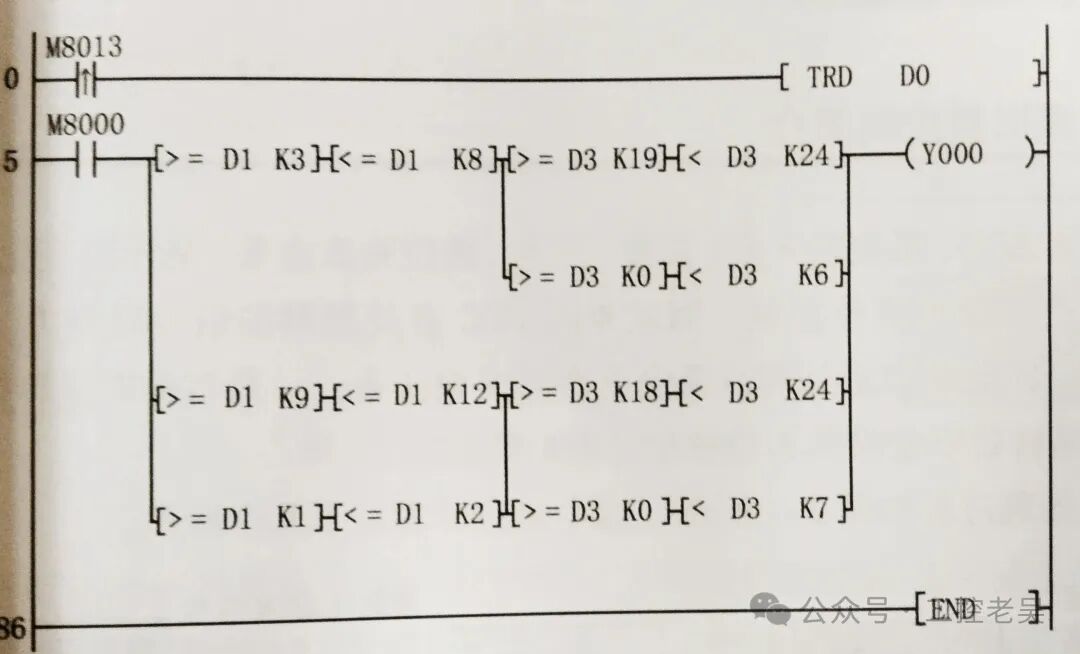
Practical Example 2: Using Comparison Instructions to Program Ladder Diagram for Campus Streetlight Control

Scenario: March, April, and May are spring; June, July, and August are summer; September, October, and November are autumn; December, January, and February are winter. In spring and summer, lights turn on from 19:00 to 6:00; in autumn and winter, lights turn on from 18:00 to 7:00.
Programming Steps:
1. M8013 activates every second, using the TRD instruction to read the clock, storing the retrieved information (year, month, day, hour, minute, second, week) in a continuous series of 7 words starting from D0;
2. Store the required month in D1 and the hour in D3;
3. In spring and summer (March to August), lights are on from 19:00 to 6:00; in autumn and winter (September to December, January to February), lights are on from 18:00 to 7:00.
Two Common Pitfalls for Beginners
1. What can the “source” in comparison instructions be?
It can be a constant (starting with K, e.g., K50), a register (starting with D, storing values), or a counter (starting with C, storing counts), but both sides must be numbers (you cannot compare D with X/Y because X/Y are binary signals).
2. Can the M relay used for comparison results be changed?
Yes! For example, “CMP D10 K50 M100” will use M100 (equal), M101 (greater than), M102 (less than); just choose an unused M (do not repeat with other Ms in the program).
Summary: Usage of Comparison Instructions
If you want to check “greater than, less than, equal to” simultaneously → use CMP;
If you want to check if within a certain range → use ZCP, or combine > and <;
Use M relay contacts for results to directly control outputs or other logic.
Next time you encounter a scenario where “action is only taken when a certain numerical condition is met”, don’t force it with a bunch of contacts; just use comparison instructions for a simple and efficient solution!
Have you used comparison instructions in your programming? Have you encountered any inaccuracies in judgment? Share your experiences in the comments! Like and follow for the next topic on “How to Store Data in PLC Registers D”! 😉