This section discusses practical application configurations, which are not the configurations mentioned earlier in the config.txt for the /boot partition, such as display and GPU settings. Since this is called getting started, the focus is mainly on practical configurations. 1. Serial Debugging Connection to Raspberry Pi
The wire used is a USB to TTL cable 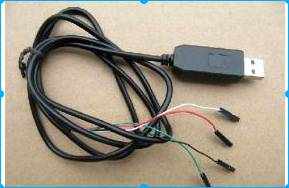 generally has red, black, white, and green wires. The red power wire is not needed. Only the other three wires are required.
The white wire is TX, indicating the transmission line.
The green wire is RX, indicating the receiving line.
The black wire is GND, the ground wire.
The corresponding Raspberry Pi default mode for P1 is:
Black GND = pin 6
White TX = pin 8
Green RX = pin 10. After connecting, it appears as 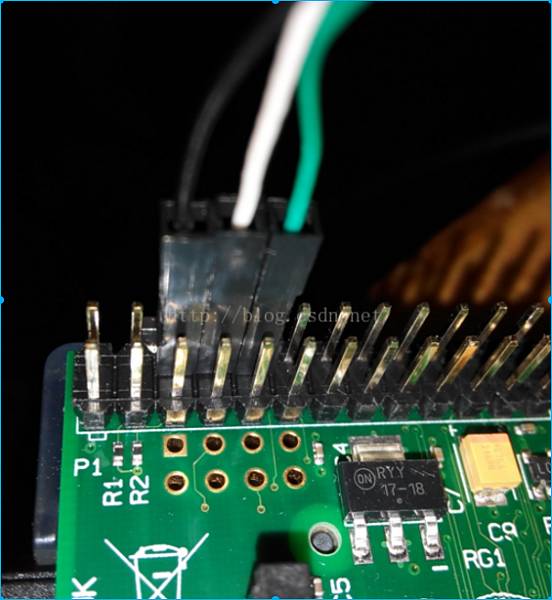
 P1 pin arrangement can also be seen on the board. That is the starting point for pin 1, and the other end connects to the Ubuntu PC, generally represented in the PC devices as /dev/ttyUSB0. Use #ls /dev/ttyUSB* to check for this device. We use putty to connect to the device #sudo putty
 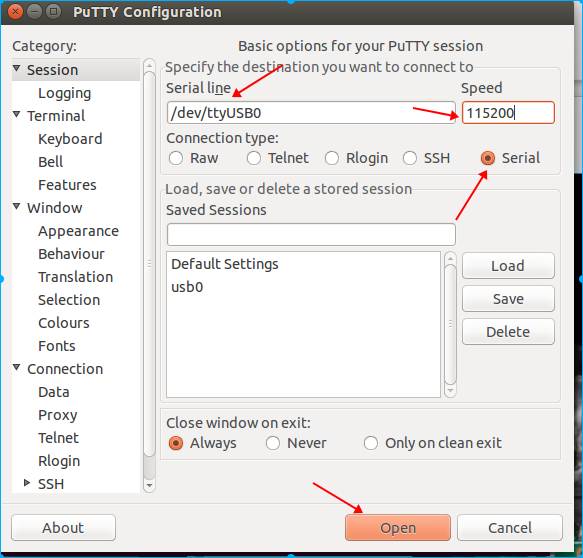 Select serial and then fill in the serial line /dev/ttyUSB0. Set the speed to 115200 and open it to pop up a black box waiting for data. At this time, we will reconnect the power to the Raspberry Pi and restart it. You can see a lot of information printed from the serial interface, which is abundant
 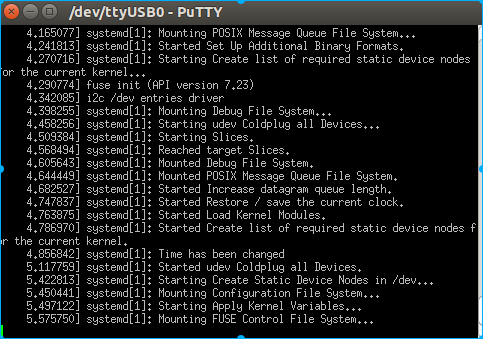 because the Raspberry Pi has also enabled serial login. So the final state of the serial port is waiting for login
 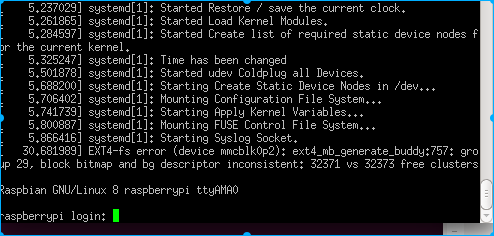 . Enter ‘pi’ and the password ‘raspberry’ to log in, and you can control ‘pi’
 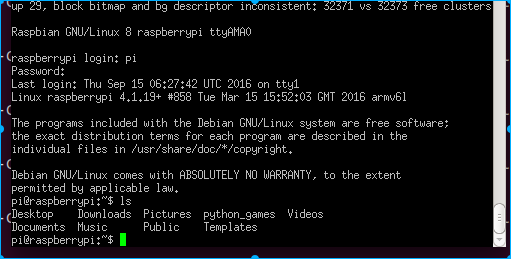 . Subsequent operations should be done through the serial port as much as possible because using SSH to log in for some installation operations will bring the PC’s environment, such as language configurations, into the Raspberry Pi, causing various issues. Therefore, we will carry out subsequent operations through the serial port. Some images are previously saved and not directly operated through the serial port, so they may look slightly different. 1. Configuring a Static IP for Raspberry Pi
In the previous section, we found the login IP of the Raspberry Pi using nmap or the router. However, the IP is DHCP, so it is not fixed every time it starts. Therefore, we need to configure a static IP. Previously, we connected to the Raspberry Pi via the default SSH. Thus, we can modify /etc/network/interfaces to change it. #cd /etc/network delete #sudo rm interfaces, create a new one #sudo nano interfaces. Directly input the content (eth after is zero, not ‘O’) auto eth0 iface eth0 inet static address 192.168.1.9 netmask 255.255.255.0 gateway 192.168.1.1. The specific IP should be filled in according to your local area network 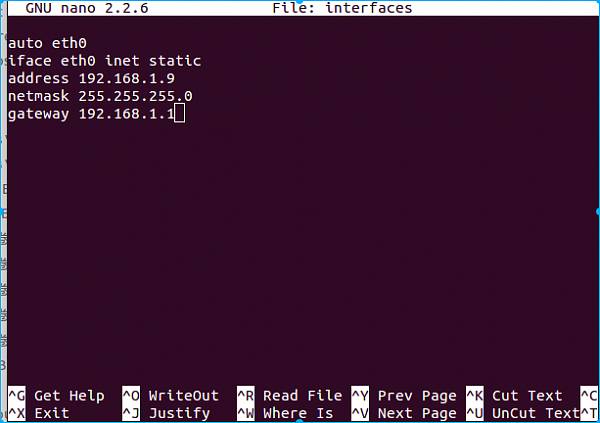 . Press ctrl+o
  then press enter to save and ctrl+x to exit. The basic nano operations are like this. The vi editor is relatively difficult for beginners. RPI provides nano to simplify things. To prove that we wrote it successfully, we can check it using #cat interfaces. Restart to see if the configuration is successful #sudo reboot. After rebooting, try pinging the IP after a minute. It has been confirmed to be OK
 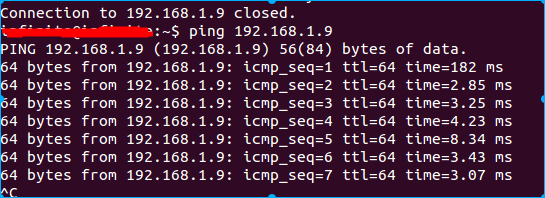 indicating that the configuration has been successful. Wireless configuration
This is the wired configuration. It is inconvenient to always connect via wire to use the Raspberry Pi. Therefore, it is better to use wireless. First, confirm that the Raspberry Pi recognizes the USB wireless network card you inserted. A model that does not require drivers has been provided earlier; let’s check if it has been recognized #lsusb Bus 001 Device 004: ID 0bda:8176 Realtek Semiconductor Corp. RTL8188CUS 802.11n WLAN Adapter Bus 001 Device 003: ID 0424:ec00 Standard Microsystems Corp. SMSC9512/9514 Fast Ethernet Adapter Bus 001 Device 002: ID 0424:9514 Standard Microsystems Corp. Bus 001 Device 001: ID 1d6b:0002 Linux Foundation 2.0 root hub. The first Realtek Semiconductor Corp. RTL8188CUS 802.11n WLAN Adapter has identified our wireless device. No need to compile any drivers. Similarly, modify /etc/network/interfaces. The content inside changes to auto wlan0 allow-hotplug iface wlan0 inet static wpa-ssid “wifissid” wpa-psk “password” address 192.168.1.9 netmask 255.255.255.0 gateway 192.168.1.1. My network is your SSID name. The wpa-psk contains your wireless password. Your wireless must also use PSK encryption. 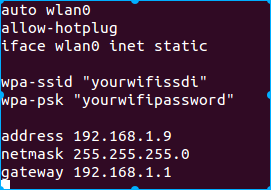 2. Expanding Raspberry Pi’s Space Use #df -h to check space and find that the / directory occupies 100% #df -h Filesystem Size Used Avail Use% Mounted on /dev/root 3.6G 3.4G 0 100% / If not expanded, there will be no other space to install software. In fact, our SD card may have 16G or 32G, so we need to use the Raspberry Pi configuration command to expand the space by entering #sudo raspi-config to pop up the configuration interface
 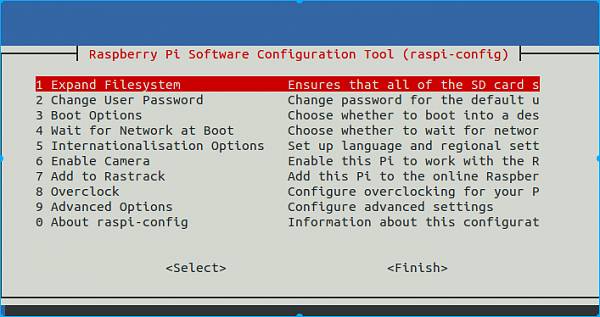 . The first item is directly pressed to enter. Start expanding and it will prompt that the expansion is complete. After the next reboot, the space will be larger
 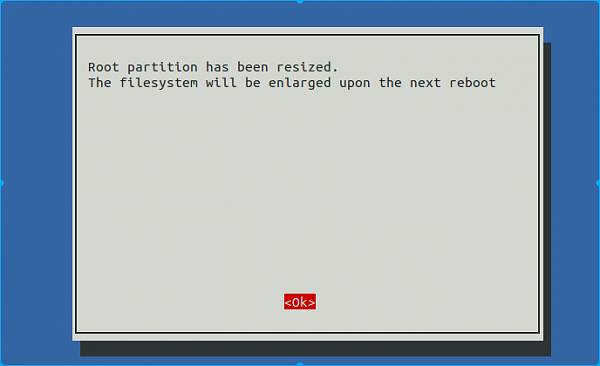 . Then select finish. It prompts you to restart. Restarting should be fine. Again, #df -h Filesystem Size Used Avail Use% Mounted on /dev/root 15G 3.4G 11G 25% / Now my / directory only uses 25%. It was originally 16 G. More software can be installed. 3. Installing VNC Visualization Interface on Raspberry Pi Up to now, we have only logged in using the command line and have never seen the Raspberry Pi’s UI interface. After logging in through the serial port, #sudo apt-get update #sudo apt-get install tightvncserver wait for tightvncserver to install. After installation, start configuring to manually start vncserver with port number 1. This port number is not the same as TCP UDP. Execute #vncserver :1
 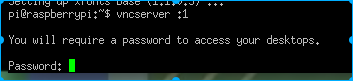 . You need to set a password for the first time. The password must be less than or equal to 8 characters and must be entered and verified multiple times.
 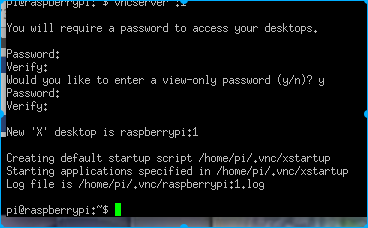 . Next, you can connect using vncview on the PC. Test using vncviewer to connect by executing vncviewer ip:1 #vncviewer 192.168.1.202:1
 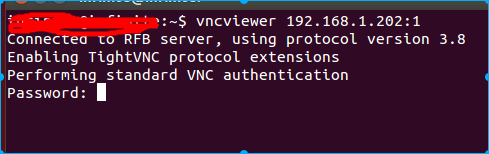 . Enter the previously set password; login successfully
 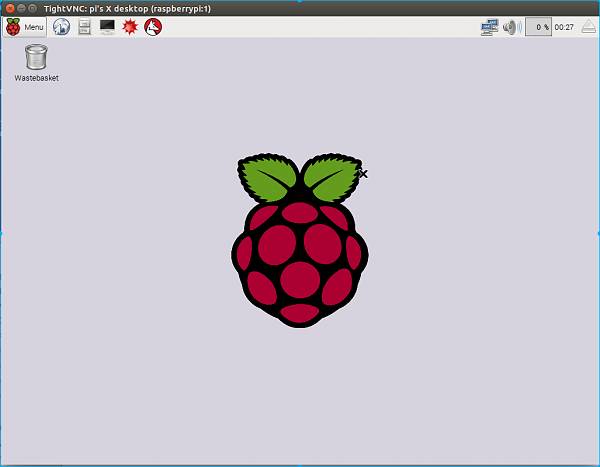 . This is the interface of the Raspberry Pi. If conditions permit, you can connect an external VGA or HDMI display. Also, note that if there are display issues, please refer to the official Raspberry Pi tutorial for the configuration of /boot/config.txt. As beginners, there is no need to buy another monitor; using the PC VNC viewer is more convenient and economical. Finally, we need to set the VNC service to start automatically. This way, every time the Raspberry Pi starts, we can log in to view it using vncviewer. #cd /etc/init.d/#sudo nano autostartvnc. Write the content inside (this is not a standard startup script; the standard one has start and stop mechanisms, etc., but we are using a practical and simple method. I won’t elaborate on startup scripts). #!/bin/sh su pi -c “/usr/bin/tightvncserver :1” Save
 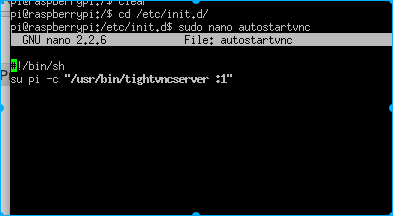 . Set the script to execute and execute the auto-start script #sudo chmod +x autostartvnc. You need to enter /etc/init.d to execute this directory #sudo update-rc.d autostartvnc defaults
  .
.
Now it can start automatically. I found an error when I rebooted. VNC did not start, but it can be started manually, which is really strange. The role of the serial port debugging is very obvious at this time. /home/pi/.vnc/raspberrypi :1.log found two errors: one is that the 75dpi font file is missing, and the other is that /home/pi/.Xresources cannot be found 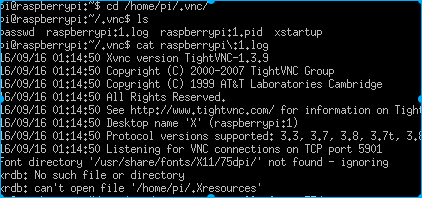 . So we solve it #sudo apt-get install xfonts-75dpi #touch /home/pi/.Xresources #cd /etc/init.d #sudo update-rc.d autostartvnc defaults. Reboot again #vncviewer ip:1. This time you can log in directly. Subsequently, you can directly operate on the host.
Finally, you can also log in and operate using your mobile phone: mainly used to check the working status. For example, if the Raspberry Pi is downloading or compiling something for a long time and the PC is off, we can occasionally check using the mobile phone. Mobile APP download: It is especially important. Do not download the domestic version of VNC. Download the vncviewer from the official website, which is also available on Google Play.
The full name is VNC Viewer. Some domestic VNC viewers impersonate this icon and claim to be enhanced versions; do not use them. This is all in English.  Create a new VNC connection by clicking the green + button and fill in the IP name. Note the colon after the IP and the number 1
  . Click connect
  . Enter the password, and you can remember the password. Click continue
  . Ignore the warning prompt and click continue
  . The lovely Raspberry Pi interface will appear
 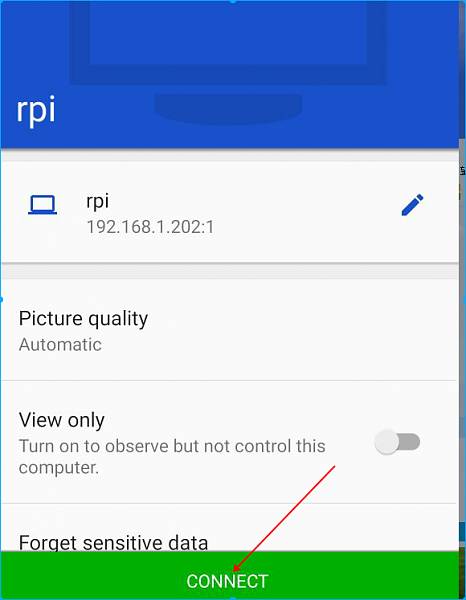 . In the future, as long as the Raspberry Pi is powered on, we can log in at any time to check the status using our mobile phone. In the future, with an external hard drive, downloading movies at 100M speed all day long. Wouldn’t you want to see how much has been downloaded? No need to open the PC to log in. Just use the phone. Finally, if needed, you can modify the software source for the Raspberry Pi. Usually, when installing software, the default is to download from the Raspberry Pi source, which is very slow. Software updates and downloads take a long time. Fortunately, Alibaba Cloud provides such domestic mirrors. In some regions, Alibaba Cloud may not work well. You can search for other sources. First, back up the original source. The source location is saved in /etc/apt/source.list. #cd /etc/apt #sudo cp sources.list sources.list.bak. Start editing #sudo nano source.list. Delete the original content inside. Fill in Alibaba Cloud’s source deb http://mirrors.aliyun.com/raspbian/raspbian wheezy main non-free contrib rpi. Start updating data #sudo apt-get update. If unable to update or fails, restore the original backup and update from the official source honestly. In the next episode, we will try to light up an LED.
Look at Xue Zhongce: http://ce.kanxue.com
Look at Xue Forum: http://bbs.pediy.com/

—– WeChat ID: ikanxue —–
Look at Xue • Security Continuously focusing on security for 16 years, professionally serving you!