1. Buy Materials:
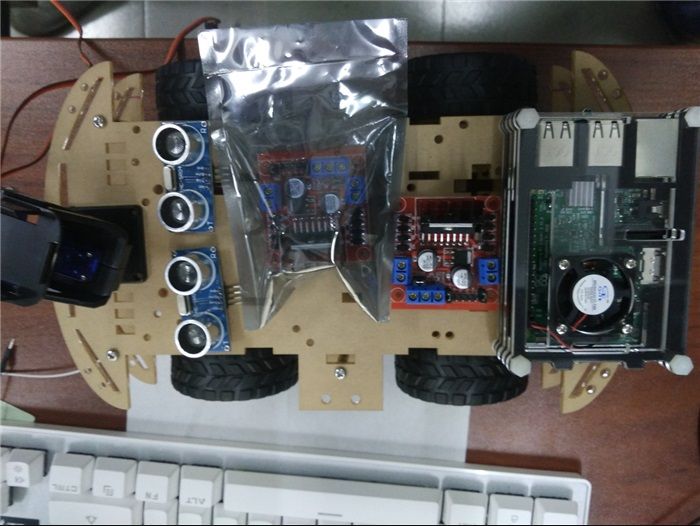
① A Raspberry Pi (I used the Model 3 B), an intelligent car chassis, two L298N motor driver boards, two ultrasonic modules HC-SR04, power supply, and several Dupont wires. (You can buy them on some online stores) See the image below:
2. After buying all the materials, let’s start debugging.
①    : First install the system, I used Ubuntu 16.04 Mate (I taught everyone how to install it in my previous tutorial, it doesn’t have to be this system), to install wiringPi, let’s start from how to install the wiringPi library.
i.    Use GIT tool.
ii.    If you haven’t installed GIT on your platform, you can enter the following command:
iii.    sudo apt-get install git-core
iv.    If an error occurs during this process, try updating the software, for example, enter the following command:
v.    sudo apt-get update
vi.    sudo apt-get upgrade
vii.    Then you can get the source code of wiringPi through GIT.
viii.    git clone git://git.drogon.net/wiringPi
ix.    Enter the wiringPi directory and install wiringPi.
x.    cd wiringPi
xi.    ./build
xii.    The build script will help you compile and install wiringPi.

After installation, enter in the terminal: gpio –v
The version number will appear.
Then enter: gpio readall
The above image is very important, the wPi may be different for different Raspberry Pi models.
② : Debugging the L298N motor driver module, I searched online for how to use it and downloaded a manual.
I defined the wPi codes as 22, 23, 24, and 25 for three GPIO ports. The code is as follows:
#include<wiringPi.h>
#include<stdio.h>
int main(){//Initialize wiringPiSetup();
pinMode(22,OUTPUT);
pinMode(23,OUTPUT);
pinMode(24,OUTPUT);
pinMode(25,OUTPUT);
int i=0;
while(true){    printf("please input number to control :\n");
    scanf("%d",&i);
    switch(i)    {            case 1:                {                        digitalWrite(22,HIGH);
                        digitalWrite(23,LOW);
                        digitalWrite(24,HIGH);
                        digitalWrite(25,LOW);
                        delay(1000);
                        break;                }                case 2:                {                        digitalWrite(22,LOW);
                        digitalWrite(23,HIGH);
                        digitalWrite(24,LOW);
                        digitalWrite(25,HIGH);
                        delay(1000);
                        break;                }                case 3:                {                        digitalWrite(22,HIGH);
                        digitalWrite(23,LOW);
                        digitalWrite(24,LOW);
                        digitalWrite(25,LOW);
                        delay(1000);
                        break;                }                case 5:                {        digitalWrite(22,LOW);
                        digitalWrite(23,LOW);
                        digitalWrite(24,LOW);
                        digitalWrite(25,HIGH);
                        delay(1000);
                        break;                }            case 0:                {                        digitalWrite(22,LOW);
                        digitalWrite(23,LOW);
                        digitalWrite(24,LOW);
                        digitalWrite(25,LOW);
                        delay(1000);
                        break;                }                    default:                    break;
      }   }}     return 0;}
When compiling, be careful to link the wiringPi library, for example: gcc –o demo demo.cpp –lwiringPi
Then run: ./demo.
For specific wheel control of the car, please refer to the L298N manual.
Then add more controls to manage how the wheels turn. By default, ENA is connected to high level, you can also use PWM to control it, of course, just go check the manual if you’re interested. At this point, the motor is driven, see, isn’t it simple?
③    : Driving the HC-SR04 ultrasonic module, first ask Baidu for the manual.
Open the manual and take a look, let’s start driving it.
One VCC, one GND, one trigger, and one receiver. The working principle of this module is that it first inputs at least 10us trigger signal to the TRIG pin, the module will emit 8 cycles of 40kHz square wave and detect echoes. Once an echo signal is detected, the ECHO outputs a high-level echo signal. The pulse width of the echo signal is proportional to the distance measured. Thus, the distance can be calculated from the time interval between sending and receiving the echo signal. Formula: Distance = High-level time * Sound speed (340M/S) / 2. Trig is the sending end, Echo is the receiving end, these two must be connected to GPIO ports, this time I connected the wPi codes as 15 and 16. The code is as follows:
#include<stdio.h>
#include<wiringPi.h>
#include<time.h>
#include<sys/time.h>
int main(){wiringPiSetup();
pinMode(15,OUTPUT);
pinMode(16,INPUT);

digitalWrite(15,HIGH);
delay(0.015);//Give it 15 microseconds of high level to start the sending end
digitalWrite(15,LOW);
struct timeval first, second;
bool b=false;
while(true){    if(1==digitalRead(16))//When GPIO port 16 is high, start timing    {            gettimeofday(&first,NULL);
        while(true)        {            if(0==digitalRead(16))//When GPIO port 16 is low, stop timing                {                    gettimeofday(&second,NULL);
                    //second=time(NULL);
                    b=true;
                    break;
                }
        }    }
    if(b==true)        break;}
double ret = (second.tv_usec - first.tv_usec)*340/2;
printf("time is %d:",(second.tv_usec - first.tv_usec));
printf("distance is %lf:",(ret/1000000));
return 0;}
④ : You see, it’s not difficult at all, unknowingly, I have completed two modules. In fact, at this point, the wall-avoidance car is already finished.
If I have time, I will definitely teach everyone step by step. Wait for me to record a video to teach everyone in the second half of the year.
Welcome to follow our WeChat official account, my knowledge is limited, if there are any mistakes in the article, please feel free to provide feedback or leave a message, thank you very much!
