1. Overview
As we all know, transferring data between two computers in an office can be very troublesome, and NAS can solve this problem very well. There are many methods to build NAS with Raspberry Pi. Previously, we have filmed tutorials using Samba and FTP to achieve NAS functionality, but these require command line configuration and are not intuitive or convenient for beginners, and the functionality of such NAS systems is not complete. Therefore, this time we will use the open-source OMV to build the NAS system!
Currently, most tutorials on building NAS with OMV available online are quite outdated, and following them may result in various issues. However, our tutorial is based on the latest official Raspberry Pi system, so you won’t encounter any problems by following along. The concise video tutorial can be found on Bilibili – Yang Kun Raspberry Pi Enthusiasts Base, and the VLOG recording the whole process is available on Bilibili – Play Pi VLOG. We welcome your support!
2. Tutorial Content
1. Install the System on Raspberry Pi
Here, we will use the latest official lightweight version of the Raspberry Pi system (the version with a desktop cannot be used!)

Remember to click on this setting, where you need to enable SSH, set the password for the pi account, and configure the WIFI username and password.


2. Set a Static IP
Open the router’s backend to view the Raspberry Pi’s IP address.

In the ssh software, enter the following command to configure the DHCP file:
sudo nano /etc/dhcpcd.confModify this position in the file according to your situation.

Then restart the Raspberry Pi.
sudo reboot3. Change the Source
sudo nano /etc/apt/sources.listComment out the original ones and copy the following into it:
deb http://mirrors.tuna.tsinghua.edu.cn/raspbian/raspbian/ bullseye main non-free contrib rpi
Continue with:
sudo nano /etc/apt/sources.list.d/raspi.listComment out the original ones and copy the following into it:
deb https://mirrors.tuna.tsinghua.edu.cn/raspberrypi/ bullseye main ui
Then remember to update:
sudo apt-get updatesudo apt-get upgrade4. Install OMV
wget https://cdn.jsdelivr.net/gh/OpenMediaVault-Plugin-Developers/installScript@master/installchmod +x installsudo ./install -n5. Configure OMV
Enter the NAS system by typing the Raspberry Pi’s IP address in the browser.
The default username is admin, and the password is openmediavaultFirst, set the logout time in System Settings – Workbench, as the previous one was too short.

Insert the hard disk into the Raspberry Pi and quickly wipe the disk.

Create a file system.

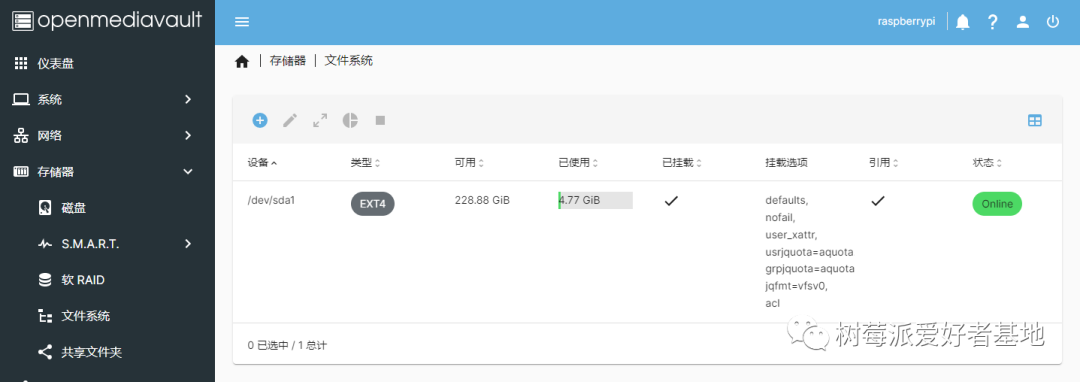
Mount it.


Create a shared folder.


Configure the SMB service.


Configure the general login user pi.


6. Start Using
Add a mapping directly on WINDOWS.

Then it can be used.

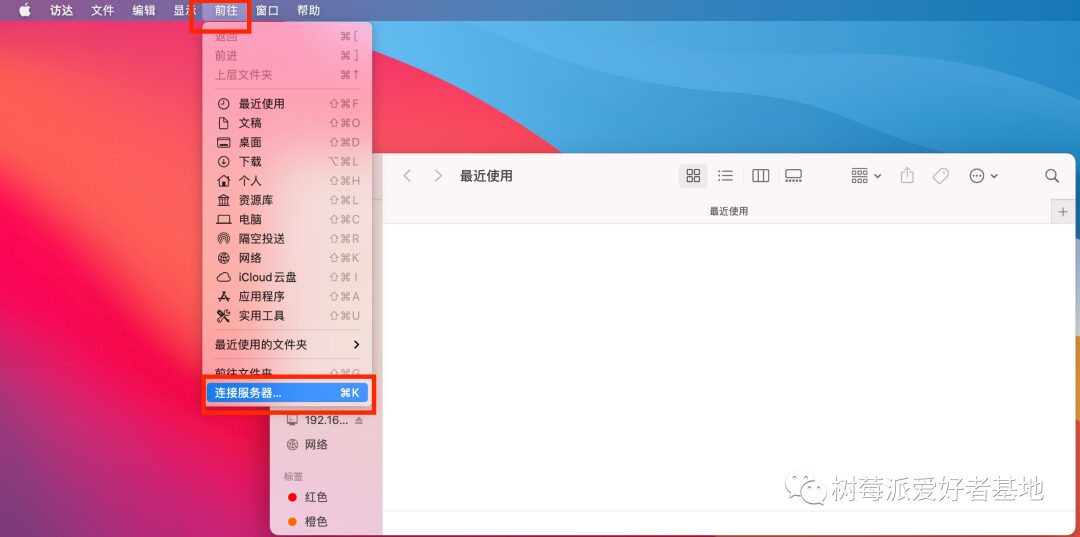
On MAC, just go to and connect to the server.


7. Install a Small Display for NAS
Start the I2C function of the Raspberry Pi.
sudo apt-get install -y python3-smbussudo apt-get install -y i2c-toolssudo raspi-configFollow the steps below to enable the i2c function.

Restart the Raspberry Pi.
sudo rebootInstall the Adafruit-SSD1306 library.
The Adafruit-SSD1306 library is a Python-based OLED library that can be used to control screens with 128*64 and 128*32 pixel SSD1306 chips.
sudo apt-get remove python3-pipsudo apt-get install python3-pipsudo python3 -m pip install --upgrade pip setuptools wheelInstall the PIL library, which some image processing programs will use.
sudo apt-get install python3-pilUse pip to install the Adafruit-SSD1306 library.
sudo pip install Adafruit-SSD1306Then download a copy of the library containing code examples for later use.
cd ~sudo apt install gitgit clone https://github.com/adafruit/Adafruit_Python_SSD1306.gitcd ~/Adafruit_Python_SSD1306/examples/For the screen wiring, make sure not to connect it incorrectly. The Raspberry Pi pin layout (all Raspberry Pi 40-pin layouts are the same, no need to change for different versions) is as shown below:

Connect the screen PCB pins to the corresponding GPIO pins on the Raspberry Pi as indicated.
Screen GND connects to Raspberry Pi GND<br/>Screen VCC connects to Raspberry Pi 3V3<br/>Screen SDA connects to Raspberry Pi SDA<br/>Screen SCL connects to Raspberry Pi SCLBe careful not to reverse VCC and GND, or the screen will burn out!!!
After connecting, use the command to check whether the i2c device is recognized.
sudo i2cdetect -y 1Modify the program.
cd ~sudo cp ~/Adafruit_Python_SSD1306/examples/stats.py ~/sudo nano stats.pyReplace all the content in the file with the following:
import timeimport Adafruit_GPIO.SPI as SPIimport Adafruit_SSD1306from PIL import Imagefrom PIL import ImageDrawfrom PIL import ImageFontimport subprocess# Raspberry Pi pin configuration:RST = None # on the PiOLED this pin isnt used# Note the following are only used with SPI:DC = 23SPI_PORT = 0SPI_DEVICE = 0# Beaglebone Black pin configuration:# RST = 'P9_12'# Note the following are only used with SPI:# DC = 'P9_15'# SPI_PORT = 1# SPI_DEVICE = 0# 128x32 display with hardware I2C:#disp = Adafruit_SSD1306.SSD1306_128_32(rst=RST)# 128x64 display with hardware I2C:disp = Adafruit_SSD1306.SSD1306_128_64(rst=RST)# Note you can change the I2C address by passing an i2c_address parameter like:disp = Adafruit_SSD1306.SSD1306_128_64(rst=RST, i2c_address=0x3C)# Alternatively you can specify an explicit I2C bus number, for example# with the 128x32 display you would use:# disp = Adafruit_SSD1306.SSD1306_128_32(rst=RST, i2c_bus=2)# 128x32 display with hardware SPI:# disp = Adafruit_SSD1306.SSD1306_128_32(rst=RST, dc=DC, spi=SPI.SpiDev(SPI_PORT, SPI_DEVICE, max_speed_hz=8000000))# 128x64 display with hardware SPI:# disp = Adafruit_SSD1306.SSD1306_128_64(rst=RST, dc=DC, spi=SPI.SpiDev(SPI_PORT, SPI_DEVICE, max_speed_hz=8000000))# Alternatively you can specify a software SPI implementation by providing# digital GPIO pin numbers for all the required display pins. For example# on a Raspberry Pi with the 128x32 display you might use:# disp = Adafruit_SSD1306.SSD1306_128_32(rst=RST, dc=DC, sclk=18, din=25, cs=22)# Initialize library.disp.begin()# Clear display.disp.clear()disp.display()# Create blank image for drawing.# Make sure to create image with mode '1' for 1-bit color.width = disp.widthheight = disp.heightimage = Image.new('1', (width, height))# Get drawing object to draw on image.draw = ImageDraw.Draw(image)# Draw a black filled box to clear the image.draw.rectangle((0,0,width,height), outline=0, fill=0)# Draw some shapes.# First define some constants to allow easy resizing of shapes.padding = -2top = paddingbottom = height-padding# Move left to right keeping track of the current x position for drawing shapes.x = 0# Load default font.font = ImageFont.load_default()# Alternatively load a TTF font. Make sure the .ttf font file is in the same directory as the python script!# Some other nice fonts to try: http://www.dafont.com/bitmap.php# font = ImageFont.truetype('Minecraftia.ttf', 8)def get_cpu_temp(): tempfile=open("/sys/class/thermal/thermal_zone0/temp") cpu_temp=tempfile.read() tempfile.close() return float(cpu_temp)/1000while True:# Draw a black filled box to clear the image. draw.rectangle((0,0,width,height), outline=0, fill=0)# Shell scripts for system monitoring from here : https://unix.stackexchange.com/questions/119126/command-to-display-memory-usage-disk-usage-and-cpu-load cmd = "hostname -I | cut -d' ' -f1" IP = subprocess.check_output(cmd, shell = True ).decode("utf-8") cmd = "top -bn1 | grep load | awk '{printf "CPU Load: %.2f", $(NF-2)}'" CPU = subprocess.check_output(cmd, shell = True ).decode("utf-8") cmd = "free -m | awk 'NR==2{printf "Mem: %s/%sMB %.2f%% ", $3,$2,$3*100/$2 }'" MemUsage = subprocess.check_output(cmd, shell = True ).decode("utf-8") cmd = "df -h | awk '$NF=="/"{printf "Disk: %d/%dGB %s", $3,$2,$5}'" Disk = subprocess.check_output(cmd, shell = True ).decode("utf-8")# Write two lines of text. draw.text((x, top), "IP: " + str(IP), font=font, fill=255) draw.text((x, top+8), str(CPU), font=font, fill=255) draw.text((x, top+16), str(MemUsage), font=font, fill=255) draw.text((x, top+25), str(Disk), font=font, fill=255) draw.text((x, top+35), "Temp: "+str(get_cpu_temp()), font=font, fill=255)# Display image. disp.image(image) disp.display() time.sleep(.1)To make stats.py run automatically on boot, we can configure it like this, so we won’t have to find the Raspberry Pi’s IP address through tools or the router!!!
Modify the /etc/rc.local file:
sudo nano /etc/rc.localAdd a line before exit 0:
sudo python /home/pi/stats.py &3. Check the Effect
sudo python stats.py

