
On the road
1. Raspberry Pi
Since this project requires the use of a camera and the ability to deploy and run models, the recommended options from the teacher’s growth camp are Raspberry Pi or a similar board. I found that I only have a Raspberry Pi (using a 3B), and I have never played with it before, so this time I will start to learn about Raspberry Pi from scratch.
🌲What is Raspberry Pi?
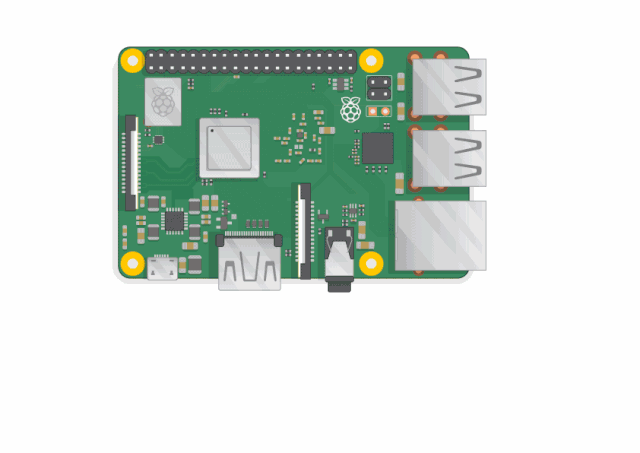
✅Can you find the items marked in the picture?

-
USB ports – These ports are used to connect a mouse and keyboard. You can also connect other components, such as USB drives. -
SD card slot – You can insert the SD card here. This is where the operating system and files are stored. -
Ethernet port – Used to connect the Raspberry Pi to the network via an Ethernet cable. The Raspberry Pi can also connect to the internet via Wi-Fi. -
Audio jack – You can connect headphones or speakers here. -
HDMI port – Used to connect a monitor (or projector) to display the Raspberry Pi desktop. If your monitor has speakers, you can also use them to play sound. -
Micro USB power interface – This is where you connect the power supply. You should always connect the power last, after connecting all other components. -
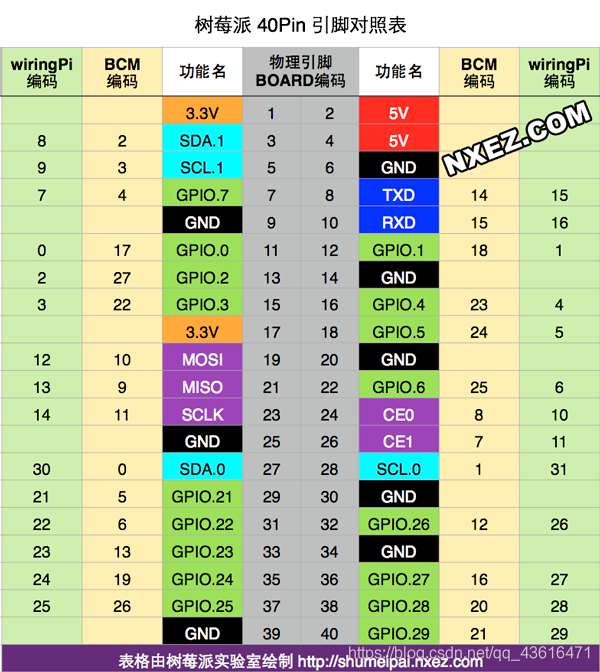
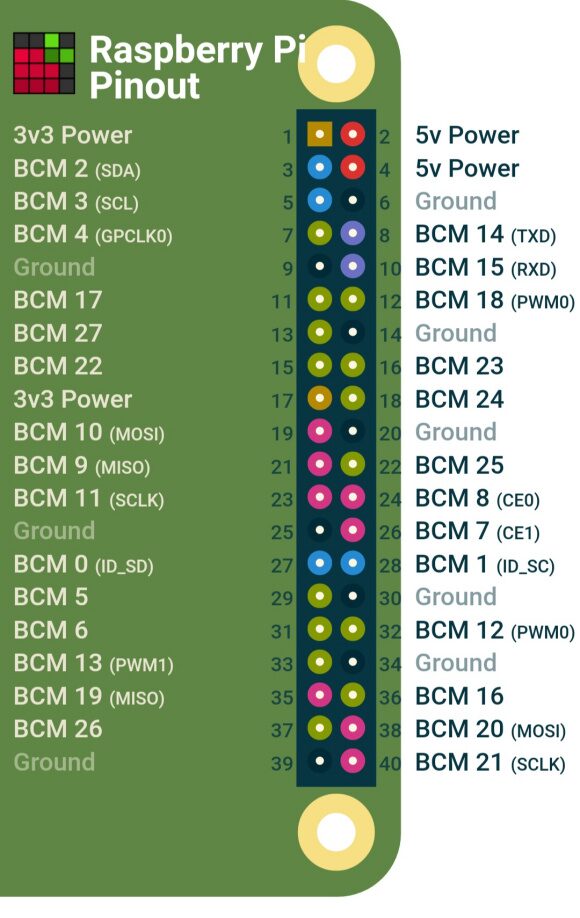
GPIO interface – These interfaces allow you to connect electronic components (such as LEDs and buttons) to the Raspberry Pi. ✅Can you find the items marked in the picture?

-
GPIO pins x 26
-
UART bus x 1
-
SPI bus x 1
-
I2C bus x 1
-
5V x 2
-
3.3V x 2
-
GND x 8
2. Software Preparation
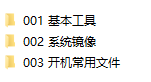
👉This time we are using the image provided by the growth camp (I will also include the image link).
If you want to download the Raspbian system image yourself, you can go to the official website (https://www.raspberrypi.org/). However, for this project, using the official or third-party Raspberry Pi system images will not connect to the OpenInnoLab platform tools.
-
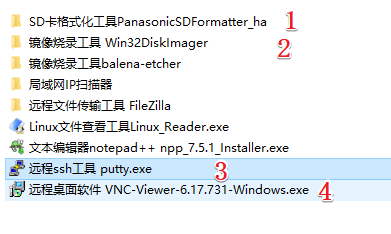
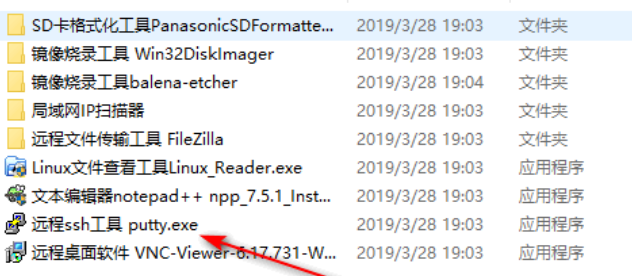
001 Basic tools: Includes image burning tools, local IP scanners, remote file transfer tools FileZilla, text editor Notepad++, remote ssh tools putty, SD card formatting tool SD Formatter
-
Install the software in the basic tools folder as needed
-
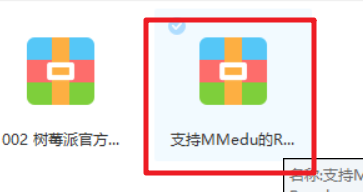
002 System images 
-
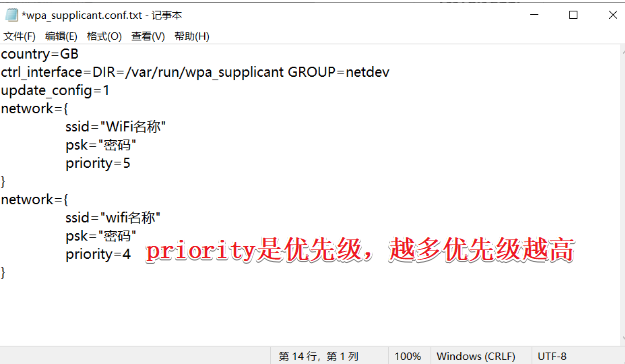
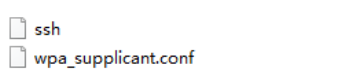
003: Common files for booting, including empty ssh files and wifi configuration files

3. Burning preparation and SSH and wifi
👉Raspberry Pi runs on a Linux system, and the system is burned onto a microSD card.
-
Start the formatting software, select the drive letter of the SD card that needs to be formatted
-
Click format and confirm
-
Click OK again
-
The first time it will fail
-
Repeat the above steps again
-
After successful formatting, the boot drive letter will appear as shown below, and you can see that the corresponding drive of the SD card has become empty.
Be careful when selecting the drive letter of the SD card; do not select another drive or hardware, otherwise the image may overwrite other drives.

4 Raspberry Pi Boot
👉Power on to start
5How to Obtain the Raspberry Pi IP Address
Once you know the Raspberry Pi’s IP address, you can remotely log in to the Raspberry Pi using your laptop. There are many ways to directly obtain the Raspberry Pi’s IP address:
1. If the Raspberry Pi is connected to a screen, you can directly point the mouse to the network icon in the upper right corner, and the IP address will automatically display.
2. If the Raspberry Pi is connected to a screen, you can open the Raspberry Pi command line window and enterifconfig
3. If there is no display, connect your computer to the same network as the Raspberry Pi via Wi-Fi or wired network, open a local IP scanner on the computer, and scan for the Raspberry Pi’s IP address.
4. Check the configuration interface of the router that has Wi-Fi enabled to find the Raspberry Pi and view the IP address.
I personally recommend using the third or fourth methods, as they are relatively quick.
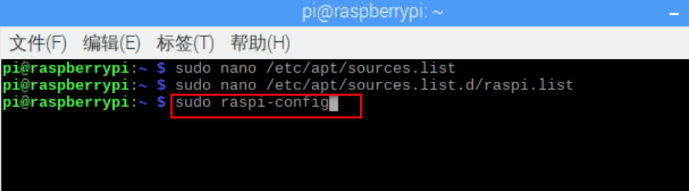
6 Remote Login to Raspberry Pi and Internal Configuration
👉You can remotely log in to the Raspberry Pi using the remote ssh tool putty
This command line’ssudoindicates using administrator root privileges,apt-getindicates using the apt-get package manager to download,installindicates to install and download,fonts-wqy-zenheiindicates the software name. Thus, allsudo apt-get install software namemeans this.
Raspberry Pi Internal Configuration
Open the Raspberry Pi command line interface and enter the command to access the Raspberry Pi configuration interface.
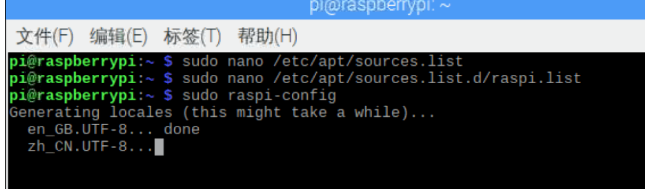
sudo raspi-config
Use the up and down keys and left and right keys to switch the cursor position.
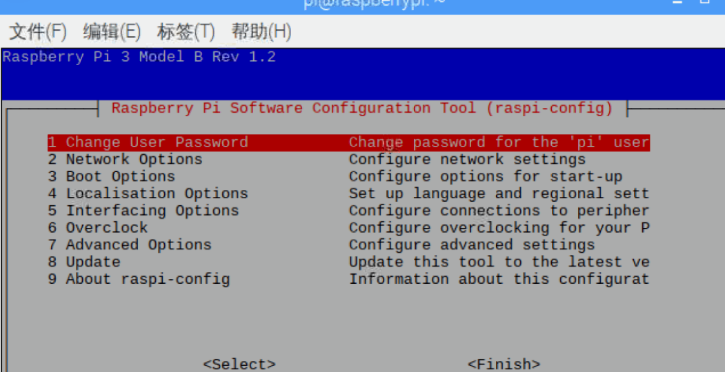
First line: Change User Password Change password
Modify it to your own password as required. The default username is pi, and the password is raspberry
This password will be used for remote ssh login, VNC remote desktop, and when administrator root privileges are required.
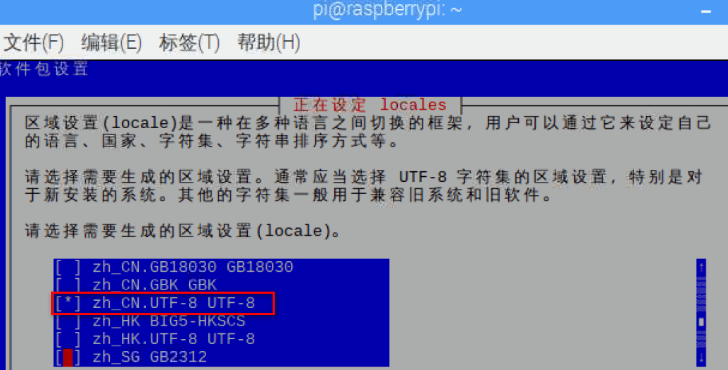
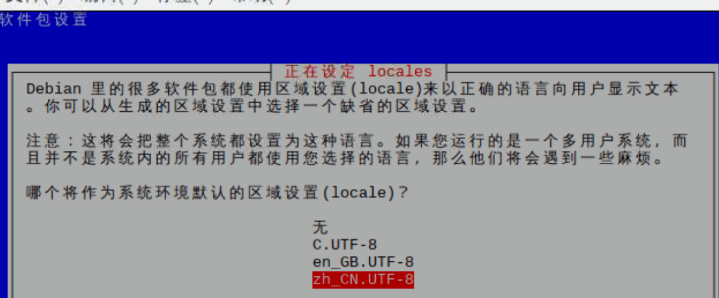
Fourth line: Localisation Options Select region
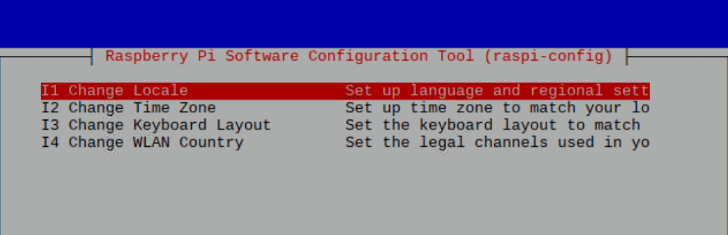
Change Locale Select the country
This is a long list; go to the bottom of this list, place the cursor in front of zh_CN.UTF-8 UTF-8, press space, then press enter, return to the previous interface and press enter again.
Re-select the fourth line Localisation Options
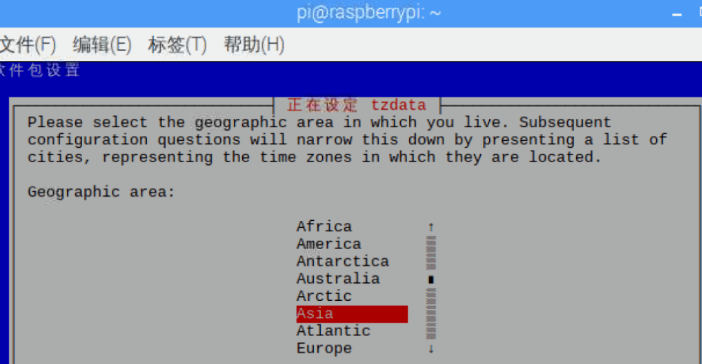
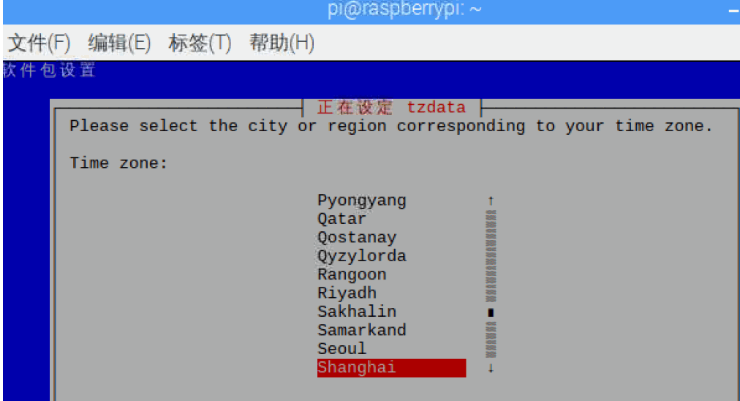
Second line:Change Timezone Select the time zone
Select Asia, then select Shanghai, press enter to confirm.
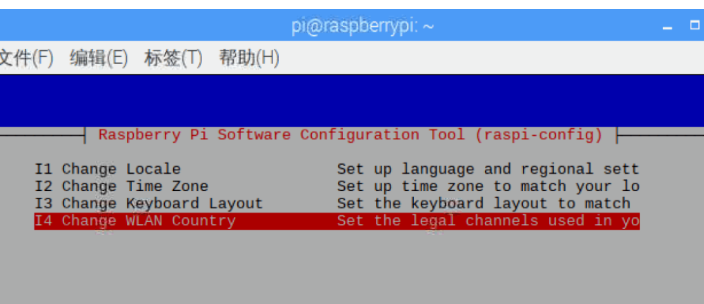
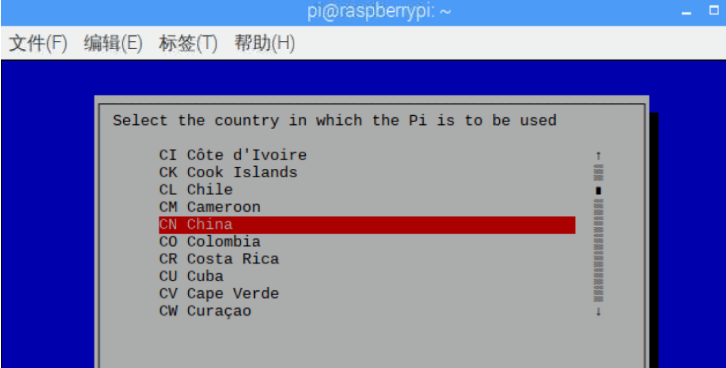
Fourth line: Change Wi-fi Country Select wifi country
Select CN China, press enter
Fifth line: Interfacing Options Enable functions
It is recommended to enable the following options
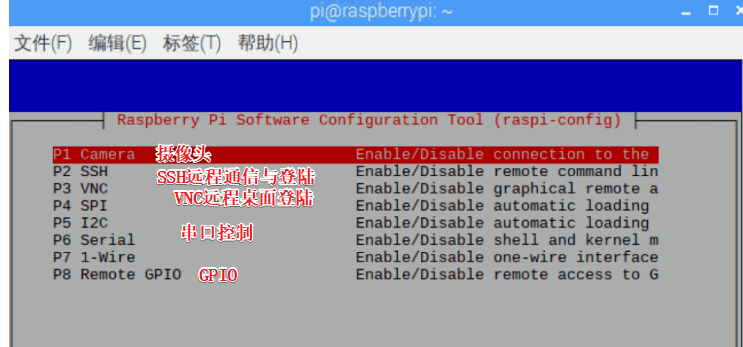
Camera: Camera
SSH: SSH remote communication and login
VNC: VNC remote desktop login
Serial: Serial control
Remote GPIO: Remote GPIO pin control
Seventh line:<span>Advanced Options</span> Advanced settings
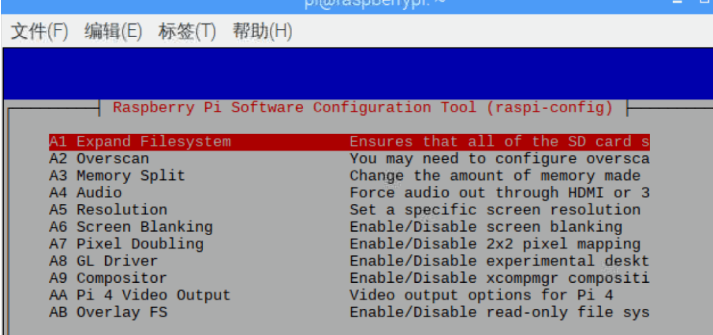
-
Select
Expand Filesystem, which expands the root directory to this SD card, fully utilizing the storage space of the SD card -
Select
Overscan, to display on the entire screen -
Select
Audio, selectForce 3.5mm('headphone' jack), the sound from the Raspberry Pi will output from the headphone jack -
Select
Resolution, choose the default setting, automatically adjust the resolution based on the display -
Select
Pixel Doubling, increase the desktop display qualitySelect
Finish, a dialog box will pop up asking if you want to restart, you can directly press enter to confirm the restart, or wait for it to take effect the next time you start.
Install Chinese Fonts
Open the Raspberry Pi command line and enter the following command
sudo apt-get install fonts-wqy-zenheiIn this command,
sudoindicates using administrator root privileges,apt-getindicates using the apt-get package manager to download,installindicates to install and download,fonts-wqy-zenheiindicates the software name. Thus, allsudo apt-get install software namemeans this.
Install the Chinese input method scim
sudo apt-get install scim-pinyin
If prompted with Y/N during the installation process, select y
This command will install the Chinese input method; after successful installation, you can close the Raspberry Pi terminal and restart the Raspberry Pi controller. After rebooting, you can normally use the Chinese input method.
9. Upgrade all installed software
Running the command below will compare the locally installed software with the corresponding software in the newly downloaded software list. If it finds that the installed software version is too low, it will prompt you to update. Executing this command may take a long time.
sudo apt-get upgradeWhat is the difference between
sudo apt-get updateandsudo apt-get upgrade?Answer:
updateonly retrieves and updates the downloadable software list from the download source, equivalent to updating the index map.upgradeupdates the software itself. The latter takes much longer.
10. About Changing Software Sources
https://pypi.tuna.tsinghua.edu.cn/simple
Why change software sources?
Software sources refer to the application package repository of the Debian-based operating system. Many software packages are included in this repository. The Raspberry Pi’s operating system is also based on Debian, so it has its own software sources to include various Raspberry Pi applications.
By default, the software source address for Raspberry Pi is http://archive.raspbian.org/, located in Europe, which is very slow to access domestically, often only a few k per second download speed. Therefore, before playing with Raspberry Pi, it is strongly recommended to replace it with domestic software sources.
All Raspberry Pi software source addresses can be found here: https://www.raspbian.org/RaspbianMirrors
Generally, just find a domestic one, such as Tsinghua University’s open-source software mirror station.
Why is it called
mirror? Because the mirror station synchronizes itself with the foreign source every few minutes, maintaining the same software resource list as the foreign source, just like looking in a mirror.In addition to Tsinghua University Open Source Software Mirror Station, there are many domestic mirror stations, such as Alibaba Cloud, Huawei Cloud, Tongji University, Chongqing University, University of Science and Technology of China, etc.

Why write?
To turn bits into bits, completing the process of input, processing, and output (IPO); at the same time, I hope to receive your feedback and suggestions to achieve mutual growth in teaching!