Although I personally prefer Rust, the Rust ecosystem does not yet have an embedded system with the structure/abstraction levels and rich ecosystem like ZephyrRTOS. I consider myself a pragmatic + idealistic engineer, so I chose to use the C/C++ based ZephyrRTOS with its rich ecosystem while also trying to integrate the Rust embedded ecosystem. Although this has created a lot of trouble for me, I enjoy it.
Due to the high level of abstraction in ZephyrRTOS, one could say that the architecture of Zephyr RTOS is quite close to Linux (e.g., device tree, Kconfig, driver interfaces, etc.), which also brings a relatively high entry barrier to Zephyr RTOS. Therefore, I have started a new column to record my insights while learning, hoping to help everyone. Please feel free to leave comments or suggestions.
Let’s avoid unnecessary talk. For all information about Zephyr RTOS, please follow the official website: https://zephyrproject.org/
Development Hardware
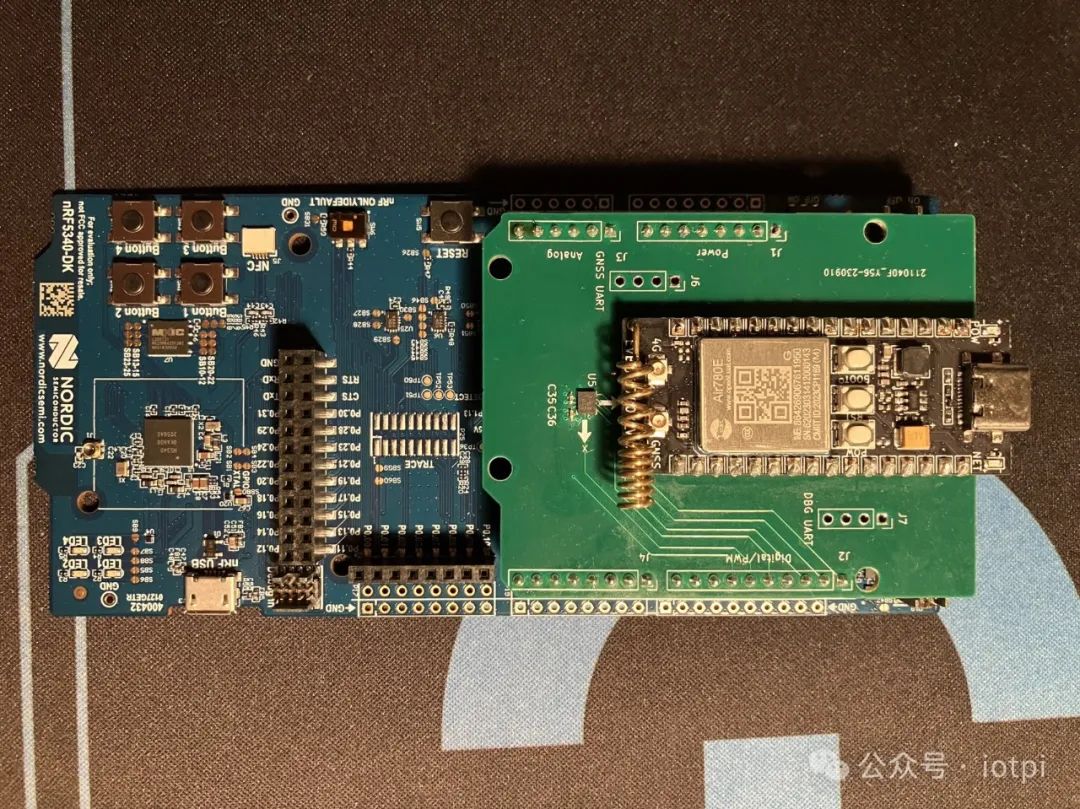
Currently, the development board I am using is Nordic’s nRF5340 DK (https://docs.zephyrproject.org/latest/boards/nordic/nrf5340dk/doc/index.html). I have added a custom adapter board on top, which currently has a Hezhong Air780EG development board (https://air780eg.cn) and QST’s QMI8658A (https://www.qstcorp.com/imu_prod/QMI8658).
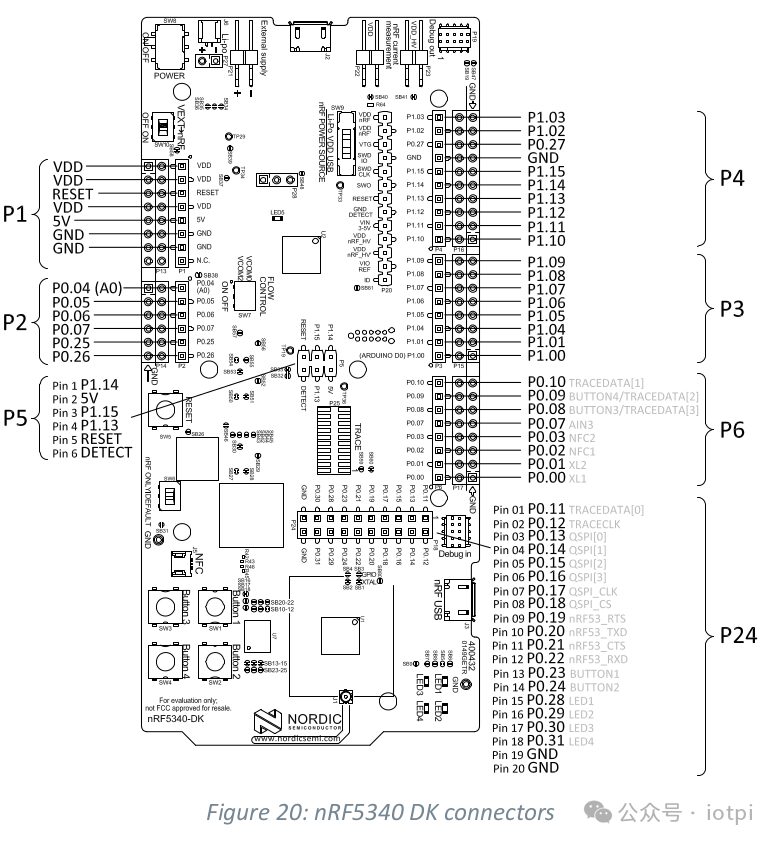
The pinout of the nRF5340 DK is as follows (from the nRF5340 DK user manual).
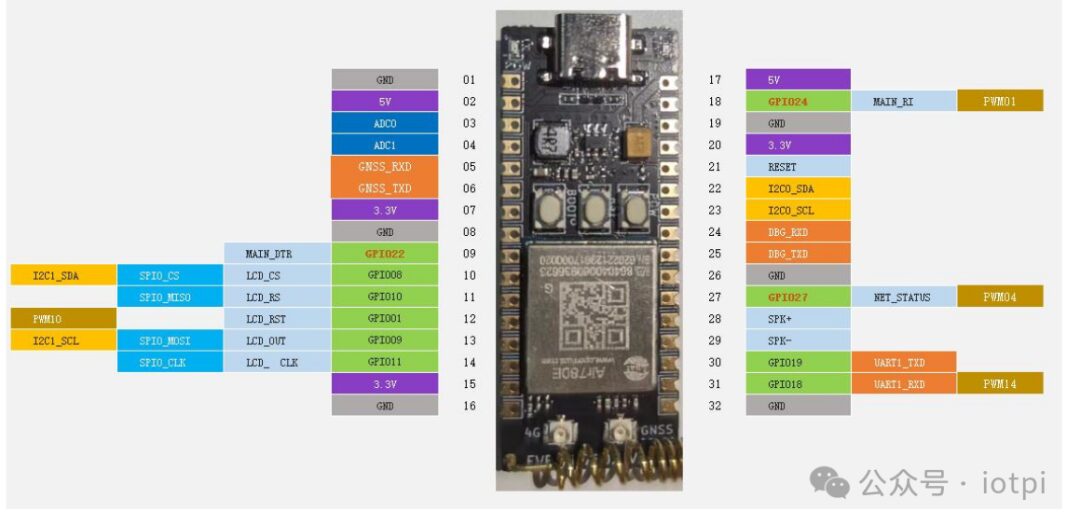
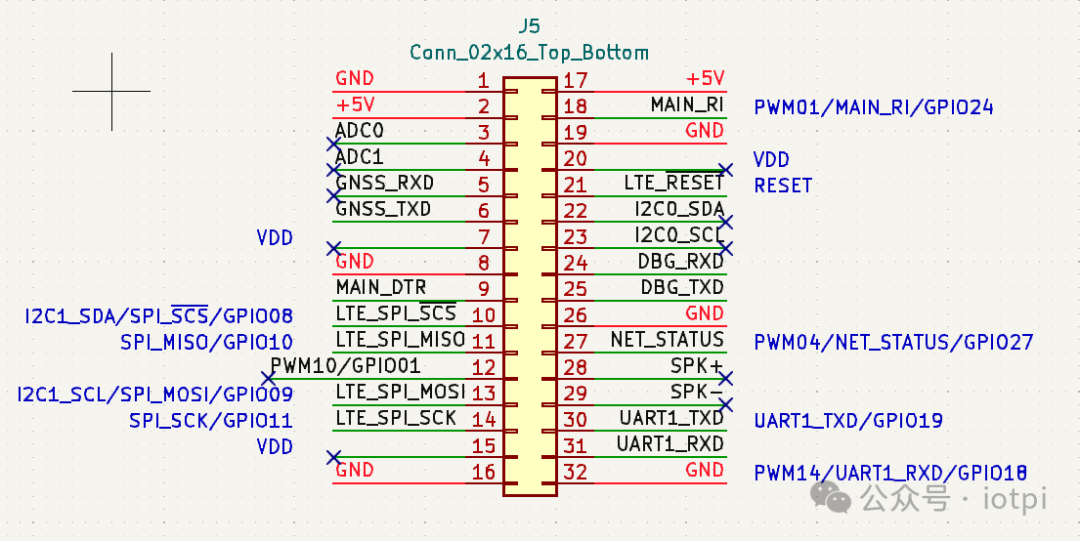
This is the pinout diagram for the Hezhong Air780EG development board.
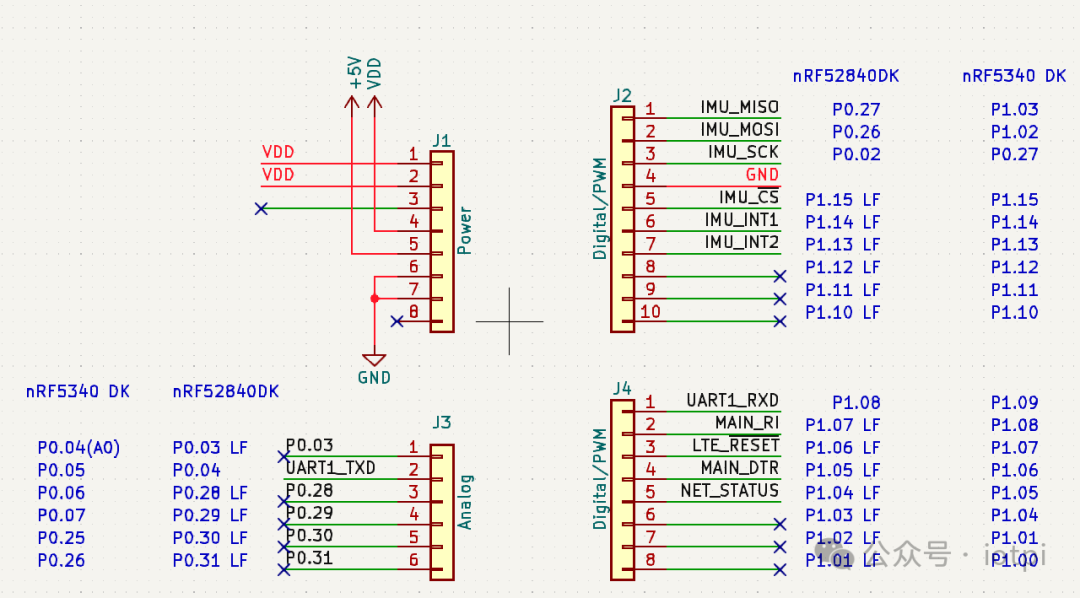
The schematic diagram of the adapter board connecting to the Air780EG development board.
The schematic diagram of the adapter board connecting to the nRF5340 DK Arduino compatible socket.
For development on the nRF5340, I am using Nordic’s nRF Connect SDK based on a fork of Zephyr RTOS. For specific installation methods, see https://docs.nordicsemi.com/bundle/ncs-latest/page/nrf/installation/install_ncs.html; I won’t elaborate on that here.
My development environment is nRF Connect SDK 2.5.2 (including Nordic forked Zephyr 2.4.99) and Zephyr SDK toolchain 0.16.5. The operating system is Debian Bookworm, and I did not use VS Code and the nRF VS Code extension, but instead used Emacs + west tool + gdb + picocom manually.
Setting Up the Simplest Application Framework
The official documentation for creating an application can be found here: https://docs.zephyrproject.org/latest/develop/application/index.html#creating-an-application
The Nordic version is here: https://docs.nordicsemi.com/bundle/ncs-latest/page/nrf/create_application.html
I am currently using what is called a Freestanding Application organizational method. The main reason is that I do not want to clone a complete Zephyr or nRF Connect SDK for different applications. However, for general team projects, it is recommended to use the Workspace Application method for better version management.
My current directory structure is as follows:
<ROOT>/
├─── <west-workspace>/
│  ├─── .west/
│  ├─── nrf/
│  ├─── zephyr/
│  └─── ...
└─── applications/
          └───────<app1>/                    ├─── src/
                    └─── ...
          └───────<app2>/                    ├─── src/
                    └─── ...
For the application itself, the simplest structure is as follows (removing the above directory structure):

└─── app1/
     ├── CMakeLists.txt
     ├── prj.conf
└── src/
          ├── CMakeLists.txt
└── main.c
File content is as follows:

CMakeLists.txt:

# Copyright (c) 2024 Qingdao IotPi Information Technology Ltd., Allrights Reserved
cmake_minimum_required(VERSION 3.20.0)
find_package(Zephyr REQUIRED HINTS $ENV{ZEPHYR_BASE})
project(app1)# Note here is app, not the project name app1
target_include_directories(app PRIVATE include)
add_subdirectory(src)

prj.conf:
# Empty file

src/CMakeLists.txt
# Copyright (c) 2024 Qingdao IotPi Information Technology Ltd., Allrights Reserved
# Note here is app, not the project name app1
target_sources(app  PRIVATE  main.c)

src/main.c:
// Copyright (c) 2024 Qingdao IotPi Information Technology Ltd., Allrights Reserved
#include <zephyr/kernel.h>
int main(void){
    printk("Hello World! %s\n", CONFIG_BOARD);
    return 0;
}


In the app1 directory, execute the following command:

Note: Be sure to introduce the Zephyr environment settings in advance; there are instructions in the official documentation. According to the directory structure I provided, it is source <ROOT>/ncs/zephyr/zephyr-env.sh
west build -b nrf5340dk_nrf5340_cpuapp_ns -p always .


Executing west flash will flash the firmware into the application core of the nRF5340.


Serial Port Description
For the serial port of the nRF5340 DK, see the description in this document.
https://docs.nordicsemi.com/bundle/ncs-latest/page/nrf/device_guides/working_with_nrf/nrf53/nrf5340.html#getting-logging-output
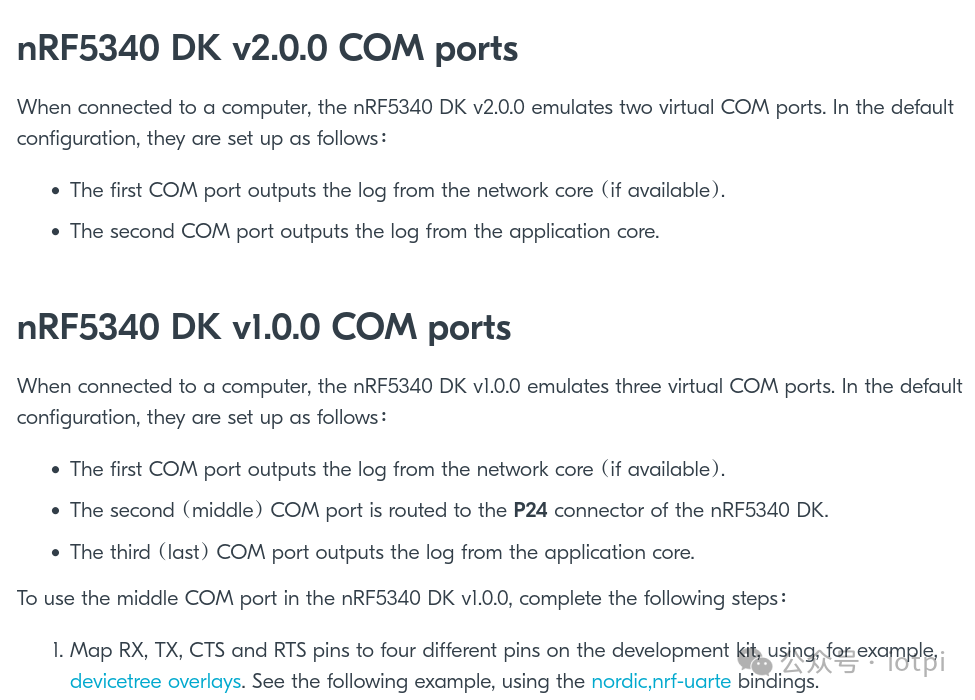
On this board, there are three serial ports. When there are no other devices with the same name under Linux, the names of the three serial ports are dev/ttyACM{0,1,2}. In the most basic app later, ttyACM0 corresponds to uart1, and ttyACM2 corresponds to uart0. The specific meanings will be detailed later.
With the default configuration, enable the serial port:
picocom -b 115200 /dev/ttyACM0
# Another terminal window or tmux window:
picocom -b 115200 /dev/ttyACM2
Restart the device (you can press the RESET button on the development board), and the following will be displayed in the serial port ttyACM2:
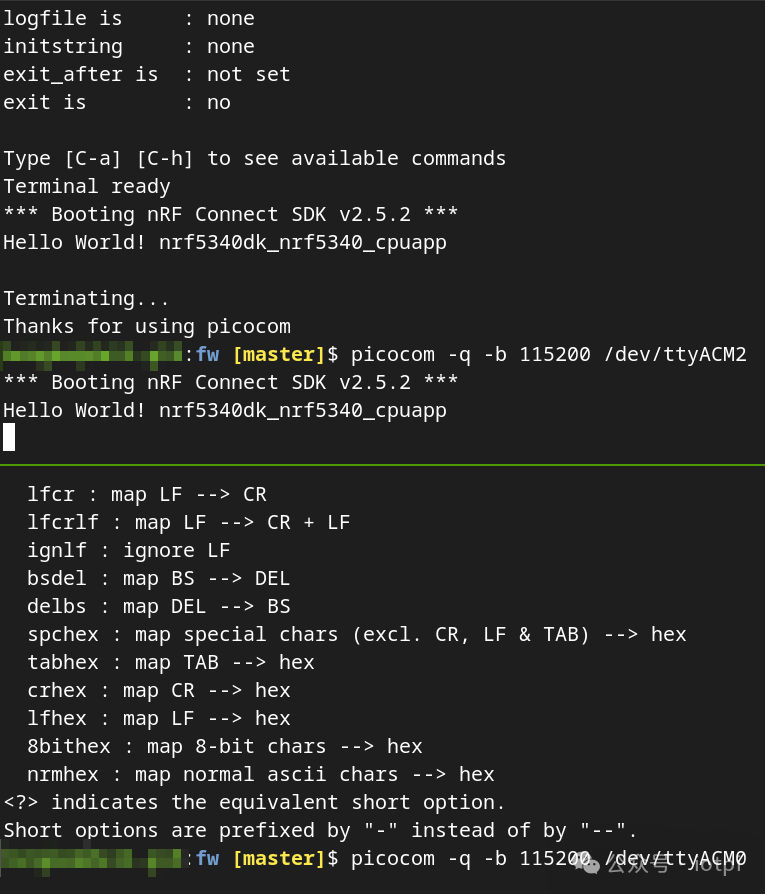
At this point, the most basic program can run correctly. The next article will begin the real deep dive, explaining this simplest Hello World.