Recently, the 8GB RAM version of the Raspberry Pi 4 has been released for sale, and the firmware now supports booting from USB storage media (the stable version of the bootloader was released on June 15, 2020).
So what are you waiting for? The Raspberry Pi 4 with 8GB RAM and USB 3.0 SSD is irresistible!
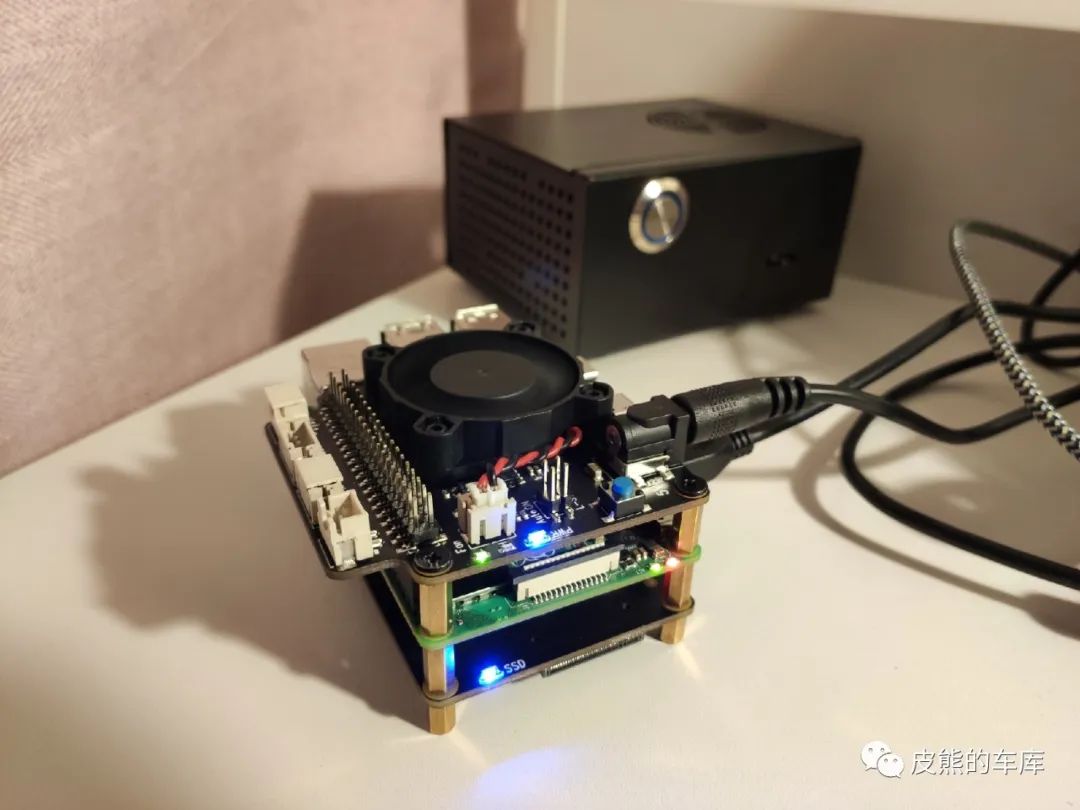
In the picture: Raspberry Pi 4 8GB version + X872 (SSD) + X735 (Power Supply) + X857-C1 (Case)
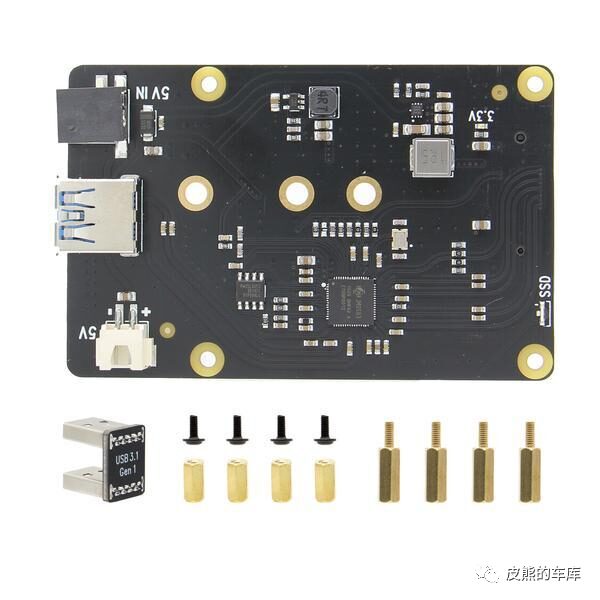
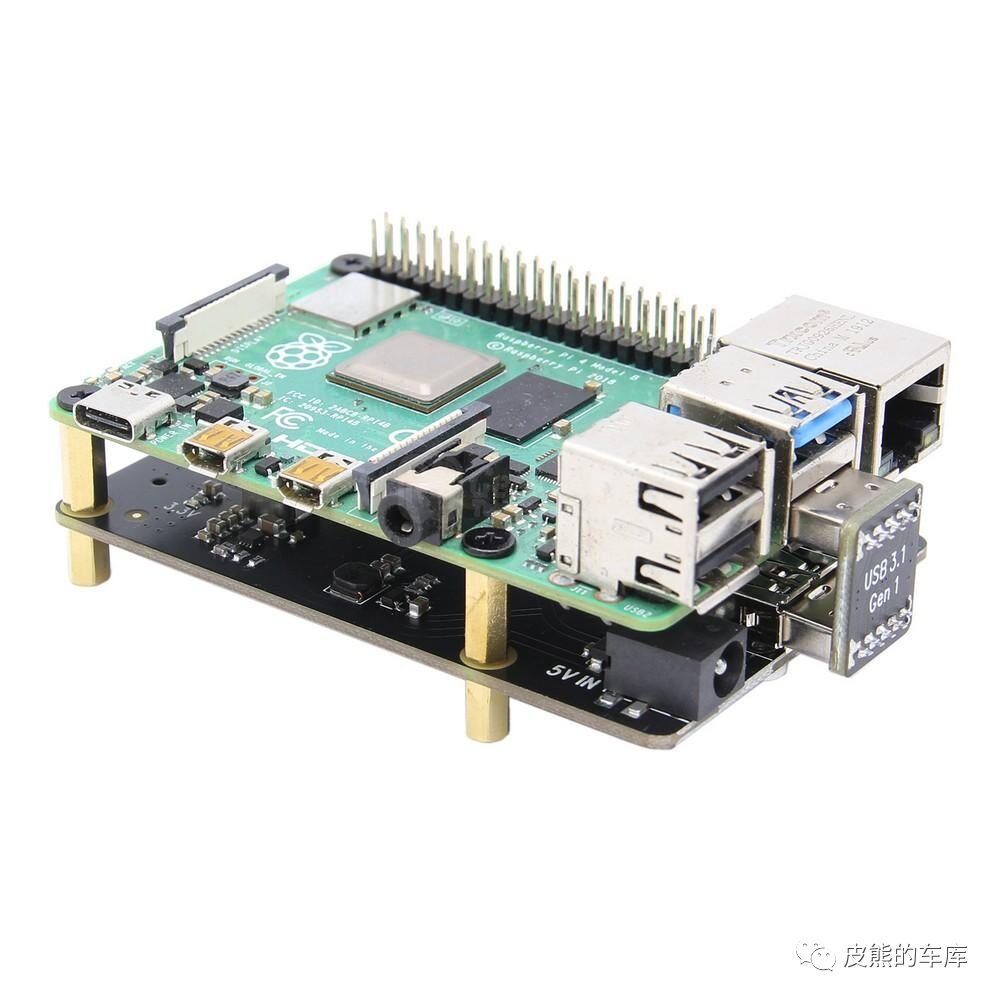
For SSD to USB, I chose Geekworm’s X872 conversion board (which has a built-in USB 3.1 Gen2 to PCIe Gen3x2 10Gb/s bridge controller). With it, we can use high-performance NVME M.2 SSDs on the Raspberry Pi 4:
Once assembled, our guide begins:
-
Common operation, use a prepared SD card with the latest version of Raspberry Pi OS to boot the Raspberry Pi.
-
Common operation, perform various upgrades.
sudo apt update sudo apt full-upgrade sudo rpi-update sudo reboot sudo apt install rpi-eeprom -
Modify
/etc/default/rpi-eeprom-update
FIRMWARE_RELEASE_STATUS="critical"Change “critical” to “stable“.
-
Use the latest stable version bin file to flash the eeprom.
sudo rpi-eeprom-update -d -f /lib/firmware/raspberrypi/bootloader/stable/pieeprom-2020-06-15.bin -
Use vcgencmd to check the updated bootloader.
pi@raspberrypi:~ $ vcgencmd bootloader_version Jun 15 2020 14:36:19 version c302dea096cc79f102cec12aeeb51abf392bd781 (release) timestamp 1592228179 pi@raspberrypi:~ $ vcgencmd bootloader_config[all] BOOT_UART=0 WAKE_ON_GPIO=1 POWER_OFF_ON_HALT=0 DHCP_TIMEOUT=45000 DHCP_REQ_TIMEOUT=4000 TFTP_FILE_TIMEOUT=30000 ENABLE_SELF_UPDATE=1 DISABLE_HDMI=0 BOOT_ORDER=0xf41 (4 means boot from USB, 1 means boot from SD card) -
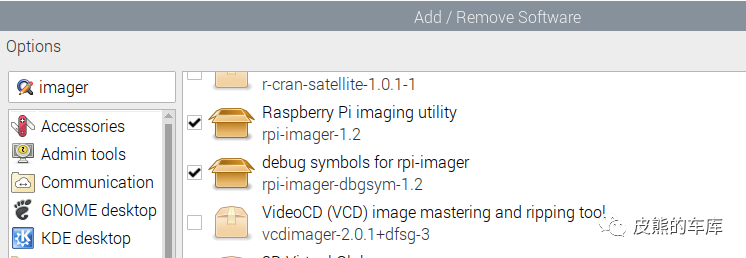
Use rpi-imager to image the latest Raspberry Pi OS system onto the SSD on the X872. You can directly flash in the Raspberry Pi system to save the hassle.
-
After flashing, be sure to copy all /boot directory files with .elf and .dat extensions from the current SD card to the newly flashed SSD’s /boot directory.
-
Shut down, remove the SD card, and boot the Raspberry Pi. The system will boot from the SSD, done!
It is said that USB 3.0 high-speed data transfer may affect the 2.4G WIFI signal, but now everyone should be using 5G WIFI, so this shouldn’t be a problem.
-
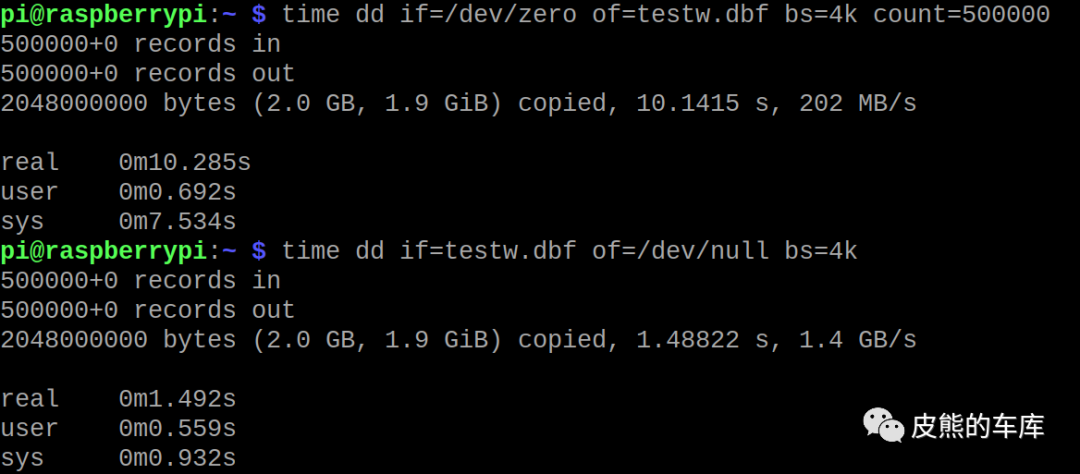
Read and write performance test:
Exclusive Secret!!!
Resolve the issue where the X872 is unusable after rebooting the Raspberry Pi 4; it is necessary to unplug and reinsert the USB connection bridge!
This is a pitfall that anyone who uses the X872 board will inevitably encounter. After rebooting, the USB device cannot be found, and it is necessary to unplug and reinsert the USB connection bridge. Sigh, I almost gave up.
It was observed that there was a printed message during reboot:
Reset USB port-power 500ms
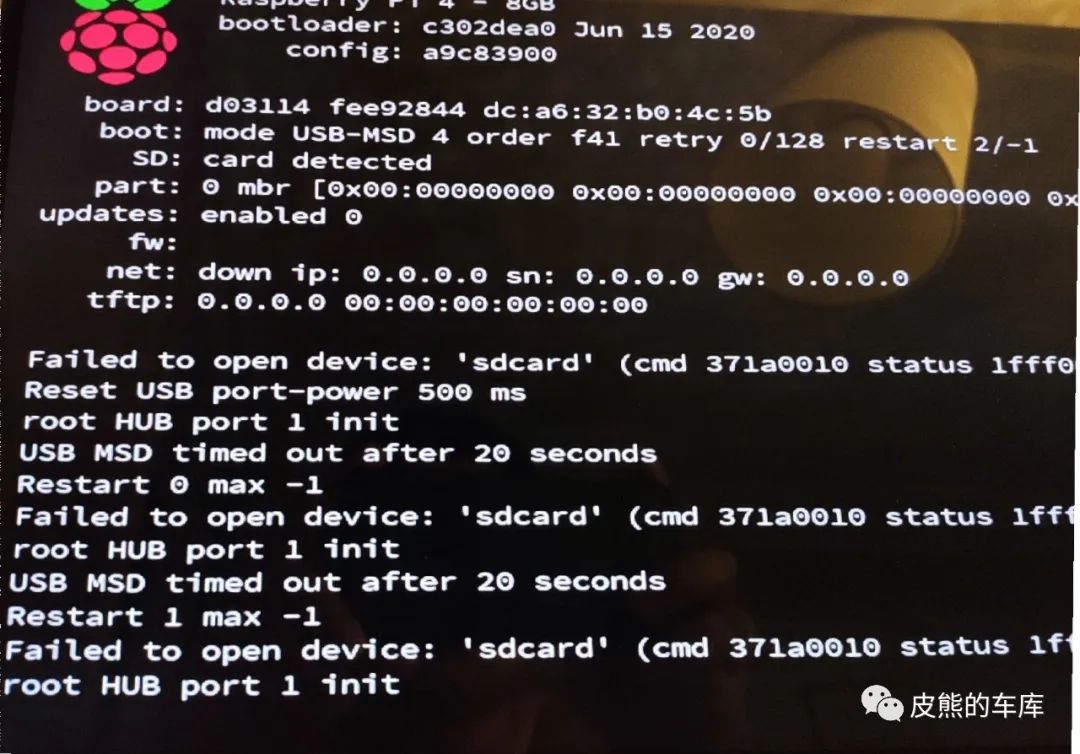
It was instinctively judged that the time for the USB port to recover from power off is too short, causing the X872 board to “not respond and cannot initialize properly”.
I tried to raise an issue on GitHub, and to my surprise, the engineer replied immediately. I then learned that in the new version of the firmware (20200615), it is possible to extend the USB port power off recovery time by modifying USB_MSD_PWR_OFF_TIME (default 500ms).
Modify the new version firmware (20200615) configuration as follows to extend the USB port power off recovery time to a maximum of 1000ms:
Then the issue of the X872 hanging after reboot is resolved!!!
Modify firmware:
pi@raspberrypi:~/newfirmware $ cp /lib/firmware/raspberrypi/bootloader/stable/pieeprom-2020-06-15.bin ./pieeprom.bin
pi@raspberrypi:~/newfirmware $ rpi-eeprom-config pieeprom.bin > bootconfig.txt
pi@raspberrypi:~/newfirmware $ cat bootconfig.txt
[all]
BOOT_UART=0
WAKE_ON_GPIO=1
POWER_OFF_ON_HALT=0
DHCP_TIMEOUT=45000
DHCP_REQ_TIMEOUT=4000
TFTP_FILE_TIMEOUT=30000
ENABLE_SELF_UPDATE=1
DISABLE_HDMI=0
BOOT_ORDER=0xf41

pi@raspberrypi:~/newfirmware $ vi bootconfig.txt
pi@raspberrypi:~/newfirmware $ cat bootconfig.txt
[all]
BOOT_UART=0
WAKE_ON_GPIO=1
POWER_OFF_ON_HALT=0
DHCP_TIMEOUT=45000
DHCP_REQ_TIMEOUT=4000
TFTP_FILE_TIMEOUT=30000
ENABLE_SELF_UPDATE=1
DISABLE_HDMI=0
USB_MSD_PWR_OFF_TIME=1000
BOOT_ORDER=0xf41

pi@raspberrypi:~/newfirmware $ rpi-eeprom-config --out pieeprom-new.bin --config bootconfig.txt pieeprom.bin
pi@raspberrypi:~/newfirmware $ rpi-eeprom-config pieeprom-new.bin
[all]
BOOT_UART=0
WAKE_ON_GPIO=1
POWER_OFF_ON_HALT=0
DHCP_TIMEOUT=45000
DHCP_REQ_TIMEOUT=4000
TFTP_FILE_TIMEOUT=30000
ENABLE_SELF_UPDATE=1
DISABLE_HDMI=0
USB_MSD_PWR_OFF_TIME=1000
BOOT_ORDER=0xf41

pi@raspberrypi:~/newfirmware $ sudo rpi-eeprom-update -d -f ./pieeprom-new.bin
BCM2711 detected
VL805 firmware in bootloader EEPROM
BOOTFS /boot
*** INSTALLING ./pieeprom-new.bin  ***
BOOTFS /boot
EEPROM update pending. Please reboot to apply the update.
pi@raspberrypi:~/newfirmware $ vcgencmd bootloader_config[all]
BOOT_UART=0
WAKE_ON_GPIO=1
POWER_OFF_ON_HALT=0
DHCP_TIMEOUT=45000
DHCP_REQ_TIMEOUT=4000
TFTP_FILE_TIMEOUT=30000
ENABLE_SELF_UPDATE=1
DISABLE_HDMI=0
USB_MSD_PWR_OFF_TIME=1000
BOOT_ORDER=0xf41

pi@raspberrypi:~/newfirmware $ sudo reboot
Related Resources:
Official documentation about the Raspberry Pi 4’s boot EEPROM:
https://www.raspberrypi.org/documentation/hardware/raspberrypi/booteeprom.md
https://www.raspberrypi.org/documentation/hardware/raspberrypi/bcm2711_bootloader_config.md
Official rpi-eeprom GitHub:
https://github.com/raspberrypi/rpi-eeprom