Getting Started with Arduino: A Beginner’s Guide (Part 2)

【Click the above「blue text」 to follow us, let’s become technology aesthetics together!】

Total text:2169 words 24 images

Estimated reading time: 6 minutes

(For easier reading, key points have been highlighted)

The previous article introduced what Arduino is and how to choose an Arduino board. 【Getting Started with Arduino (Part 1)】
In this article, we will take a look at the software part and then try to light up our Arduino board!
Download Arduino Compilation Environment
https://www.arduino.cc/en/Main/Software
(The latest Arduino IDE Pro has also been released, those who want to experience it can download it~
https://blog.arduino.cc/2019/10/18/arduino-pro-ide-alpha-preview-with-advanced-features/)
Getting Started with Arduino: A Beginner's Guide (Part 2)
Here we still take the non-Pro version as an example, choose the appropriate version to install according to the computer system
Getting Started with Arduino: A Beginner's Guide (Part 2)
Prompt to install components, just default to next
Getting Started with Arduino: A Beginner's Guide (Part 2)
Select the installation path, you can modify it yourself, I installed it in a virtual machine, so I defaulted to this path, otherwise it is not recommended to put it on the system disk C.
Getting Started with Arduino: A Beginner's Guide (Part 2)
Quietly waiting for installation……
Getting Started with Arduino: A Beginner's Guide (Part 2)
Next, it will prompt to install drivers and serial port information, just install directly.
Getting Started with Arduino: A Beginner's Guide (Part 2)
The new version installation language defaults to the same as the computer’s language setting, which is Chinese.
If you open the English interface and are not used to it, you can also change it to the Chinese interface.
Open the Arduino main program, go to: File > Preferences, find the Editor language item, set it to Chinese, close the Arduino main program and reopen it
Getting Started with Arduino: A Beginner's Guide (Part 2)
A dialog box will pop up, select Editor language –> Simplified Chinese, click OK.
Getting Started with Arduino: A Beginner's Guide (Part 2)
Close Arduino IDE and reopen it, it will be in Chinese interface~
Getting Started with Arduino: A Beginner's Guide (Part 2)
Understanding Arduino IDE
The purpose of this small experiment is to light up the LED light on pin 13 of the Arduino UNO board for one second, then turn it off, then keep it off for one second, and repeat this cycle.
Now, we assume that the control board used is the Arduino UNO model (beginners are recommended to use UNO, which is stable), and that the Arduino development environment has been set up according to the steps above, and the USB driver has been installed.
– Connect Arduino Control Board and Computer
Plug one end of the USB cable into the Arduino control board and the other end into the computer’s USB port.(Note: When working independently, the Arduino control board can choose to be powered by USB, or it can choose to be powered by a power bank or power adapter
Connect Arduino Control Board and Computer
Open Arduino IDE, and the editing interface of Arduino IDE will appear
Getting Started with Arduino: A Beginner's Guide (Part 2)
– Understanding Arduino IDE
Let’s first get to know this Arduino compiler briefly, as we will be dealing with it often in the future.
Getting Started with Arduino: A Beginner's Guide (Part 2)
Arduino IDE is the software editing environment for Arduino products. In simple terms, it is the place to write and download code.
Any Arduino product needs to download code to operate.
The hardware circuit we set up is to assist the code to complete, both are indispensable.Just like humans control body movements through the brain, if the code is the brain, then the peripheral hardware is the body, and the activity of the body depends on the brain, so the hardware implementation depends on the code.
The basic functional areas of Arduino IDE have been marked in the image above (used an old image for convenience, but the layout is the same as the new version), most of the white area in the image is the code editing area, used to input code.Note that when entering code, you need to switch to English input mode.The black area below is the message prompt area, which will display whether the compilation or download was successful.
– Download a Blink Program
Getting Started with Arduino: A Beginner's Guide (Part 2)
Download the simplest code, which can help us familiarize ourselves with how to download programs, while also testing the board’s functionality.
The LED marked L on the UNO board. This test code is to make this LED light up.
– Open Blink
Plug in the USB cable, open Arduino IDE, and find the “Blink” code.File > Examples > 01.Basics > Blink
Getting Started with Arduino: A Beginner's Guide (Part 2)
– Verify the Program
Usually, after writing a piece of code, we need to verify it to see if there are any errors. Click “Verify”.
Getting Started with Arduino: A Beginner's Guide (Part 2)
After verification (compilation) is completed, you can see the corresponding prompt.
Since it is sample code, there will be no errors in verification,but in the future, after writing code, you need to verify it before downloading it to Arduino.
Before downloading the program, we also need to tell Arduino IDE what board we are using and which serial port it corresponds to.
– Set Board Model
Arduino includes various versions of controllers, among which the most common are Uno, Leonardo, and Mega series controllers (the most complete selection guide).
In the board section, you need to select the board type according to the firmware type of your chosen hardware. (The sample uses a controller with Uno as the bootloader) Tools > Board > Arduino Uno
Getting Started with Arduino: A Beginner's Guide (Part 2)
– Set Serial Port
Tools > Serial Port > xx, where xx must match what we see in the computer device manager.
Getting Started with Arduino: A Beginner's Guide (Part 2)
– Download the Program
As shown, finally, click “Upload”.(Here upload and download are actually the same thing)
Getting Started with Arduino: A Beginner's Guide (Part 2)
Upload completed!
If all goes well, we can visually see the effect of the program running on the board:
The LED light on pin 13 of the Arduino Uno board is blinking.
Alright, these are the most basic operations of the IDE.
You might ask, if I don’t know how to write code, how can I connect sensors to the board and let the sensors achieve various functions?
At this time, I can recommend you to learn MIND+, because it is a graphical programming software that supports various open-source hardware such as Arduino, micro:bit, and control boards. You can complete programming by simply dragging graphical program blocks, and of course, it can also use advanced programming languages such as python/c/c++, allowing everyone to easily experience the joy of creation.
Getting Started with Arduino: A Beginner's Guide (Part 2)
Through simple manual pulling, you can achieve the same functionality in the IDE, and you can also see the code writing situation,which is very friendly for beginners.
Getting Started with Arduino: A Beginner's Guide (Part 2)

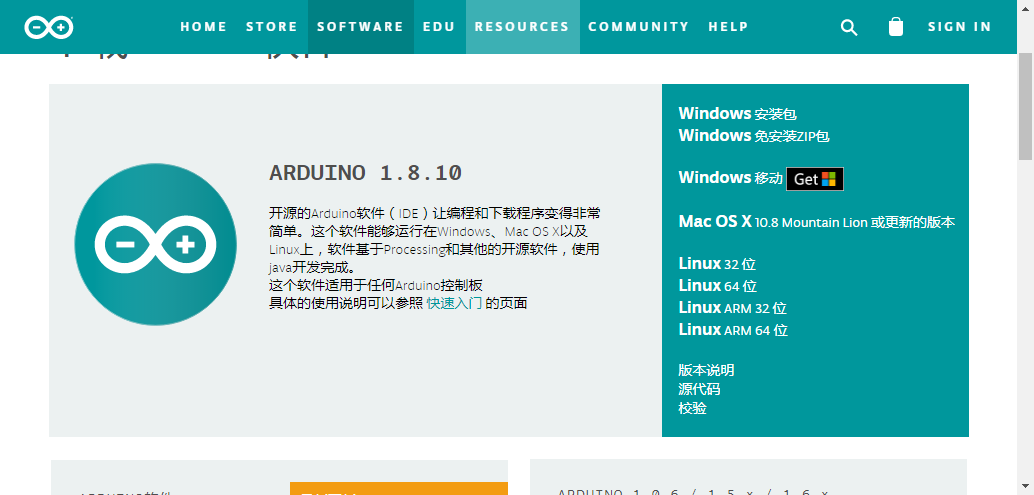
You can download it here: http://mindplus.cc/

Hurry up and buy some sensors to play with!!DF products are cool

Previous issues review

【Welfare】Arduino Pin Collection

Make an Otto Robot in 1 hour

Color Picker Flashlight: Countless colors, only one is chosen

This gesture sensor can test your hand speed limit
The roaring plastic is here!

Look! This is true creativity!

With it, Dad no longer has to worry about me secretly playing with my phone!
It’s the same graduation project, just look at what others have done!

Let’s Play!

👇

Leave a Comment

×