The ping command is the most frequently used network command in projects, and we usually use its basic functions. Today, let’s take a detailed look at the 7 basic uses of the Ping command.
1. Basic of Ping Command
2. Usage of ping -t
3. Usage of ping -a
4. Usage of ping -n
5. Usage of ping -l size
6. Usage of ping -r count
7. How to Ping Hundreds to Thousands of IP Addresses in Bulk
1. Introduction to the Basic Ping Command
Ping is a powerful TCP/IP tool in networking. Its main functions are:
1. To check network connectivity and analyze network speed
2. To obtain the server IP from the domain name
3. To infer the operating system used by the other party and the number of routers the data packet has passed based on the returned TTL value.
We usually use it to directly ping an IP address to test network connectivity.
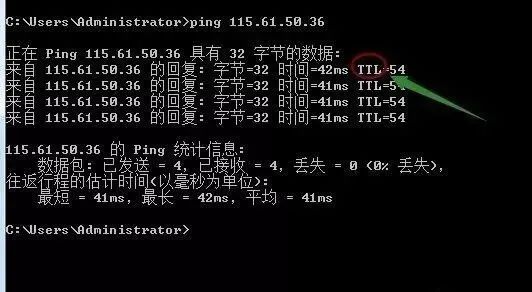
For example, directly pinging an IP address or gateway will show the above data. Some friends may ask what bytes=32; time<1ms; TTL=128 means.
Bytes Value: The size of the data packet, which is in bytes.
Time Value: Response time; the smaller this time, the faster you connect to this address.
TTL Value: Time To Live, indicating how long the DNS record exists on the DNS server; it is a value of the IP protocol packet that tells routers when the data packet should be discarded.
We can roughly judge the type of the target system as either Windows or UNIX/Linux series based on the size of the returned TTL value.
Generally, TTL values:
Between 100~130ms indicates Windows systems;
Between 240~255ms indicates UNIX/Linux systems.
Of course, what we mainly want to understand today is not just these, but other references for ping.
Besides directly pinging the network IP address to verify network smoothness and speed, it also has these uses.
2. Usage of ping -t
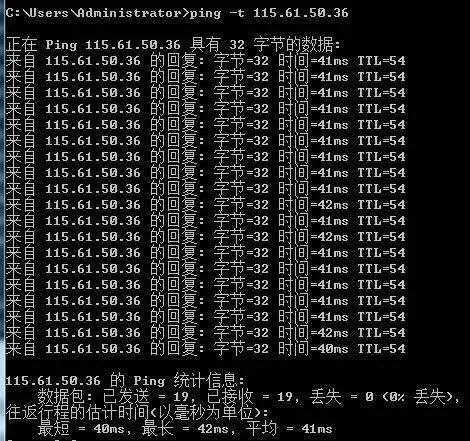
Pings the specified computer continuously until interrupted by the administrator.
This indicates that the computer is connected to the router, and the network performance is good. By pressing Ctrl+C on the keyboard, you can stop it from continuing to ping, and it will summarize how many data packets were sent and how many were successful.
3. Usage of ping -a
ping -a resolves the computer name and NetBios name. You can ping its IP address to resolve the hostname. When you encounter an IP but do not know which device it is, you can use ping -a to find out its hostname.

4. Usage of ping -n
By default, only four data packets are sent. This command allows you to define the number of packets sent, which is helpful for measuring network speed. For example, if I want to test the return average time of 10 packets sent, the fastest and slowest times can be obtained as follows:
From the above, I can see that during the process of sending 10 packets to 47.93.187.142, all 10 packets were returned without loss, with the fastest return speed being 32ms, the slowest being 55ms, and the average speed being 37ms. This indicates that my network is good.
If the network is poor, such as in a monitoring system that is very laggy, this test may show packet loss. If the loss is significant, it indicates a bad network, allowing for a straightforward judgment of the network condition.
5. Usage of ping -l size
ping -l size: Sends a data packet of the specified size to the target host.
By default, Windows’ ping sends a data packet size of 32 bytes, with a maximum of 65500 bytes. If the size of the data packet sent at once is greater than or equal to 65500 bytes, it may cause the receiving computer to crash. Therefore, Microsoft has restricted this value; this parameter combined with other parameters can be very powerful, such as attackers can use it with the -t parameter to implement a DOS attack. (So it has risks; do not use it lightly on others’ computers).
For example: ping -l 65500 -t 211.84.7.46
Will continuously execute the ping command on the IP address until interrupted by the user with Ctrl+C.
This will continuously send data packets of 65500 bytes to the computer at 211.84.7.46. If you only have one computer, it may not have much effect, but if there are many computers, it can completely paralyze the other party, causing severe network congestion, thus demonstrating its significant power.
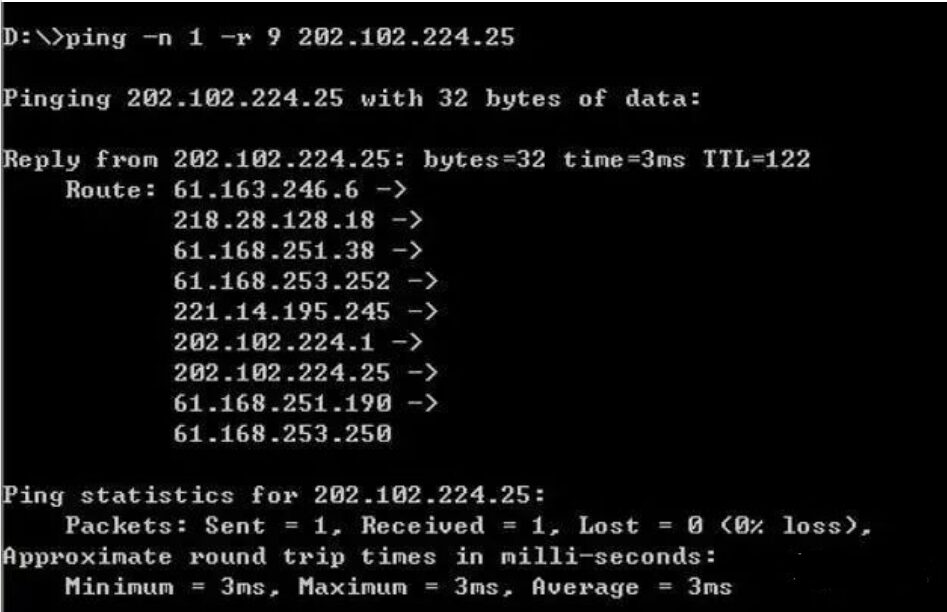
6. Usage of ping -r count
This command records the outgoing and returning packet routes in the “Record Route” field, probing the number of routes passed, but can track a maximum of 9 routes.
ping -n 1 -r 9 202.102.224.25 (sends one data packet, recording a maximum of 9 routes)
This will display all 9 routes passed, as shown in the image. This means you can track the 9 routes the IP address has passed, which can quickly locate issues when checking for faults.
7. How to Batch Ping Multiple IP Addresses
1. Ping a subnet
For a subnet with numerous IP addresses, if checking them one by one is troublesome, we can directly batch ping the subnet to see which IP address has issues at a glance.
First, look at the code, simply enter it in the command line window:
for /L %D in (1,1,255) do ping 10.168.1.%D
Modify the IP address range to the one you want to check.
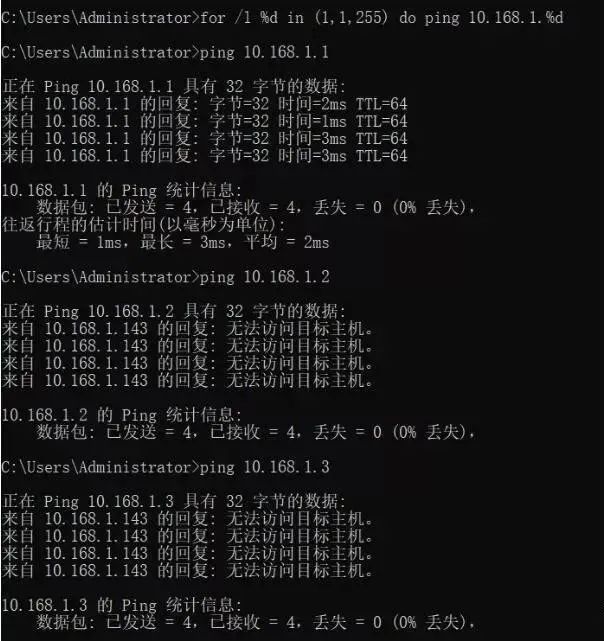
Once you input the batch command, it will automatically ping all IP addresses within the subnet.
Now, what does the code “for /L %D in(1,1,255) do ping 10.168.1.%D” mean?
The (1,1,255) in the code is the start and end of the subnet, which checks all IP addresses between 192.168.1.1 and 192.168.1.255, incrementing by 1 each time until all 255 IP addresses are checked.
2. Upgraded Ping Subnet
Although the above command can batch ping addresses, it can be cumbersome to view the output when the number of results is large. So, let’s upgrade it with the following code.
for /L %D in (1,1,255) do ping -n 10.168.1.%D >>a.txt
Note, the IP address changes, just fill in the subnet you need to test, and a.txt can also be changed to your desired filename.
This will import the results into the a.txt file; after checking all IPs, open a.txt and search for “TTL=”. Those containing it are reachable addresses, while those without “TTL=” are unreachable. As shown in the figure.
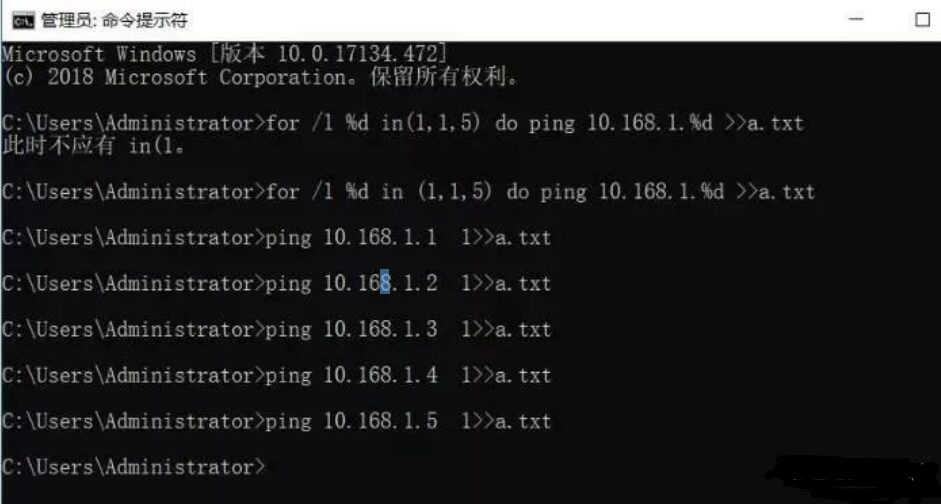
After opening, just search for addresses without TTL.
3. Further Upgraded Ping Subnet Command
Many may say that this still requires searching, which is not too convenient. Is there a simpler method? The answer is definitely yes, let’s look at the code.
for /l %D in (1,1,255) do (ping 192.168.1.%D -n 1 && echo 192.168.1.%D >>ok.txt || echo 192.168.1.%D >>no.txt)
This code will place reachable and unreachable IPs into two separate files, making it very convenient, as shown in the figure:
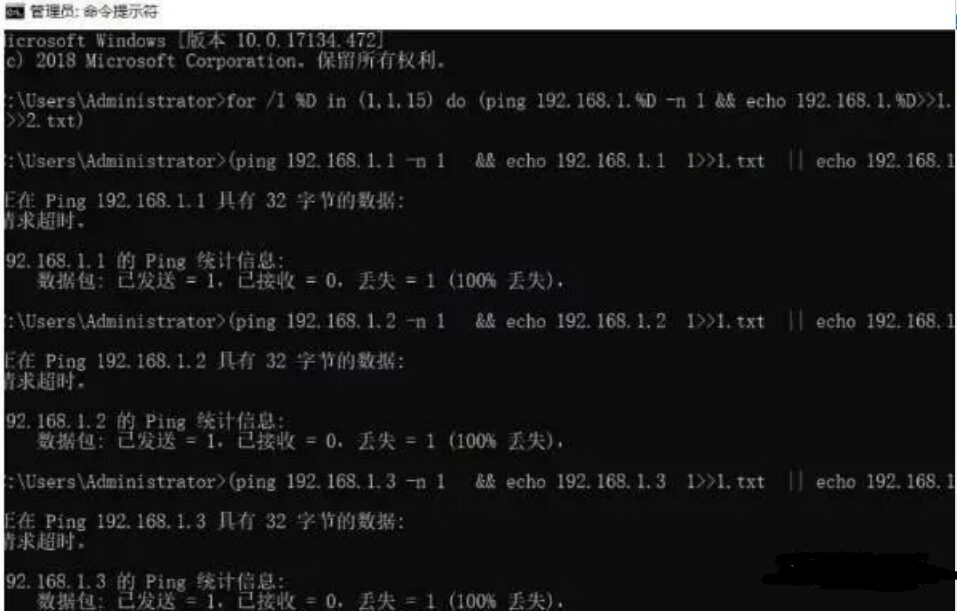
This code is very practical and can be used in large networks. Just be careful when entering, but it doesn’t matter; you can bookmark this article for future use, directly copy the code, and just change the IP address inside.
4. Ultimate Ping Subnet Command
The three commands mentioned above are for batch checking IP addresses within the same subnet. However, in practical projects, there may be different subnet IP addresses that need to be checked simultaneously. So what to do?
There is also a method to batch check unplanned IP addresses simultaneously. Let’s look at the code:
for /f %D in (ip.txt) do (ping %D -n 1 && echo %i >>ok.txt || echo %D >>no.txt)
Notice that an ip.txt file is added; you need to prepare this file yourself, writing the IP addresses you want to ping in it. You can ping over 1000 IP addresses, and the code will read the IP addresses from this file and place the results into two files. I won’t provide screenshots here as it’s easy to understand.
Additional Note:
The files generated by the above code will be in your command line’s default directory. That is, if your command line status is:
Disclaimer: This article is reprinted from the internet, and copyright belongs to the original author. If there are any copyright issues, please contact us in time to delete it. Thank you!
Complete question bank for the 2022 Electrician Junior Exam (including answers)
3 Must-Have Tools for Electricians, Easily Accessible via WeChat!
[Bookmark] The “Path” of a Ten-Year Veteran Electrician, Secrets to Earning Over Ten Thousand a Month!
Which of the five major electrical drawing software (CAD, Eplan, CADe_simu…) do you pick?
Latest Electrical CAD Drawing Software, with Detailed Installation Tutorial!
Latest Electrical Drawing Software EPLAN, with Detailed Installation Tutorial!
Common Issues for Beginners Using S7-200 SMART Programming Software (with download link)
Comprehensive Electrical Calculation EXCEL Sheet, Automatically Generated! No Need to Ask for Electrical Calculations!
Bluetooth Headphones, Electrician/PLC Introductory Books Available? Come and Claim Your Electrical Gifts!
Basic Skills of PLC Programming: Ladder Diagrams and Control Circuits (with 1164 Practical Cases of Mitsubishi PLC)
Still Can’t Understand Electrical Diagrams? Basic Electrical Diagram Reading Skills and Simulation Software for Quick Hands-On!
12 Free Electrician Video Courses, 10GB Software/E-books, 30 Days of Free Live Electrician Courses Available!