👇1000-person technical exchange QQ group, please note 【public account】 for faster access

1. Linux Package Manager Yum
Common methods for installing software in Linux include: yum/apt, rpm package installation, and source code installation. Among them, CentOS uses yum by default, while Ubuntu uses apt.
1. What is a Software Package
In Linux, a common way to install software is to download the source code of the program and compile it to obtain an executable program.
However, this can be cumbersome, so some people pre-compile commonly used software into packages (which can be understood as installation programs on Windows) and place them on a server. The package manager can easily retrieve this compiled software package for direct installation.
The relationship between software packages and package managers is similar to that of “Apps” and “App Stores”.
Yum (Yellow dog Updater, Modified) is a commonly used package manager in Linux. It is primarily applied in distributions like Fedora, RedHat, and CentOS.2. How to Install Software
Using yum, we can complete the installation of gcc with a simple command.
sudo yum install -y lrzsz(1) Yum will automatically find which software packages need to be downloaded.
(2) The -y option can avoid asking us whether to install during the download and installation process.
(3) The lrzsz tool is used to transfer files between Windows machines and remote Linux machines via XShell. After installation, files can be uploaded by dragging them over.
Notes:
1. When installing software, since it requires writing to system directories, you generally need sudo or switch to the root account to complete it. 2. Yum can only install one software package at a time. If you try to install another software package while yum is installing one, it will report an error. 3. If yum encounters an error, please search for solutions online.3. How to Uninstall Software
Again, it’s just one command:
sudo yum remove lrzsz2. Linux Editor – Using Vim
1. Basic Concepts of Vim
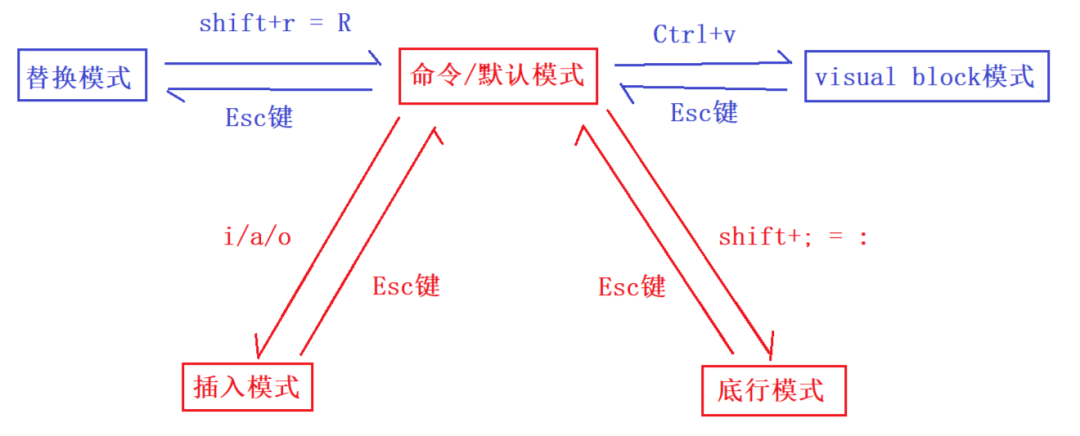
Vim is a multi-mode editor. Currently, there are five modes that we can encounter when using Vim: Command/Normal/Regular mode, Insert mode, Bottom line mode, and Visual Block mode. However, the focus should be on the first three modes.
1.1 Command/Normal/Regular Mode
Controls the movement of the screen cursor, deletion of characters, words, or lines, copying segments, and switching to insert mode or bottom line mode.1.2 Insert Mode
Text can only be entered in insert mode. Pressing the 'Esc' key returns to command mode. This mode is the most frequently used editing mode.1.3 Bottom Line Mode
File saving or exiting can also be used for file replacement, string searching, listing line numbers, etc. In command mode, press shift+: to enter this mode. To view all your modes: open vim and directly enter :help vim-modes in bottom line mode.Switching between the five modes is shown in the image below:
(1) To enter vim, type vim followed by the file name at the system prompt, and you will enter the full-screen editing interface:
$ vim test.cHowever, one important point to note is that after entering vim, you are in [Normal mode], and you need to switch to [Insert mode] to enter text.
(2) Switch from [Normal mode] to [Insert mode]
Press 'a' to start typing from the current cursor position. Press 'i' to start typing from the next position of the cursor. Press 'o' to insert a new line and start typing from the beginning of that line.(3) Switch from [Insert mode] to [Normal mode]
While in [Insert mode], you can only keep entering text. If you realize you made a mistake and want to move the cursor back to delete the character, you need to press the ‘ESC’ key to switch back to [Normal mode] before deleting the text. Of course, you can also delete directly.
(4) Switch from [Normal mode] to [Bottom line mode]
Press 'shift + ;', which is essentially pressing ':'(5) To exit vim and save the file, in [Normal mode], press the ‘:’ key to enter [Bottom line mode], for example:
: w (save the current file) : wq (type 'wq' to save and exit vim) : q! (type 'q!' to force exit vim without saving)Therefore, to return to command mode from any mode, simply press [Esc].
3. Vim Command Mode Command Set
1. Move Cursor
You can use the arrow keys to move up and down in vim, but the proper way is to use the lowercase letters [h], [j], [k], [l] to control the cursor to move left, down, up, and right respectively.
[shift+g = G]: Move to the end of the text [n+shift+g]: Move to the nth line of the text [gg]: Move to the beginning of the text [$]: Move to the end of the current line [- ^]: Move to the beginning of the current line [w]: Jump forward by word [e]: Jump backward by word [ctrl + b]: Move the screen back one page [ctrl + f]: Move the screen forward one page2. Delete Characters
[x]: Each press deletes one character at the cursor position [n+x]: Delete n characters, for example, [6x] means delete the 6 characters (including itself) after the cursor [dd]: Delete the line at the cursor position [n+dd]: Start deleting n lines from the line at the cursor position [X]: Uppercase X, each press deletes one character before the cursor [n+X]: For example, [20X] means delete the 20 characters before the cursor3. Copy
[yy]: Copy the line at the cursor position to the buffer [n+yy]: Copy n lines, for example, '6yy' means copy the 6 lines starting from the line at the cursor position. [p]: Paste the characters in the buffer at the cursor position. Note: All copy commands related to 'y' must be used with 'p' to complete the copy and paste function. [yw]: Copy the characters from the cursor position to the end of the word into the buffer. [n+yw]: Copy n characters to the buffer4. Replace
[r]: Replace the character at the cursor position. [R]: Batch replace. Replace characters at the cursor position until the 'ESC' key is pressed.5. Undo Last Action
[u]: If you accidentally execute a command, you can immediately press [u] to return to the previous action. Pressing 'u' multiple times can undo multiple actions. [ctrl + r]: Restore the undone action6. Commenting and Uncommenting
Comment: ctrl+v --> hjkl (cursor positioning) --> shift+i --> //(double slashes) --> Esc Uncomment: ctrl+v --> hjkl --> d7. Jump to a Specific Line
[ctrl + g]: List the line number of the cursor position. [n+G]: For example, [15G] means move the cursor to the beginning of line 15 of the article.8. Change
[cw]: Change the word at the cursor position to the end of the word. [c+n+w]: For example, [c3w] means change 3 words.4. Vim Bottom Line Mode Command Set
Before using bottom line mode, please remember to press [ESC] to ensure you are in command mode, then press [:] to enter bottom line mode.
1. List Line Numbers
[set nu/set nonu]: Set/Cancel line numbers.2. Search for Characters
[/ + keyword]: First press the [/] key, then enter the character you want to search for. If the first keyword found is not what you want, you can keep pressing [n] to find the desired keyword. [? + keyword]: First press the [?] key, then enter the character you want to search for. If the first keyword found is not what you want, you can keep pressing [n] to find the desired keyword backward.3. Save File
[w]: Enter the letter [w] after the colon to save the file.4. Exit Vim
[q]: Press [q] to exit. If you cannot exit vim, you can follow [q] with a [!] to force exit vim. [wq]: It is generally recommended to use [w] together when exiting, so that you can save the file when exiting. [!ls], [!ll], [!pwd]: Jump back to the directory and execute the command directly.5. Compile and Execute Code Without Exiting Vim
!gcc code.c -o hello.txt !./hello.txt6. Split Screen
[vs + filename]: Open the specified file in a split screen in vim. Use the cursor to determine which file the text is in. [ctrl + ww]: Move the cursor to another screen during split screen.
For course inquiries, add: HCIE666CCIE
↑ Or scan the QR code above ↑
If you have any technical points or content you want to see
You can leave a message below to tell me!