Click on the "Xiaobai Learns Vision" above, select to add "Star" or "Top"
Heavyweight content, delivered first time
Author: ANKIT SACHAN
Compiler: ronghuaiyang
Introduction
This article analyzes the pros and cons of Canny and provides the process of using deep learning for edge detection in OpenCV. There is a code link at the end.
In this article, we will learn how to use deep learning-based edge detection in OpenCV, which is more accurate than the currently popular Canny edge detector.Edge detection is useful in many use cases, such as visual saliency detection, object detection, tracking and motion analysis, structure from motion, 3D reconstruction, autonomous driving, image-to-text analysis, and more.
What is Edge Detection?
Edge detection is a very old problem in computer vision, which involves detecting edges in an image to determine the boundaries of objects, thus separating the objects of interest. One of the most popular edge detection techniques is the Canny edge detection, which has become the method of choice for most computer vision researchers and practitioners. Let’s quickly look at Canny edge detection.
Canny Edge Detection Algorithm
In 1983, John Canny invented the Canny edge detection at MIT. It treats edge detection as a signal processing problem. The core idea is that if you observe the intensity changes of each pixel in the image, it is very high at the edges.
In the simple image below, intensity changes only occur at the boundary. So, you can easily identify edges by observing the changes in pixel intensity.

Now, look at this image. The intensity is not constant, but the rate of change of intensity is highest at the edges. (Calculus review: the rate of change can be calculated using the first derivative (gradient).)

The Canny edge detector identifies edges through four steps:
- Denoising: Since this method relies on sudden changes in intensity, if the image has a lot of random noise, it will treat the noise as edges. Therefore, it is a very good idea to smooth your image using a 5×5 Gaussian filter.
- Gradient Calculation: Next, we calculate the gradient (rate of intensity change) of each pixel in the image. We also calculate the direction of the gradient.
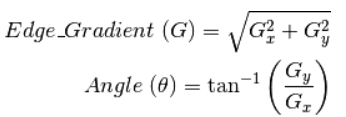
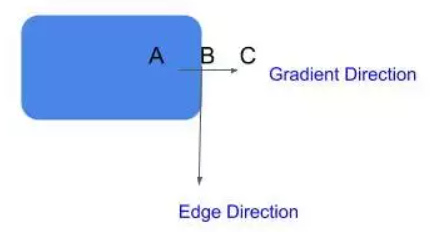
The gradient direction is perpendicular to the edges, and it is mapped to one of four directions (horizontal, vertical, and two diagonal directions).
- Non-Maximum Suppression: Now, we want to remove pixels that are not edges (set their value to 0). You might say, we can simply pick the pixels with the highest gradient values; these are our edges. However, in real images, the gradient does not simply peak at just one pixel, but is very high at pixels near the edges. Therefore, we take the local maxima in a 3×3 area along the gradient direction.
-
Hysteresis Thresholding: In the next step, we need to decide on a gradient threshold, below which all pixels will be suppressed (set to 0). The Canny edge detector uses hysteresis thresholding. Hysteresis thresholding is a very simple and effective method. We use two thresholds instead of just one:
High Threshold = Choose a very high value so that any pixel with a gradient value above this value is definitely an edge.
Low Threshold = Choose a very low value so that any pixel with a gradient value below this value is definitely not an edge.
Pixels with gradients between these two thresholds will be checked, and if they are connected to edges, they will be retained; otherwise, they will be discarded.
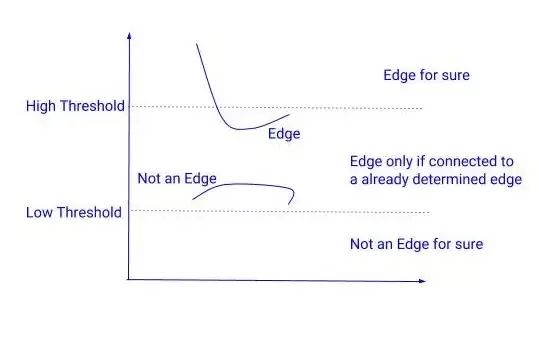
Hysteresis Thresholding
Problems with Canny Edge Detection:
Since the Canny edge detector only focuses on local changes and has no semantic (understanding the content of the image) understanding, its accuracy is limited (often this is the case).
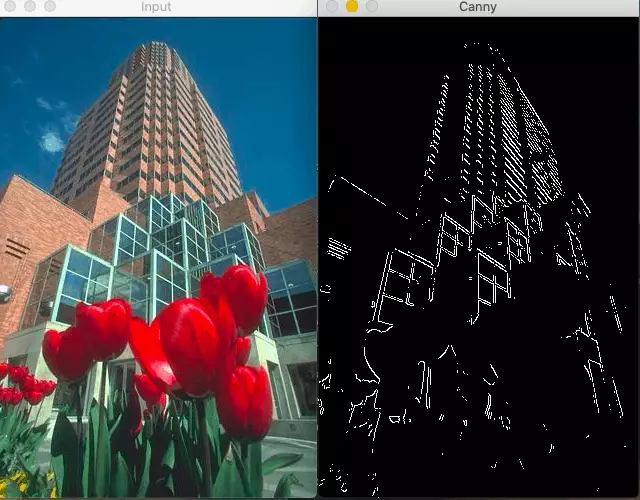
The Canny edge detector will fail in this case because it does not understand the context of the image
Semantic understanding is crucial for edge detection, which is why learning-based detectors using machine learning or deep learning produce better results than the Canny edge detector.
Deep Learning-Based Edge Detection in OpenCV
OpenCV integrates deep learning-based edge detection technology in its new DNN module. You need OpenCV 3.4.3 or higher. This technique is called Holistically-Nested Edge Detection or HED, which is an end-to-end learning-based edge detection system that uses a trimmed VGG-like convolutional neural network for image-to-image prediction tasks.
HED leverages the outputs of intermediate layers. The outputs from previous layers are called side outputs, and the outputs of all five convolutional layers are fused to generate the final prediction. Since the feature map sizes generated in each layer differ, it can effectively view the image at different scales.
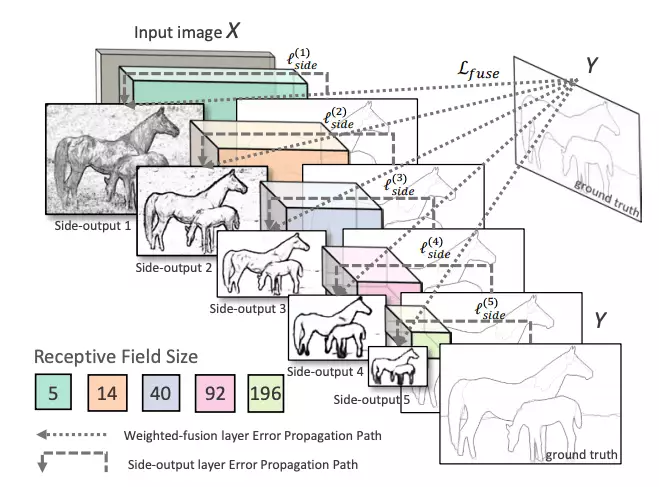
Network Structure: Holistically-Nested Edge Detection
The HED method is not only more accurate than other deep learning-based methods but also much faster. This is why OpenCV decided to integrate it into the new DNN module. Here are the results from this paper:
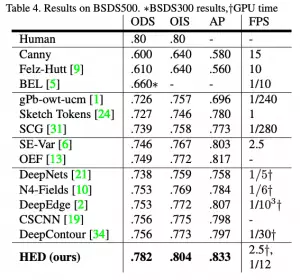
Code for Training Deep Learning Edge Detection in OpenCV
The pre-trained model used by OpenCV has been trained in the Caffe framework and can be loaded as follows:
sh download_pretrained.sh
There is a crop layer in the network, which is not implemented by default, so we need to implement it ourselves.
class CropLayer(object):
    def __init__(self, params, blobs):
        self.xstart = 0
        self.xend = 0
        self.ystart = 0
        self.yend = 0

    # Our layer receives two inputs. We need to crop the first input blob
    # to match a shape of the second one (keeping batch size and number of channels)
    def getMemoryShapes(self, inputs):
        inputShape, targetShape = inputs[0], inputs[1]
        batchSize, numChannels = inputShape[0], inputShape[1]
        height, width = targetShape[2], targetShape[3]

        self.ystart = (inputShape[2] - targetShape[2]) // 2
        self.xstart = (inputShape[3] - targetShape[3]) // 2
        self.yend = self.ystart + height
        self.xend = self.xstart + width

        return [[batchSize, numChannels, height, width]]

    def forward(self, inputs):
        return [inputs[0][:,:,self.ystart:self.yend,self.xstart:self.xend]]
Now, we can overload this class and simply register the layer with one line of code.
cv.dnn_registerLayer('Crop', CropLayer)
Now, we are ready to build the network graph and load the weights, which can be done using OpenCV’s<span>dnn.readNet</span> function.
net = cv.dnn.readNet(args.prototxt, args.caffemodel)
Next, the step is to batch load images and run them through the network. For this, we use<span>cv2.dnn.blobFromImage</span> method. This method creates a four-dimensional blob from the input image.
blob = cv.dnn.blobFromImage(image, scalefactor, size, mean, swapRB, crop)
Where:
image: is the input image we want to send to the neural network for inference.
scalefactor: Image scaling constant; often we need to divide the uint8 image by 255 so that all pixels are between 0 and 1. The default is 1.0, no scaling.
size: The spatial size of the output image. It will equal the input size required by the subsequent neural network as the output of blobFromImage.
swapRB: Boolean value indicating whether we want to swap the first and last channels in a 3-channel image. OpenCV’s default image is in BGR format, but if we want to convert this order to RGB, we can set this flag to True, which is also the default.
mean: For normalization, sometimes we calculate the mean pixel value over the training dataset and subtract it from each image during training. If we do mean subtraction during training, we must apply it during inference. This mean is a tuple corresponding to the R, G, B channels. For example, the mean for the Imagenet dataset is R=103.93, G=116.77, B=123.68. If we use swapRB=False, then this order will be (B, G, R).
crop: Boolean flag indicating whether we want to center crop the image. If set to True, when cropping the input image from the center, the smaller size equals the corresponding size, while the other size is equal to or greater than that size. However, if we set it to False, it will maintain the aspect ratio and just resize to the fixed size.
In our case:
inp = cv.dnn.blobFromImage(frame, scalefactor=1.0, size=(args.width, args.height),
                           mean=(104.00698793, 116.66876762, 122.67891434), swapRB=False,
                           crop=False)
Now, we just need to call the forward method.
net.setInput(inp)
out = net.forward()
out = out[0, 0]
out = cv.resize(out, (frame.shape[1], frame.shape[0]))
out = 255 * out
out = out.astype(np.uint8)
out=cv.cvtColor(out,cv.COLOR_GRAY2BGR)
con=np.concatenate((frame,out),axis=1)
cv.imshow(kWinName,con)
Result:
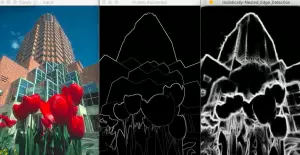
The middle image is the manually labeled image, and the right side is the result of HED
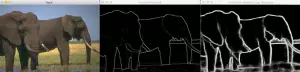
The middle image is the manually labeled image, and the right side is the result of HED
Code in the article: https://github.com/sankit1/cv-tricks.com/tree/master/OpenCV/Edge_detection
 —END—
—END—
Original English text: https://cv-tricks.com/opencv-dnn/edge-detection-hed/
Download 1: Chinese Tutorial on OpenCV-Contrib Extension Modules

Reply "Chinese Tutorial on Extension Modules" in the background of "Xiaobai Learns Vision" official account to download the first Chinese version of the OpenCV extension module tutorial online, covering installation of extension modules, SFM algorithms, stereo vision, object tracking, biological vision, super-resolution processing, and more than twenty chapters of content.

Download 2: 52 Lectures on Python Vision Practical Projects

Reply "Python Vision Practical Projects" in the background of "Xiaobai Learns Vision" official account to download 31 visual practical projects including image segmentation, mask detection, lane line detection, vehicle counting, eyeliner addition, license plate recognition, character recognition, emotion detection, text content extraction, face recognition, etc., to help quickly learn computer vision.

Download 3: 20 Lectures on OpenCV Practical Projects

Reply "20 Lectures on OpenCV Practical Projects" in the background of "Xiaobai Learns Vision" official account to download 20 practical projects based on OpenCV to achieve advanced learning of OpenCV.

Group Chat

Welcome to join the reader group of the official account to communicate with peers. Currently, there are WeChat groups for SLAM, 3D vision, sensors, autonomous driving, computational photography, detection, segmentation, recognition, medical imaging, GAN, algorithm competitions, etc. (will gradually be subdivided in the future). Please scan the WeChat number below to join the group, with a note: "Nickname + School/Company + Research Direction", for example: "Zhang San + Shanghai Jiao Tong University + Visual SLAM". Please follow the format; otherwise, it will not be approved. After successful addition, you will be invited to join related WeChat groups based on your research direction. Please do not send advertisements in the group; otherwise, you will be removed. Thank you for your understanding~