Eclipse ThreadX USBX is a high-performance embedded USB protocol stack that supports Host, Device, and OTG modes, perfectly integrated with the ThreadX real-time operating system. It is renowned for its compact code size and high performance, making it ideal for resource-constrained embedded applications. This article will delve into the features, usage methods, and packaging process of USBX.
Core Features of USBX
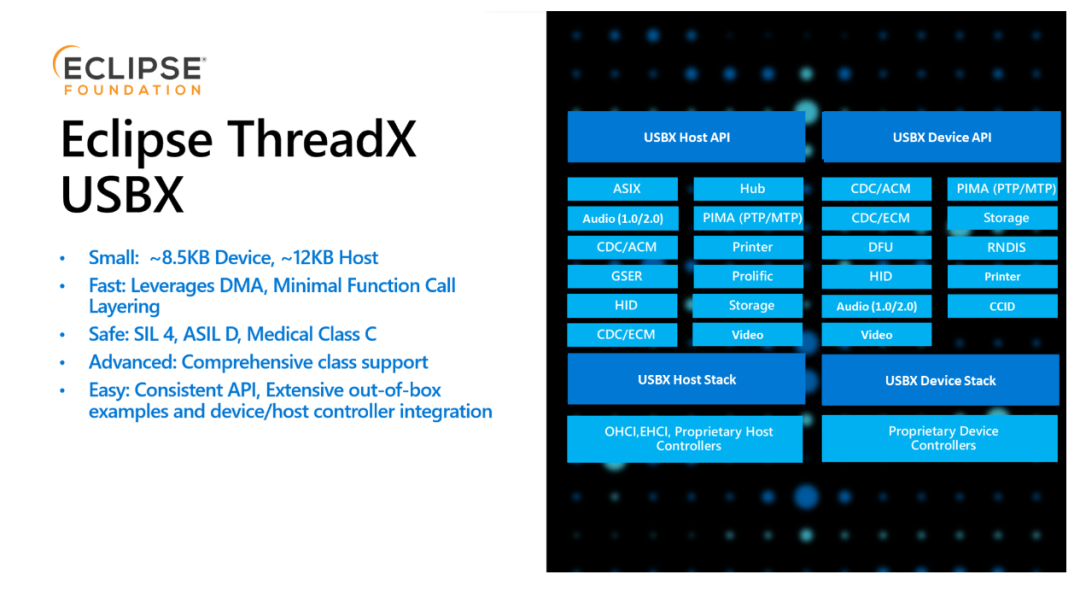
The main features of USBX include:
-
• High Performance: Optimized for embedded systems, offering extremely high performance and efficiency. -
• Compact Code Size: Minimal resource usage, suitable for resource-constrained embedded devices. -
• Multi-Mode Support: Supports USB Host, Device, and OTG modes. -
• ThreadX Integration: Seamlessly integrated with the ThreadX real-time operating system, simplifying the development process. -
• Cross-Platform Support: Supports various processor architectures and compilers. -
• Rich Sample Code: Provides multiple sample programs for developers to learn and use.
Installing and Using USBX
USBX is typically integrated as part of ThreadX into the SDKs and development environments provided by semiconductor manufacturers. You can develop using tools provided by manufacturers such as STMicroelectronics, NXP, Renesas, and Microchip. Alternatively, you can clone the repository from GitHub:<span>git clone https://github.com/eclipse-threadx/usbx.git</span>.
The repository structure is as follows:
-
• <span>cmake</span>: CMake build files. -
• <span>common</span>: Core files of USBX. -
• <span>ports</span>: Architecture and compiler-related files. -
• <span>samples</span>: Sample code. -
• <span>support</span>: Miscellaneous platform configuration files.
Building the USBX Static Library
USBX uses the CMake build system and supports various MCUs and host systems. The following steps describe how to build the USBX static library using the Arm GNU Toolchain and CMake:
-
1. Install Tools: Install CMake (version 3.0 or higher), Arm GNU Toolchain (arm-none-eabi), and Ninja. -
2. Build the ThreadX Library: USBX depends on ThreadX, so you need to build the ThreadX library first. -
3. Clone the Repository: <span>git clone https://github.com/eclipse-threadx/usbx.git</span> -
4. Configure <span>ux_user.h</span>: Define the required features and additional functionalities; you can refer to<span>ux_user_sample.h</span>. -
5. Build the Static Library: For example, targeting the Cortex-M4 architecture, use the following command: cmake -Bbuild -GNinja -DCMAKE_TOOLCHAIN_FILE=cmake/cortex_m4.cmake . cmake --build ./build
This will generate the static library file for USBX.
Integrating USBX into Your Project
To integrate the USBX static library into your project, you need to:
-
1. Add USBX to Your Project: You can use CMake’s <span>add_subdirectory()</span>function to add USBX to your build system. -
2. Link the Static Library: Link the USBX static library during your project’s linking phase. -
3. Initialize USBX: Initialize USBX in your application. -
4. Use USBX API: Use the API functions provided by USBX for USB operations.
Packaging and Releasing Your Application
Packaging and releasing an embedded application typically involves bundling your code, library files, and other necessary resources into a firmware image file. This depends on your target hardware platform and development tools. The general process includes:
-
1. Compile Your Application: Ensure your application compiles successfully. -
2. Link All Necessary Libraries: Include the USBX library and other necessary library files. -
3. Generate Firmware Image: Use your development toolchain to generate a firmware image file suitable for the target hardware. This usually involves linker scripts and some platform-specific settings. -
4. Test the Firmware: Test the firmware on the target hardware to ensure it operates correctly.
Conclusion
Eclipse ThreadX USBX is a powerful and easy-to-use embedded USB protocol stack. It offers high performance, a compact code size, and seamless integration with the ThreadX RTOS, simplifying the complexities of embedded USB development. With proper configuration and build processes, you can easily integrate USBX into your embedded projects and generate runnable firmware image files. Understanding the architecture and API of USBX, along with the correct configuration and build for your target platform, is key to successfully using USBX.
Project Address:https://github.com/eclipse-threadx/usbx