

This is actually a relatively early project, but it is still worth sharing with friends. (There are also different types of robot projects introduced in previous articles for everyone’s reference at the end of the article)
What if you can’t afford a $530,000 Boston Dynamics robot dog?
How about using an open-source project to DIY one with Raspberry Pi, costing less than 4,000 yuan?
With this setup, doesn’t it feel like you have that Boston Dynamics dog vibe?

First, let’s do some warm-up exercises and showcase the flexible joints:

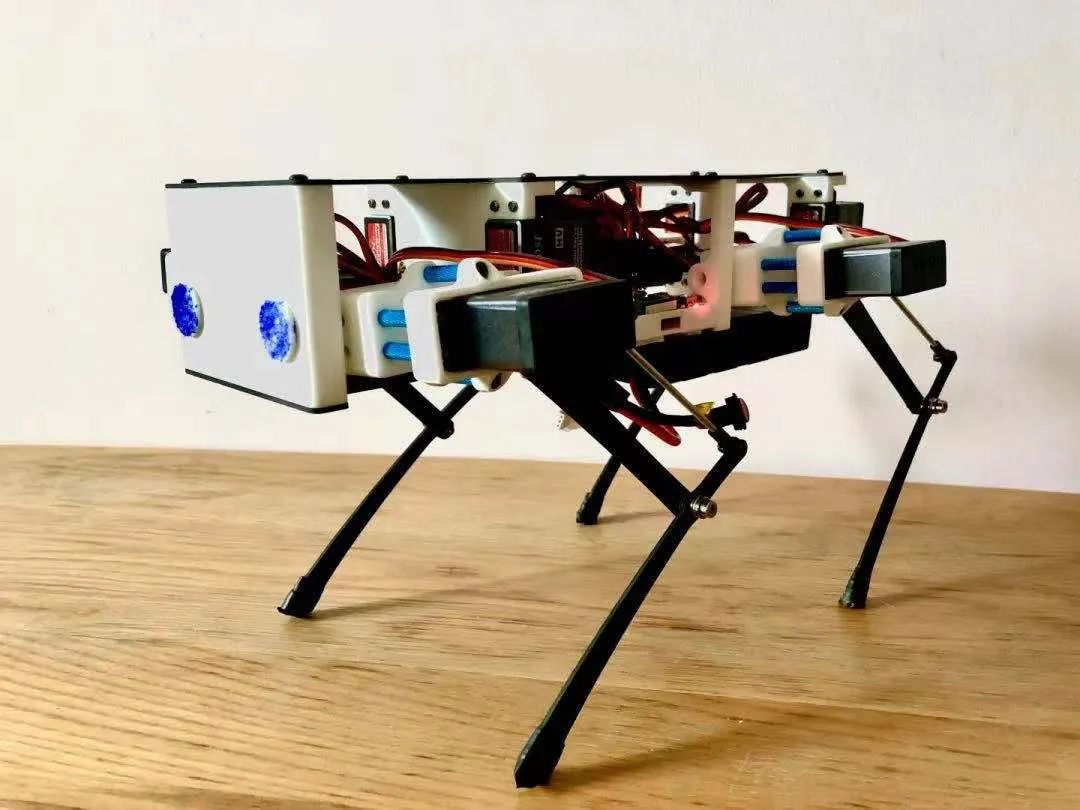
Through three-axis body posture control, this Raspberry Pi version of the Boston Dynamics dog can achieve two movement modes.
One is jogging posture. In this four-phase gait, the two legs diagonally opposite the robot dog move simultaneously, allowing for faster movement speed.

The other is walking posture. This eight-phase gait that combines body movement helps maintain the balance and stability of the robot dog.

This robot dog was created by a foreign guy Michael Romanko.
Feeling a bit excited?
Then let’s continue to read, grab this detailed open-source tutorial, and owning your mini Boston Dynamics dog is not a dream. (Dog head)
Hardware costs less than 4,000 yuan
This Raspberry Pi robot dog is built on the open-source ThingVerse Spot Micro framework. The shell part is made using a 3D printer with a 0.6 nozzle.

The software part is implemented on a Raspberry Pi 3B computer running Ubuntu 16.04.
So first, you need to prepare a Raspberry Pi 3B development board worth about 230 yuan.

The control components include a servo driver PCA9685 priced at less than 30 yuan, with an I2C interface.
And 12 servo motors PDI-HV5523MG, with a single price of about 70+ yuan.
Additionally, you need to equip a 16×2 I2C interface LCD display.
For the battery, a 2s 4000mAh lithium battery is used, directly connected to the power servo, priced at about 160 yuan.
The voltage regulator used is HKU5 5V/5A UBEC, which powers the Raspberry Pi, LCD panel, and PCA9695 control board, costing approximately 45 yuan.
The entire setup, including the 3D printer, costs no more than 4,000 yuan, even lower than the cost of Stanford’s cheap open-source quadruped robot Pupper (600-1000 dollars).

▲ Stanford Pupper
Detailed tutorial down to every detail
Mike’s assembly tutorial is relatively brief, but it provides a reference for a “mini robot dog AI” (SpotMicroAI) community.
The SpotMicroAI tutorial can be described as “hand-holding”, where the engineer who wrote the tutorial has provided detailed steps for assembling the robot dog, even including how to SSH into the Raspberry Pi, aiming for everyone to understand.

First, install the operating system for the Raspberry Pi, it is recommended to install PINN, which is an enhanced version of the NOOBS operating system installer.
After installation, the system comes with SSH and VNC, without needing to connect a keyboard and mouse to the Raspberry Pi, you can debug it remotely.

▲ Successfully connected to Raspberry Pi via VNC
Select to install Raspbian Lite from the many operating system options in PINN. After that, disconnect the VNC connection, and connect to the Raspberry Pi entirely via SSH.

The Raspberry Pi system comes with FTP. To facilitate beginners in transferring files between the computer and Raspberry Pi, it is recommended to install the FileZilla software.
Enter the Raspberry Pi’s IP address, username, password, port 22, and click Quickconnect to connect to the Raspberry Pi’s file system. Now, you can drag and drop files from SpotMicroAI as needed.

Next, we enter the most critical step, installing the robot dog control software. To simplify installation, the author has written a script that automates the installation process:
ssh [email protected] https://gitlab.com/custom_robots/spotmicroai/basic-runtime/-/raw/master/utilities/self_install.sh | bashThen start the I2C communication bus. Open the terminal and run the following command:
sudo raspi-configThen make the following changes from the display options: Interfacing options → Enable I2C

Next, connect all hardware to the Raspberry Pi as shown in the diagram below:

The 3D printing files for the robot dog’s shell are also included. The author recommends using a 0.6mm nozzle, with a layer height set to 0.3mm, to maximize printing speed.

After completing the hardware assembly, it’s time for software debugging.
First, download the default configuration file in JSON format: https : //gitlab.com/custom_robots/spotmicroai/basic-runtime/-//blob/master/spotmicroai.default and place it in the user’s home directory.
Open the calibration tool and click to calibrate the 12 servos, finding the initial position of the motors when the robot dog is in a “rest” state.
cd ~/spotmicroai/calibration./calibration.sh
The calibrated robot dog can perform various actions.

By the way, what is the display screen installed at the tail of the robot dog for? It helps us quickly see the current status of the robot dog.

For example, in the panel above, we can see the current temperature of the Raspberry Pi CPU, the connection status with the external controller, the status of the servo control board, etc.
Thus, the mini robot dog is completed. If you want to not only assemble it but also learn more advanced development tutorials, you can check out the contents in Extra.
Next Steps
Currently, Mike’s mini robot dog can only perform some simple actions. Mike’s next plan is to make it as smart as the Boston Dynamics robot dog. Mike’s future goals are:
1. Add a laser radar to achieve simple 2D mapping of the room through SLAM, just like the original Boston Dynamics robot dog.
Someone has already achieved Mike’s first goal:

2. Develop an automatic motion module to guide the robot to perform simple tasks around the sensed 2D environment. For example, navigating in a room and avoiding obstacles.
3. Create software modules combining cameras or network cameras for basic image classification. For example, perceiving the closure and opening of a fist, allowing the robot to respond to a specific action, achieving gesture control.
Netizens: Let’s do it
DIY “Boston Dynamics dog” by yourself, such practice has even been praised by the Raspberry Pi official.

Netizens have expressed: “Wow, this is really cool.”
Some people can’t wait to start making it themselves.


So, shall we do it?
Reference links:
https://www.raspberrypi.org/blog/mini-raspberry-pi-boston-dynamics-inspired-robot/
https://github.com/mike4192/spotMicro#Overview
https://gitlab.com/custom_robots/spotmicroai
Source: Quantum Bit
Hardware Arsenal
DF Hardware Arsenal
Click to learn more👆
If anyone has anything to say, feel free to leave a message below!
Previous Project Review
▼ DIY a small spider robot with Arduino

Click to read👆
▼ DIY a remote-controlled six-legged robot

Click to read👆
▼ Make a small quadruped robot based on ESP32

Click to read👆
▼ A robot that can run, jump, and stroll, the little brother of Boston Dynamics Spot is here!
Click to read👆
▼ Highly expandable, the little brother of the quadruped robot Stanford Pupper is here!

Click to read👆
▼ How to make a Strider camera robot with ESP32-CAM and 3D printed parts

Click to read👆