Click the blue text above to follow us
WeChat Official Account:OpenCV Academy
Follow us for more knowledge on computer vision and deep learning
Since the release ofYOLOv5 version 7.0, and the introduction of YOLOv8 and YOLO 11, previous versions of OpenCV 4.6 can no longer load exported ONNX format models. Only OpenCV 4.7 and above can support inference deployment for the latest versions of YOLOv5, YOLOv8, and YOLO 11 models. First, let’s take a look at the input and output formats of the latest version ofYOLO 11: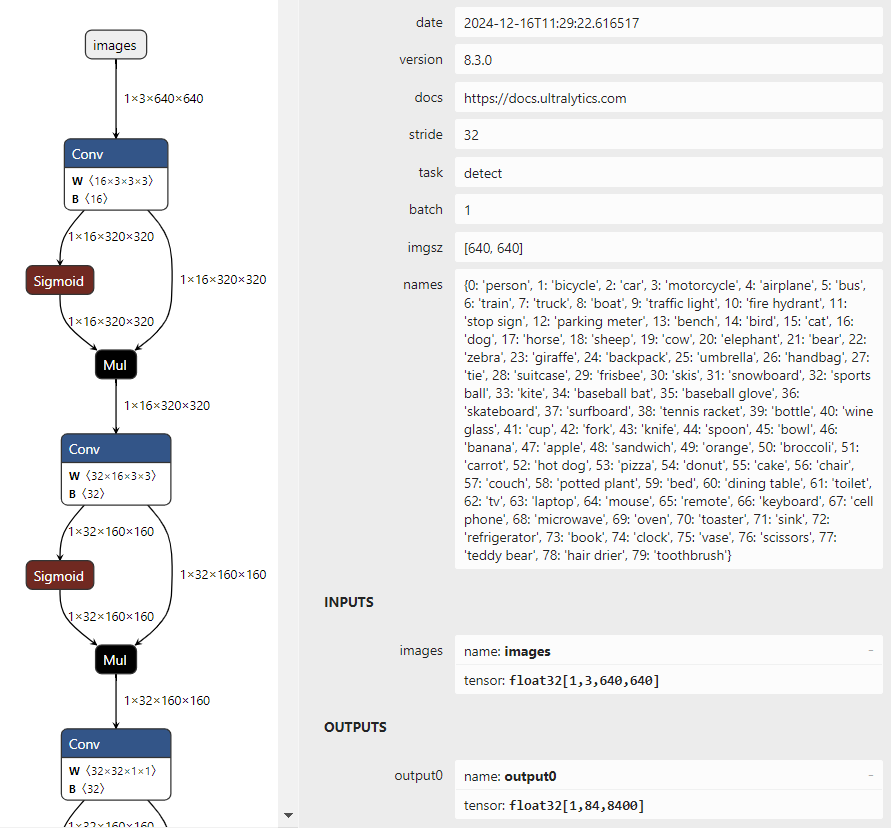
You will find that the input and output results are completely consistent with YOLOv8, with no changes.
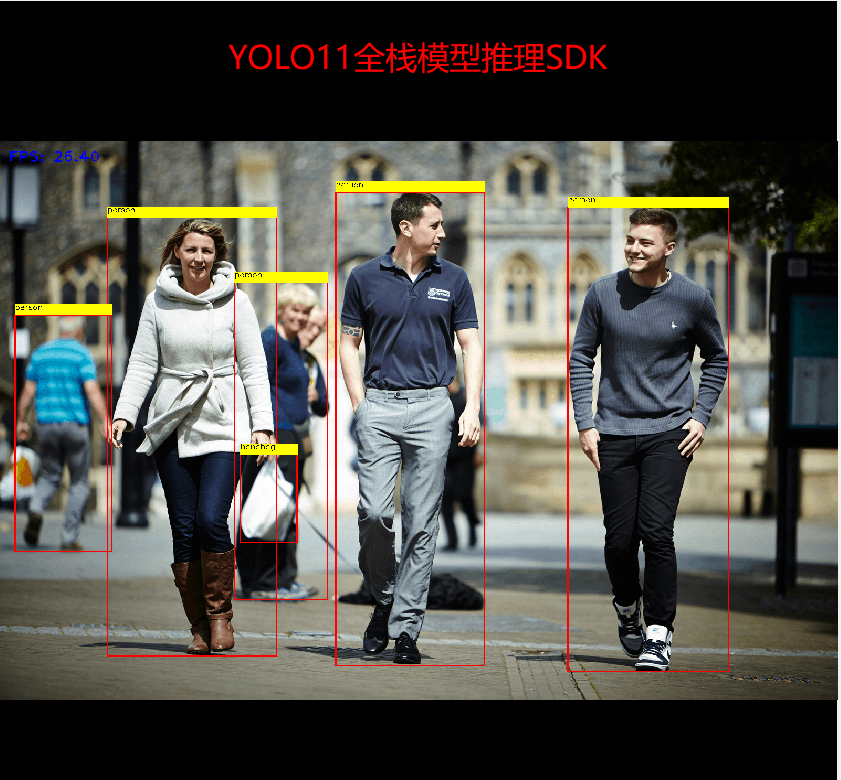
Inference demonstration screenshots:

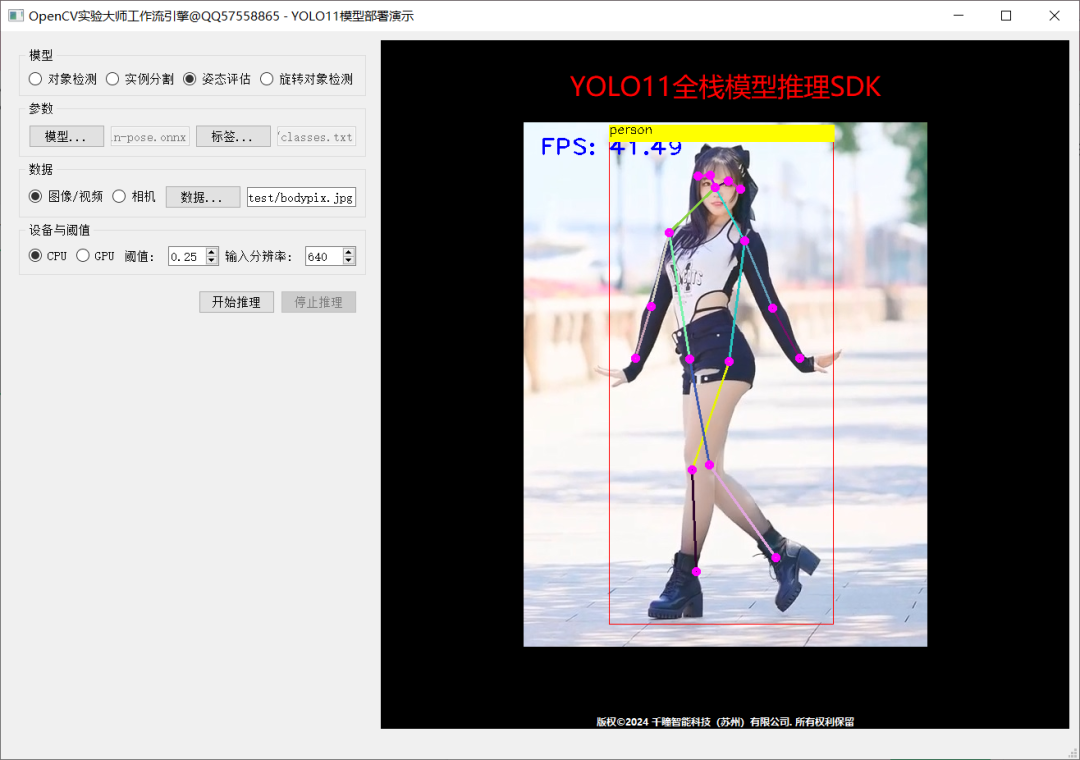
The code has been fully tested and can be called directly:
#include<opencv2/opencv.hpp>
#include<iostream>
#include<fstream>

std::string label_map ="D:/python/yolov5-7.0/classes.txt";
int main(int argc,char** argv){
    std::vector<std::string> classNames;
    std::ifstream fp(label_map);
    std::string name;
while(!fp.eof()){
        getline(fp, name);
if(name.length()){
            classNames.push_back(name);
}
}
    fp.close();
    std::vector<cv::Scalar> colors;
    colors.push_back(cv::Scalar(0,255,0));
    colors.push_back(cv::Scalar(0,255,255));
    colors.push_back(cv::Scalar(255,255,0));
    colors.push_back(cv::Scalar(255,0,0));
    colors.push_back(cv::Scalar(0,0,255));
    std::string onnxpath ="D:/projects/yolov8n.onnx";
auto net = cv::dnn::readNetFromONNX(onnxpath);

    net.setPreferableBackend(cv::dnn::DNN_BACKEND_OPENCV);
    net.setPreferableTarget(cv::dnn::DNN_TARGET_CPU);
    cv::VideoCapture capture("D:/images/video/sample.mp4");
    cv::Mat frame;
while(true){
bool ret = capture.read(frame);
if(frame.empty()){
break;
}
        int64 start = cv::getTickCount();
// Image preprocessing - formatting operations
int w = frame.cols;
int h = frame.rows;
int _max = std::max(h, w);
        cv::Mat image = cv::Mat::zeros(cv::Size(_max, _max), CV_8UC3);
        cv::Rect roi(0,0, w, h);
        frame.copyTo(image(roi));
float x_factor = image.cols /640.0f;
float y_factor = image.rows /640.0f;

// Inference
        cv::Mat blob = cv::dnn::blobFromImage(image,1/255.0, cv::Size(640,640), cv::Scalar(0,0,0),true,false);
        net.setInput(blob);
        cv::Mat preds = net.forward();
// Post-processing, 1x84x8400
        cv::Mat outs(preds.size[1], preds.size[2], CV_32F, preds.ptr<float>());
        cv::Mat det_output = outs.t();
float confidence_threshold =0.5;
        std::vector<cv::Rect> boxes;
        std::vector<int> classIds;
        std::vector<float> confidences;
for(int i =0; i < det_output.rows; i++){
            cv::Mat classes_scores = det_output.row(i).colRange(4, preds.size[1]);
            cv::Point classIdPoint;
double score;
            minMaxLoc(classes_scores,0,&score,0,&classIdPoint);
// Confidence between 0 and 1
if(score >0.25)
{
float cx = det_output.at<float>(i,0);
float cy = det_output.at<float>(i,1);
float ow = det_output.at<float>(i,2);
float oh = det_output.at<float>(i,3);
int x =static_cast<int>((cx -0.5* ow)* x_factor);
int y =static_cast<int>((cy -0.5* oh)* y_factor);
int width =static_cast<int>(ow * x_factor);
int height =static_cast<int>(oh * y_factor);
                cv::Rect box;
                box.x = x;
                box.y = y;
                box.width = width;
                box.height = height;

                boxes.push_back(box);
                classIds.push_back(classIdPoint.x);
                confidences.push_back(score);
}
}

// NMS
        std::vector<int> indexes;
        cv::dnn::NMSBoxes(boxes, confidences,0.25,0.50, indexes);
for(size_t i =0; i < indexes.size(); i++){
int index = indexes[i];
int idx = classIds[index];
            cv::rectangle(frame, boxes[index], colors[idx %5],2,8);
            cv::rectangle(frame, cv::Point(boxes[index].tl().x, boxes[index].tl().y -20),
                cv::Point(boxes[index].br().x, boxes[index].tl().y), cv::Scalar(255,255,255),-1);
            cv::putText(frame, classNames[idx], cv::Point(boxes[index].tl().x, boxes[index].tl().y -10), cv::FONT_HERSHEY_SIMPLEX,.5, cv::Scalar(0,0,0));
}


float t =(cv::getTickCount()- start)/static_cast<float>(cv::getTickFrequency());
        putText(frame, cv::format("FPS: %.2f",1.0/ t), cv::Point(20,40), cv::FONT_HERSHEY_PLAIN,2.0, cv::Scalar(255,0,0),2,8);
char c = cv::waitKey(1);
if(c ==27){
break;
}
        cv::imshow("OpenCV4.8 + YOLOv8", frame);
}
    cv::waitKey(0);
    cv::destroyAllWindows();
return0;
}
1
QT5 + OpenCV4 Beginner to Practical – Roadmap
Course IntroductionSystematically master QT application development skills and related software engineering knowledge, understand commonly used UI components, metadata systems, multithreading, design patterns in QT desktop application development, learn to efficiently develop OpenCV algorithms and QT interface integration based on OpenCV experimental master tool software and workflow engine library, integrate multithreaded inference of YOLOv8 series models, complete face recognition, code reading, template matching, measurement, blob detection, circle detection, line segment detection, contour finding, security intrusion detection, fitness counting, electronic fence systems, Ubuntu embedded development board QT + deep learning + OpenCV4.8 face recognition, automatic watermark removal, and other application development and migration cases. The course summary includes over 80+ hours, provides more than 100 pages of detailed electronic documents, nearly ten thousand lines of C++ code, and dozens of various QT + OpenCV + deep learning cases, providing e-book materials. Benchmarking job positions, get ahead, and be ready for employment after completion.Target AudienceDevelopers who need to master QT5 + OpenCV, senior undergraduate and graduate students, developers who need to complete deep learning application development, upper computer developers.Discount ActivitiesOriginal Price:498Discount: 399Scan to view the course directory
Recommended Reading
OpenCV4.8+YOLOv8 Object Detection C++ Inference Demonstration
ZXING+OpenCV Build Open Source Barcode Detection Application
Strategy | A Good Method to Learn Deep Learning in Just Three Months
Three Lines of Code to Implement TensorRT8.6 C++ Deep Learning Model Deployment
Practical | YOLOv8+OpenCV Implement DM Code Positioning Detection and Analysis
Object Detection Bounding Box Loss – From IOU to ProbIOU
Must-Read for Beginners | Five Misconceptions in Learning Deep Learning