Click on the above “Beginner Learning Visual“, choose to add “Star” or “Pinned“
Heavyweight content delivered promptly
Getting started with deep learning, many people have experienced the bitter journey from beginner to abandonment, with countless individuals failing at the first hurdle: environment configuration issues. As the saying goes, if the environment is not set up correctly, learning leads to tears.
If you are facing the pain of configuring the environment, whether you are a Windows user, Ubuntu user, or a die-hard Mac fan, this article is tailor-made for you. Next, we will discuss the deep learning environment configuration issues for Windows, Mac, and Ubuntu in turn.
1. Windows System Deep Learning Environment Configuration
Installation Combination: Anaconda + PyTorch (GPU version) + GTX1060
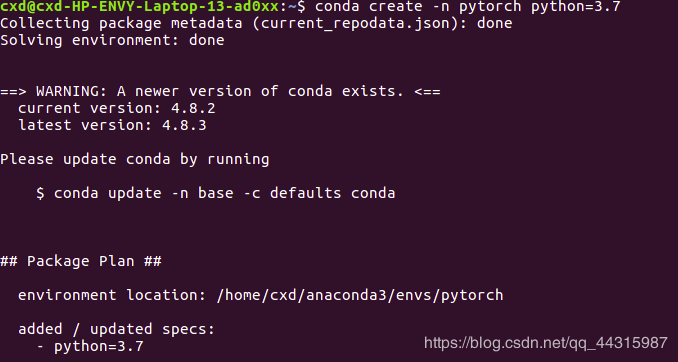
1.1 Open Anaconda Prompt

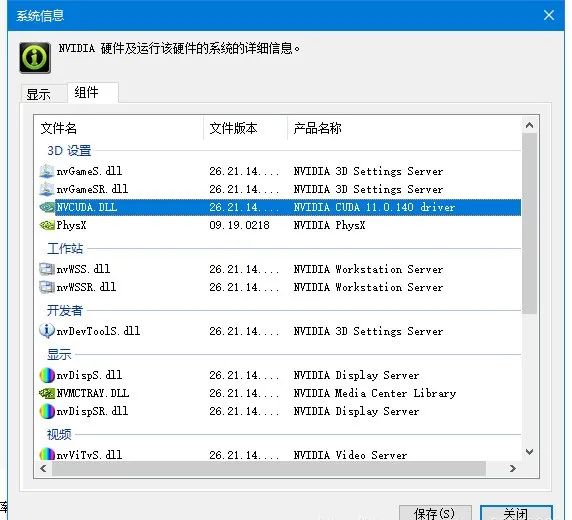
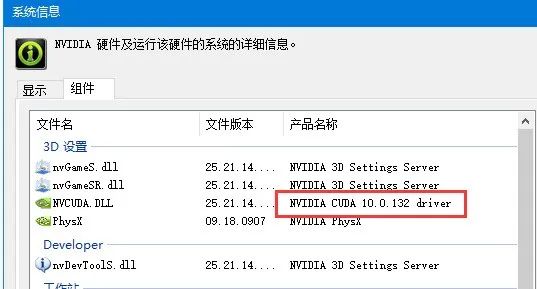
1.2 Determine the CUDA version supported by hardware
NVIDIA Control Panel – Help – System Information – Components
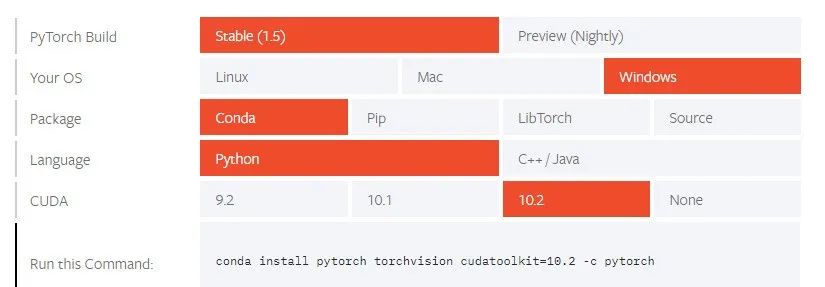
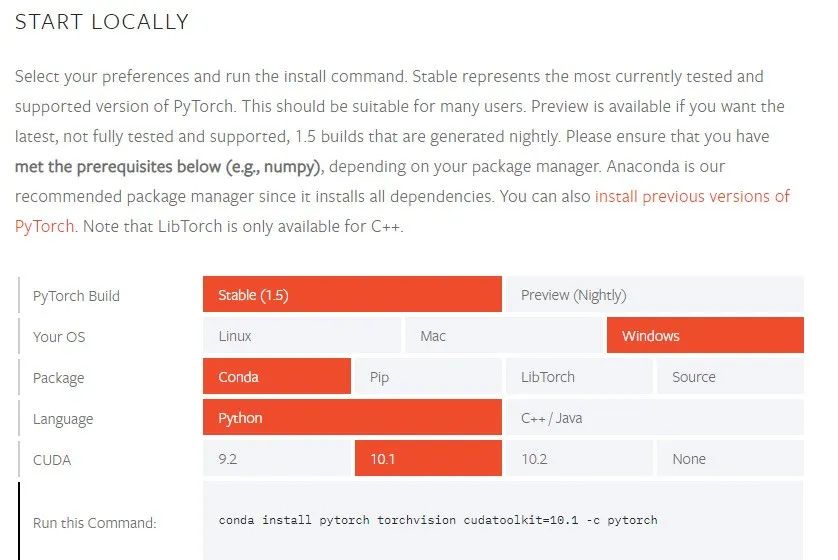
1.3 Determine PyTorch version and torchvision version
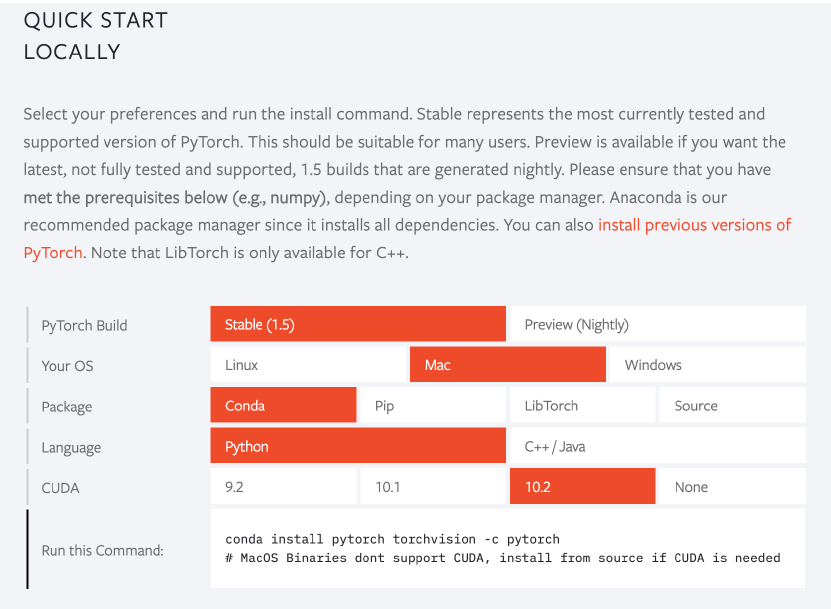
Visit the PyTorch official website: https://pytorch.org/get-started/locally/
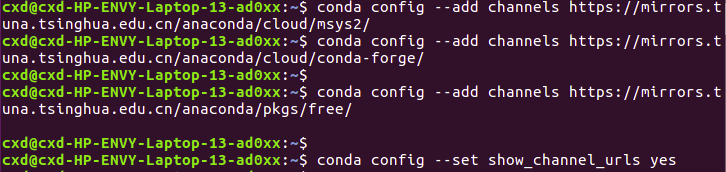
Because the official source is too slow, here we use Tsinghua source for downloading
1.4 Download the corresponding installation package from the mirror
Tsinghua Mirror:
PyTorch:

torchvision:

1.5 Local Installation
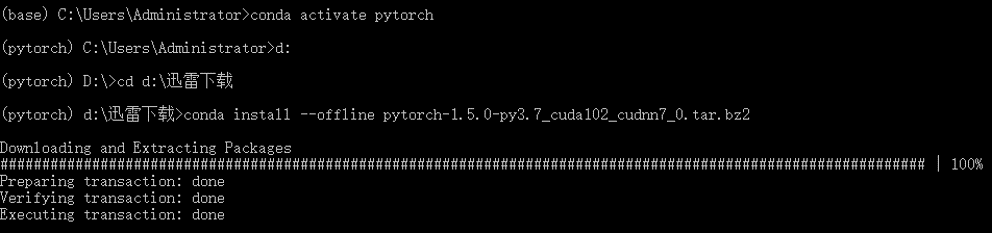

Then return to the directory where the virtual environment is located and use conda install anaconda to install the basic packages required for the environment

1.6 Test
Code 1:
from __future__ import print_function
import torch
x = torch.rand(5, 3)
print(x)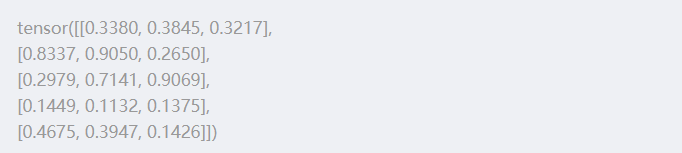
import torch
torch.cuda.is_available()If there are no exceptions in the output of the above two code snippets, it indicates that the environment setup was successful.
1.7 Issues Encountered
-
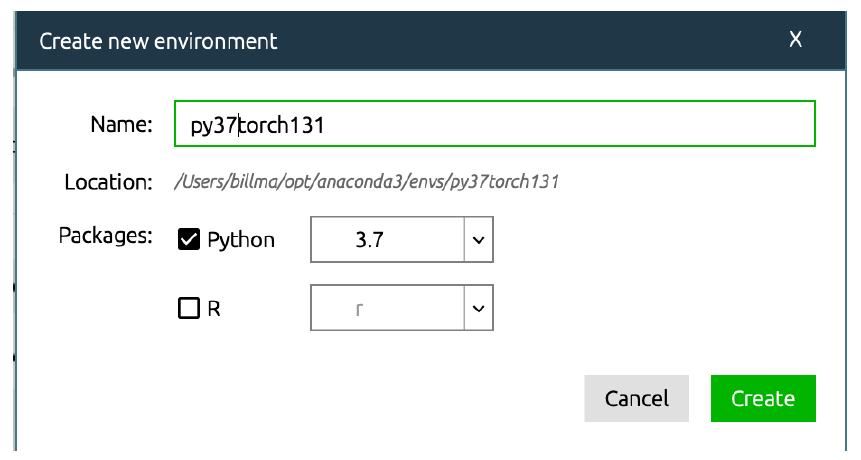
Error creating virtual environment with the command below
conda create -n py37_torch131 python=3.7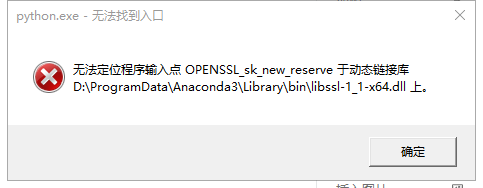
The environment will be saved in the envs folder under the Anaconda directory
-
PackagesNotFoundError: The following packages are not available from current channels
-
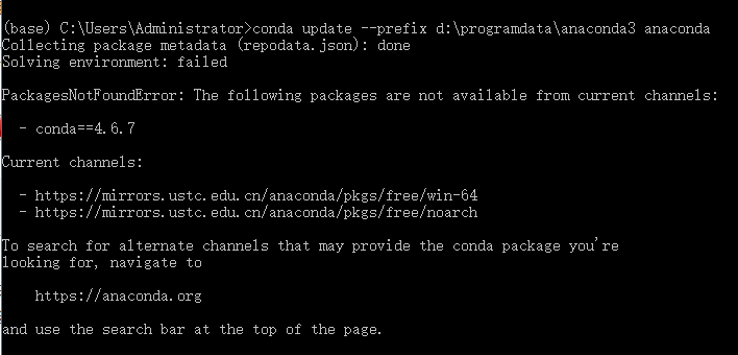
Conda download is too slow
I shout Tsinghua is awesome!
-
CUDA installation
-
PyTorch installation
conda install pytorch torchvision cudatoolkit=10.0 -c pytorch-
How to enter the virtual environment in Jupyter Notebook
python -m ipykernel install –name
1. Open Anaconda Prompt and enter conda env list to view existing environments
2. Enter activate name (name is the environment you want to switch to)
3. conda install ipykernel to install necessary plugins
4. python -m ipykernel install –name Name to add the environment to Jupyter (Name is the name displayed in Jupyter for this environment, customizable)
Delete kernel
jupyter kernelspec remove
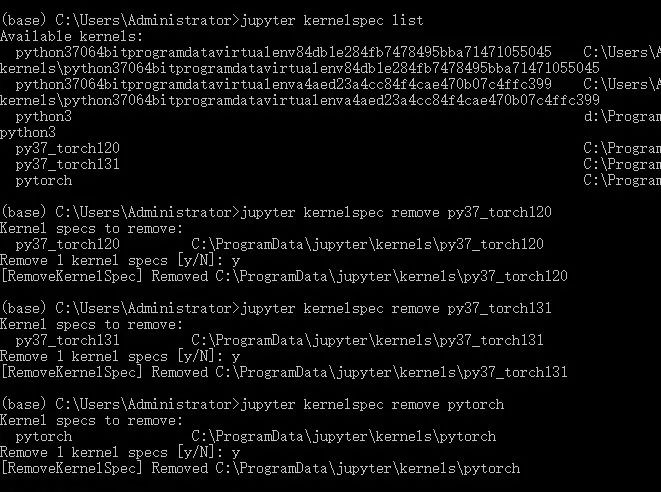
[Errno 13] Permission denied: ‘/usr/local/share/jupyter’
python -m ipykernel install --user --name py27-caffe-notebookThus, the kernel addition is complete. To view existing kernels:
jupyter kernelspec listDelete an existing kernel
jupyter kernelspec remove <kernel_name></kernel_name>The above command only deletes the configuration file and does not uninstall the corresponding ipykernel of the virtual environment. Therefore, if you want to reinstall the kernel for the corresponding Python virtual environment, just activate the virtual environment, and then
python -m ipykernel install --name <kernel_name></kernel_name>-
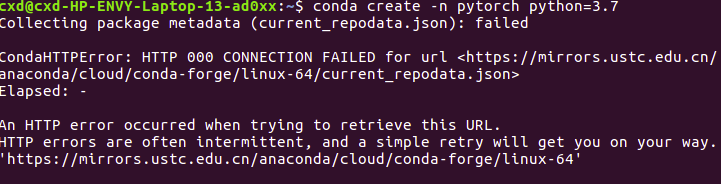
Conda installation fails halfway
Download the file locally, navigate to the directory of the file, and use the command
conda install --offline <package_name></package_name>2.1 Install Anaconda
2.2 Confirm Download Status

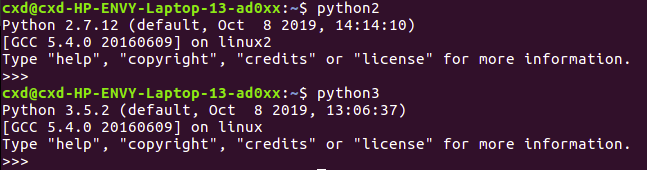
In the Mac Terminal, enter
python --versionEnsure that the installed Python is version 3.x. In the Terminal, enter
jupyter notebook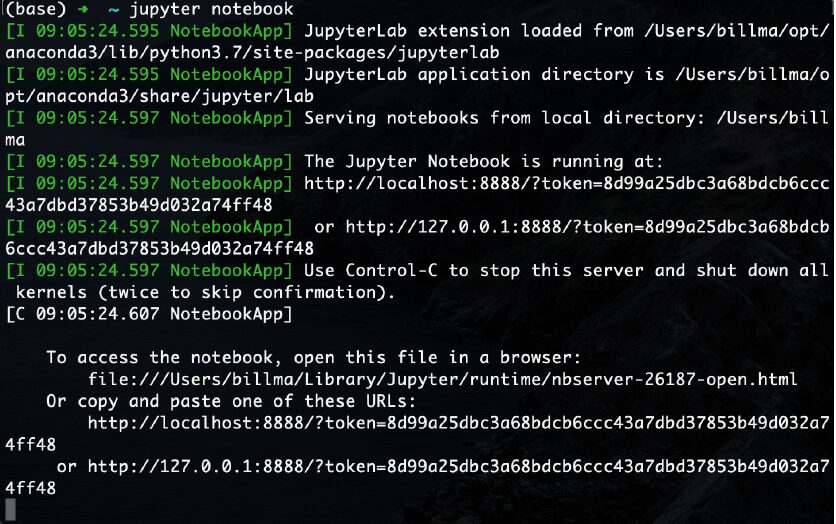

2.2.1 Common Issues
If multiple Anaconda versions are downloaded on the computer, conflicts may occur during operation. In the Terminal, enter
cd ~Return to the home directory and enter
cat .bash_profileIf you can only see one version of Anaconda, there is no problem. If there are multiple versions, conflicts may occur when downloading packages. Use vim, nano, or other text editors to delete the old version of Anaconda’s
export PATH= ...Delete it.
2.3 Creating Virtual Environments and Downloading Packages
Using conda to create virtual environments and download corresponding packages is a simple task.
2.3.1 Graphic
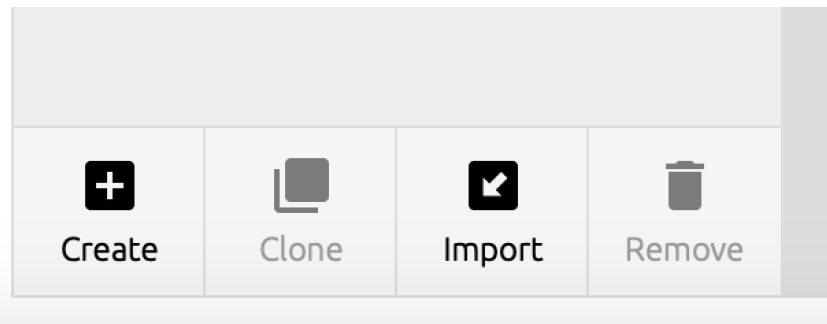
Then on the Home page, ensure that the top left corner points to the environment name you just created. In this environment, install jupyter notebook, noting that the original notebook installed is in base and cannot be shared.
Return to the Environments section, and you can see all the packages in this environment. Select All in the upper left corner, and enter the name of the package you want to download
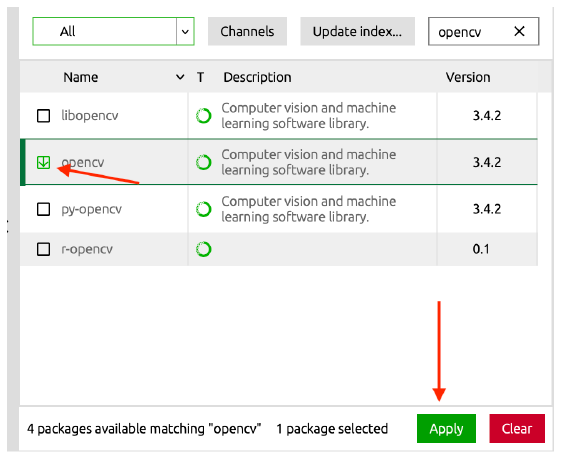
Then select it for download

2.3.2 Command Line
Using the command line to complete the above operations is also very straightforward. This time we take PyTorch as an example. In the Terminal, enter
conda create --name env_nameThis will create a virtual environment called “env_name”. Enter
conda env listto see all created virtual environments, where the one with * is the current environment. Enter
conda activate env_nameto enter the environment
conda deactivateto exit the current virtual environment and return to base.
2.3.3 Download PyTorch
conda install pytorch torchvision -c pytorchCopy it, paste it into the Terminal, and run it to start downloading.
After downloading, enter in the Terminal
python3Then import the two packages just downloaded to confirm completion
import torch
import torchvision
print(torch.__version__)
print(torchvision.__version__)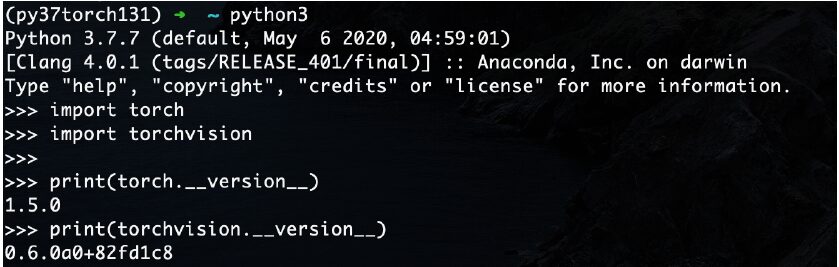
quit()And it’s done.
2.4 Additional Situations
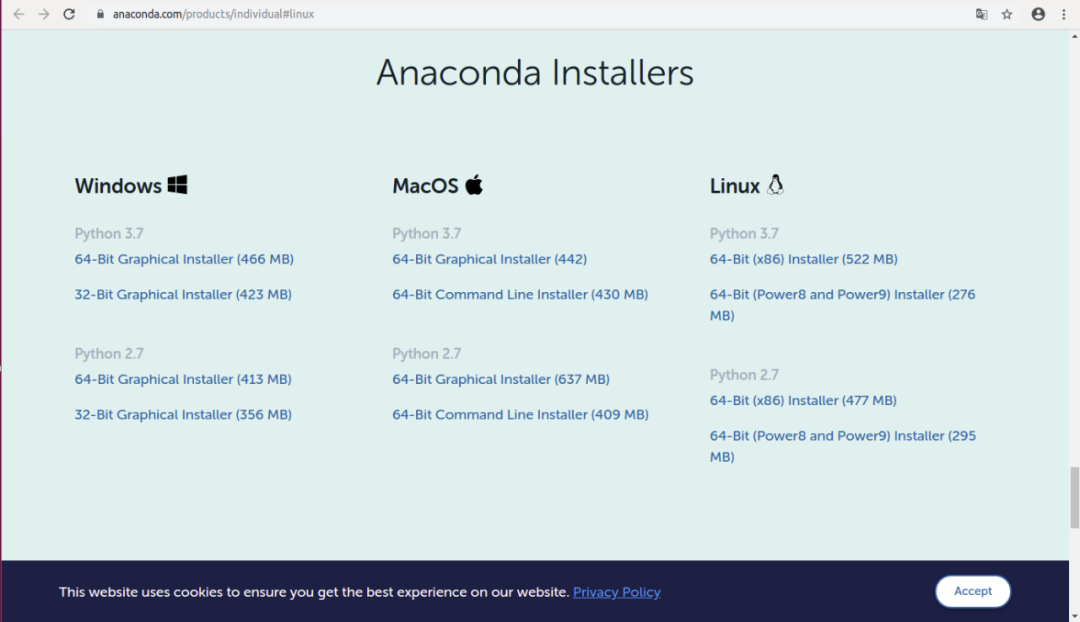
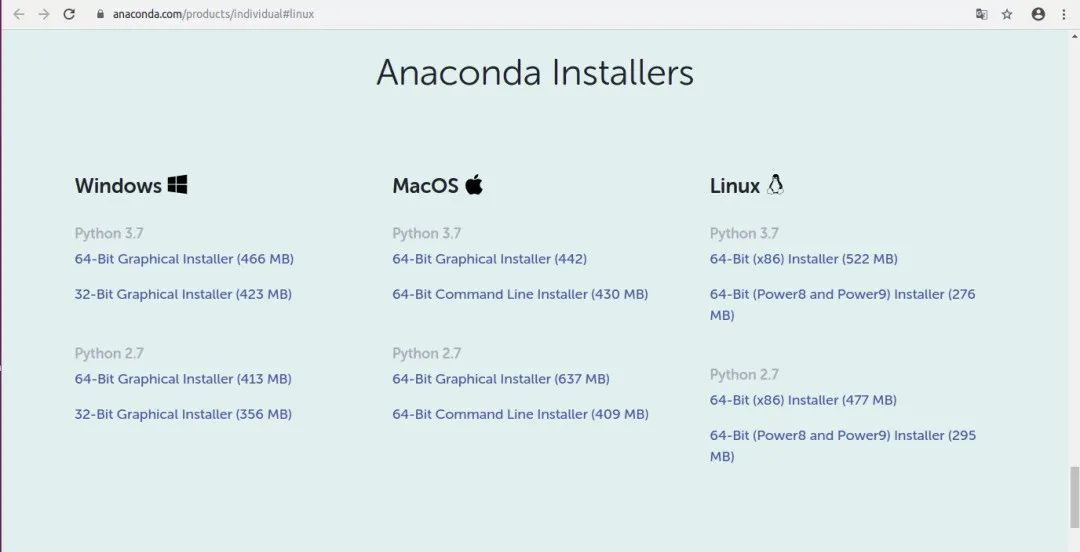
Click on the 64-Bit (x86) Installer (522 MB) below to download the 64-bit version.
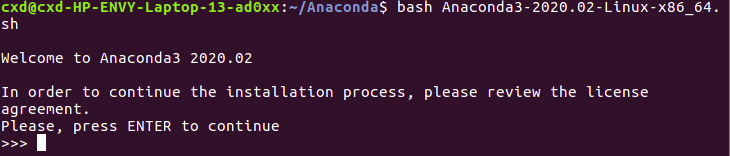
The downloaded file name is: Anaconda3-2020.02-Linux-x86_64.sh.
cd to the directory where Anaconda3-2020.02-Linux-x86_64.sh is located:


Next, manually add the environment variable. First, cd to ~, then edit the .bashrc file: sudo vim .bashrc

# Distinguish between anaconda python and system built-in python
alias python3="/usr/bin/python3.5"
alias python2="/usr/bin/python2.7"
. /home/cxd/anaconda3/etc/profile.d/conda.sh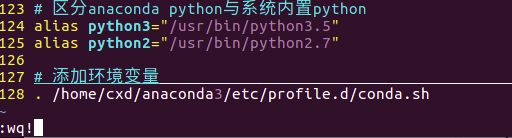
Enter source .bashrc to execute the modified initialization document


3.2 PyTorch CPU Version Installation
Open the PyTorch official website: https://pytorch.org/
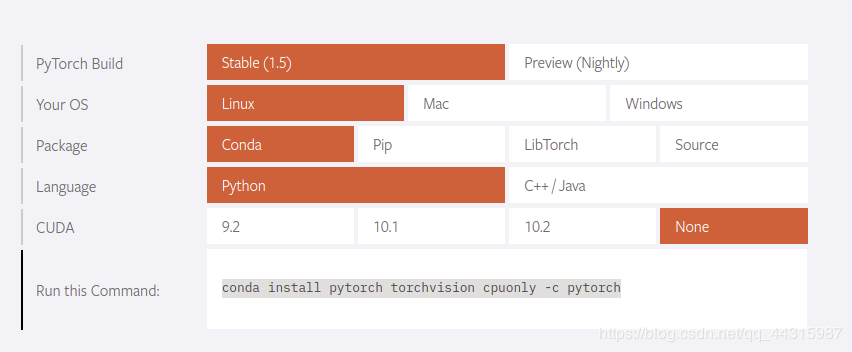
conda config --add channels https://mirrors.tuna.tsinghua.edu.cn/anaconda/cloud/pytorchconda install pytorch torchvision cpuonly -c pytorch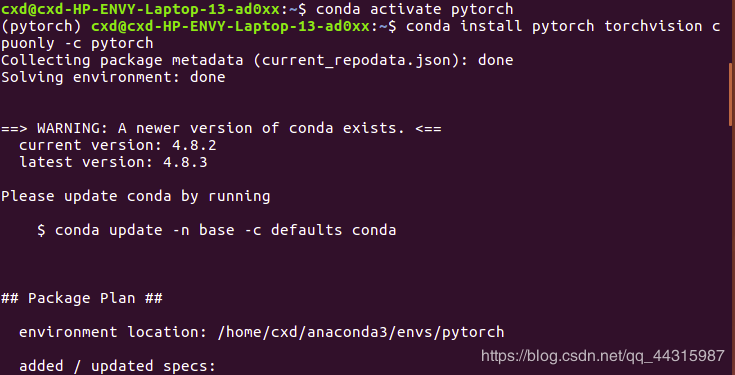
import torch
print(torch.__version__)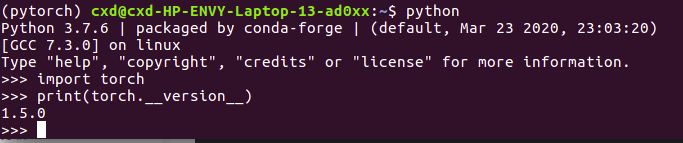
3.3 PyTorch GPU Installation
3.3.1 GPU Driver Installation
-
Check Graphics Card Type
Execute the command: ‘ ubuntu-drivers devices’
== /sys/devices/pci0000:00/0000:00:01.0/0000:01:00.0 ==
modalias : pci:v000010DEd00001C8Dsv00001028sd0000086Fbc03sc02i00
vendor   : NVIDIA Corporation
model    : GP107M [GeForce GTX 1050 Mobile]
driver   : nvidia-driver-390 - distro non-free
driver   : nvidia-driver-435 - distro non-free
driver   : nvidia-driver-440 - distro non-free recommended
driver   : xserver-xorg-video-nouveau - distro free builtin

== /sys/devices/pci0000:00/0000:00:14.3 ==
modalias : pci:v00008086d0000A370sv00008086sd000042A4bc02sc80i00
vendor   : Intel Corporation
model    : Wireless-AC 9560 [Jefferson Peak]
manual_install: True
driver   : backport-iwlwifi-dkms - distro free
You can see here that there is a device which is GTX 1050. The recommended driver is 440.
-
Install Driver
Install all recommended drivers
sudo ubuntu-drivers autoinstallTo install one driver
sudo apt install nvidia-4403.3.2 Install CUDA
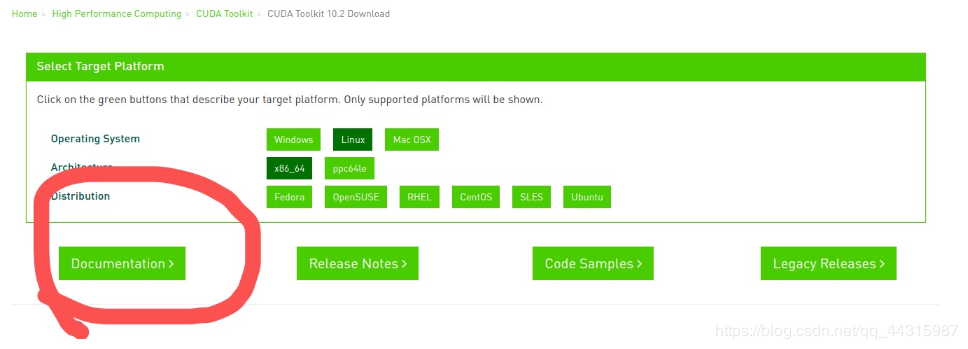
CUDA installation requires the appropriate graphics card driver. Below is the version correspondence between the driver and CUDA
Table 1. CUDA Toolkit and Compatible Driver Versions
CUDA Toolkit    Linux x86_64 Driver Version Windows x86_64 Driver Version
CUDA 10.2.89    >= 440.33   >= 441.22
CUDA 10.1 (10.1.105 general release, and updates)   >= 418.39   >= 418.96
CUDA 10.0.130   >= 410.48   >= 411.31
CUDA 9.2 (9.2.148 Update 1) >= 396.37   >= 398.26
CUDA 9.2 (9.2.88)   >= 396.26   >= 397.44
CUDA 9.1 (9.1.85)   >= 390.46   >= 391.29
CUDA 9.0 (9.0.76)   >= 384.81   >= 385.54
CUDA 8.0 (8.0.61 GA2)   >= 375.26   >= 376.51
CUDA 8.0 (8.0.44)   >= 367.48   >= 369.30
CUDA 7.5 (7.5.16)   >= 352.31   >= 353.66
CUDA 7.0 (7.0.28)   >= 346.46   >= 347.62
CUDA download link: http://suo.im/6dY8rL
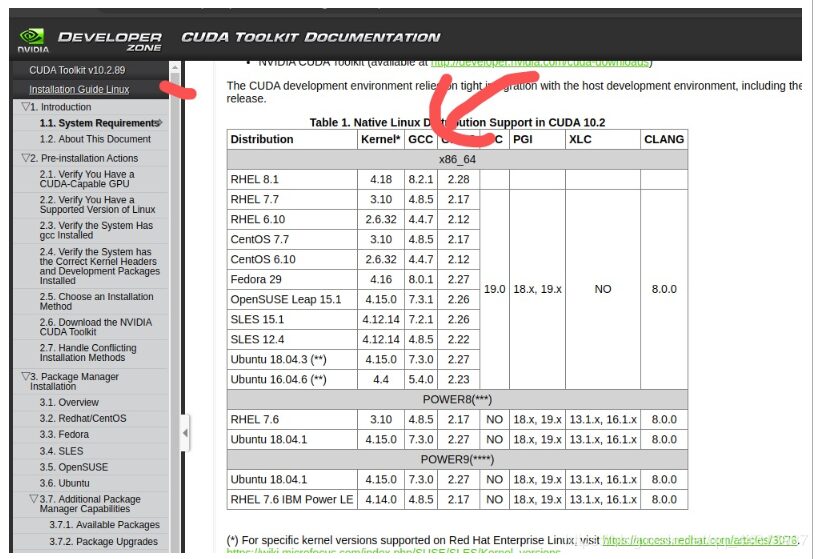
Installer Type can choose either of the first two. However, after obtaining the CUDA file, first check the gcc version. Below is an example using the first runfile (local) installation method.
-
Install GCC
Linux generally comes with GCC, let’s first check the version of GCC in your system
gcc --versionAnd the GCC dependency version for CUDA will be provided in the official installation guide
sudo apt-get install gcc-7.0
sudo apt-get install g++-7.0
After installation, you need to switch the system GCC version
sudo update-alternatives --install /usr/bin/gcc gcc /usr/bin/gcc-7 50
sudo update-alternatives --install /usr/bin/g++ g++ /usr/bin/g++-7 50
Select the required version
sudo update-alternatives --config gcc
  Select       Path          Priority  Status
------------------------------------------------------------* 0 /usr/bin/gcc-9 50 Automatic mode 1 /usr/bin/g++-9 50 Manual mode 2 /usr/bin/gcc-7 50 Manual mode-
Install CUDA
sudo sh cuda_<your_version>_linux.run</your_version>-
Configure Environment Variables
sudo vim ~/.bashrcCopy the following command into it
export PATH=/usr/local/cuda-10.2/bin${PATH:+:$PATH}}
export LD_LIBRARY_PATH=/usr/local/cuda-10.2/lib64${LD_LIBRARY_PATH:+:${LD_LIBRARY_PATH}}
Check if the installation was successful
nvcc -V3.3.3 Install cuDNN
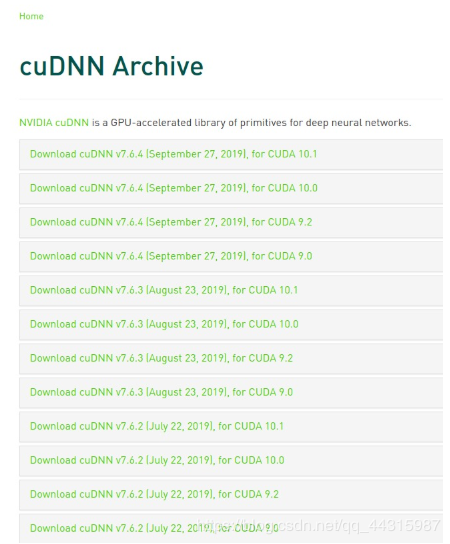
https://developer.nvidia.com/cudnn Select the version corresponding to CUDA
Then copy the include and lib64 folders of cuDNN to CUDA
sudo cp cuda/include/cudnn.h    /usr/local/cuda-10.2/include    # The name of the unzipped folder is cuda-10.2
sudo cp cuda/lib64/libcudnn*    /usr/local/cuda-10.2/lib64
sudo chmod a+r /usr/local/cuda-10.2/include/cudnn.h   /usr/local/cuda-10.2/lib64/libcudnn*
3.3.4 Install PyTorch-GPU
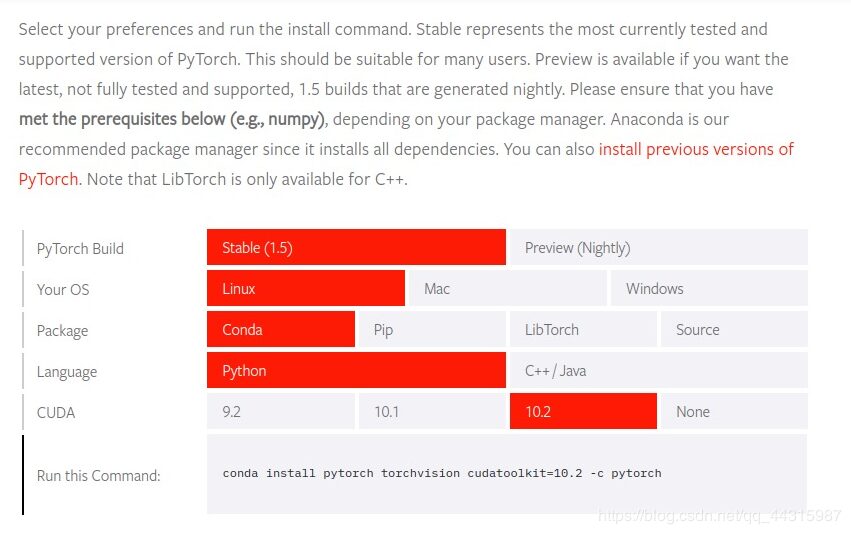
Conda installation:
# Choose the corresponding CUDA version
conda install pytorch torchvision cudatoolkit=10.2
pip installation:
pip install torch torchvision -i https://pypi.mirrors.ustc.edu.cn/simpleDownload 1: OpenCV-Contrib Extension Module Chinese Version Tutorial
Reply "Extension Module Chinese Tutorial" in the "Beginner Learning Visual" public account backstage to download the first OpenCV extension module tutorial in Chinese, covering more than twenty chapters including extension module installation, SFM algorithms, stereo vision, target tracking, biological vision, super-resolution processing, etc.
Download 2: Python Vision Practical Projects 52 Lectures
Reply "Python Vision Practical Projects" in the "Beginner Learning Visual" public account backstage to download 31 visual practical projects including image segmentation, mask detection, lane line detection, vehicle counting, eyeliner addition, license plate recognition, character recognition, emotion detection, text content extraction, face recognition, etc., to help you quickly learn computer vision.
Download 3: OpenCV Practical Projects 20 Lectures
Reply "OpenCV Practical Projects 20 Lectures" in the "Beginner Learning Visual" public account backstage to download 20 practical projects based on OpenCV, achieving advanced learning in OpenCV.
Communication Group
Welcome to join the public account reader group to communicate with peers. Currently, there are WeChat groups for SLAM, 3D vision, sensors, autonomous driving, computational photography, detection, segmentation, recognition, medical imaging, GAN, algorithm competitions, etc. (will gradually be subdivided). Please scan the WeChat ID below to join the group, and note: "Nickname + School/Company + Research Direction", for example: "Zhang San + Shanghai Jiao Tong University + Visual SLAM". Please follow the format; otherwise, the request will not be approved. After successfully adding, you will be invited into the relevant WeChat group based on your research direction. Please do not send advertisements in the group; otherwise, you will be removed from the group. Thank you for your understanding~