“In embedded development, target devices often cannot compile locally due to limited resources. Cross-compilation becomes a key technology—using a powerful host platform and a dedicated toolchain to generate executable code for the target platform. This article elaborates on its concepts and general processes, detailing cross-compilation implementation with examples from the three major architectures: ARM, MIPS, and RISC-V.”
01
—
Concept of Cross-Compilation
Cross-compilation refers to the process of compiling code on a host platform (usually an x86 architecture PC running Linux/Windows) using a specific toolchain to generate executable code that can run directly on the target platform (such as embedded devices with ARM/MIPS/RISC-V architectures).
In embedded scenarios, target platforms generally face resource constraints (such as weak CPU power, small memory/storage, and lack of a complete operating system), making it impossible to carry out the compilation process directly (which requires substantial memory and processing power); thus, cross-compilation becomes a fundamental step in embedded development.
02
—
General Process of Cross-Compilation
The complete cross-compilation process must cover all stages of “environment preparation – compilation configuration – building – verification,” as shown in the flowchart below:
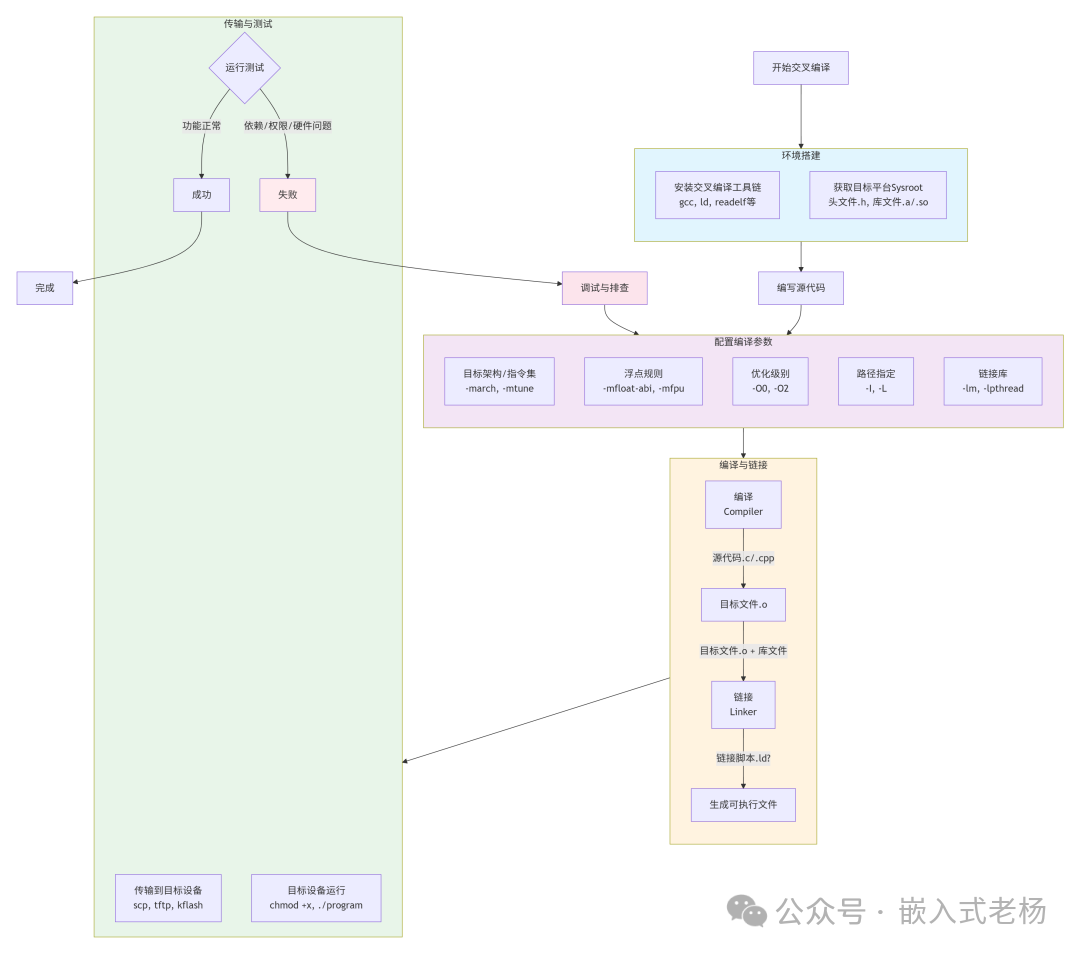
1.Environment Setup: Toolchain + Sysroot
Install the cross-compilation toolchain: This includes the compiler specific to the target platform (such as aarch64-linux-gnu-gcc), linker (ld), and target file inspection tools (readelf), etc.
Obtain the target platform Sysroot: This is the “root directory image” of the target system, containing the header files (.h) required for compilation and the library files (static library .a / dynamic library .so) needed for linking, ensuring that the compiled products fully match the library dependencies of the target system (e.g., copying /usr/include and /lib directories from Raspberry Pi).
2.Write Source Code:
Write code (primarily in C/C++) based on the hardware characteristics of the target platform (such as architecture, peripheral register addresses) and the software environment (whether there is an OS, type of OS), avoiding the use of host platform-specific APIs (e.g., Windows Win32 functions cannot run on Linux embedded devices).
3.Configure Compilation Parameters:
Clearly specify the following key parameters (using GCC as an example):
Target Architecture / Instruction Set: -march (e.g., ARM’s armv8-a, RISC-V’s rv64imafdc), -mtune (CPU optimization).
Floating Point Rules: -mfloat-abi (e.g., hard for hard floating point, soft for soft floating point), -mfpu (specify floating point unit, such as ARM’s neon).
Optimization Level: -O0 (no optimization, for debugging), -O2 (balance between performance and compilation speed, commonly used).
Header File / Library File Paths: -I (specify header file path, e.g., -I./sysroot/usr/include), -L (specify library file path, e.g., -L./sysroot/lib).
Link Libraries: -l (e.g., link math library -lm, thread library -lpthread).
4.Compile and Link
Compile: This converts the source code into object files (.o, binary intermediate files that cannot be run directly) for the target platform.
Link: This merges multiple .o files and dependent libraries to generate the executable file for the target platform (primarily in ELF format, pure binary .bin for bare metal scenarios).
5.Transfer and Test
Transfer the executable file to the target device via serial (tftp), network (scp), or flashing tools (kflash), grant execution permissions (chmod +x), and run it to verify if the functionality is normal (e.g., LED blinking, log printing).
03
—
Cross-Compilation for Three Major Embedded Platforms
The following covers three mainstream scenarios: ARM (with OS), MIPS (with OS), and RISC-V (bare metal), with details optimized according to actual development.
1. ARM Architecture: Raspberry Pi 4B (64-bit Linux, AArch64)
Architecture: ARM Cortex-A72 (AArch64, ARMv8), running Raspbian (Debian-based Linux).
Toolchain Selection: Use aarch64-linux-gnu-gcc for 64-bit; use arm-linux-gnueabihf-gcc (hard floating point version) for 32-bit ARM (e.g., Raspberry Pi Zero).
Step 1: Set Up Environment (Host is Ubuntu 22.04)
# 1. Install cross toolchain
sudo apt update && sudo apt install -y gcc-aarch64-linux-gnu g++-aarch64-linux-gnu
# 2. Prepare Sysroot (copy from Raspberry Pi, ensure library matches)
# First, log in to Raspberry Pi via SSH, package key files from the root directory (Raspberry Pi IP: 192.168.1.100)
ssh [email protected] "sudo tar -czf /tmp/raspi_sysroot.tar.gz /usr/include /usr/lib /lib"
# Copy to host PC
scp [email protected]:/tmp/raspi_sysroot.tar.gz ./
# Unzip to host directory
mkdir -p ./raspi_sysroot
tar -zxf raspi_sysroot.tar.gz -C ./raspi_sysroot
Step 2: Write Source Code (hello_raspi.c, with system calls)
#include <stdio.h>
#include <unistd.h>
#include <sys/utsname.h>  // Get system information
int main() {
    struct utsname sys_info;
    uname(&sys_info);  // Get target platform's system architecture, kernel version, etc.
    printf("Hello from Raspberry Pi 4B (AArch64)!\n");
    printf("Target Architecture: %s\n", sys_info.machine);  // Output architecture (e.g., aarch64)
    printf("Target Kernel Version: %s\n", sys_info.release);  // Output kernel version
    // Loop to print for observation
    for (int i = 0; i < 3; i++) {
        printf("Count: %d\n", i + 1);
        sleep(1);
    }
    return 0;
}
Step 3: Compile and Link (support dynamic/static compilation)
# Method 1: Dynamic compilation (depends on target board's libc.so, smaller file size)
aarch64-linux-gnu-gcc \
  -o hello_raspi_dynamic hello_raspi.c \
  -march=armv8-a -O2 \
  # Match Cortex-A72 architecture, O2 optimization
  -I./raspi_sysroot/usr/include \
  # Specify Sysroot header files
  -L./raspi_sysroot/lib \
  # Specify Sysroot library files
  -lm  # Link math library (example, this code can actually omit this)
# Method 2: Static compilation (does not depend on target board dynamic libraries, larger file size, strong compatibility)
aarch64-linux-gnu-gcc \
  -o hello_raspi_static hello_raspi.c \
  -march=armv8-a -O2 \
  -I./raspi_sysroot/usr/include \
  -L./raspi_sysroot/lib \
  -static  # Key parameter for static compilation
# Check executable file information (confirm target architecture)
aarch64-linux-gnu-readelf -h hello_raspi_dynamic
# The "Machine" field in the output should be "AArch64", confirming it is a target platform file
Generated files:
-
hello_raspi_dynamic: AArch64 dynamic linked executable (ELF format, depends on libc.so.6).
-
hello_raspi_static: AArch64 static linked executable (ELF format, no external library dependencies).
Step 4: Transfer and Run
# 1. Transfer file to Raspberry Pi (dynamic/static optional)
scp hello_raspi_static [email protected]:/home/pi/
# 2. Log in to Raspberry Pi and run
ssh [email protected]
chmod +x /home/pi/hello_raspi_static
/home/pi/hello_raspi_static
# Expected output:
# Hello from Raspberry Pi 4B (AArch64)!
# Target Architecture: aarch64
# Target Kernel Version: 5.15.84-v8+
# Count: 1
# Count: 2
# Count: 3
Automated Compilation Makefile
To simplify the compilation process for multi-file projects, create a Makefile:
# Cross-compilation toolchain
CC = aarch64-linux-gnu-gcc
# Compilation parameters: architecture, optimization, Sysroot path
CFLAGS = -march=armv8-a -O2 -I./raspi_sysroot/usr/include -L./raspi_sysroot/lib
# Target files
TARGET_DYN = hello_raspi_dynamic
TARGET_STAT = hello_raspi_static
# Source files
SRC = hello_raspi.c
# Default target: compile dynamic + static versions
all: $(TARGET_DYN) $(TARGET_STAT)
# Dynamic compilation
$(TARGET_DYN): $(SRC)    $(CC) $(CFLAGS) -o $@ $<
# Static compilation
$(TARGET_STAT): $(SRC)    $(CC) $(CFLAGS) -static -o $@ $<
# Clean generated files
clean:    rm -f $(TARGET_DYN) $(TARGET_STAT)
# Declare phony targets (to avoid name conflicts)
.PHONY: all clean
Usage: make to compile, make clean to clean.
2. MIPS Architecture: OpenWRT Router (MT7620A, 32-bit Little Endian)
Architecture: MIPS 24Kc (32-bit little-endian, mipsel), running OpenWRT (embedded Linux).
Toolchain Selection: Prefer using the precompiled toolchain from OpenWRT (to avoid the hassle of source compilation), with the toolchain prefix mipsel-openwrt-linux-.
Step 1: Obtain Precompiled Toolchain
-
Visit the OpenWRT official website (https://downloads.openwrt.org/), select the corresponding firmware version (e.g., 23.05).
-
Download the “Toolchain” package (e.g., openwrt-toolchain-ramips-mt7620_gcc-12.3.0_musl.Linux-x86_64.tar.xz, ramips-mt7620 corresponds to MT7620A).
-
Unzip the toolchain to the host PC:
tar -xJf openwrt-toolchain-ramips-mt7620_gcc-12.3.0_musl.Linux-x86_64.tar.xz
# Toolchain path: ./openwrt-toolchain-ramips-mt7620_gcc-12.3.0_musl.Linux-x86_64/bin/
Step 2: Write Source Code (led_control.c, control router LED)
OpenWRT controls the LED through sysfs, and the path varies by device model, so you need to confirm the actual path on the target router first:
# Log in to the router (default IP: 192.168.1.1, username root)
ssh [email protected]
# View all LED sysfs paths
ls /sys/class/leds/  # Output like "mt7620a:green:wan", "mt7620a:red:status"
Based on the actual path, write the code:
#include <stdio.h>
#include <fcntl.h>
#include <unistd.h>
#include <string.h>
// Replace with the target router's LED path (from the above command)
#define LED_WAN_PATH "/sys/class/leds/mt7620a:green:wan/brightness"
// Control LED on/off (brightness=255 on, 0 off)
void set_led(int fd, int on) {
    const char* val = on ? "255" : "0";
    lseek(fd, 0, SEEK_SET);  // Reset file pointer
    write(fd, val, strlen(val));
}
int main() {
    // Open LED control file (read-only will fail, need O_WRONLY)
    int fd = open(LED_WAN_PATH, O_WRONLY);
    if (fd < 0) {
        perror("Failed to open LED path");  // Print error reason
        return -1;
    }
    // LED blinks 3 times (on for 1 second, off for 1 second)
    printf("LED blinking...\n");
    for (int i = 0; i < 3; i++) {
        set_led(fd, 1);
        sleep(1);
        set_led(fd, 0);
        sleep(1);
    }
    close(fd);
    printf("LED control done\n");
    return 0;
}
Step 3: Compile (using precompiled toolchain)
# Toolchain prefix (from unzipped path)
TOOLCHAIN_PREFIX=./openwrt-toolchain-ramips-mt7620_gcc-12.3.0_musl.Linux-x86_64/bin/mipsel-openwrt-linux-
# Compile (OpenWRT toolchain has built-in Sysroot, no need to specify)
${TOOLCHAIN_PREFIX}gcc \
  -o led_control_mips led_control.c \
  -mips32r2 -mtune=24kc -O2  # Match MIPS 24Kc architecture
Generated file: led_control_mips (MIPS 32-bit little-endian executable, ELF format).
Step 4: Transfer and Run
# Transfer file to router (OpenWRT tmp directory has read/write permissions)
scp led_control_mips [email protected]:/tmp/# Log in to the router and run
ssh [email protected]
chmod +x /tmp/led_control_mips
/tmp/led_control_mips
# Observe the router's WAN port green LED blinking, while the terminal outputs "LED blinking..."
3. RISC-V Architecture: Kendryte K210 (64-bit Bare Metal)
Architecture: RISC-V RV64IMAFDC (64-bit, supports integer, multiplication, floating-point, etc. instruction sets), no operating system (bare metal), requires direct manipulation of hardware registers.
Toolchain Selection: Use the bare metal dedicated toolchain riscv64-unknown-elf-gcc (does not include Linux system libraries, only includes compiler runtime library libgcc.a).
Step 1: Install Toolchain (Host is Ubuntu)
# Download precompiled toolchain (from SiFive official)
wget https://github.com/sifive/freedom-tools/releases/download/v2020.12/riscv64-unknown-elf-gcc-10.2.0-2020.12.8-x86_64-linux-ubuntu14.tar.gz
# Unzip
tar -zxf riscv64-unknown-elf-gcc-10.2.0-2020.12.8-x86_64-linux-ubuntu14.tar.gz
# Add to environment variable (temporary effect, for permanent effect, write to ~/.bashrc)
export PATH=$PATH:$(pwd)/riscv64-unknown-elf-gcc-10.2.0-2020.12.8-x86_64-linux-ubuntu14/bin
Step 2: Write Bare Metal Code (k210_led.c, manipulate GPIO registers)
Refer to the official manual for K210’s GPIO register addresses; the LED pin is usually GPIO16 (may vary by development board, need to confirm with hardware manual):
#include <stdint.h>
// K210 GPIO register base address (defined in official manual)
#define GPIO_BASE 0x38000000
// GPIO output enable register (bit=1 indicates corresponding pin is output)
#define GPIO_OUTPUT_EN  (*(volatile uint32_t *)(GPIO_BASE + 0x00))
// GPIO output value register (bit=1 indicates high level, 0 low level)
#define GPIO_OUTPUT_VAL (*(volatile uint32_t *)(GPIO_BASE + 0x04))
// Initialize LED: set GPIO16 as output
void led_init() {
    GPIO_OUTPUT_EN |= (1 << 16);  // Set bit16, enable GPIO16 output
    GPIO_OUTPUT_VAL &= ~(1 << 16); // Initially off (pull low)
}
// Toggle LED state
void led_toggle() {
    GPIO_OUTPUT_VAL ^= (1 << 16);  // XOR operation, toggle bit16
}
// Delay function (note: empty loop delay depends on CPU frequency, only for example; use hardware timer in actual projects)
void delay_ms(uint32_t ms) {
    // K210 default frequency 400MHz, roughly estimate loop count (adjust based on actual frequency)
    const uint32_t cycles_per_ms = 400000;  // 400MHz = 400,000,000 cycles/second
    for (uint32_t i = 0; i < ms; i++) {
        for (uint32_t j = 0; j < cycles_per_ms; j++) {
            __asm__ volatile ("nop");  // Empty instruction to prevent compiler from optimizing out the loop
        }
    }
}
// Bare metal program entry (no main function, need to specify entry as _start, or set via linker script)
int main() {
    led_init();
    while (1) {  // Infinite loop, bare metal program has no exit mechanism
        led_toggle();
        delay_ms(500);  // Toggle every 500ms (1 second blink)
    }
    return 0;
}
Step 3: Write Linker Script (k210.ld, specify memory layout)
Bare metal programs need to define the code and data segments’ positions in memory through a linker script (K210 has 8MB RAM, starting address 0x80000000):
/* K210 Linker Script */
MEMORY {
ram (rwx) : ORIGIN = 0x80000000, LENGTH = 8M  // RAM starting address + size
}
SECTIONS {
    .text : {  // Code segment (stores instructions)
        *(.text)  // All source files' .text segments
        *(.rodata) // Read-only data segment (e.g., string constants)
    } > ram  // Place in RAM area
    .data : {  // Initialized data segment
        *(.data)
    } > ram
    .bss : {  // Uninitialized data segment (cleared at runtime)
        *(.bss)
    } > ram
}
Step 4: Compile and Link (generate binary file)
Bare metal programs need to be linked directly with gcc (ensure to include compiler runtime library), rather than using ld alone:
# Compile + link: generate ELF file (with debug information)
riscv64-unknown-elf-gcc \
  -o k210_led.elf k210_led.c \
  -march=rv64imafdc -mabi=lp64d \  # Match K210 architecture + ABI
  -nostdlib -nostartfiles \  # Do not link standard libraries and startup files (bare metal has no OS)
  -T k210.ld \  # Specify linker script
  -g  # Generate debug information (optional, for gdb debugging)
# Convert to pure binary file (K210 can load directly)
riscv64-unknown-elf-objcopy -O binary k210_led.elf k210_led.bin
Generated files:
-
k210_led.elf: RISC-V bare metal ELF file (with symbol table, for debugging).
-
k210_led.bin: Pure binary file (K210 can be flashed via JTAG / serial).
Step 5: Flash and Run
Use the K210 dedicated flashing tool kflash.py:
# Install kflash
pip install kflash
# Flash (-p specifies serial port, e.g., /dev/ttyUSB0; K210 must be set to flashing mode first)
kflash -p /dev/ttyUSB0 -b 1500000 k210_led.bin
# After flashing is complete, the K210 development board's LED starts blinking once every second
04
—
Summary
1. Toolchain Matching:
Must fully match the target platform’s “architecture (ARM/MIPS/RISC-V) + bitness (32/64) + endianness (little-endian / big-endian) + OS (with / without)”; otherwise, the compiled product cannot run.
2.Sysroot Cannot Be Ignored:
Platforms with OS (such as Raspberry Pi, OpenWRT) rely on header files and libraries in Sysroot to avoid the “compiled successfully but missing libraries at runtime” issue.
3.File Format Differences:
With OS: Generates ELF format executable files (supports dynamic/static linking).
Bare Metal: Generates pure binary files (.bin), requiring a linker script to specify memory layout.
4.Debugging and Optimization:
Use -g to generate debug information, combined with gdb-multiarch for remote debugging of target devices.
Avoid empty loop delays in bare metal; prioritize using hardware timers (such as K210’s Timer0) for precise delays.
Through the above process, most cross-compilation needs for embedded platforms can be covered, from Linux devices with OS to bare metal chips without OS, all capable of generating usable target code.
Previous Articles:
Brightness and Color Adjustment Program for WS2812B Based on STM32
Key Parameters and Selection Points for ADC
The Essence of Task Switching in FreeRTOS
Introduction to a Domestic Low-Power Series MCU
The Difference Between Firmware and Software in Embedded Development
The Role of the Embedded “Clock Tree”
MCU Registers vs. Library Functions: Which Should You Choose?
AI Smart Ring: Small Size, Big Technological Energy
Detailed Explanation of Motor Principles and Classifications
Introduction to Peripheral Component Selection and Layout for Switching Power Supply (DCDC) Design