Detailed Steps and Considerations for Dynamic Library Plugin Projects (DLL) in Visual Studio, the following content provides a complete operational process and common problem solutions:
1. Create a Qt Class Library (DLL) Project
1. Start Visual Studio
Open Visual Studio (recommended versions are 2019 or 2022, and the Qt Visual Studio Tools extension must be installed to support Qt projects).
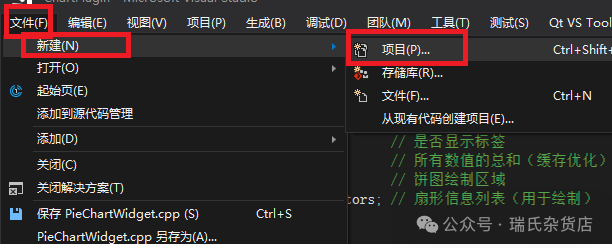
2. Create a New Project
- •
Click on the menu bar Create New Project → Enter Qt in the search box → Select Qt Class Library (if the template exists).
- •
If the template is not found (e.g., in older versions of VS), select Dynamic Link Library (DLL), and manually configure Qt support later.
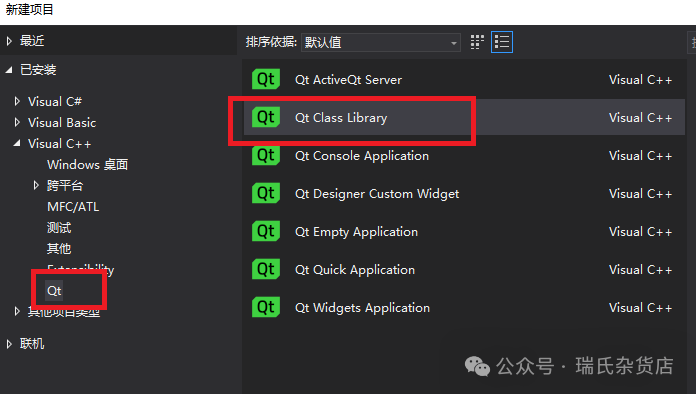
3. Configure Basic Project Information
- •
Project Name: For example,
<span>ChartPlugin</span>. - •
Location: For example, choose the project storage path (e.g.,
<span>D:\Projects\PieChartPlugin</span>). - •
Solution Name: For example, auto-generated (e.g.,
<span>ChartPluginSolution</span>).
2. Configure Project Properties (Key Step)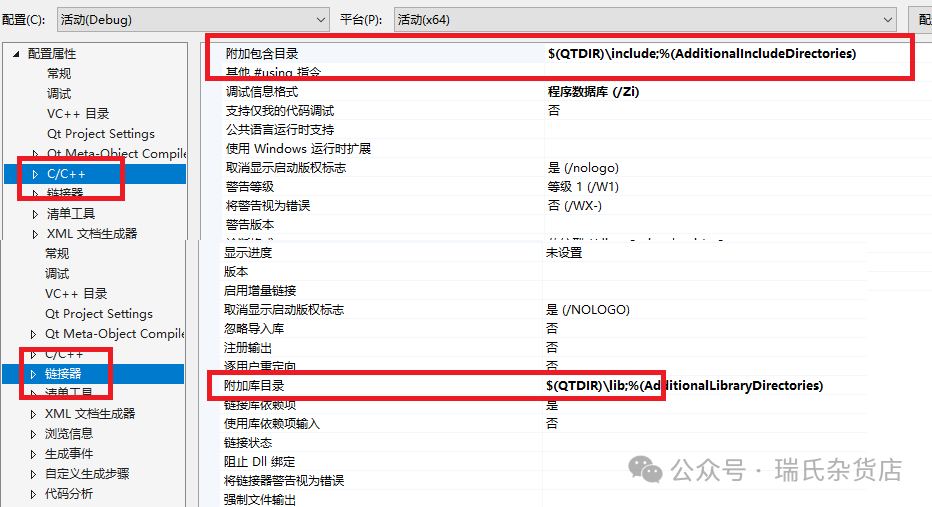
1. Confirm Qt Environment Variables
- •
Ensure that Qt is installed and the environment variable
<span>QTDIR</span>is configured (e.g.,<span>C:\Qt\5.15.2\msvc2019_64</span>), and Visual Studio can recognize this path. - •
If not configured, manually add: right-click “This PC” → “Properties” → “Advanced System Settings” → “Environment Variables” → Add user variable
<span>QTDIR</span>, with the value being the Qt installation path (e.g.,<span>C:\Qt\5.15.2\msvc2019_64</span>).
2. Configure C/C++ → General → Additional Include Directories
- •
Double-click the project → Right-side “Property Manager” → Expand
<span>PieChartPlugin</span>→<span>Microsoft.Cpp.x64.user</span>(or corresponding platform) → Double-click C/C++ → General. - •
Add to Additional Include Directories:
$(QTDIR)\include;$(ProjectDir); // $(QTDIR) is the Qt installation path, $(ProjectDir) is the project root directory - •
Purpose: To allow the compiler to find Qt header files (such as
<span>QtWidgets</span>,<span>QtCore</span>) and project custom header files (such as<span>PieChartWidget.h</span>).
3. Configure C/C++ → Preprocessor → Preprocessor Definitions
- •
Add to Preprocessor Definitions:
PIECHARTPLUGIN_LIBRARY;_WINDOWS;_CRT_SECURE_NO_WARNINGS - •
<span>PIECHARTPLUGIN_LIBRARY</span>: User-defined macro to mark the plugin library (must be consistent with subsequent plugin export macros). - •
<span>_WINDOWS</span>: Specifies the Windows platform (to avoid conflicts with other platforms). - •
<span>_CRT_SECURE_NO_WARNINGS</span>: Disables CRT security warnings (optional, but common in Windows development).
4. Configure Linker → General → Additional Library Directories
- •
Add to Additional Library Directories:
$(QTDIR)\lib;$(OutDir) - •
<span>$(QTDIR)\lib</span>: Path to Qt library files (such as<span>Qt5Core.lib</span>,<span>Qt5Gui.lib</span>). - •
<span>$(OutDir)</span>: Project output directory (such as<span>Debug</span>or<span>Release</span>folders, used to find the generated DLL during linking).
5. Configure Linker → Input → Additional Dependencies
- •
Add Qt core libraries to Additional Dependencies (choose Debug/Release versions based on Qt version and configuration):
Qt5Core.lib;Qt5Gui.lib;Qt5Widgets.lib; // Release version // If it is a Debug configuration, add libraries with "d" suffix (e.g., Qt5Cored.lib) - •
If the project configuration is Debug, use the debug library (e.g.,
<span>Qt5Cored.lib</span>); if it is Release, use the release library (e.g.,<span>Qt5Core.lib</span>). - •
You can switch configurations (Debug/Release) in the Configuration Manager and configure dependencies separately.
- •Note:
- •
If the project configuration is Debug, use the debug library (e.g.,
<span>Qt5Cored.lib</span>); if it is Release, use the release library (e.g.,<span>Qt5Core.lib</span>). - •
You can switch configurations (Debug/Release) in the Configuration Manager and configure dependencies separately.
3. Configure Plugin Metadata (Key!)
Qt plugins must be described by a metadata file (in JSON format) to provide plugin information; otherwise, Qt Creator will not recognize it.
1. Create Metadata File
Create <span>piechartplugin.json</span> in the project root directory with the following content:
{
"Keys":["PieChartWidget"],// Name of the plugin in Qt Designer
"Name":"Pie Chart Plugin",// Display name of the plugin
"Version":"1.0.0",// Version number
"Description":"A custom pie chart widget for Qt.",// Description
"Author":"Your Name",// Author
"Copyright":"Copyright © 2024 Your Company.",// Copyright
"PluginType":"Designer",// Plugin type (Designer indicates a Qt Designer plugin)
"Interfaces":["com.example.PieChartInterface/1.0"]// Implemented interface IID
}
2. Configure Metadata File Path
- •
Add the include path for the metadata file in the project properties:
- •
Right-click the project → Properties → Resources → Additional Include Directories → Add
<span>$(ProjectDir)</span>(ensure the JSON file is copied to the output directory). - •
Add piechartplugin.json in Linker → Input → Additional Dependencies (optional, some versions require explicit specification).
4. Write Plugin Code (Match User Requirements)
1. Implement Pie Chart Control (<span>PieChartWidget.h</span>/<span>PieChartWidget.cpp</span>)
- •
Implement pie chart drawing, data setting, label display, and other functions according to user requirements (refer to the code provided by the user).
- •
Key: Ensure the control inherits from
<span>QWidget</span>and exposes configurable properties (such as<span>items</span>,<span>showLabels</span>) through<span>Q_PROPERTY</span>.
2. Implement Plugin Interface (<span>PieChartInterface.h</span>)
- •
Define the plugin interface class, inherit from
<span>QObject</span>, and declare pure virtual functions (such as<span>items()</span>,<span>setItems()</span>). - •
Use
<span>Q_DECLARE_INTERFACE</span>to declare the unique identifier for the interface (must be consistent with the<span>Interfaces</span>field in the metadata file).
3. Implement Plugin Registration Class (<span>PieChartPlugin.cpp</span>)
- •
Inherit from the interface class and
<span>QObject</span>, and implement the interface methods. - •
Use the
<span>Q_PLUGIN_METADATA</span>macro to declare plugin metadata (specifying the JSON file path). - •
Export the plugin instance (by exporting the
<span>createPlugin</span>function with<span>extern "C"</span>).
5. Build and Test the Plugin
1. Build the Project
- •
Select Release or Debug configuration → Click Build → Build Solution.
- •
Output path:
<span>$(OutDir)</span><span> (e.g., </span><code><span>D:\Projects\PieChartPlugin\x64\Release</span>), generating<span>PieChartPlugin.dll</span>.
2. Deploy the Plugin to Qt Creator
- •
Copy the generated
<span>PieChartPlugin.dll</span>and<span>piechartplugin.json</span>to the plugin directory of Qt Creator:$(QTDIR)\plugins\designer // e.g., C:\Qt\5.15.2\msvc2019_64\plugins\designer
3. Verify the Plugin in Qt Creator
- •
Start Qt Creator → Create or open a Qt Widgets project → Left-side “Widget Panel” → Search for
<span>PieChartWidget</span>. - •
If the control is displayed, the plugin integration is successful; if not displayed, check:
- •
Whether the DLL is correctly copied to the
<span>designer</span>directory. - •
Whether the metadata file
<span>piechartplugin.json</span>exists and the path is correct. - •
Whether the Qt version matches the plugin compilation version (e.g., both are 5.15.2 msvc2019_64).
6. Common Problems and Solutions
1. Compilation Error: “Cannot open include file: ‘QtWidgets’: No such file or directory”
- •
Reason: The Qt include path is not correctly configured.
- •
Solution: Check if
<span>C/C++ → General → Additional Include Directories</span>includes<span>$(QTDIR)\include</span>.
2. Link Error: “Unresolved external symbol _imp__Qt5Core…”
- •
Reason: The Qt library path is not correctly configured, or the required libraries are not linked.
- •
Solution:
- •
Confirm that
<span>Linker → General → Additional Library Directories</span>includes<span>$(QTDIR)\lib</span>. - •
Check if
<span>Linker → Input → Additional Dependencies</span>has added the correct Qt libraries (e.g.,<span>Qt5Core.lib</span>).
3. Qt Creator Prompts “Plugin Not Registered”
- •
Reason: The metadata file is missing or the path is incorrect, or the plugin did not export the
<span>createPlugin</span>function. - •
Solution:
- •
Confirm that
<span>piechartplugin.json</span>exists and that the<span>Interfaces</span>field is consistent with<span>Q_DECLARE_INTERFACE</span>. - •
Check if
<span>PieChartPlugin.cpp</span>contains the<span>Q_PLUGIN_METADATA</span>macro and exports the<span>createPlugin</span>function.
4. Debugging Error: “Cannot load DLL”
- •
Reason: Other Qt libraries that the DLL depends on have not been copied to the output directory.
- •
Solution:
- •
Use the
<span>windeployqt</span>tool to automatically copy dependencies: execute<span>windeployqt --release PieChartPlugin.dll</span>in the command line (ensure the<span>windeployqt.exe</span>path is added to the environment variable, usually located in<span>$(QTDIR)\bin</span>).
Conclusion
By following the above steps, you can complete the configuration and build of the Qt pie chart plugin (DLL) in Visual Studio and integrate it into Qt Creator. The key is to correctly configure the Qt paths, preprocessor macros, linker dependencies, and ensure the plugin metadata file is correct. When encountering issues, prioritize checking path configurations and whether dependencies are complete.