(Give DotNet a star to enhance your .Net skills)
Source: Dongxia Dugu cnblogs.com/tcjiaan/p/14547950.html
Introduction
A small fan is essentially a motor with blades attached to its shaft. There are two-blade and three-blade designs. We played with these as kids; solar-powered hats had small fans, and when riding bikes to school, they would spin in sunlight. There were also battery-operated ones that were quiet enough not to attract the teacher’s attention when placed on our desks during hot weather.
Nowadays, there are two additional power supply methods for small fans: USB fans and those powered by mobile phones. To be honest, the airflow is not impressive, and it can be quite dangerous.
You might wonder why we need a microcontroller and Raspberry Pi for a small fan when we can just plug it into a power source? Well, by using an L9110 driver chip and issuing commands from a microcontroller, we can control the fan’s rotation direction and adjust the speed using PWM.
Old Zhou recommends this type of small fan module.
Or this one.

Or this one will do too.

The advantage of these modules is that they integrate the driver chip, so we don’t have to buy the motor, blades, and L9110 module separately. When searching, you can look for “fan module,” “small fan module,” or “fire extinguishing robot.” The term “fire extinguishing robot” sounds good, but it could also be called a “combustion-supporting robot.” According to product descriptions, it can easily extinguish flames from a lighter at a distance of 20 cm. However, based on Old Zhou’s tests, it not only failed to extinguish the fire but actually made it burn brighter.
Anyway, just doing some experiments; we won’t dwell on that. When purchasing these modules, you don’t need to worry about the cost-performance ratio; just buy the cheapest one, as they are likely from the same manufacturer.
After buying, you need to do some simple installation work. Don’t worry; even a three-year-old girl can do it. Just attach the fan blades to the motor rotor. Here’s a tip: when pressing down, keep your fingers on the motor’s base; otherwise, applying too much force will push the motor out.

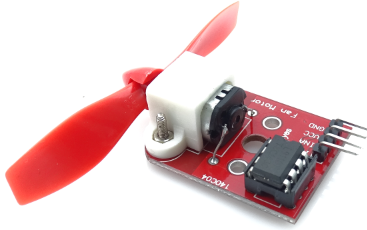
As for the blades, refer to the structure of an electric fan; they should have a concave side facing outward. Once installed, it should look like this.

If the motor is loose, you can tighten the two screws a bit. The cap on the blades can easily fall off, so you can use glue to secure it, but it’s okay to throw it away too.
Alright, the above are all trivial matters. Now let’s focus on how to drive the small fan using the Raspberry Pi.
First, you will see that the module has four pins:
VCC: Positive power supply, connect to the Raspberry Pi’s 5V port.
GND: Negative power supply, connect to any GND port on the Raspberry Pi.
INA and INB: Two control ports.
Thus, the core of the driving mechanism lies in these two input pins.
When INA is high and INB is low – the fan rotates forward;
When INA is low and INB is high – the fan rotates in reverse.
However, the terms “forward” and “reverse” are relative; different modules may have different directions. The positive and negative terminals of the motor can be reversed, which will also reverse the rotation direction. Therefore, it is hard to determine which side is forward and which side is reverse; in any case, there are two different rotation directions.
Do not set INA and INB to the same level (braking, motor does not rotate); this is meaningless control input (of course, you can try, but it won’t yield the expected results).
So, you can see that driving this thing is quite simple, so Old Zhou will provide an example.
    class Program
    {
        // The two interfaces used
        const int IN_A = 20;
        const int IN_B = 21;

        static void Main(string[] args)
        {
            GpioController controller = new();
            // Open the interfaces
            controller.OpenPin(IN_A, PinMode.Output);
            controller.OpenPin(IN_B, PinMode.Output);

            // Enter the loop
            bool looping = true;
            while (looping)
            {
                Console.WriteLine("\nPlease enter A or B, press any other key to exit");
                ConsoleKey pressed = Console.ReadKey().Key;
                switch (pressed)
                {
                    case ConsoleKey.A:
                        // A - High level
                        // B - Low level
                        controller.Write(IN_A, 1);
                        controller.Write(IN_B, 0);
                        break;
                    case ConsoleKey.B:
                        // A - Low level
                        // B - High level
                        controller.Write(IN_A, 0);
                        controller.Write(IN_B, 1);
                        break;
                    default:
                        looping = false;
                        break;
                }
            }
            // Close the interfaces
            controller.ClosePin(IN_A);
            controller.ClosePin(IN_B);
            controller.Dispose();
        }
    }
All the code is above; to save space on the blog, Old Zhou will not upload a compressed package for this example.
This example works like this: you can control the fan’s rotation direction by typing “A” or “B” on the keyboard. I haven’t handled case sensitivity, so if you input lowercase a or b, it won’t have any effect (note that I’m using the ConsoleKey enumeration type).
When the pressed key is 【A】: INA outputs high level, INB outputs low level;
When the pressed key is 【B】: INA outputs low level, INB outputs high level.
When any other key is pressed, the loop exits.
Finally, compile, publish, upload to Raspberry Pi, run it, and you will see the effect.
Be careful, be careful, be careful!!!!!!!! After connecting the wires, make sure to secure the fan properly. You can use something (like a phone, brick, etc.) to weigh it down on the edge of the table, or use the motherboard standoffs to secure it. After running the program, input A or B to make the fan rotate in different directions. Be cautious not to let your fingers touch the blades to avoid cuts; if there are children nearby, distract them with two mints to prevent curiosity from leading them to touch the blades.

– EOF –
Did you gain anything from reading this article? Please share it with more people.
Recommended to follow “DotNet” to enhance your .Net skills

Likes and views are the greatest support ❤️