
“Hi, Proxmox can really do a lot of things”

1. Introduction
Proxmox VE (Proxmox Virtual Environment) has a user-friendly web interface, a JAVA-based UI, and kernel interfaces that allow easy operations for VM clients. It also features convenient template functionalities, making it quite similar to foreign commercial VPS environments. It supports VT and iSCSI, which is practical for managing virtual clusters in small to medium-sized enterprises.
2. Basic Operations on the Host Machine
Before installing Proxmox, ensure that CPU virtualization support is enabled; this can be done in the BIOS, following the motherboard’s manual. Generally, this should not pose any issues. Next, install Proxmox using a USB drive.
/etc/default/grubGRUB_CMDLINE_LINUX_DEFAULT="quietto:
GRUB_CMDLINE_LINUX_DEFAULT="quiet intel_iommu=on"update-grubTo verify its effectiveness, use the following command:
dmesg | grep -e DMAR -e IOMMU
//Note: If the command dmesg | grep -e DMAR -e IOMMU does not produce output, it indicates a problem. It is likely an issue with the BIOS settings, and you need to enable VT-x support for the CPU. For AMD CPUs, the /etc/default/grub file should be modified to GRUB_CMDLINE_LINUX_DEFAULT=”quiet amd_iommu=on. This option also supports several values that can be added as needed.
3. Adding Modules
Modify the following file:
/etc/modulesAdd the following lines (default is empty):
vfio vfio_iommu_type1 vfio_pci vfio_virqfdFirst, find the network card ID (Note: Remember the ID value preceding the output information).
lspci | grep net
Then, enter the system and open the following file:
/etc/pve/nodes/YourClusterName/qemu-server/VMID.confManually add the following content:
machine:q35 hostpci0:02:00.0,pcie=1 # NIC 1 hostpci1:02:00.1,pcie=1 # NIC 2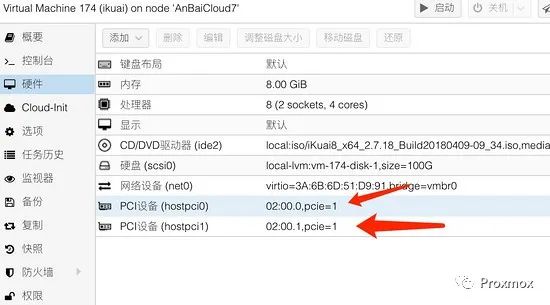
//Success will display the corresponding NIC information above.
If you accidentally add a NIC used by the physical host, it will cause the server to disconnect. In this case, use a USB drive to enter rescue mode, delete the original configuration, and restart.
Source: lianzhang.org Thank you for your support.
Feel free to leave comments for discussion.
#Proxmox Platform #Online VM Application Testing – Limited
Now that SDN is here, do we still need CCIE, HCIE, XXXIE?
Encoding methods for 10M/100M/1G/10G Ethernet
A detailed and vivid introduction to the hottest 5G technology, easy to understand.
For more information, please follow

1. The original articles published in this WeChat public platform “Proxmox” are copyright of this public account, and reprints must indicate the source.
2. This public platform will translate some overseas technical articles for enthusiasts to study and communicate, and the published Chinese versions are owned by this public account. If reprinted, please indicate the source.
3. The content published by this public platform that indicates the source is copyrighted by the original source (those whose copyright cannot be verified or not indicated are collected from the internet), and the reprinted content (videos, articles, advertisements, etc.) is for information dissemination purposes only and is for reference only, not representing this platform’s endorsement of its views and positions. The authenticity, accuracy, and legality of the content are the responsibility of the original author.
4. Content marked “source xxx” by this platform is reprinted for the purpose of conveying more information and facilitating industry discussions, and does not mean that this platform agrees with its views or verifies the authenticity of its content. The article content is for reference only. If there is any infringement, please contact for deletion.
5. Please be wary of fraudulent acts using this platform’s name.
6. This statement applies to all content published by this platform “Proxmox” and takes effect from the creation of this platform, remaining in effect permanently.