 Author | Ye Fei
Source | Alibaba Middleware Team
1 ChaosBlade
With the development of cloud-native technologies, the consistency, reliability, and flexible orchestration capabilities of cloud-native applications have led most enterprises to choose to migrate their applications to the cloud. However, the cloud infrastructure faces significant challenges in terms of stability and observability.
ChaosBlade is an open-source tool developed by Alibaba that follows the principles of chaos engineering and chaos experiment models. It helps enterprises enhance the fault tolerance of distributed systems and ensures business continuity during the migration to cloud-native systems.
ChaosBlade Operator implements experimental scenarios on the Kubernetes platform, defining chaos experiments through Kubernetes standard CRDs. It allows for easy creation, updating, and deletion of experimental scenarios using Kubernetes resource operations, including executing commands via kubectl, client-go, etc., as well as using the chaosblade CLI tool.
This article mainly introduces the underlying implementation principles of ChaosBlade for fault injection in Kubernetes, the version optimization process, and large-scale application drills.
01 Resource Model
When deploying applications in Kubernetes, we typically define applications as Pod, Deployment, StatefulSet, and other resource types, all of which are built-in resources in Kubernetes. In practice, when facing complex application scenarios, the built-in resource types may not meet our needs. Operators are a solution for containerizing complex applications by implementing custom resources and custom controllers. The chaosblade-operator is built on this Operator model.
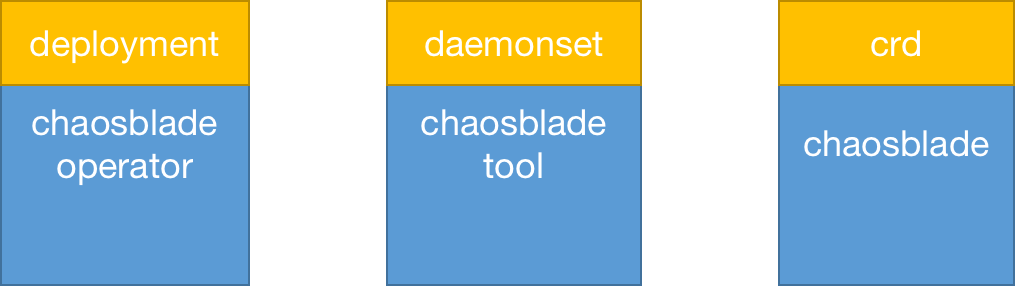
After installing the chaosblade-operator in Kubernetes, it generates a chaosblade-operator instance of the deployment resource type, a chaosblade-tool instance of the daemonset resource type, a custom resource definition, as well as other resources like RABC, SA, etc.;
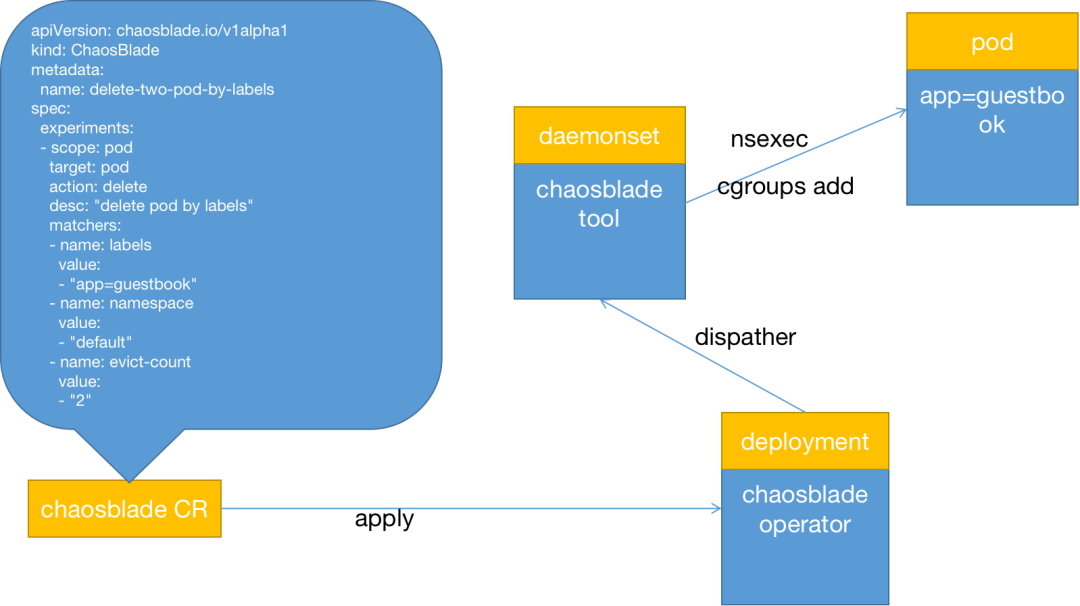
ChaosBlade defines the custom resource type as chaosblade, abbreviated as blade. Each time a new drill is created, a blade instance resource can be created through kubectl or the chaosblade CLI. The blade resource itself also contains the chaosblade chaos experiment definition;
The chaosblade-operator listens to the lifecycle of blade resources. When it detects that a blade resource instance has been created, it retrieves the chaos experiment definition, parses it, and then calls chaosblade-tool to actually inject the faults;
The chaosblade-tool is a daemonset resource type. A Pod is guaranteed to be deployed on each Node. From the perspective of Linux Namespace, this Pod shares the same network and PID namespaces with the Node, allowing for partial Node-level drills.
02 Lifecycle
In the resource model, it was briefly mentioned that the chaosblade-operator listens to the creation of blade resources. In reality, the chaosblade-operator listens to the entire lifecycle of blade resources, which is equivalent to the lifecycle of the experimental drill. The chaosblade-operator updates the experimental status based on the state of the blade resource.
|
Blade Resource State |
Experimental Process |
CPU Load Case |
|
apply (new) |
New Drill |
New CPU Load Drill |
|
running (running) |
Drill Running |
CPU Loading |
|
deleted (deleted) |
Recover Drill |
Recover Drill |
03 Fault Injection
In the resource model, it was mentioned that the chaosblade-operator retrieves the chaos experiment definition when it detects that a blade resource instance has been created and then parses it to inject the fault. So how does the chaosblade-operator actually inject faults?
In the early versions of the chaosblade-operator, most scenarios were implemented by copying the chaosblade CLI tool into the container via the Kubernetes API and then executing commands inside the container to achieve fault injection, as shown in the diagram below;
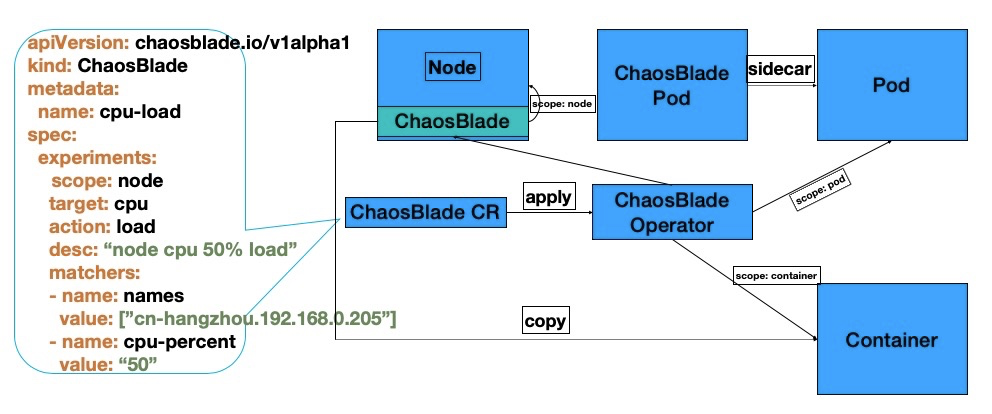
As can be seen, the YAML definition on the left is the Chaosblade chaos experiment model definition, which is also part of the blade resource instance information. When the blade resource is created via kubectl apply, the chaosblade-operator listens for the resource creation and parses the experiment definition;
When parsing the scope = node, it will find and execute commands in the chaosblade-tool pod located on the node. These actions consume very few resources for the entire cluster;
However, when parsing the scope = pod or scope = container, in most scenarios, the chaosblade-operator would copy the chaosblade CLI tool into the business container and then execute commands inside the business container. The size of the tool package and the number of containers selected for the experiment determine the resource consumption, and compatibility and version updates may not be well guaranteed;
In the new version of the chaosblade-operator, the initial issues, optimization processes, and implementation principles will be detailed in the following sections.
2 Initial Pain Points
When a cloud-native application reaches a certain scale and is to be drilled;
-
Cluster Environment: 1000 Node Nodes
-
Target Application: 5000 replicas of deployment
-
Drill Scenario: Introduce a 1000 ms delay in the interface provided by the application
01 Slow Injection
First, it is necessary to find the 5000 replicas, copy the tool into the container, and execute commands inside the container. Assuming that copying the tool takes 100 ms, the entire process would take 500000 ms, which is simply unacceptable for users.
02 Network Bandwidth Usage
Copying the tool into the container would require calling the Kubernetes API at least 5000 times. Assuming a file size of 5MB, 5000 times would consume a total bandwidth of 5000×5=25000MB, which would have a catastrophic impact on IO;
03 Compatibility Issues
Assuming that we have passed various tests and successfully copied the tool inside, if the tool itself depends on certain commands, such as network (tc), disk (dd), etc., and those commands are not available in the container, or if the versions are incompatible, how should we handle it?
04 Read-Only Pods
For Pods configured with a read-only file system, files cannot be written, so the tool cannot be copied inside at all.
05 Invasive
Leaving the tool inside the business container binds the tool’s lifecycle to that of the container;
3 Optimization Process
In the iteration process of the initial version, several optimizations were made, including synchronous to asynchronous, package slimming, on-demand copying, etc. While these optimizations improved injection efficiency to some extent, they did not address the essence of the problem, which is still limited by the IO performance of the host;
Regardless of whether it was synchronous to asynchronous, package slimming, or on-demand copying, none of these optimizations fundamentally resolved the issues caused by copying the tool. To solve the problem, we need to address its essence. From the perspective of Linux virtualization technology, how can we inject faults into containers without copying the tool?
01 Linux Virtualization
For Linux virtualization technology, the core implementation principles are the isolation capabilities of Linux Namespaces, the limiting capabilities of Linux Cgroups, and the rootfs-based file system;
Linux Namespace allows processes (containers) to exist in an isolated sandbox environment, while Linux Cgroups can limit the resource usage of processes within that sandbox, such as limiting CPU and memory usage;
-
Linux Cgroups
Linux Cgroups can restrict the resource usage of processes within the sandbox and can also manually assign the resource usage of a specific process to an existing Linux Cgroups control. Typically, the resource usage statistics of containers are calculated based on the usage of processes within the Linux Cgroups control group. At this point, a CPU load process is started on the host and assigned to control an existing container’s control group, which is equivalent to injecting a CPU load scenario into that container.
On Docker, we can try to inject a CPU load scenario into an nginx container without invading that container. First, start an nginx container using the command: docker run -it -d -p 8087:80 –cpus 0 –name nginx nginx. After the container starts, Docker will create a new Cgroups control group for that container, and in this command, the container is limited to using only one CPU core.
1. Find the PID of the container’s process, which is the first process started when the container is launched.
docker inspect --format "{{.State.Pid}}" nginx
2. View the Cgroups control group of the process, which will show many Cgroup subsystems such as CPU, memory, blkio, etc.
cat /proc/$(docker inspect --format "{{.State.Pid}}" nginx)/cgroup

11:devices:/docker/4bcf3de8de2904b3308d8fc8dbdf6155cad7763fa108a32e538402156b6eacaa
10:blkio:/docker/4bcf3de8de2904b3308d8fc8dbdf6155cad7763fa108a32e538402156b6eacaa
9:pids:/docker/4bcf3de8de2904b3308d8fc8dbdf6155cad7763fa108a32e538402156b6eacaa
8:memory:/docker/4bcf3de8de2904b3308d8fc8dbdf6155cad7763fa108a32e538402156b6eacaa
7:freezer:/docker/4bcf3de8de2904b3308d8fc8dbdf6155cad7763fa108a32e538402156b6eacaa
6:perf_event:/docker/4bcf3de8de2904b3308d8fc8dbdf6155cad7763fa108a32e538402156b6eacaa
5:cpuset:/docker/4bcf3de8de2904b3308d8fc8dbdf6155cad7763fa108a32e538402156b6eacaa
4:hugetlb:/docker/4bcf3de8de2904b3308d8fc8dbdf6155cad7763fa108a32e538402156b6eacaa
3:cpuacct,cpu:/docker/4bcf3de8de2904b3308d8fc8dbdf6155cad7763fa108a32e538402156b6eacaa
2:net_prio,net_cls:/docker/4bcf3de8de2904b3308d8fc8dbdf6155cad7763fa108a32e538402156b6eacaa
1:name=systemd:/docker/4bcf3de8de2904b3308d8fc8dbdf6155cad7763fa108a32e538402156b6eacaa
3. View the process list of the CPU control group, which can show many processes controlled by that container’s Cgroup CPU subsystem. Following this idea, we only need to start a CPU load process and write the process’s PID into this file to achieve CPU injection into the container;
cat /sys/fs/cgroup/cpu$(cat /proc/$(docker inspect --format "{{.State.Pid}}" nginx)/cgroup | head -n 1 | awk -F ':' '{print $3}')/tasks

7921
7980
7981
7982
7983
4. CPU load script
#! /bin/bash

while [ 1 ]
do
        echo "" > /dev/null
done
5. After executing the CPU load script, find the PID and write the process into the container’s process list file.
echo PID >> /sys/fs/cgroup/cpu$(cat /proc/$(docker inspect --format "{{.State.Pid}}" nginx)/cgroup | head -n 1 | awk -F ':' '{print $3}')/tasks
6. At this point, it can be observed that the container’s CPU reaches 100%, while the host does not, indicating that the CPU load only affects the container. Using the same method, any fault scenarios such as memory or IO resource consumption can be achieved.
Ultimately, we successfully injected a CPU load scenario into the container without invading it. Through Cgroups control groups, we can also achieve injection scenarios supported by other Cgroups subsystems, such as high CPU load, high memory usage, high IO load, etc.;
-
Linux Namespace
By using Linux Cgroups, we achieved CPU load injection into the container without invading it. We can also support high CPU load, high memory usage, high IO load, etc. For other types of faults, such as network latency or file deletion, another method must be used, which is the isolation capability of Linux Namespace.
The network, IPC, and MNT namespace isolation capabilities of Linux Namespace allow operations such as creating new files or starting new processes in the container’s independent namespace without being perceived or observed by other containers;
On Docker, we can try to inject a network delay scenario into an nginx container without invading that container. First, start an nginx container using the command: docker run -it -d -p 8087:80 –cpus 0 –name nginx nginx. After the container starts, it will have its independent network namespace listening on port 80.
1)Network Delay on Host
TC (TrafficControl) is used for traffic control in the Linux kernel, allowing for network delays, packet loss, etc. First, we try to inject a network delay of 100ms on the host using the following command:
# Delay
tc qdisc add dev eth0 root netem delay 100ms
At this point, if the client opens the browser and accesses http://IP:8087, a stable 100ms delay will be observed. However, upon closer observation, it will be found that there are delays on other ports as well, such as 22, 3306, etc. (Note: the test must be conducted from a different client machine, not directly on the current machine via curl http://127.0.0.1:8087).
# Restore
tc qdisc del dev eth0 root
2)Network Delay in Container
How can we inject a network delay in the container? It’s actually quite simple. Linux provides the setns() function, which allows easy entry into the specified process’s namespace. To inject network delay, we just need to enter the target container’s network namespace;
1. Find the container’s process
docker inspect --format "{{.State.Pid}}" nginx
2. Enter the container’s namespace using the nsenter command, which ultimately calls the setns() function. If this command is not available, the util-linux package needs to be installed.
nsenter -t 7921 -n
3. At this point, check the IP-related information, and the returned information will be related to the container’s IP.
$ ip addr
1: lo: <LOOPBACK,UP,LOWER_UP> mtu 65536 qdisc noqueue state UNKNOWN group default qlen 1000
    link/loopback 00:00:00:00:00:00 brd 00:00:00:00:00:00
    inet 127.0.0.1/8 scope host lo
       valid_lft forever preferred_lft forever
124: eth0@if125: <BROADCAST,MULTICAST,UP,LOWER_UP> mtu 1500 qdisc noqueue state UP group default
    link/ether 02:42:ac:11:00:13 brd ff:ff:ff:ff:ff:ff link-netnsid 0
    inet 172.17.0.19/16 brd 172.17.255.255 scope global eth0
       valid_lft forever preferred_lft forever
4. Injecting network delay will only affect the container.
tc qdisc add dev eth0 root netem delay 100ms
At this point, if the client opens the browser and accesses http://IP:8087, a stable 100ms delay will be observed, but it will not affect other ports, such as 22, 3306, etc.; because the actual delay itself only affects the container’s network namespace and does not affect the host.
Ultimately, we successfully injected a network delay fault scenario into the container without invading it. Linux provides many dimensions of namespace isolation and allows entry into any type of namespace, enabling fault injection scenarios such as file deletion, process termination, etc.
02 ChaosBlade Implementation
In the Chaosblade 1.6.x version, fault injection into containers has been achieved through the isolation capabilities of Linux Namespace and the limiting capabilities of Linux Cgroups. The chaosblade-operator mainly listens for changes in the CRD resource status and does not execute fault injection operations. Instead, the daemonset-type resource chaosblade-tool is responsible for the actual fault injection. The overall implementation scheme is shown in the diagram below:
Similarly, the YAML definition on the left is the Chaosblade chaos experiment model definition, which is also part of the blade resource instance information. When the blade resource is created via kubectl apply, the chaosblade-operator listens for the resource creation and parses the experiment definition;
When parsing the scope = node, it will find and execute commands in the chaosblade-tool pod located on the node. These actions consume very few resources for the entire cluster, similar to the earlier versions;
However, when parsing the scope = pod or scope = container, the chaosblade-operator does not copy the chaosblade CLI tool into the business container or execute commands inside the container, significantly reducing the dependency on the Kubernetes API. So how does the chaosblade-operator achieve this? The chaosblade-operator only uses the Kubernetes API to find the experimental target, i.e., the target business Pod, and then finds the chaosblade-tool pod deployed on the node where the target business Pod is located, retrieves the container name inside the Pod, and finally encapsulates commands to be executed directly in the chaosblade-tool.
Why can commands executed in the chaosblade-tool pod deployed on the node where the target business Pod resides directly affect the target business Pod? If you carefully read the previous section on Linux virtualization, you should have the answer. The chaosblade-tool, as a daemonset resource, has the ability to switch the PID namespace of the host, and the /sys/fs directory is mounted into the chaosblade-tool pod during resource definition, allowing chaosblade-tool to freely change the process’s cgroups control group. Thus, chaosblade-tool can inject faults into any container on that host, separating part of the work from the chaosblade-operator, making the use of chaosblade-operator simpler and more lightweight, aligning with the original design theory;
Chaosblade-tool achieves containerized fault injection through the isolation capabilities of Linux Namespace and the limiting capabilities of Linux Cgroups, greatly improving performance, compatibility, and stability. Most scenarios can be executed directly by chaosblade-tool, as long as the dependency library versions and commands of the chaosblade-tool container support the drill, there will be no compatibility or stability issues. For example, in earlier versions, we even had to consider issues like what to do if the target business container does not have the dd or tc commands, or if the dd version is incompatible;
No matter whether Kubernetes uses Docker, containerd, CRI-O, or other container runtime technologies, Chaosblade can quickly achieve compatibility because it achieves containerized fault injection through the isolation capabilities of Linux Namespace and the limiting capabilities of Linux Cgroups, with minimal dependency on container runtime-related APIs, needing only to find the container’s PID 1 process;
-
Scenario Analysis
First, starting from the fault scenarios supported by chaosblade, fault injection based on process dimensions can be divided into two categories: Resource Consumption and State Change.
Resource Consumption: The injection method is easy to understand. By running processes that continuously consume resources and ensuring the process runs continuously, we can achieve the goal of consuming system resources, such as CPU saturation, memory saturation, disk IO load, port occupation, etc.;
State Change: The injection method may not be as straightforward. This “state” can be understood as available disk space, file permissions, POD states, etc. To achieve this type of fault injection, we need to run a process to modify the target resource’s state. Of course, the “state change” method may also require the process to run for an extended period to complete, unlike “resource consumption,” which requires a terminal state to complete the fault injection, meaning the process must execute successfully rather than just ensure the process runs continuously.
Classifying the fault scenarios supported by chaosblade yields the following table:

In the resource consumption fault injection mode, it is necessary to determine whether the resource is shared at the host level and is already supported by Linux Cgroups subsystems, such as CPU, memory, disk IO, etc. We can achieve fault injection by entering the target container process’s PID namespace and joining the target container process’s control group. There are also some special cases, such as network port occupation, which, while classified as resource consumption fault injection mode, is a resource shared within the independent namespace, so it requires switching to the NET namespace to achieve;
In the state change fault injection mode, operations need to be performed based on specific scenarios by entering the target container process’s command namespace. For example, for network scenarios, we need to enter the NET Namespace; for file scenarios, we need to enter the MNT Namespace, etc.
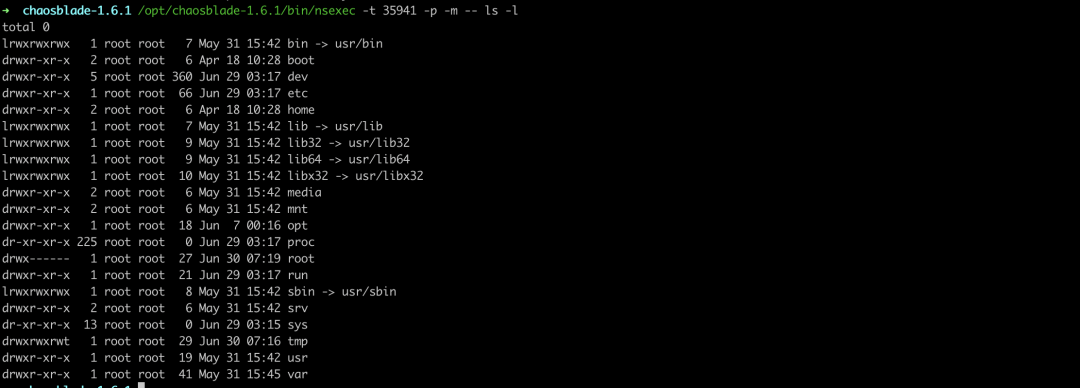
In the chaosblade-1.6.x version, namespace switching has already been implemented, for example, entering the container (process PID is 35941) namespace to execute the ls command:
Combining the injection mode of the scenario with the isolation capabilities of Linux Namespace and the limiting capabilities of Linux Cgroups, we can analyze what methods should be used to inject faults in the container in most cases;
4 Large-Scale Application Drills
In the Chaosblade 1.6.x version, fault injection into containers has been achieved through the isolation capabilities of Linux Namespace and the limiting capabilities of Linux Cgroups. Compared to the tool copying method, efficiency has significantly improved, compatibility is stronger, and it is non-invasive.
This section will observe the injection performance and resource consumption of the chaosblade-operator early version and Chaosblade chaosblade-operator 1.6.x version through actual scenarios.
01 Experimental Case
Deploy the chaosblade-operator 1.5.0 version and chaosblade-operator 1.6.1 version in Kubernetes, conducting three experiments to inject CPU load scenarios to observe injection performance, disk IO, and network bandwidth;
-
Deploy tomcat deployment resource type in Kubernetes, setting the number of replicas to 20
-
Deploy tomcat deployment resource type in Kubernetes, setting the number of replicas to 50
-
Deploy tomcat deployment resource type in Kubernetes, setting the number of replicas to 100
02 Experimental Environment
A three-node Kubernetes cluster with the master in schedulable mode
|
Node/Resource |
CPU |
Memory |
|
master1 |
4c |
16g |
|
node1 |
4c |
16g |
|
node2 |
4c |
16g |
03 Experimental Results
-
chaosblade-operator 1.5.0 Version
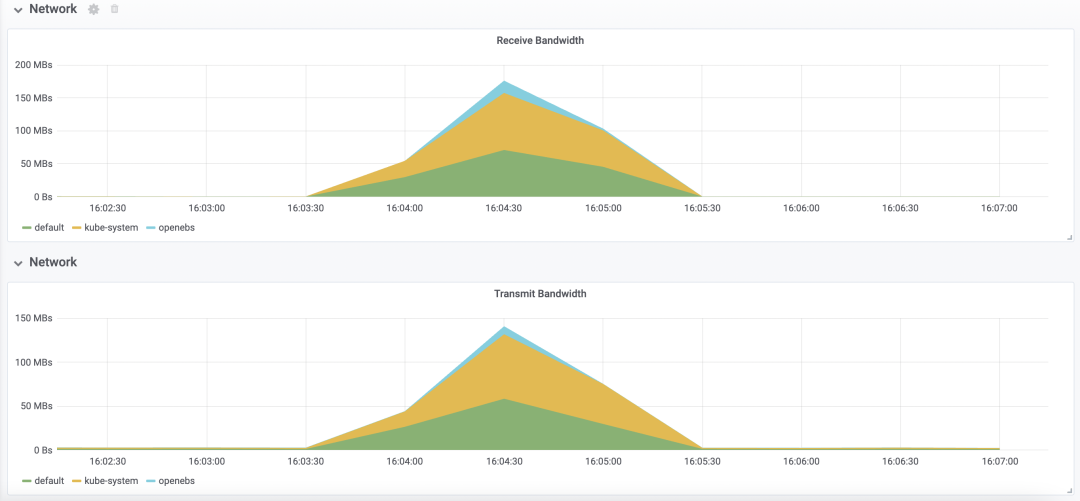
Deploy tomcat deployment resource type in Kubernetes, setting the number of replicas to 20; inject CPU load scenario using chaosblade CLI, specifying CPU usage rate to 60, filtering all Pods by labels, and setting waiting time to 5 minutes;
Injection Duration
Injection duration reached 57s
time ./blade create k8s pod-cpu load --kubeconfig ~/.kube/config --namespace default --cpu-percent 60 --labels app=tomcat --waiting-time 5m
{"code":200,"success":true,"result":"4fce727793e239cb"}

real  0m57.851s
user  0m0.811s
sys  0m0.208s
Resource Consumption
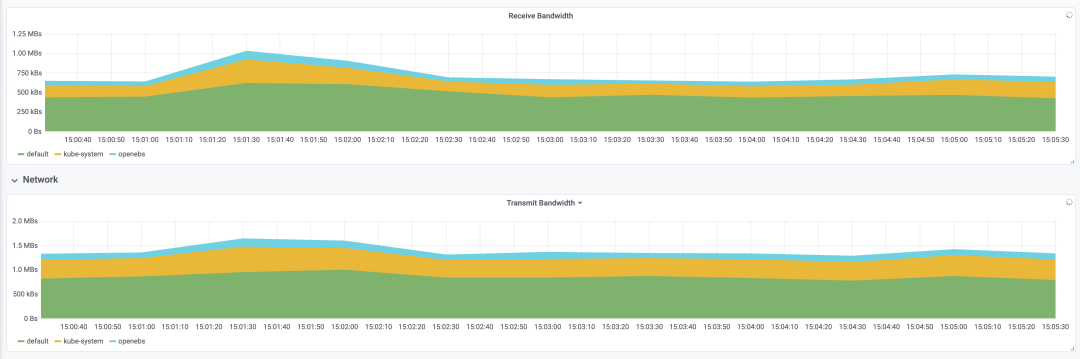
Network bandwidth peaked at around 180MBs, and transfer peaked at around 140MBs

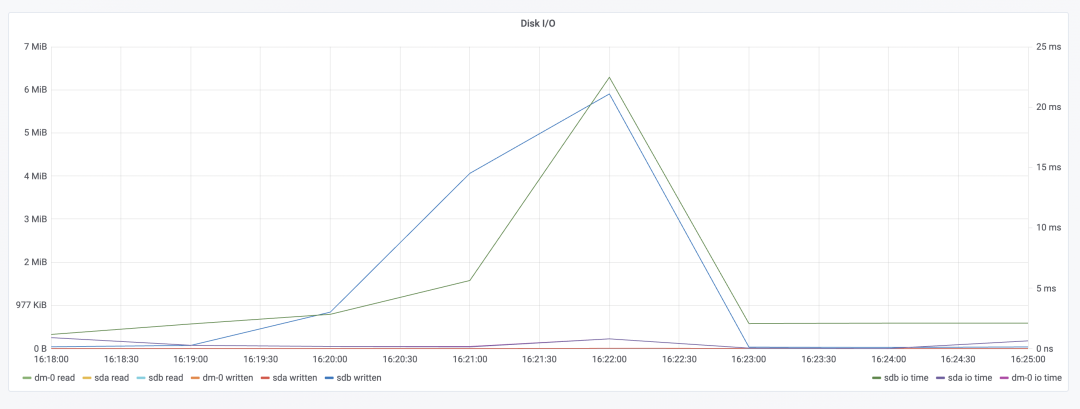
Deploy tomcat deployment resource type in Kubernetes, setting the number of replicas to 50; inject CPU load scenario using chaosblade CLI, specifying CPU usage rate to 60, filtering all Pods by labels, and setting waiting time to 5 minutes;
Injection Duration
Injection duration reached 2m25.806s
time ./blade create k8s pod-cpu load --kubeconfig ~/.kube/config --namespace default --cpu-percent 60 --labels app=tomcat --waiting-time 5m
{"code":200,"success":true,"result":"71e07348af26e4aa"}

real  2m25.806s
user  0m1.010s
sys  0m0.239s
Resource Consumption

Deploy tomcat deployment resource type in Kubernetes, setting the number of replicas to 100; inject CPU load scenario using chaosblade CLI, specifying CPU usage rate to 60, filtering all Pods by labels, and setting waiting time to 20 minutes;
Injection Duration
time ./blade create k8s pod-cpu load --kubeconfig ~/.kube/config --namespace default --cpu-percent 60 --labels app=tomcat --waiting-time 20m
{"code":200,"success":true,"result":"cc477f2c632e2510"}

real  4m59.776s
user  0m1.132s
sys  0m0.281s
Resource Consumption
-
chaosblade-operator 1.6.1 Version
Now install chaosblade-operator 1.6.1 version
helm install chaosblade-operator chaosblade-operator-1.5.0.tgz
Deploy tomcat deployment resource type in Kubernetes, setting the number of replicas to 20; inject CPU load scenario using chaosblade CLI, specifying CPU usage rate to 60, filtering all Pods by labels, and setting waiting time to 5 minutes;
Injection Duration
time ./blade create k8s pod-cpu load --kubeconfig ~/.kube/config --namespace default --cpu-percent 60 --labels app=tomcat --waiting-time 5m
{"code":200,"success":true,"result":"fe8ebc493bda3d7e"}

real  0m5.537s
user  0m0.525s
sys  0m0.067s
Resource Consumption
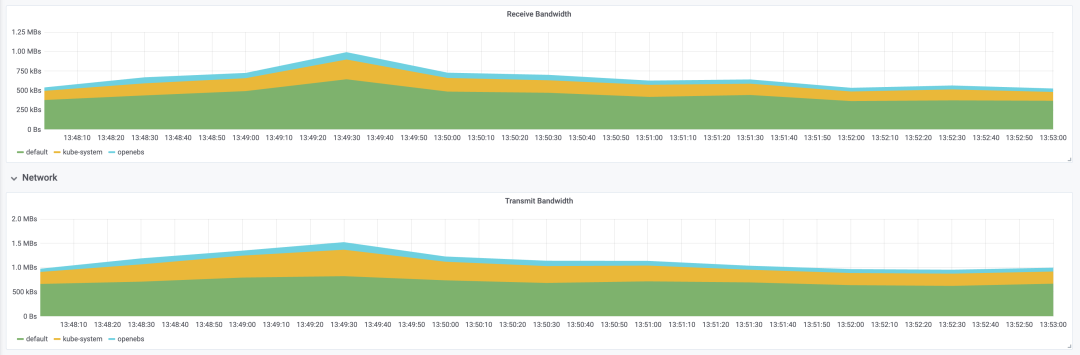
Deploy tomcat deployment resource type in Kubernetes, setting the number of replicas to 50; inject CPU load scenario using chaosblade CLI, specifying CPU usage rate to 60, filtering all Pods by labels, and setting waiting time to 5 minutes;
Injection Duration
time ./blade create k8s pod-cpu load --kubeconfig ~/.kube/config --namespace default --cpu-percent 60 --labels app=tomcat --waiting-time 5m
{"code":200,"success":true,"result":"a4d9c4c9c16642b5"}

real  0m24.519s
user  0m0.597s
sys  0m0.071s
Resource Consumption
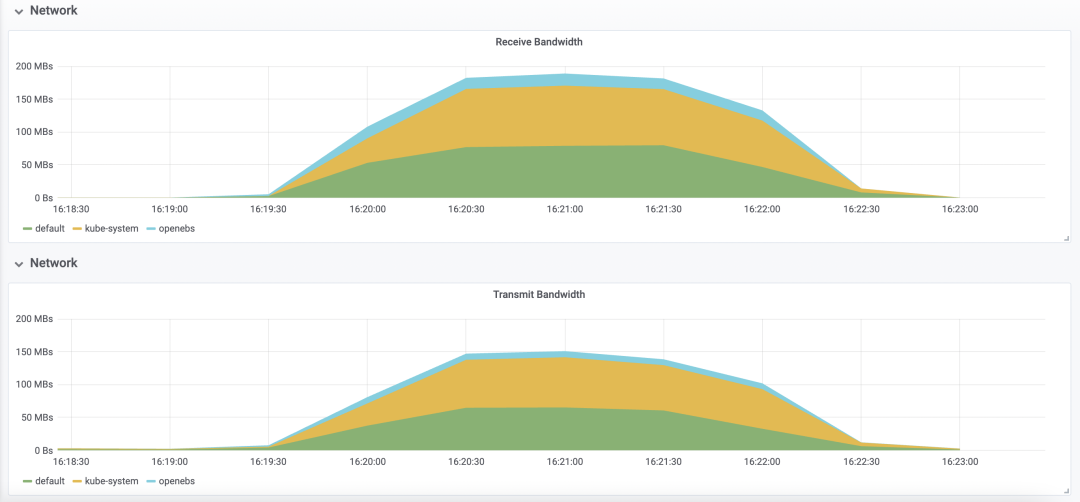
Deploy tomcat deployment resource type in Kubernetes, setting the number of replicas to 100; inject CPU load scenario using chaosblade CLI, specifying CPU usage rate to 60, filtering all Pods by labels, and setting waiting time to 5 minutes;
Injection Duration
time ./blade create k8s pod-cpu load --kubeconfig ~/.kube/config --namespace default --cpu-percent 60 --labels app=tomcat --waiting-time 5m
{"code":200,"success":true,"result":"f4f4790a369cc448"}

real  1m46.554s
user  0m0.696s
sys  0m0.055s
Resource Consumption
04 Experimental Summary
-
chaosblade-operator 1.5.0 Version
|
Pod Count/Impact Scope |
Injection Duration |
Disk IO Impact |
Network Bandwidth Impact |
|
20 |
57s |
Minor Impact |
Significant Impact |
|
50 |
2m25s |
Significant Impact |
Significant Impact |
|
100 |
4m59s |
Extreme Impact |
Extreme Impact |
-
chaosblade-operator 1.6.1 Version
|
Pod Count/Impact Scope |
Injection Duration |
Disk IO Impact |
Network Bandwidth Impact |
|
20 |
5s |
Almost No Impact |
Almost No Impact |
|
50 |
27s |
Almost No Impact |
Almost No Impact |
|
100 |
1m46s |
Almost No Impact |
Almost No Impact |
Through the comparative analysis of experimental results and observation charts, it is evident that the chaosblade-operator 1.6.1 version has almost no impact on resource consumption during the injection process, and the injection duration has significantly improved;
For other new features, such as enhanced compatibility, support for read-only file system Pods, and non-invasive operations, further experiments can be actively attempted. We believe you will gain deeper insights.
05 Reflections
01 Support for Java Scenarios
ChaosBlade’s implementation for container Java scenarios relies on the JVM’s attach javaagent capability, which means that when attaching the JVM, it must be able to locate the path of the javaagent.jar package. Therefore, it is currently necessary to copy javaagent.jar into the container; how to elegantly inject Java scenarios into containers remains an area worth exploring and breaking through.
02 Support for Node-Level Drills
ChaosBlade Operator has limited support for Kubernetes Node-level drills. When injecting faults at the Node level, the actual injection is done by the chaosblade-tool container, which by default only operates at the process and network namespace level of the host. Therefore, the network delay, packet loss, and process termination scenarios supported in the chaosblade-tool container are essentially equivalent to Node-level network delay, packet loss, and process termination scenarios;
For other Kubernetes Node support, it cannot truly achieve Node-level dimensions. For example, CPU, memory, and disk IO can only be considered Node-level under the condition that the chaosblade-tool container is not resource-restricted. Scenarios such as file systems and Java scenarios are currently not achievable. From another perspective, we should consider whether we need these scenarios. In most cases, installing chaosblade directly on the host (Node) can fully support all scenarios.
Related Links
ChaosBlade Official Website:
https://chaosblade.io/
ChaosBlade GitHub:
https://github.com/chaosblade-io/chaosblade