Introduction: The operating system is the crown jewel of computer science, and the kernel is the gem on that crown. Have you ever dreamed of writing your own operating system? Today, we will guide you through the process of implementing a simple operating system kernel from scratch using the C language!
🚀 Why Choose C Language for Kernel Development?
The C language is hailed as the “god of system programming,” with 99% of operating system kernels in the world written in C, including Linux, Windows, macOS, and more. The advantages of choosing C for kernel development include:
✅ Close to Hardware – Allows direct manipulation of memory and hardware registers✅ Outstanding Performance – Almost no runtime overhead✅ Precise Control – Enables precise control over memory layout and execution flow✅ Mature Ecosystem – Supported by a rich set of compilers and debugging tools
🎯 What Will You Learn from This Article?
Through this article, you will master:
- • The basic architecture and working principles of an operating system kernel
- • Core techniques for developing a kernel using C language
- • Implementation of key technologies such as memory management and interrupt handling
- • Building a runnable simple operating system from scratch
🧱 Simple Operating System Architecture Design
The operating system we design includes the following core modules:
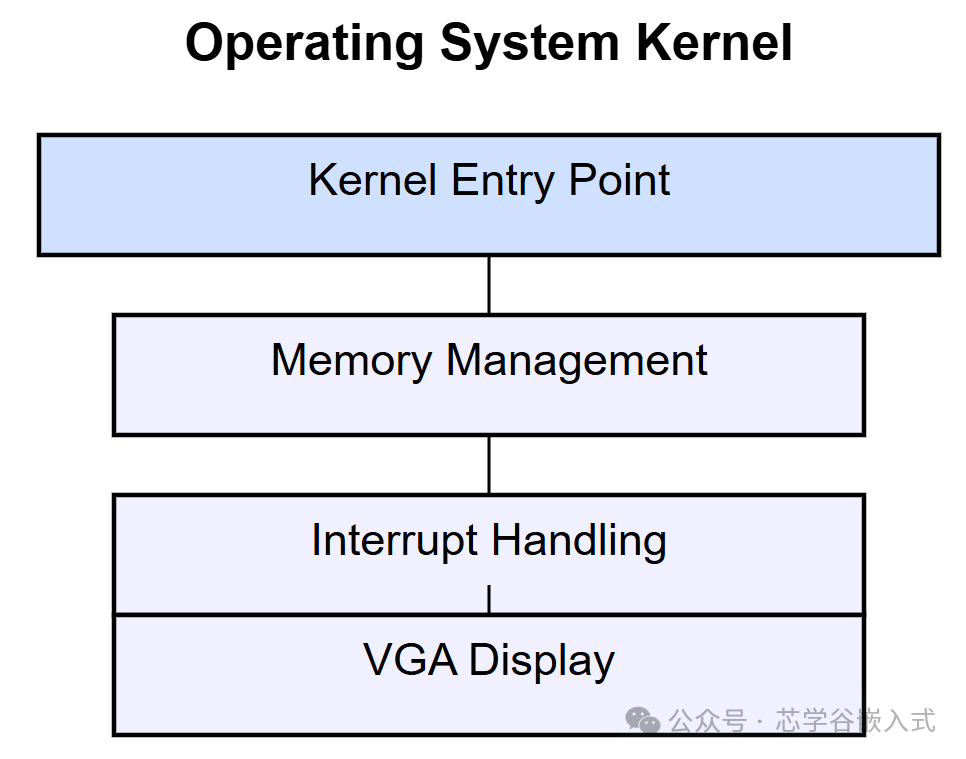
- 1. Kernel Entry Point – The first execution point after system startup
- 2. Memory Management Module – Manages memory allocation and deallocation for the system
- 3. Interrupt Handling Module – Handles hardware interrupts and exceptions
- 4. VGA Display Module – Outputs information to the screen
🔧 Core Technology Implementation for Kernel Development
1. Implementing the Kernel Entry Point
The kernel entry point is the first function executed after the system starts. We need to write the startup code in assembly language and then jump to the C language main function:
// main.c - Kernel main function
#include "vga.h"

void kernel_main() {
    // Initialize VGA display
    vga_init();

    // Output welcome message
    vga_puts("Welcome to MyOS!\n");
    vga_puts("Kernel loaded successfully!\n");

    // More kernel functionalities can be added here

    // Kernel main loop
    while(1) {
        // Execute some background tasks when the system is idle
    }
}
2. Implementing the VGA Display Module
To enable the kernel to output information on the screen, we need to implement a simple VGA display driver:
// vga.h - VGA display driver header file
#ifndef VGA_H
#define VGA_H

void vga_init();
void vga_putc(char c);
void vga_puts(const char* str);

#endif
// vga.c - VGA display driver implementation
#include "vga.h"
// VGA text mode video memory address
static volatile unsigned short* vga_buffer = (unsigned short*)0xB8000;
static int cursor_x = 0;
static int cursor_y = 0;
static unsigned char vga_color = 0x07; // Black background, white text
// Initialize VGA display
void vga_init() {
// Clear screen
for (int i = 0; i < 80 * 25; i++) {
vga_buffer[i] = (vga_color << 8) | ' ';
}
cursor_x = 0;
cursor_y = 0;
}
// Output a single character
void vga_putc(char c) {
if (c == '\n') {
cursor_x = 0;
cursor_y++;
} else {
vga_buffer[cursor_y * 80 + cursor_x] = (vga_color << 8) | c;
cursor_x++;
}
// Handle newline
if (cursor_x >= 80) {
cursor_x = 0;
cursor_y++;
}
// Handle scrolling
if (cursor_y >= 25) {
// Scroll up one line
for (int i = 0; i < 24 * 80; i++) {
vga_buffer[i] = vga_buffer[i + 80];
}
// Clear the last line
for (int i = 0; i < 80; i++) {
vga_buffer[24 * 80 + i] = (vga_color << 8) | ' ';
}
cursor_y = 24;
}
}
// Output a string
void vga_puts(const char* str) {
while (*str) {
vga_putc(*str++);
}
}3. Implementing the Memory Management Module
The operating system needs to manage memory allocation and deallocation. We implement a simple memory manager:
// memory.h - Memory management header file
#ifndef MEMORY_H
#define MEMORY_H

void* kmalloc(unsigned int size);
void kfree(void* ptr);

#endif
// memory.c - Memory management implementation
#include "memory.h"
// Simple memory pool management
static unsigned char memory_pool[1024 * 1024]; // 1MB memory pool
static unsigned int pool_index = 0;
// Simple memory allocation function
void* kmalloc(unsigned int size) {
if (pool_index + size > sizeof(memory_pool)) {
return 0; // Insufficient memory
}
void* ptr = &memory_pool[pool_index];
pool_index += size;
return ptr;
}
// Simple memory free function (does not actually free in this simple implementation)
void kfree(void* ptr) {
// In this simple implementation, we do not actually free memory
// A real operating system would require more complex memory management algorithms
}4. Implementing the Interrupt Handling Module
Interrupts are an important mechanism for the operating system to respond to hardware events. We need to implement basic interrupt handling:
// interrupt.h - Interrupt handling header file
#ifndef INTERRUPT_H
#define INTERRUPT_H

void interrupt_init();
void handle_interrupt(int interrupt_number);

#endif
// interrupt.c - Interrupt handling implementation
#include "interrupt.h"
#include "vga.h"
// Initialize interrupt handling
void interrupt_init() {
// In a real implementation, the interrupt descriptor table (IDT) needs to be set up here
// For brevity, we simplify the handling
vga_puts("Interrupt system initialized\n");
}
// Interrupt handling function
void handle_interrupt(int interrupt_number) {
char msg[] = "Interrupt received: 0x00\n";
// Convert interrupt number to hexadecimal character
msg[22] = (interrupt_number >> 4) < 10 ? (interrupt_number >> 4) + '0' : (interrupt_number >> 4) - 10 + 'A';
msg[23] = (interrupt_number & 0xF) < 10 ? (interrupt_number & 0xF) + '0' : (interrupt_number & 0xF) - 10 + 'A';
vga_puts(msg);
}🛠️ Compiling and Running
To compile our operating system kernel, follow these steps:
- 1. Write a Linker Script – Define the layout of the kernel in memory
- 2. Write Startup Code – Initialize the system using assembly language
- 3. Compile All Source Files – Use the GCC compiler
- 4. Link to Generate Kernel Image – Use the linker to create an executable file
- 5. Create a Boot Disk – Write the kernel to a bootable storage device
Linker Script Example
/* linker.ld - Linker script */
ENTRY(_start)

SECTIONS
{
    . = 1M;

    .text BLOCK(4K) : ALIGN(4K)
    {
        *(.text)
    }

    .rodata BLOCK(4K) : ALIGN(4K)
    {
        *(.rodata)
    }

    .data BLOCK(4K) : ALIGN(4K)
    {
        *(.data)
    }

    .bss BLOCK(4K) : ALIGN(4K)
    {
        *(COMMON)
        *(.bss)
    }
}
🎯 Conclusion
Through this article, you should have mastered the basic methods for developing a simple operating system kernel using C language. Although the functionalities we implemented are still quite simple, this lays a solid foundation for you to further delve into operating system development.
Operating system development is a challenging yet rewarding field. I hope you continuously enhance your technical skills throughout this process and ultimately achieve the creation of more complex and powerful operating systems!