
M
Click the blue words / Microsoft Developer MSDN
Follow us
Author: Shijiong – Microsoft Most Valuable Professional (MVP)
Typesetting: Alan Wang
Shijiong
Microsoft Most Valuable Professional (MVP)

Microsoft Azure MVP, Microsoft Community Contributor, author of “Windows IoT Application Development Guide”.
The Raspberry Pi is a compact and portable single-board computer that is very popular among students and makers. Recently, I saw the azure-openai-gpt4-voice-chatbot project by MVP Jiadong Chen, which I found quite interesting. This project captures voice input through a microphone using Python and utilizes the Azure Speech SDK to convert the voice into text, which is then sent as a prompt to a large language model. The text returned by the large language model is converted back into speech using the Azure Speech SDK and read to the user. This project can run on a PC platform. On the official Microsoft platform, there is a Conversational Speaker project, which is based on .NET 6 and C# and utilizes Azure OpenAI and Azure Speech to create a voice interaction assistant that supports platforms like Linux/Raspbian, macOS, and Windows, along with a demonstration on Raspberry Pi 4.
After seeing the above two articles, I wondered if it was possible to build a voice assistant for a large language model using Python on the Raspberry Pi. To put it simply, it would involve using a microphone to detect the user’s voice input, converting it to text, and then using that text as a prompt for the large language model, with the results being read back to the user in a text-to-speech format. Thus, I began preparing for the project, considering both hardware and software aspects.
First, I used the Raspberry Pi 4B as the mainboard. Although the Raspberry Pi 5 has been released, I believe the 4B model is still the most commonly used. It has four ARM Cortex-A72 cores, each with a default clock frequency of 1.5 GHz. Next, I considered the input microphone and output speaker, which can be approached in several ways. The first option is to use a separate microphone and speaker setup, where we can use the onboard 3.5mm audio output for the speaker and a USB microphone. The second option is to use an integrated microphone and speaker solution, which can be purchased on Taobao, generally costing around several dozen yuan. When ordering, be sure to check if the device supports the Raspberry Pi. I happen to have a MaxHub BM21 wireless omnidirectional microphone speaker on hand, which can connect via USB or Bluetooth and integrates both a microphone and a speaker.
From a software perspective, the Raspberry Pi can run the official OS or an Ubuntu system, making it convenient to write and debug code in Python. However, it is important to note that the project requires the Azure Speech SDK. According to the official documentation on “Installing the Speech SDK“, the Azure Speech SDK for Python only supports x64 and ARM64 architectures. Therefore, when setting up the Raspberry Pi system, be sure to install the 64-bit Raspberry Pi OS or Ubuntu, and avoid the 32-bit systems. In combination with the previously mentioned BM21 omnidirectional microphone speaker, it can be directly recognized by the system in the Ubuntu environment without the need for additional drivers, but this is not the case in Raspberry Pi OS. Hence, I chose the Ubuntu system. By connecting to the Raspberry Pi via SSH, you can use the lsusb command to check the hardware devices connected through the USB interface, as shown in Figure 1.

Figure 1: lsusb command to check the omnidirectional microphone speaker connected to the Raspberry Pi USB interface
Now, let’s get to the main topic and start the process of creating the voice assistant.
Install Language SDK
https://learn.microsoft.com/en-us/azure/ai-services/speech-service/quickstarts/setup-platform?tabs=linux%2Cubuntu%2Cdotnetcli%2Cdotnet%2Cjre%2Cmaven%2Cnodejs%2Cmac%2Cpypi&pivots=programming-language-python
Raspberry Pi OS Image Burning
Download the Raspberry Pi Imager tool from the Raspberry Pi official website, install it, and run it after installation. In the pop-up window, select the operating system, Other general-purpose OS, Ubuntu, Ubuntu Desktop 22.04.3 LTS (64 bit).
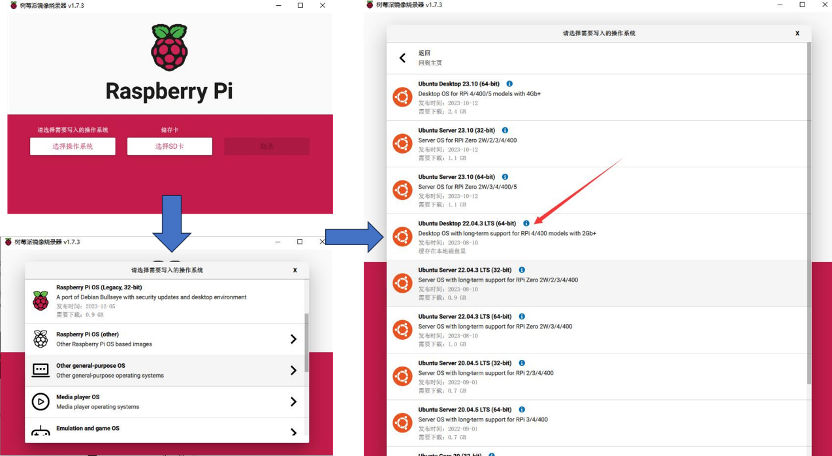
Figure 2: Raspberry Pi image burning tool
Select the corresponding TF card in the storage card and start burning. After burning is complete, insert the TF card into the Raspberry Pi 4, connect the power supply, monitor, mouse, keyboard, and other devices, and power on the Raspberry Pi. After the system runs, check the system version and Python version, which should yield results as shown in Figure 3, with Python version 3.10.12.
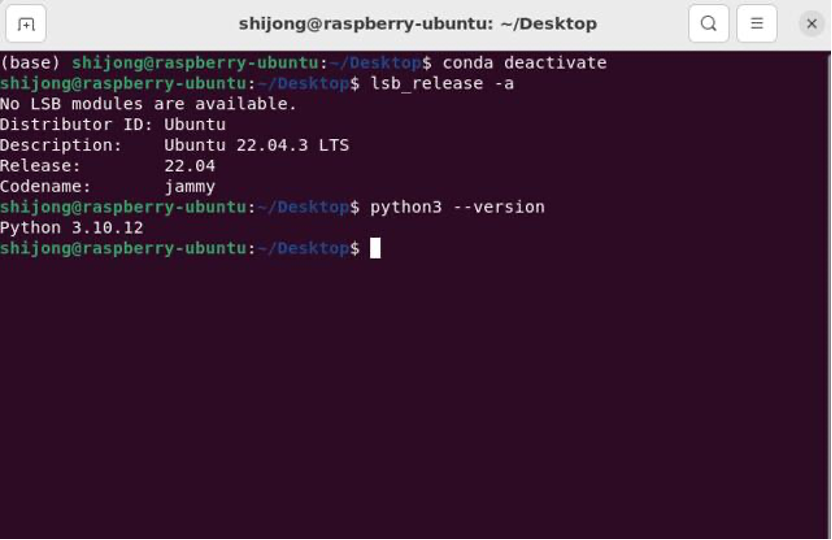
Figure 3: Viewing the installed Ubuntu version
In this environment, after installing the Azure Speech SDK, you may encounter runtime errors due to a high Python version. Therefore, we can use the Miniconda tool for Python version management. You can download Miniconda3 from the Tsinghua mirror, making sure to select the aarch64 version of Miniconda, and choose a slightly older version to ensure compatibility with the Raspberry Pi. Here, we selected the Miniconda3-py37_4.9.2-Linux-aarch64 version. After installation, restart the device, open the command line, enter the Miniconda base environment, and check the conda and python versions, which should be 4.9.2 and 3.7.10 respectively.
Raspberry Pi Imager Tool
https://www.raspberrypi.com/software/
Mirror
https://mirrors.tuna.tsinghua.edu.cn/anaconda/miniconda/
Microphone and Speaker Setup
There are also two ways to connect the microphone and speaker: one is via Bluetooth, and the other is via USB wired connection.
If using Bluetooth, after entering the Ubuntu system, click the settings icon in the upper right corner, go to system settings, and select Bluetooth from the left column. After powering on the BM21 omnidirectional microphone speaker, click on the device to pair, as shown in Figure 4.
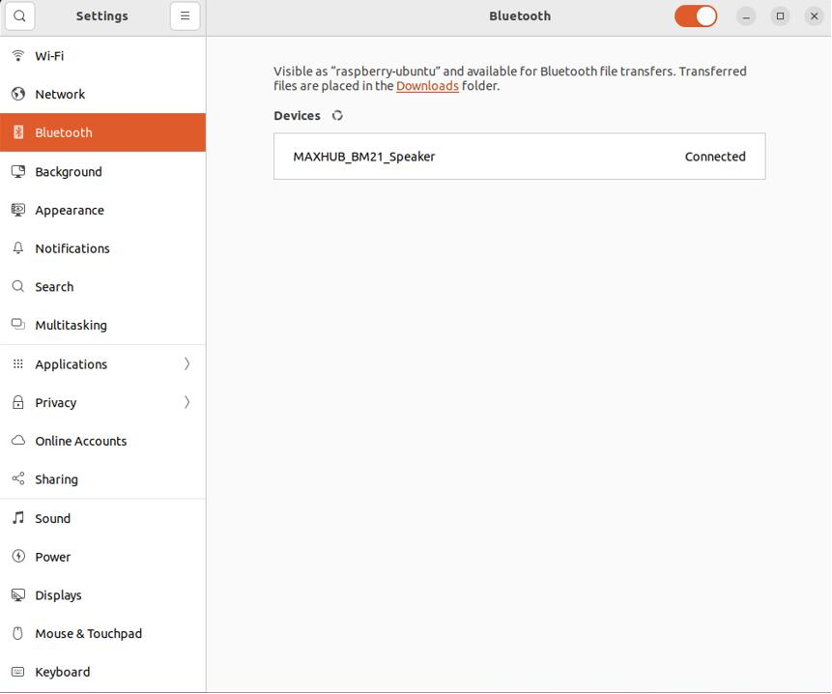
Figure 4: Bluetooth pairing
After completing the Bluetooth pairing, select Sound from the left column to set the system’s microphone and speaker, choosing the corresponding hardware devices in Input Device and Output Device, as shown in Figure 5.
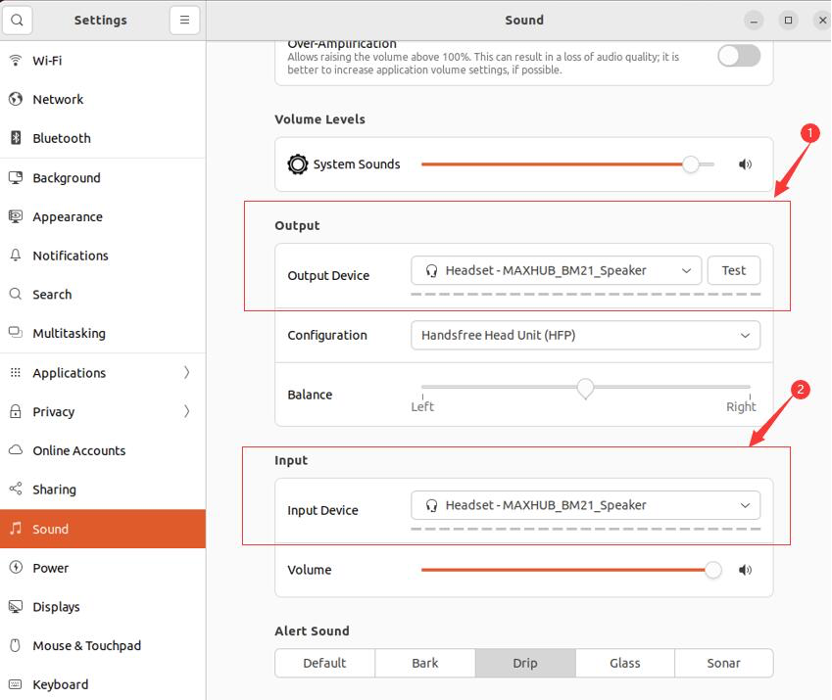
Figure 5: System microphone and speaker settings
If using USB to connect the BM21 omnidirectional microphone speaker, after entering the Ubuntu system, click the settings icon in the upper right corner, go to system settings, and select Sound from the left column to set the system’s microphone and speaker, choosing the corresponding hardware devices in Input Device and Output Device, as shown in Figure 6.

Figure 6: Setting system sound and microphone hardware devices
Install Azure Speech SDK Python Package
In the base environment, use the following command to install: pip install azure-cognitiveservices-speech
Due to slow connections to the official service, I used a domestic douban proxy. From the installation records, it shows that this is the aarch64 version of the file, as shown in Figure 7.
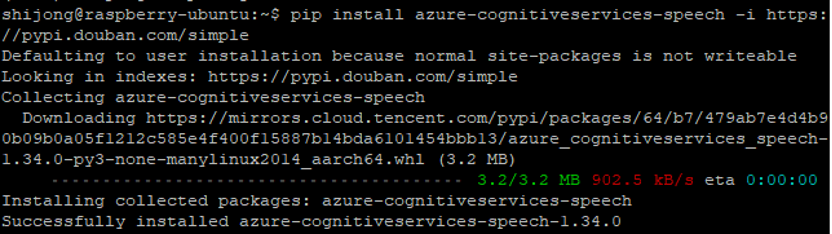
Figure 7: Installing the Azure Speech SDK Python package
Install OpenAI Python Package
In the base environment, use the following command to install: pip install openai
Again, I used a domestic douban proxy, and the installation records indicate that many of the installed packages are dependencies of OpenAI’s Python package, as shown in Figure 8.

Figure 8: Installing OpenAI’s Python package
Creating Azure Speech Service
Log in to the Azure portal with your subscription account. If you don’t have a subscription, you can create a free trial account (https://azure.microsoft.com/en-us/free).
There are two ways to create Azure Speech Service: one is to create Azure AI services, which includes various AI services such as Vision, Language, Search, and Speech, allowing you to manage multiple services with a single resource. The other way is to create Azure Speech Service separately, which has the advantage of including a free F0 level, while Azure AI Services only has the standard Standard S0 level. When creating a new resource, search for Speech, select Azure Speech Services, and proceed with the settings, as shown in Figure 9. It is important to choose a region that is as close as possible to you. From a service perspective, East US, West Europe, and Southeast Asia have the most comprehensive feature support.
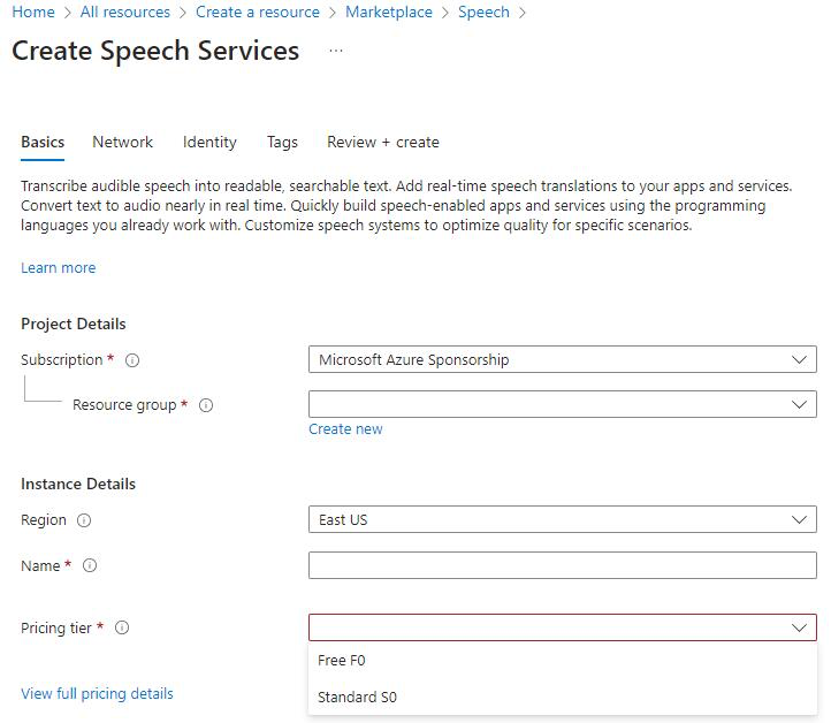
Figure 9: Creating Azure Speech Services
Creating Azure OpenAI Service
This project uses Azure OpenAI Service to create a large language model and interact with users using that model. Of course, if users have access to OpenAI services, they can use those directly. Here, I will demonstrate using Azure OpenAI Service as an example.
Currently, Azure OpenAI Service requires an application to use (application address: https://aka.ms/oai/access). Once the application is approved, you can create Azure OpenAI Service. Navigate to the Azure portal, search for Azure OpenAI in the resource creation section, and click to create. You can refer to this document on MS Learn for creating OpenAI Service: https://learn.microsoft.com/en-us/azure/ai-services/openai/how-to/create-resource?WT.mc_id=AZ-MVP-4025134. It is important to note that the large language model is available in multiple versions, and different regions support different models, so you need to establish OpenAI Service resources based on your specific model needs. For detailed model information, you can refer to the MS Learn document: https://learn.microsoft.com/en-us/azure/ai-services/openai/concepts/models?WT.mc_id=AZ-MVP-4025134. After creating the OpenAI service, you need to go to the Keys and Endpoint page to record its key and endpoint, which will be used in the code later.
After the OpenAI service is created, users can go to Azure OpenAI Studio to create and deploy models, as shown in Figure 10.
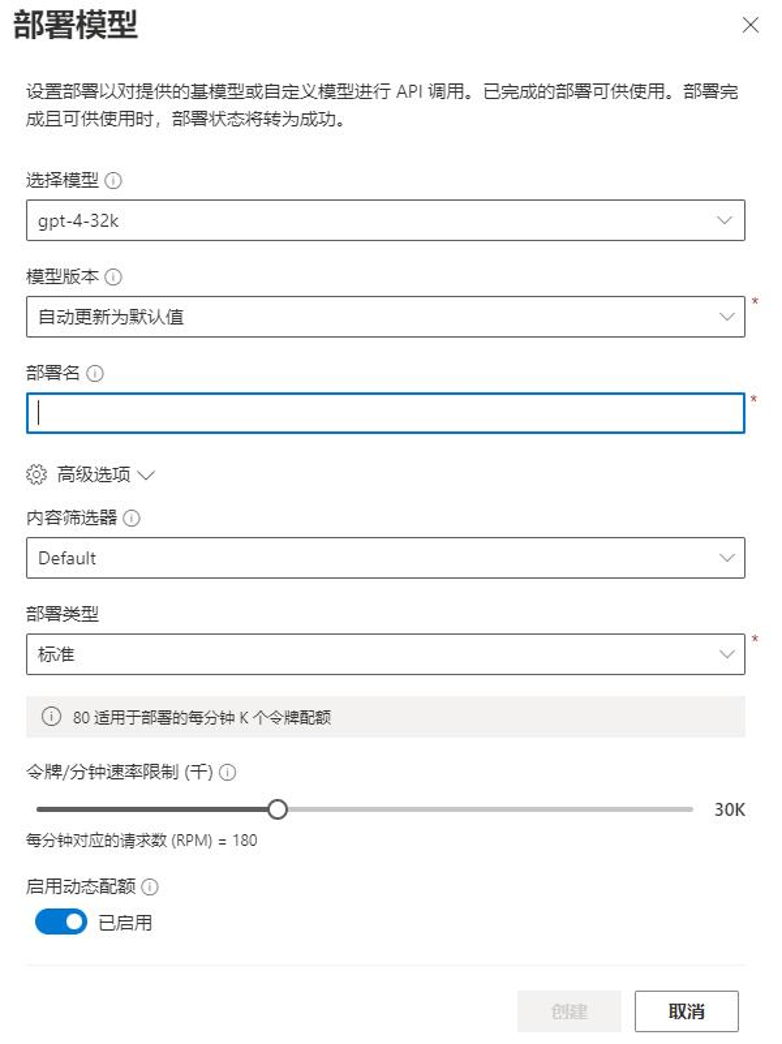
Figure 10: Deploying a large language model
It is important to remember the model name and version number you deployed, as they will be used in the code later.
Code Preparation
Download the code from GitHub: https://github.com/shijiong/GPT4VoiceAssistantForRaspberry. Currently, there are two versions available: one includes prompts, and the other does not. Here, we will use the version without prompts: VoiceAssistant.py.
Modify the configuration parameters within it as follows:
For OpenAI parameters, lines 7-9 for azure_endpoint, api_key, api_version; and line 75 for the model name model.
For Azure Speech Service parameters, lines 13-14 for speech_key, service_region, and lines 17-22 for Text to Speech language and Speech to Text language. The default selection is Mandarin, and users can check the corresponding supported languages on the MS Learn webpage Language Support. Currently, Text to Speech support is quite comprehensive, covering Mandarin, Liaoning dialect, Cantonese, Shandong dialect, Henan dialect, Sichuan dialect, Taiwanese dialect, etc.
Language Support
https://learn.microsoft.com/en-us/azure/ai-services/speech-service/language-support?tabs=tts
Running the Program
If you have installed an IDE like Visual Studio Code, you can open the source code in the software for debugging or direct execution, as shown in Figure 11.
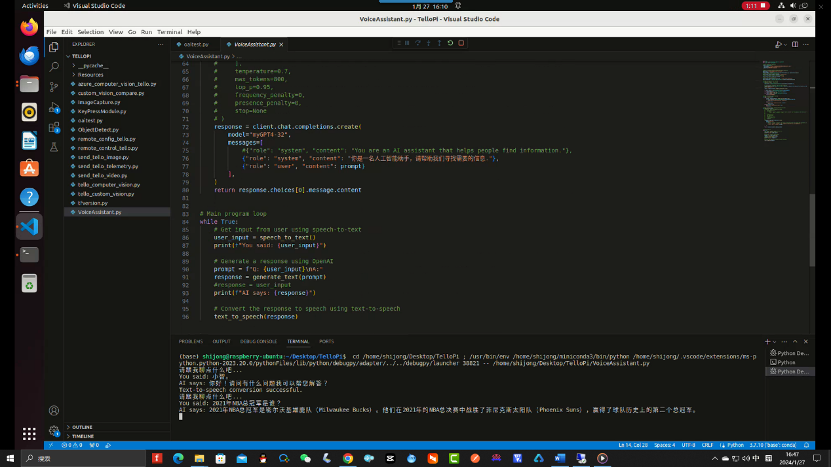
Figure 11: Program running screenshot
At this point, users can converse with the large language model via the microphone, while the debug window will display the text converted from voice input, the information returned by the large language model, and the application running status.
If you haven’t installed an IDE like Visual Studio Code, you can run the program directly by entering python3 VoiceAssistant.py in the command line.
Upgrading OpenAI Python Library
In November 2023, the official OpenAI Python library was upgraded from version 0.x.x to 1.x.x, which made the original Python code unusable. If you have an old version of the OpenAI Python library installed, you can upgrade it using pip install openai –upgrade. For more details, refer to the MS Learn document: Migrating to the OpenAI Python API library 1.x.
Migrating to the OpenAI Python API library 1.x
https://learn.microsoft.com/en-us/azure/ai-services/openai/how-to/migration?WT.mc_id=AZ-MVP-4025134&tabs=python%2Cdalle-fix
Reference Links
-
Official Microsoft Project:
https://github.com/microsoft/conversational-speaker
-
MVP Jiadong Chen’s Project:
https://github.com/chenjd/azure-openai-gpt4-voice-chatbot
-
MS Learn’s Azure Speech Service supported TTS language types:
https://learn.microsoft.com/en-us/azure/ai-services/speech-service/language-support?tabs=tts
-
Raspberry Pi image burning tool Raspberry Pi Imager:
https://www.raspberrypi.com/software/
-
MS Learn’s Azure Speech documentation:
https://learn.microsoft.com/en-us/azure/ai-services/speech-service/speech-sdk?WT.mc_id=AZ-MVP-4025134
-
Create OpenAI Service:
https://learn.microsoft.com/en-us/azure/ai-services/openai/how-to/create-resource?WT.mc_id=AZ-MVP-4025134
-
Azure OpenAI model information:
https://learn.microsoft.com/en-us/azure/ai-services/openai/concepts/models?WT.mc_id=AZ-MVP-4025134
-
Project code address:
https://github.com/shijiong/GPT4VoiceAssistantForRaspberry
-
OpenAI Python library upgrade:
https://learn.microsoft.com/en-us/azure/ai-services/openai/how-to/migration?WT.mc_id=AZ-MVP-4025134&tabs=python%2Cdalle-fix
Microsoft Most Valuable Professional (MVP)

The Microsoft Most Valuable Professional is a global award granted by Microsoft to third-party technical professionals. For 31 years, technology community leaders around the world have received this award for sharing their expertise and experience in online and offline technology communities.
MVPs are a carefully selected team of experts representing the most skilled and knowledgeable individuals in technology. They are passionate community contributors who are eager to help others. MVPs dedicate themselves to helping others through speaking engagements, forum Q&As, creating websites, writing blogs, sharing videos, open-source projects, organizing conferences, and more, maximizing assistance to users of Microsoft technologies.
For more details, please visit the official website: https://mvp.microsoft.com/en-us


WeChat Official Account|Microsoft Developer MSDN
Sina Weibo|Microsoft China MSDN
·END·