Author: Digi-Key’s North American Editors
Voice assistants have quickly become an important product feature, thanks to popular smart voice-based products like Amazon Echo and Google Home. While voice service providers offer developers API support——so they don’t have to become experts in voice recognition and parsing details——the requirement to combine audio hardware and voice processing software remains a significant barrier.
Moreover, projects lacking rich experience in the detailed work associated with each discipline, in areas such as acoustic design, audio engineering, and cloud-based services may face serious delays.
To address these issues, vendors provide complete voice assistant development kits that significantly simplify the problem. This article will introduce two such kits, one from XMOS, and the other from Seeed Technology, which enable rapid development of custom products based on Amazon Alexa Voice Service (AVS) and Google Assistant. These circuit boards can connect to the Raspberry Foundation’s Raspberry Pi 3 (RPi 3) board.
This article will explain how to get each kit up and running and demonstrate how each kit can leverage voice assistant technology at any time.
Quickly Building an AVS Prototype
Amazon launched the Alexa smart speaker, a home-oriented product that offers smart voice assistant capabilities, but these features were largely limited to smartphones in the past. For developers, the release of the AVS API opened the door to using the same voice assistant functionality in custom system designs, but it still requires extensive expertise in audio hardware and software. Now, with the launch of the XMOS xCORE VocalFusion 4-Mic kit for Amazon Alexa Voice Service (AVS), the last hurdle to implementing voice assistant functionality has been overcome.
The XMOS kit includes an XVF3000 processor board, a 100mm linear array made up of four Infineon IM69D130 MEMS microphones, an xTAG debugger, installation kit, and cables. Developers need to provide active speakers, USB power, and a USB keyboard, mouse, monitor, and internet connection for the RPi 3. After using the installation kit to connect the XMOS board and microphone array to the RPi 3, developers can quickly evaluate the Amazon Alexa voice assistant (Figure 1).
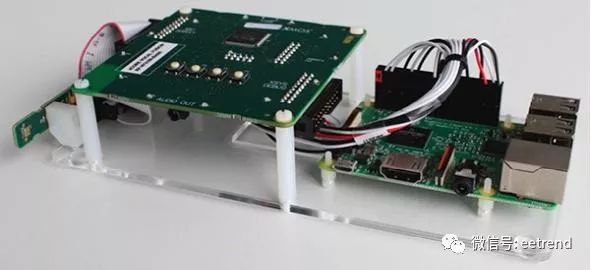
Figure 1: Developers start working with the XMOS xCORE VocalFusion kit, inserting the provided microphone array board (far left) and XMOS processor board (middle) into the Raspberry Pi 3 board (right). (Image source: XMOS)
After connecting the RPi 3 to the USB keyboard, mouse, monitor, and internet service, the next step is to install the Raspbian operating system from the SD micro card, open a terminal on the RPi 3, and clone the XMOS VocalFusion repository. After installing the operating system and repository, simply run the auto_install.sh located in the cloned vocalfusion-avs-setup directory.
The installation script will configure the Raspberry Pi audio system and its connection with the xCORE VocalFusion kit, and install and configure the AVS Device SDK on the Raspberry Pi. This installation process may take approximately two hours to complete.
Once installation is complete, developers need to perform a simple process to load their Amazon developer credentials and then start testing a wide range of voice commands and built-in features. At this point, the XMOS kit will be able to demonstrate the full range of Alexa’s capabilities, such as timers, alarms, and calendars, as well as third-party features built using the Alexa Skills Kit.
AVS Design Kit Revealed
While the setup steps are simple, the functionality of the hardware and software components in the XMOS kit is quite complex. The kit provides developers with a comprehensive reference design for implementing custom designs. At the core of the XMOS kit is the XMOS XVF3000TQ128 device, which offers high processing power (Figure 2).
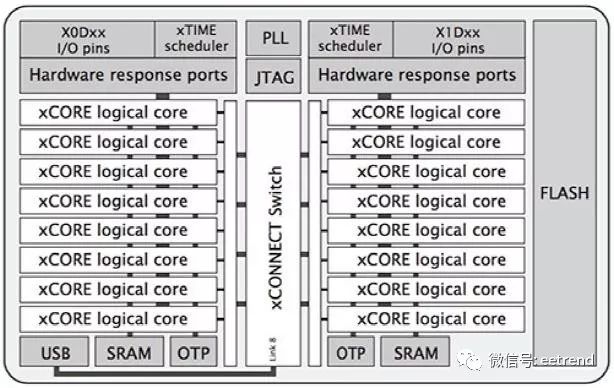
Figure 2: The XMOS XVF3000-TQ128 device integrates two xCORE Tiles, each containing eight cores to provide high-performance audio processing. (Image source: XMOS)
This device is built for parallel processing tasks and contains two xCORE Tiles, each with eight 32-bit xCORE cores with integrated I/O, 256KB of SRAM, and 8KB of one-time programmable (OTP) on-chip memory. The xTIME scheduler manages the cores and triggers core operations from hardware events at the I/O pins. Each core can independently perform computations, signal processing, or control tasks, leveraging the integrated 2MB flash memory in the xCORE VocalFusion kit, as well as the code and data used for kit setup and execution.
In addition to the XVF3000-TQ128 device, the XMOS processor board requires a few additional components (Figure 3). Besides the basic buffers and socket connections, the board also includes a Cirrus Logic CS43L21 digital-to-analog converter (DAC) to generate output audio for external speakers. Finally, the baseboard also exposes the I2C port of the XVF3000-TQ128 device, as well as an audio-optimized I2S digital audio interface.
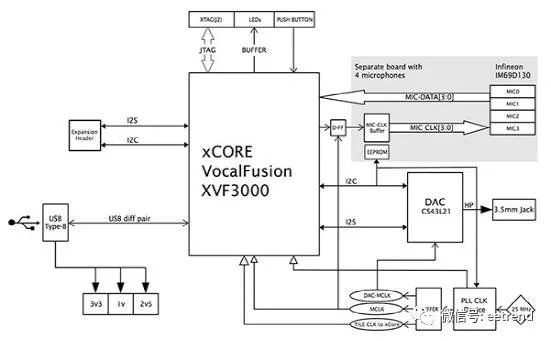
Figure 3: The XMOS kit’s baseboard includes the XVF3000-TQ128 device, DAC, buffers, and sockets for connecting to the Raspberry Pi 3 board and external speakers. (Image source: XMOS)
The overall functionality of the kit is divided into two parts: audio processing on the XMOS board and advanced voice processing services on the RPi 3 (Figure 4). The RPi’s Broadcom quad-core processor runs software that analyzes audio streams, performs wake word recognition, and handles interactions with Amazon AVS.

Figure 4: The XMOS VocalFusion kit separates Alexa functionality between the baseboard and the Raspberry Pi 3 board, with the former for audio signal processing and the latter for voice recognition and higher-level Alexa services. (Image source: XMOS)
The software installation process configures these subsystems and loads the required software packages, including Sensory’s speaker-independent wake word engine and AVS client software.
AVS provides a range of interfaces related to advanced features such as voice recognition, audio playback, and volume control. Operations occur through messages (commands) from AVS and messages (events) from the client. For example, in response to certain conditions, AVS may send instructions to the client indicating that the client should play audio, set alarms, or turn on lights. Conversely, events from the client can notify AVS that certain events have occurred, such as a new voice request from the user.
Developers can use the AVS Device Software Development Kit (SDK) API and C++ software libraries to extend the capabilities of their XMOS kit or XMOS custom designs. The AVS Device SDK extracts low-level operations such as audio input processing, communication, and AVS command management through a series of distinct C++ classes and objects, which developers can use or extend for custom applications (Figure 5).
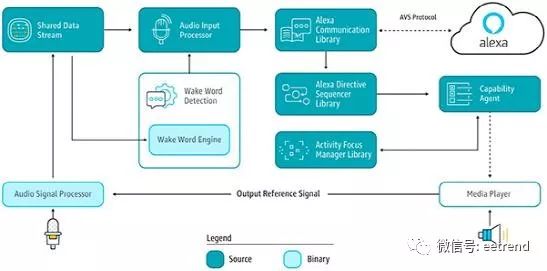
Figure 5: The Amazon AVS Device SDK organizes the extensive capabilities of AVS into distinct functional areas, each with its own interface and library. (Image source: AWS)
The complete sample applications included in the AVS Device SDK showcase key design patterns, including creating device clients and wake word interaction managers (List 1). In addition to the full suite of sample service routines, this application also shows how the main program only needs to instantiate the sample application objectsampleApplication and use a simple command to run it: sampleApplication->run().
/*
* Creating the DefaultClient – this component serves as an out-of-box default object that instantiates and “glues”
* together all the modules.
*/
std::shared_ptr<alexaClientSDK::defaultClient::DefaultClient> client =
alexaClientSDK::defaultClient::DefaultClient::create(
m_speakMediaPlayer,
m_audioMediaPlayer,
m_alertsMediaPlayer,
speakSpeaker,
audioSpeaker,
alertsSpeaker,
audioFactory,
authDelegate,
alertStorage,
settingsStorage,
{userInterfaceManager},
{connectionObserver, userInterfaceManager});
…
// If wake word is enabled, then creating the interaction manager with a wake word audio provider.
auto interactionManager = std::make_shared<alexaClientSDK::sampleApp::InteractionManager>(
client,
micWrapper,
userInterfaceManager,
holdToTalkAudioProvider,
tapToTalkAudioProvider,
wakeWordAudioProvider);
…
client->addAlexaDialogStateObserver(interactionManager);
// Creating the input observer.
m_userInputManager = alexaClientSDK::sampleApp::UserInputManager::create(interactionManager);
…
void SampleApplication::run() {
m_userInputManager->run();
}
List 1: Developers can use the AVS Device SDK C++ sample application to extend the device AVS client, demonstrating key design patterns for creating AVS clients, wake word interaction managers, and user input managers. (List source: AWS)
Rapid Prototyping with Google Assistant Development
The XMOS kit accelerates the development of Amazon Alexa prototypes, while Seeed Technology’s Google AIY Voice Kit helps developers build prototypes using Google Assistant. Similar to the XMOS AVS kit, the Seeed Google AIY Voice Kit can be used with the Raspberry Pi 3 board to build prototypes and provides the necessary components (Figure 6).
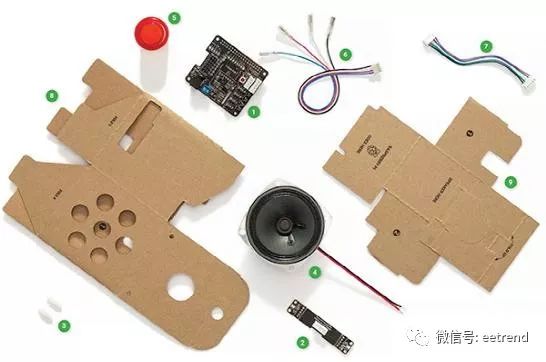
Figure 6: Developers can use the Raspberry Pi 3 with Seeed Technology’s Google AIY Voice Kit (which provides the components needed to build prototypes) to quickly create Google Assistant applications. (Image source: Google)
In addition to the Seeed Voice HAT expansion board (1), microphone board (2), and speaker (4) shown in Figure 6, the kit also includes a cardboard shell (8) and internal frame (9), as well as some basic components including supports (3), cables (6 and 7), and buttons (5).
Developers first connect the RPi 3, speaker wires, and microphone cables to the Voice HAT, and then assemble the kit. Unlike the AVS kit, the Google kit provides a simple shell and internal frame to secure the circuit board components and speaker (Figure 7).
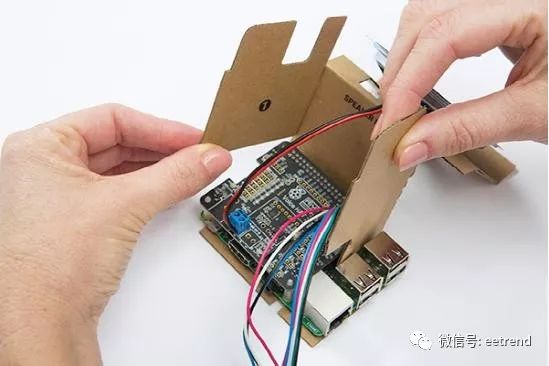
Figure 7: The Seeed Google AIY Voice Kit includes an internal cardboard frame that developers fold into a carrier for the circuit board components. (Image source: Seeed Technology)
The frame is installed inside the shell that supports the buttons and microphone array, completing the assembly (Figure 8).

Figure 8: In addition to securing the internal frame and speaker, the Seeed Google AIY Voice Kit’s shell also includes buttons and microphones (the two holes at the top of the shell). (Image source: Seeed Technology)
After downloading the voice kit image and loading it onto the SD card, simply insert the SD card into the RPi and power on the board to invoke the kit. After a brief initialization process to confirm that each component is working properly, developers need to activate services on the Google Cloud side. To do this, set up a working sandbox area and enable the Google Assistant API to create and download authentication credentials.
Finally, developers need to open a terminal console on the RPi 3 and execute the Python script assistant_library_demo.py to start Google Assistant on the kit. At this point, developers can effortlessly use the full functionality of Google Assistant.
Customizing Google Assistant Development
Using the Seeed Google AIY Voice Kit for custom development allows for leveraging the flexibility of the Raspberry Pi. The Seeed Voice HAT exposes several GPIOs on the RPi 3 that are already configured for typical IO functions (Figure 9).
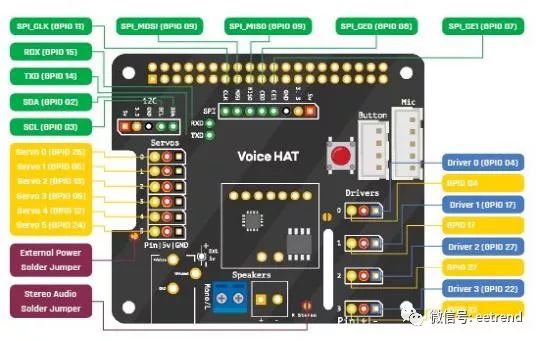
Figure 9: Developers can quickly expand the hardware capabilities of the Seeed Google AIY Voice Kit using the I/O ports exposed on the Seeed Voice HAT expansion board. (Image source: Raspberry Pi)
On the software side, developers can easily extend the baseline functionality of the kit using the Google Voice Kit API software. In addition to supporting software and utilities, the software package also includes sample application software that demonstrates various ways to implement voice services using the Google Cloud Speech API and Google Assistant SDK.
The cloud voice service is fundamentally different from the smart assistant approach, as it provides voice recognition functionality while leaving the task of implementing specific voice-initiated actions to the programmer. For designs that only require voice input functionality, this service offers a simple solution. Developers need only pass audio to the cloud voice service to convert speech to text and return the recognized text, as shown in the sample Python script included in the voice kit API (List 2).
…
import aiy.audio
import aiy.cloudspeech
import aiy.voicehat
def main():
recognizer = aiy.cloudspeech.get_recognizer()
recognizer.expect_phrase(‘turn off the light’)
recognizer.expect_phrase(‘turn on the light’)
recognizer.expect_phrase(‘blink’)
button = aiy.voicehat.get_button()
led = aiy.voicehat.get_led()
aiy.audio.get_recorder().start()
while True:
print(‘Press the button and speak’)
button.wait_for_press()
print(‘Listening…’)
text = recognizer.recognize()
if not text:
print(‘Sorry, I did not hear you.’)
else:
print(‘You said “‘, text, ‘”‘)
if ‘turn on the light’ in text:
led.set_state(aiy.voicehat.LED.ON)
elif ‘turn off the light’ in text:
led.set_state(aiy.voicehat.LED.OFF)
elif ‘blink’ in text:
led.set_state(aiy.voicehat.LED.BLINK)
elif ‘goodbye’ in text:
break
if __name__ == ‘__main__’:
main()
List 2: In the software routine provided by the Google Voice Kit API, this snippet from the sample program demonstrates how to use the Google Cloud Speech service to convert speech to text, leaving the task of implementing any voice-guided operations to the programmer. (List source: Google)
For developers needing broader functionality from Google Assistant, the Google Assistant SDK provides two implementation options: the Google Assistant Library and the Google Assistant Service.
The Python-based Google Assistant Library offers a quick way to implement Google Assistant in prototypes, such as in the Seeed voice kit. Using this approach, prototypes can instantly leverage the basic Google Assistant services, including audio capture, conversation management, and timers.
In contrast to the Cloud Speech approach, the Google Assistant Library manages conversations by treating each conversation as a series of events related to conversation and speaking states. Once speech recognition is complete, the instantiated assistant object will provide event objects that include the appropriate processing results. As shown in another Google sample script, developers use feature event handling design patterns and a series of if/else statements to handle expected event results (List 3).
…
import aiy.assistant.auth_helpers
import aiy.audio
import aiy.voicehat
from google.assistant.library import Assistant
from google.assistant.library.event import EventType
def power_off_pi():
aiy.audio.say(‘Good bye!’)
subprocess.call(‘sudo shutdown now’, shell=True)
def reboot_pi():
aiy.audio.say(‘See you in a bit!’)
subprocess.call(‘sudo reboot’, shell=True)
def say_ip():
ip_address = subprocess.check_output(“hostname -I | cut -d’ ‘ -f1”, shell=True)
aiy.audio.say(‘My IP address is %s’ % ip_address.decode(‘utf-8’))
def process_event(assistant, event):
status_ui = aiy.voicehat.get_status_ui()
if event.type == EventType.ON_START_FINISHED:
status_ui.status(‘ready’)
if sys.stdout.isatty():
print(‘Say “OK, Google” then speak, or press Ctrl+C to quit…’)
elif event.type == EventType.ON_CONVERSATION_TURN_STARTED:
status_ui.status(‘listening’)
elif event.type == EventType.ON_RECOGNIZING_SPEECH_FINISHED and event.args:
print(‘You said:’, event.args[‘text’])
text = event.args[‘text’].lower()
if text == ‘power off’:
assistant.stop_conversation()
power_off_pi()
elif text == ‘reboot’:
assistant.stop_conversation()
reboot_pi()
elif text == ‘ip address’:
assistant.stop_conversation()
say_ip()
elif event.type == EventType.ON_END_OF_UTTERANCE:
status_ui.status(‘thinking’)
elif event.type == EventType.ON_CONVERSATION_TURN_FINISHED:
status_ui.status(‘ready’)
def main():
credentials = aiy.assistant.auth_helpers.get_assistant_credentials()
with Assistant(credentials) as assistant:
for event in assistant.start():
process_event(assistant, event)
if __name__ == ‘__main__’:
main()
List 3: As shown in the sample from the Google Voice Kit, the main loop in the application using the Google Assistant Library starts an assistant object, which then generates a series of events handled by the developer’s code. (Image source: Google)
For higher customization requirements, developers can turn to the full set of interfaces offered by the Google Assistant Service (formerly known as the Google Assistant gRPC API). The Google Assistant Service is based on Google RPC (gRPC), allowing developers to send audio queries to the cloud, process the recognized speech text, and handle the corresponding responses. To achieve custom functionality, developers can access the Google Assistant Service API using various programming languages, including C++, Node.js, and Java.
When using the Google Assistant SDK for their designs, designers can leverage Google’s device matching functionality to implement hardware-specific features. As part of device setup, developers provide information about the custom device, including its functions and features, called traits. For user voice requests involving custom devices, the service will recognize valid traits of the device and generate appropriate responses (Figure 10). Developers only need to include the corresponding code related to the device traits in the device’s event handler (for example, def power_off_pi() in List 3).
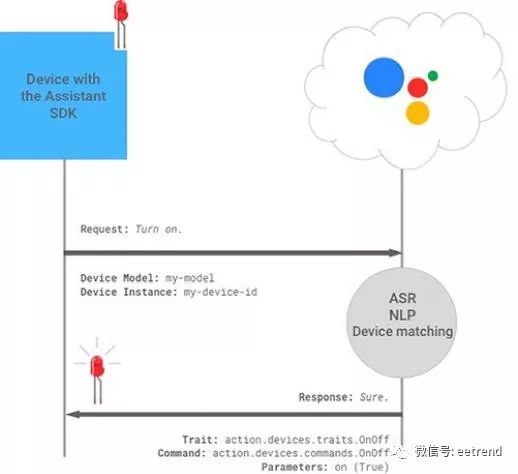
Figure 10: The Google Assistant SDK uses Automatic Speech Recognition (ASR) and Natural Language Processing (NLP) services to match user requests with specific devices and issue responses consistent with the custom device and its recognized traits. (Image source: Google)
Conclusion
In the past, smart voice assistants were largely unattainable for mainstream developers. With the launch of two off-the-shelf kits, developers can quickly implement Amazon Alexa and Google Assistant in custom designs. Each kit allows developers to quickly call upon the respective smart assistant in a basic prototype or extend the design with custom hardware and software.
Original article:https://www.digikey.com.cn/zh/articles/techzone/2018/feb/rapid-prototyping-smart-voice-assistant-raspberry-pi

Like Digi-Key’s articles? Visit Digi-Key’s official website now, or follow Digi-Key’s official WeChat!


Welcome to follow the annual technology event, click to read the original link for more information
