 MAKER: cgenco/Translated by: Qu WuEnd
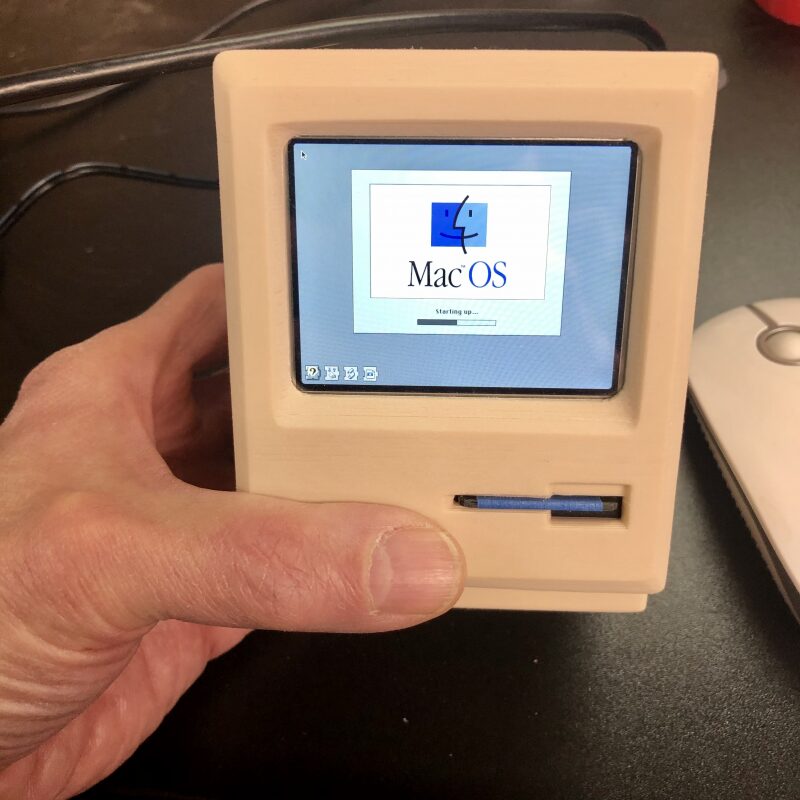
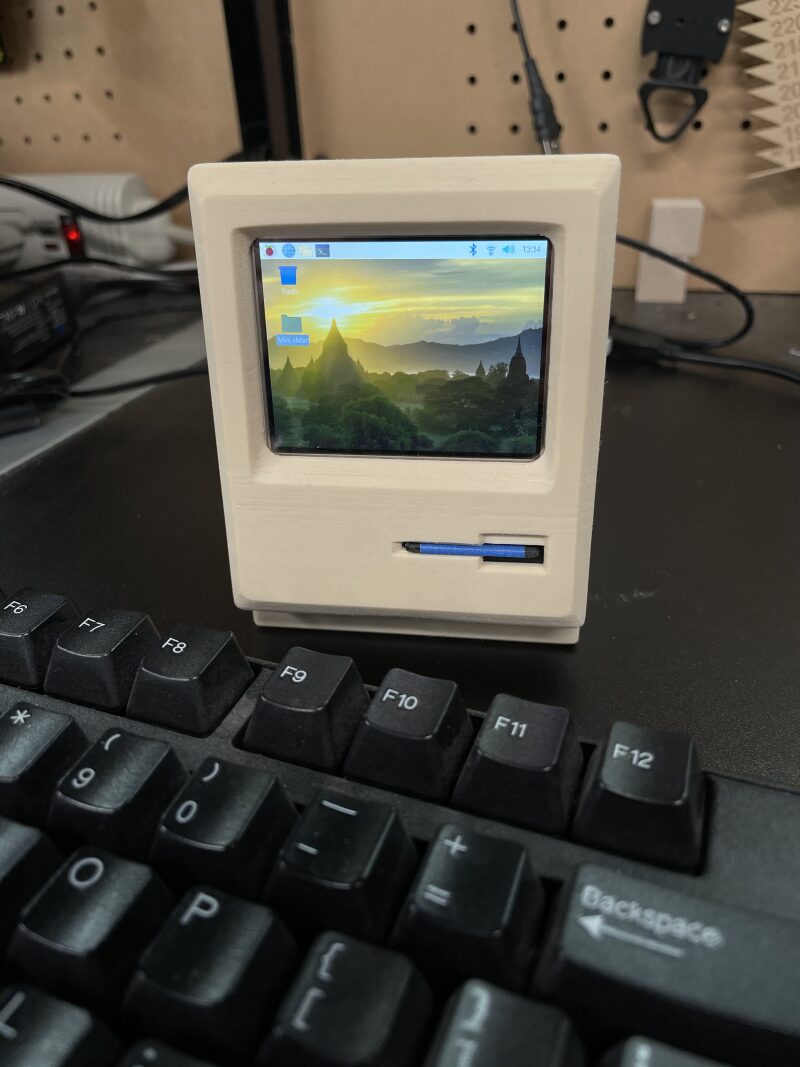
The Macintosh computer was released on January 24, 1984, and is Apple’s second computer to use a graphical user interface following the LISA. It has an impressive design and a classic operating system.
In this tutorial, we will pay tribute to the classic by recreating a miniature version of the Macintosh using the Raspberry Pi, which can run the original macOS operating system.
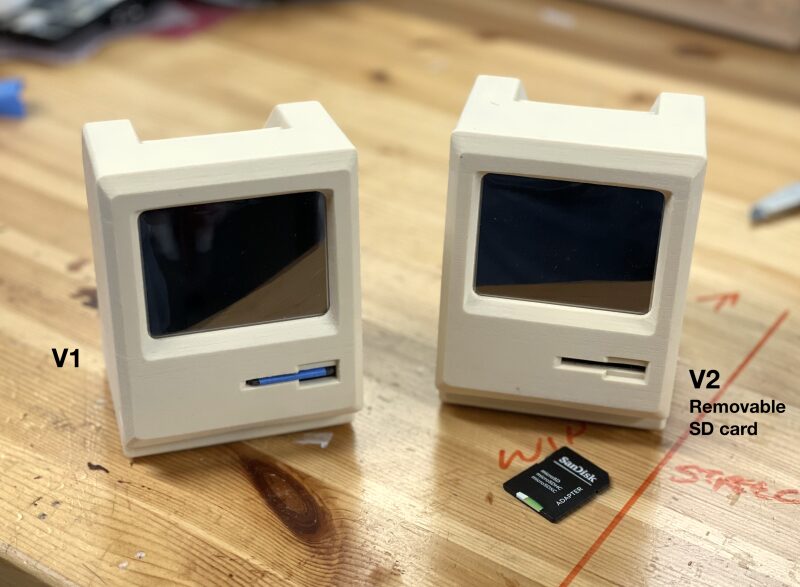
This mini computer has two versions, and you can choose either one to build. Version one: comes with a Faux disk, with the SD card accessible from the right side. Version two: resets the position of the SD card to be inserted at the front like the original Mac disk.
In the following steps, we will detail the differences between the two versions, and there are various color options for the screen. Hope you enjoy it!

Component List
Raspberry Pi Zero 2W (or Raspberry Pi Zero W) × 1 40 Pin Header × 1 Heat Sink × 1 16GB Micro SD Card × 1 Power Supply (with switch) × 1 Mini HDMI to HDMI Adapter × 1 Micro SD to SD Card Female to Male Extension Cable Adapter (for Version Two) × 1 Micro USB OTG Hub Adapter × 1 Waveshare 640×480 LCD Screen × 1 GPIO 40 Pin Male to Female Ribbon Cable (20cm long is suitable) × 1 Keyboard × 1 Mouse × 1 Bluetooth Speaker (optional) × 3 M3 × 12mm Hex Socket Head Screws × 3 M3 Hex Nuts × Color PLA Material × Some Blue Tape × 12.5mm Ball Hex Wrench × 120 Grit Sandpaper × 1 Craft Knife × 1
3D Printed Shell
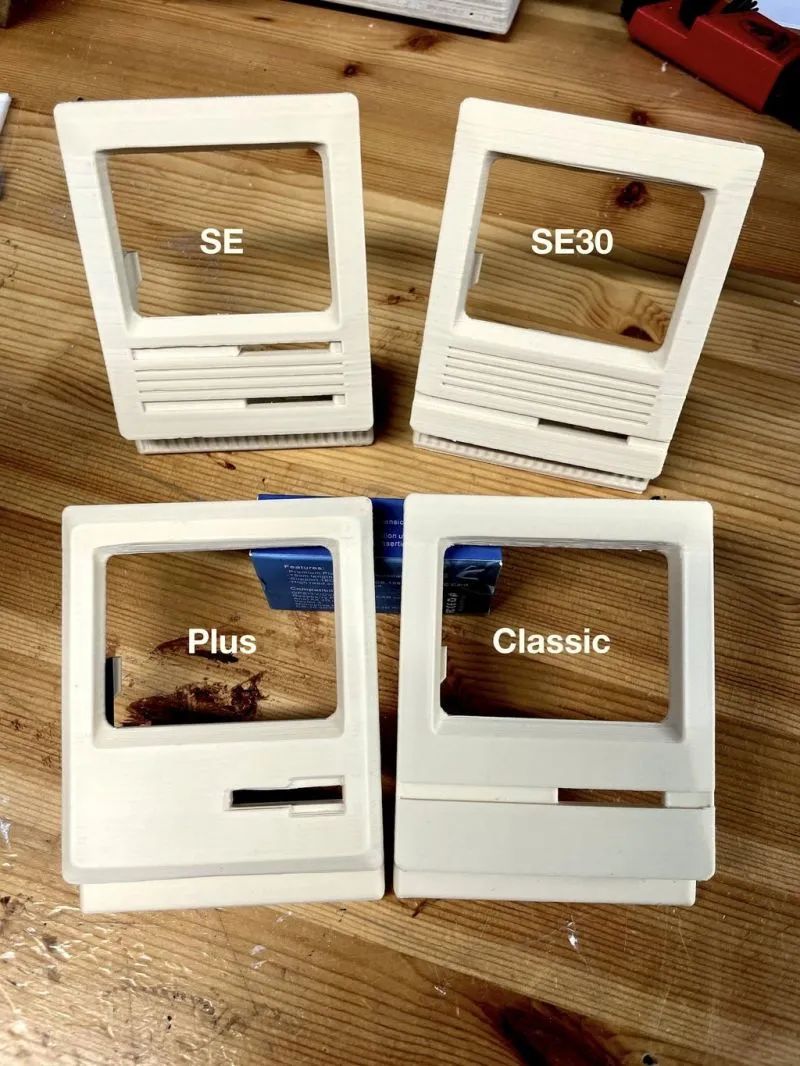
Please choose the version of the 3D shell to print as needed. You can choose from Mac Plus, SE, SE30, or Mac Classic. There are two versions.
Version one: has a Faux disk at the front, with the SD card accessible from the right side, making it relatively simple to assemble. Version two: moves the position of the SD card to the front, to be inserted into the Mac disk.
The cost difference between the two versions is minimal, and SD card expansion is very cheap. The biggest difference is that the internal space of the second version is smaller, so please carefully review the instructions before choosing to assemble.
In the print files, I will clearly label the Faux Disk and the SD card. If you want to adjust the plan, you can modify it based on the provided SketchUp files.
All STL files can be downloaded from the project repository: https://make.quwj.com/project/431
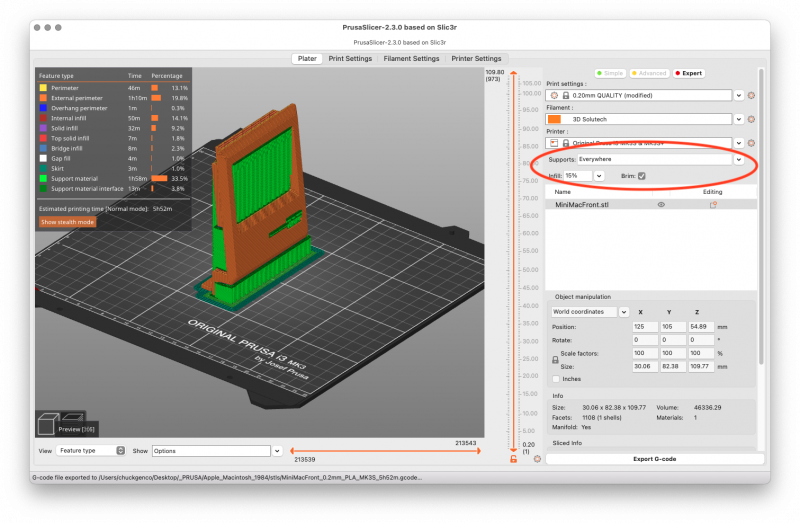
Print Shell All 3D PLA print materials are 0.20mm thick, off-white. Please note in the file that there are two front screw holes that are not aligned with SE and SE30. These files will be replaced. The other two front files are fine.
Support Testing
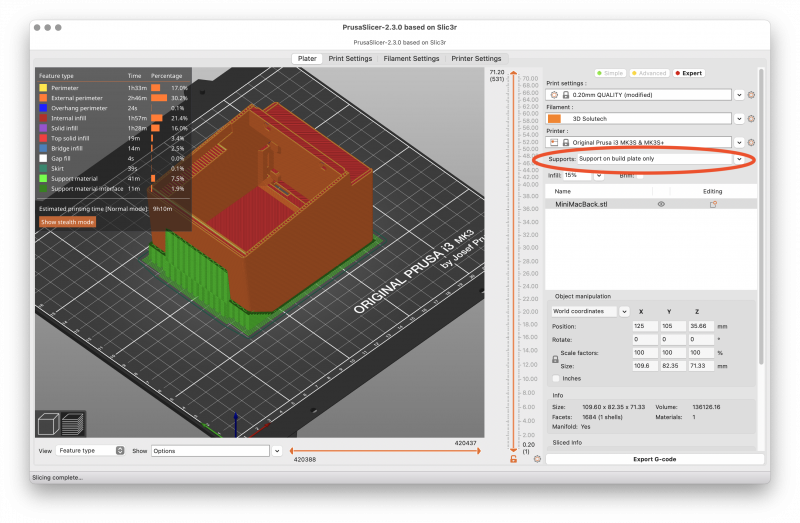
There are two areas where support hardness testing is required. At the back handle and at the front disk (for SE and SE30 versions) slot. caseBack_supportTest.stl file is only used for supporting the case. front_supportTest.stl file is the main body with support.
Identical Print Parts for Both Versions:
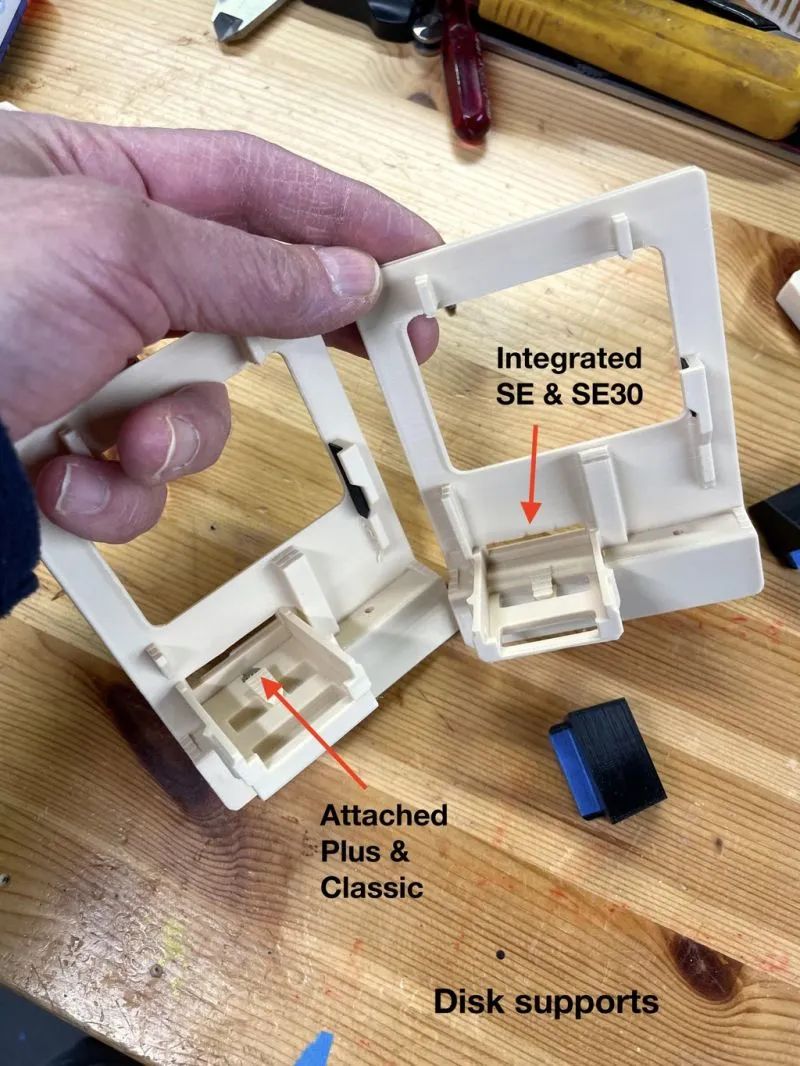
The front shell has four options. 1. Original Mac version, Mac 128 version, or Mac Plus version (the shell looks the same) – front_plus.stl. 2. SE version – front_SE_a.stl. 3. SE30 version – front_SE30_a.stl. 4. Mac Classic version – front_classic.stl.
The front part is printed vertically, with support. The front part has additional support in the design, so it needs to be removed after printing.
If you choose the Mac Plus version or Classic version. Among them, driveSupport_front.stl is without support, while the SE and SE30 front parts have been integrated into the design. driveSupport_back.stl is also without support.
Version One, with Faux Disk Port

caseBack_fauxDisk.stl back shell, with support from the shell itself, off-white PLA.
fauxDisk.STL (or fauxDisk_SE.stl if using SE front part) prints without support, black PLA.
toggle_fauxDisk.stl, without support.
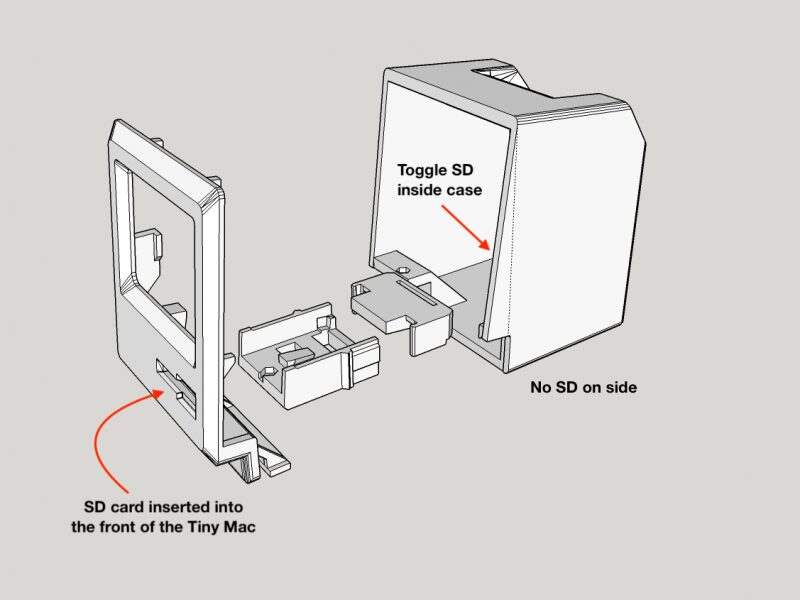
Version Two, SD Card Reset Position
caseBack_SDcard.stl back shell, with support from the shell itself, off-white PLA.
toggle_SDcard.stl, without support.
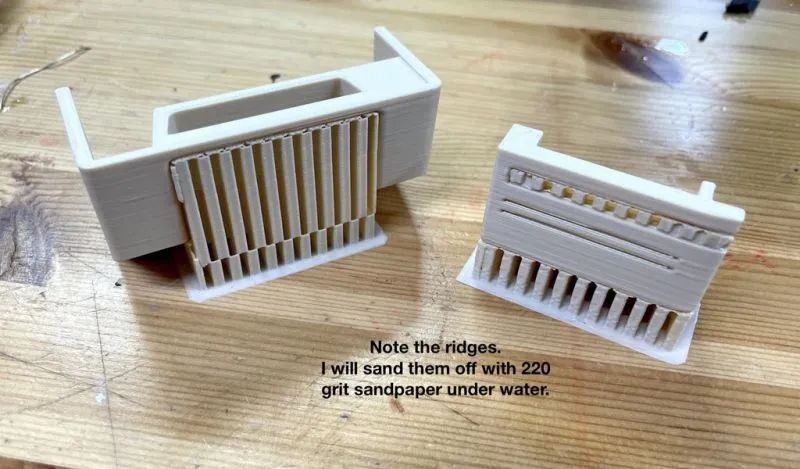
After printing, I will remove excess PLA from the shell components, and while rinsing with water, sand the shell with 220 grit sandpaper. This not only removes dust but also better polishes the shell.
Since the surface of the Mac is matte, the effect is very good.Before sanding, I used a 3D printing pen of the same material to fill in several serious defects.
Assembling the 3D Shell
Preparation Part 1. Install the nuts into the shell to install the 3M hex nuts to the back of the Mac.
The nuts are installed in a press-fit manner, aligning the nuts with the press-in area. Flip the shell over, press in the nuts, ensuring the nuts face the hex holes and are parallel to the surface, the whole process is seamless.
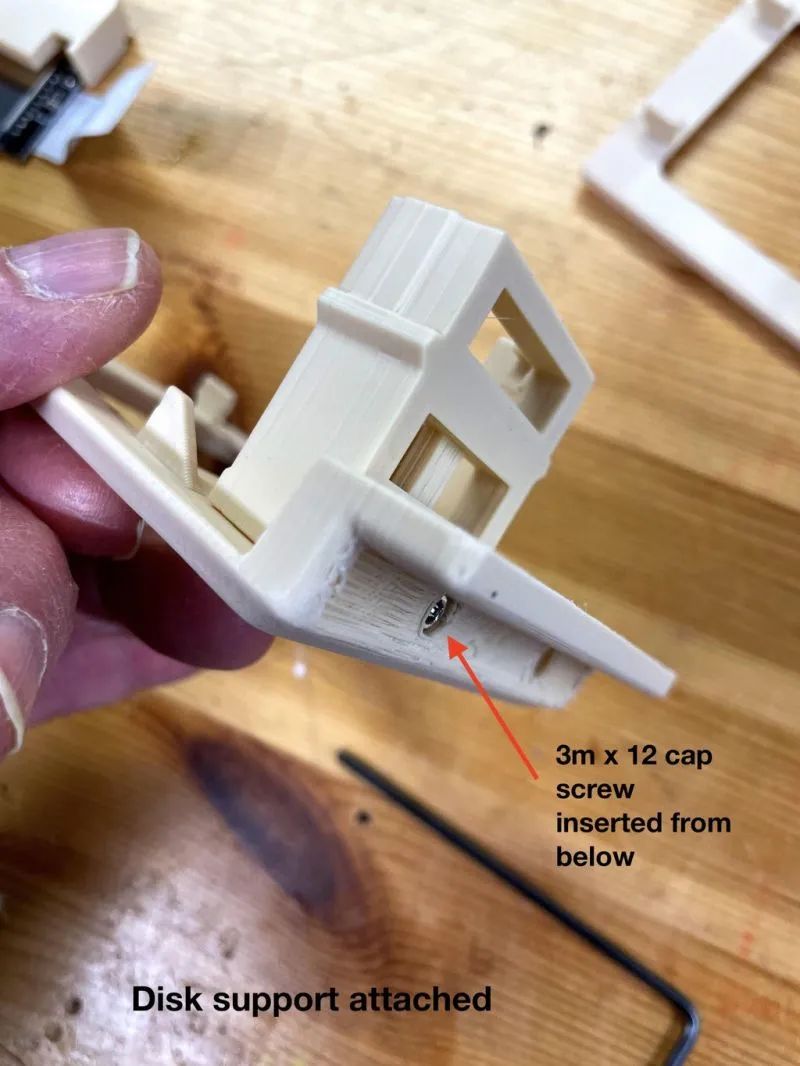
If using the Mac Plus version or Classic version, additional disk support is required. Use 3M 12mm screws to insert into the left hole from below. Align the nuts with the screws and tighten.
SE and SE30 have integrated disk support.
2. The back space of the Raspberry Pi shell is small, and the ribbon cable will seem bulky, taking up most of the space. If you need to move the SD card, you will need a wire to connect to the Raspberry Pi Zero, so ensure there are no extra debris in the entire shell, try to position the USB and HDMI ports, and if all goes well, remove and reinstall later in the following steps.
Version One, with Faux Disk
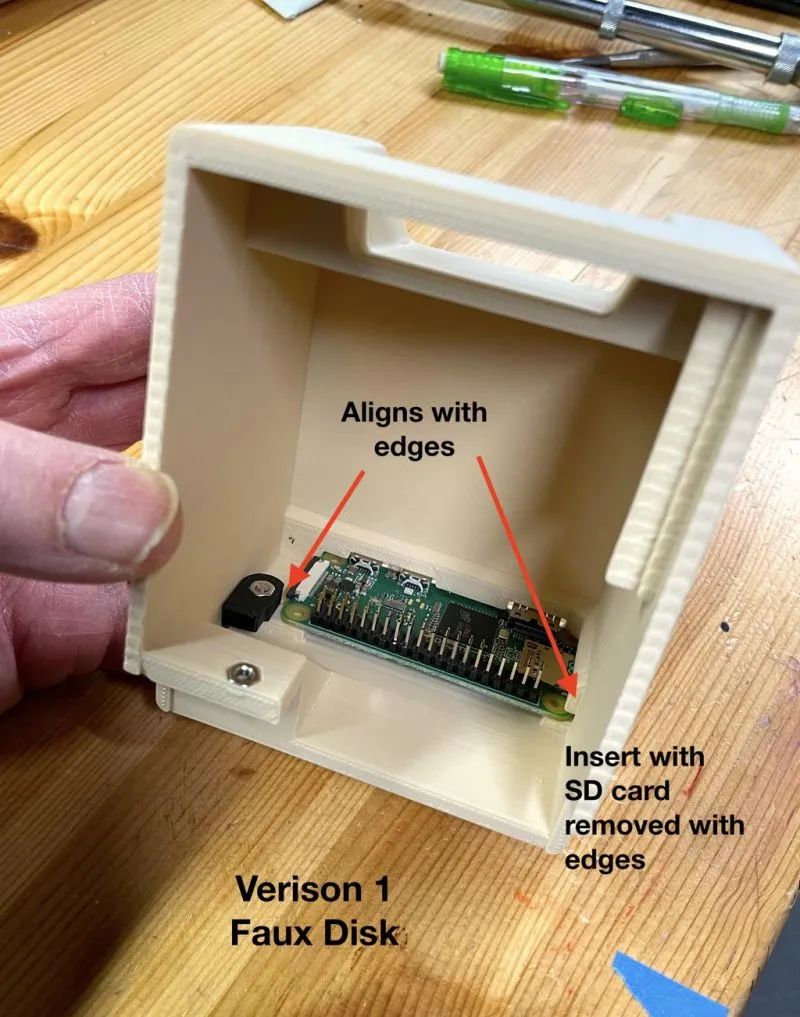
Here are two versions of the Faux disk, fauxDisk.stl and fauxDisk_SE.stl. The SE version has two disk drives. Please choose your version as needed.
Wrap the disk interface with 22mm wide tape to center it.
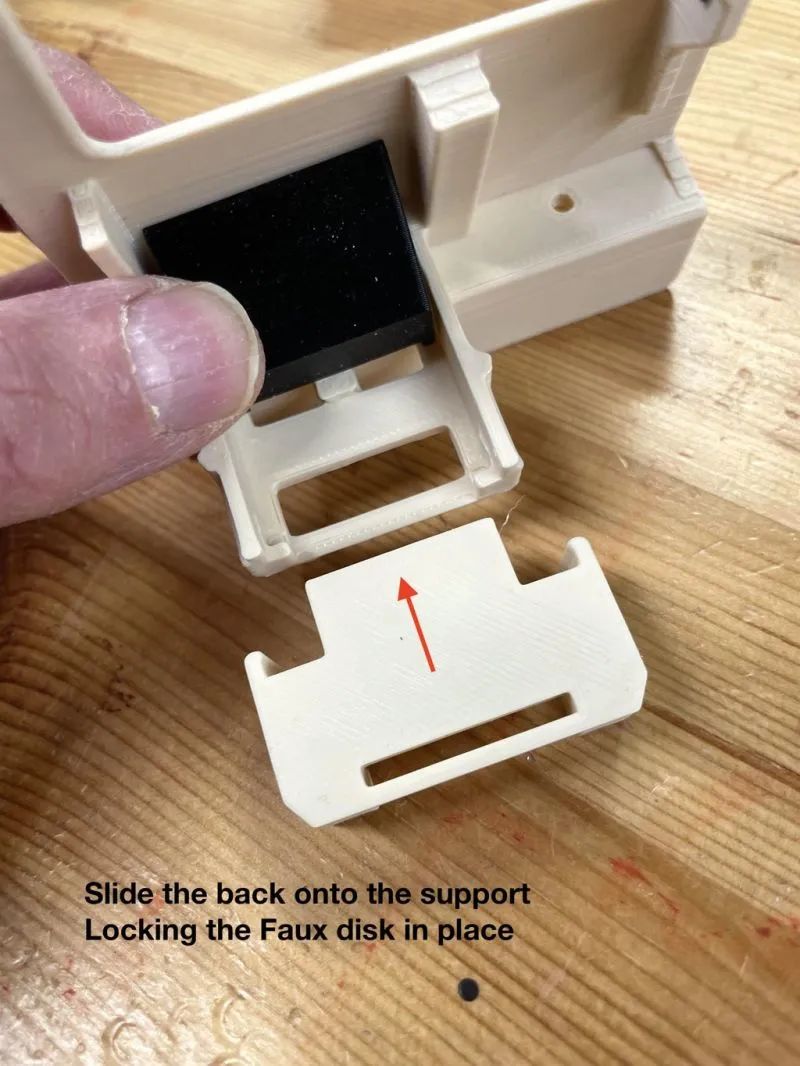
Place the Faux Disk on the disk holder and slide it forward, exposing the taped end at the front. Slide driveSupport_back from the back through the holder, gently securing the disk drive. If it is not secure enough, a small amount of hot glue can be used.
Version Two, SD Card Reset Position
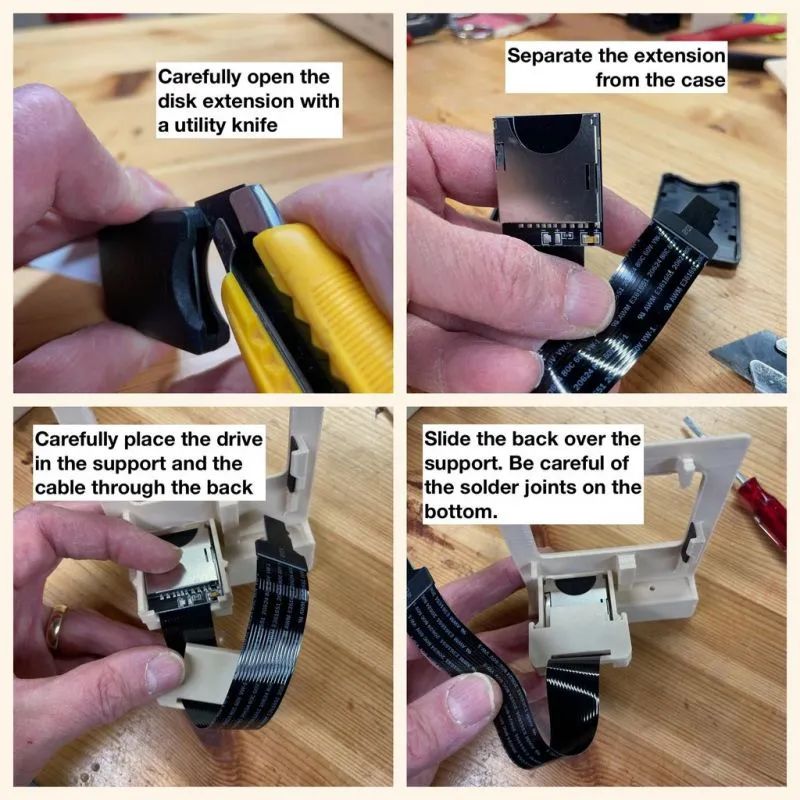
1. Carefully open the SD card expansion cover with a craft knife. Open the cover and remove the circuit board and cable.
2. Firmly install the drive onto the holder. It should align from the front, then insert the extended ribbon cable into driveSupport_back.stl, paying attention to the solder points at the bottom of the circuit board, continue to thread the cable through the slot.
3. Place driveSupport_back.stl above the holder and gently secure the drive in place.
4. You can now test if the SD card insertion is normal.
Configuring Raspberry Pi Zero W
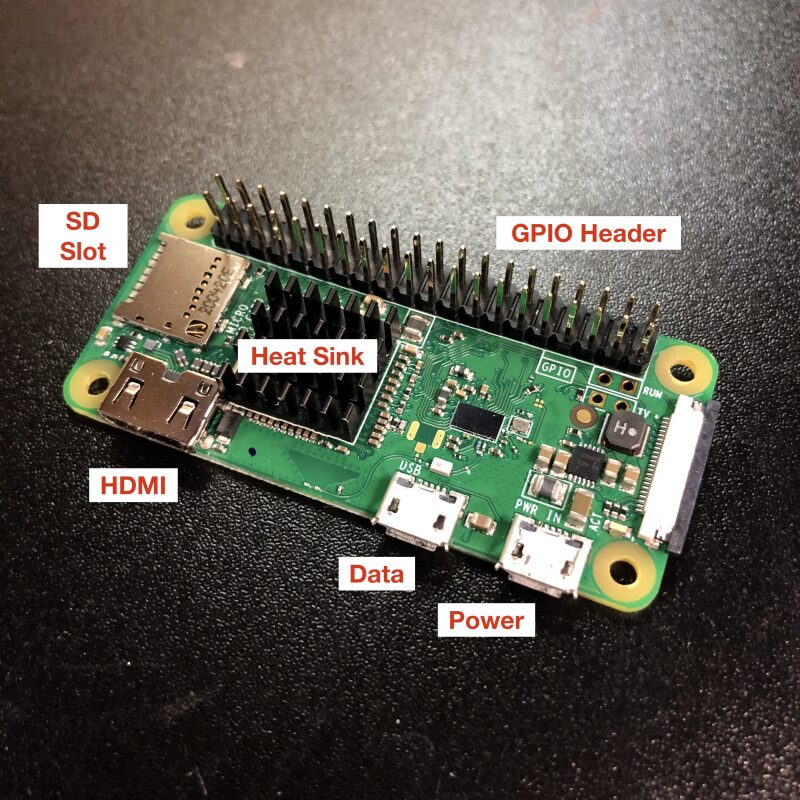
If your 40 Pin GPIO header is not pre-installed, you need to solder one. You can also directly purchase a pre-soldered version with heat sinks.
1. Install Raspberry Pi OS on the SD card, using the recommended Raspberry Pi OS operating system, which needs to be installed with a GUI interface.
For details, please refer to: https://shumeipai.nxez.com/2019/04/17/write-pi-sd-card-image-using-etcher-on-windows-linux-mac.html
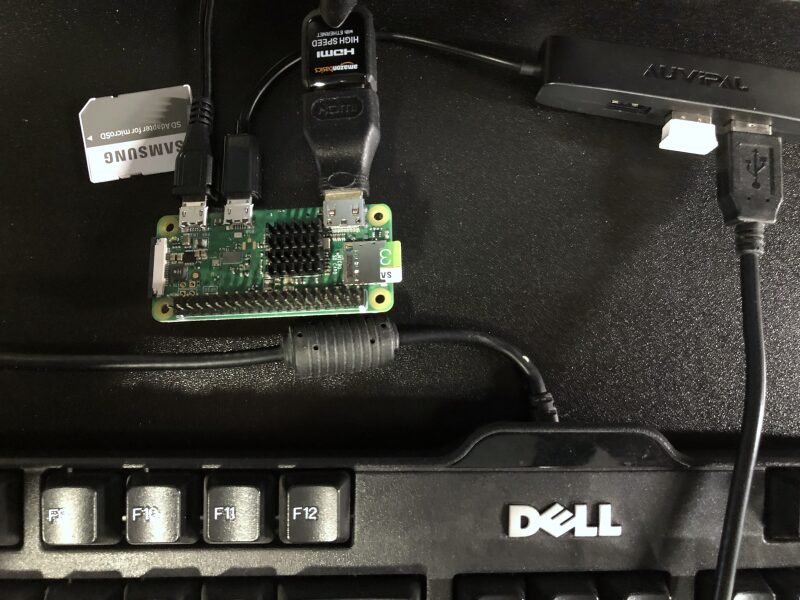
2. Insert the SD card into the Raspberry Pi Zero W, using the HDMI adapter to connect to the HDMI display. The Raspberry Pi has a micro USB port, one for power and the other for data transfer. Connect the micro USB hub to the data port. Then connect the keyboard and mouse to the hub, powered by the power supply.
3. Complete the initial setup. Please select your country, language, time zone, and keyboard. When prompted, change your password. Enable SSH, select your network and enter the password. When prompted, wait for the system to update.
4. Change the default settings. In the upper left corner, click the Raspberry icon. Follow the path Preferences > Raspberry Pi Configuration. In the dialog, if not checked, select the System tab. Check that the hostname is raspberrypi. This is the name to access the Raspberry Pi over the wireless network.

5. Next, select the Interface options, choose to enable SSH, and select OK to close the dialog.
Note: Just in case, please copy your IP address.
Finally, complete the update and restart.
Software Part
In the project created by Paul C. Pratt at https://www.gryphel.com/index.html, he created many emulators that can run in various environments, such as MacOS X, Windows 10, and Linux. One of them can be used on the Raspberry Pi with an ARM processor.
Download all files directly to the Raspberry Pi Zero W, but the process will be relatively slow. You can choose to download the files to your desktop and use the terminal window to process the files or FTP program. I use https://cyberduck.io/download/. It works for both Mac and Windows.
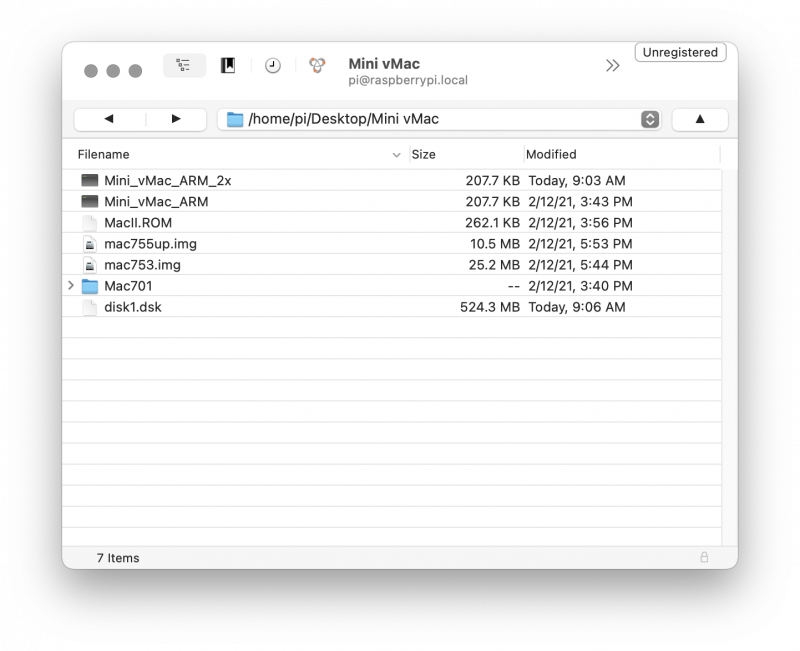
Installation Files Create a directory named Mini_vMac on the hard drive. Place the files here and copy them to the Raspberry Pi Zero W.
1. Using Gryphel services, I created two ARM executable files. You can download Pi_executables.zip from the project repository. It contains two files. One Mini_vMac_ARM, full resolution of the screen, and the other Mini_vMac_ARM_2x, which doubles the pixels for easier viewing.
Please place these two files in the Mini_vMac directory, which can be downloaded from the project repository: https://make.quwj.com/project/431
2. ROM image. Please download from Macintosh ROM: http://hampa.ch/pub/software/ROM/Macintosh%2068K/
Please download the 9779D2C4 – Macintosh II.7z file. Unzip this file and rename it to MacII.ROM and place it in the Mini_vMac directory. (Note: MacII.ROM is case-sensitive)
3. Use [ToughDev](http://www.toughdev.com/content/) to install software. Please refer to the Mini vMac system installation tutorial: http://www.toughdev.com/content/2008/06/system-7-5-5-on-mini-vmac/
Please download and unzip the file named old_mac_softs, which will contain other zips, then unzip all.
At this point, we have two paths to choose from.
Simple Black and White Path
If you want a black and white Mac, find the hfv500M_sys755_clean.zip file and locate the hfv500M_sys755_clean.dsk zip file, rename it to disk1.dsk and start Tiny Mac.
Multi-functional Path
In this path, you can choose to use color, gray, or black and white Mac. The original Mac was only black and white; you can stay on this version if you prefer.
Unzip the hfs500M.rar file, please refer to How To Geek on how to unzip files. https://www.howtogeek.com/73904/beginner-how-to-extract-.rar-files-on-windows-7-and-mac-os-x/
After unzipping, rename hfs500M.dsk to disk1.dsk. This is your virtual hard drive. If the disk is named correctly, Mini vMac will automatically mount the disk. hfv500M_sys755_clean.dsk is an image of the installed software system, but it may not fully meet your needs.
Move the following contents to your Mini_vMac directory:
disk1.dsk represents the image of the new 500M hard disk. Mac701 directory represents an image containing 6 disks. mac753.img represents the Mac OS system 7.5.3 installation disk. mac755up.img represents the Mac OS system 7.5.5 installation disk.
All software files can be downloaded from this project repository: https://make.quwj.com/project/431
Transferring Files to Raspberry Pi via Cyber Duck
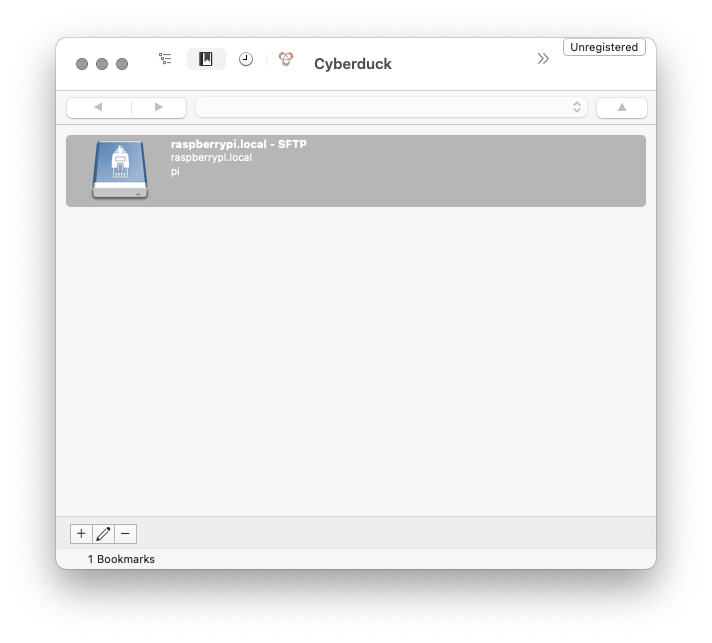
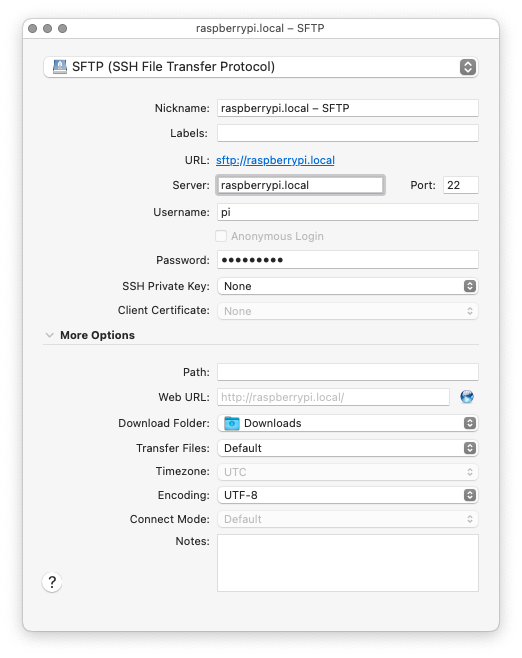
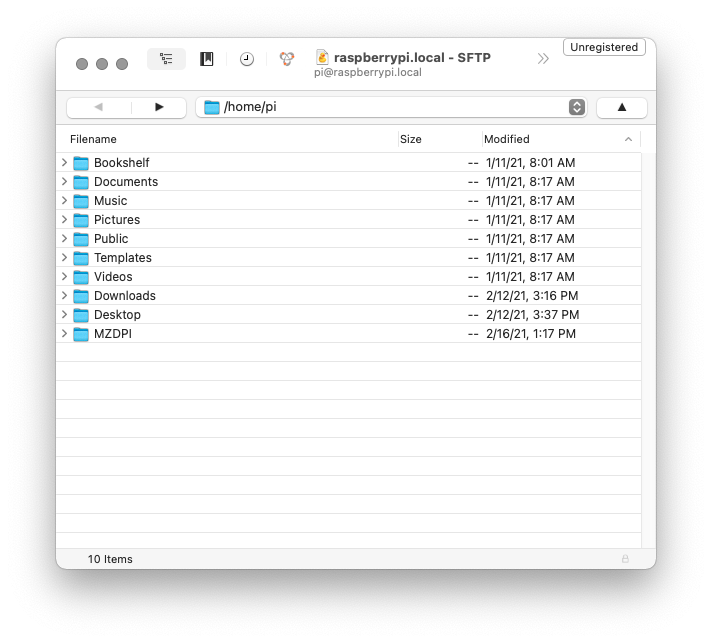
1. Start Cyber Duck. Create a shortcut for the Raspberry Pi. As shown, click the plus sign in the lower left to add a bookmark. In the pop-up dialog, change the protocol to SFTP. The server name is raspberrypi.local. The username is pi. Enter the password you set, then close the dialog.
2. Double-click the new bookmark to connect to the Raspberry Pi. If you receive any unknown messages, choose to allow.
3. If you cannot connect via Hostname, you can use the previously copied IP address to do the same. Click the plus sign in the lower left to set another bookmark. In the new dialog, change the protocol to SFTP and enter the previously noted Raspberry Pi IP address.
Use pi as the username, enter the password, and close the dialog. Then double-click the new bookmark; if there are still issues, please check online for instructions on how to transfer files via scp.
4. Now start moving files.
If you choose the simple black and white path, the files you will use are: Mini_vMac_ARM-640×480 version, please download from Dropbox. Mini_vMac_ARM_2x, please download the 320×240 version from Dropbox. MacII.ROM, download from the ROM repository and rename it. disk1.dsk, the new 500M hard disk image.
If you choose the multi-functional path, the files you will use are: Mini_vMac_ARM-640×480 version, please download from Dropbox. Mini_vMac_ARM_2x, please download the 320×240 version from Dropbox. MacII.ROM, download from the ROM repository and rename it. disk1.dsk, the new 500M hard disk image. A Mac701 library containing 6 disk images for system installation 7.0.1. mac753.img, Mac OS system 7.5.3 installation disk. mac755up.img, Mac OS system 7.5.5 installation disk.
5. Using Cyber Duck, double-click the bookmark. It may request permission; please click allow. It will open and connect to the Raspberry Pi. In the /home/pi/directory, you can see the directory and file list, then double-click the desktop directory.
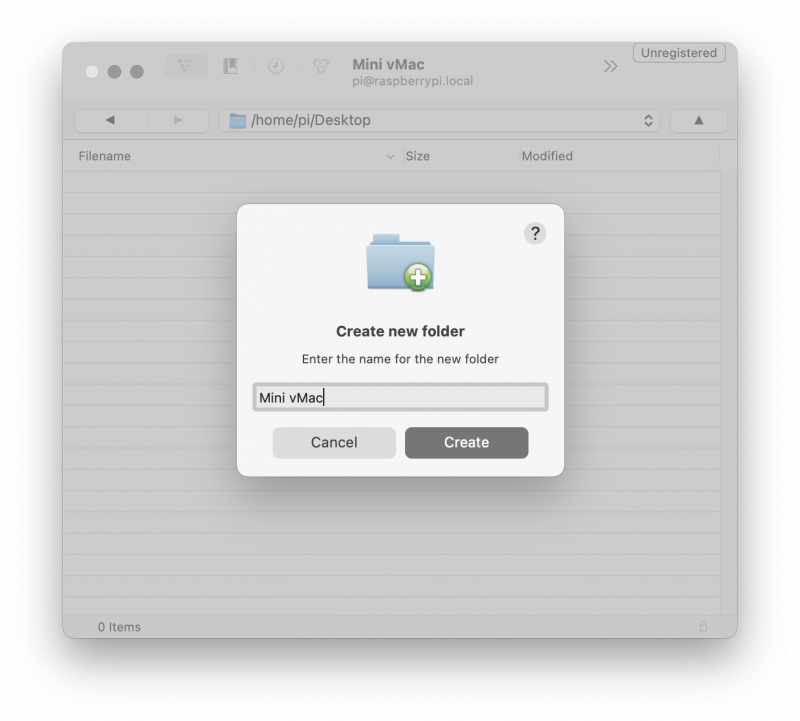
6. Right-click and create a new folder named Mini vMac. Double-click this directory to open and drag all the files listed above into this new directory. These files will be copied to the Raspberry Pi.
If using the simple black and white path, please directly add the software.
If not, please continue with the following steps.
Setting Up Mini VMac on Raspberry Pi
For those using the multi-functional path, here are instructions for System 7. You can find older versions of Mac OS System 5 and 6 on the Mini vMac application. This link provides detailed instructions: https://sites.google.com/site/minivmacapplicationsv6/systems-os
On the Raspberry Pi desktop, there is a directory named Mini vMac. Please double-click to open it, which contains the following contents.
Mini_vMac_ARMMini_vMac_ARM_2xMacII.ROMdisk1.dskMac701 directory contains 6 disk imagesmac753.imgmac755up.img
Mini_vMac_ARM executable file runs the display at a resolution of 640×480. This may be a bit small, but it looks good.
Mini_vMac_ARM_2 version can run at half resolution 320×240, but doubles the pixels. If you want to run some software, it can be easier to see but will be smaller.
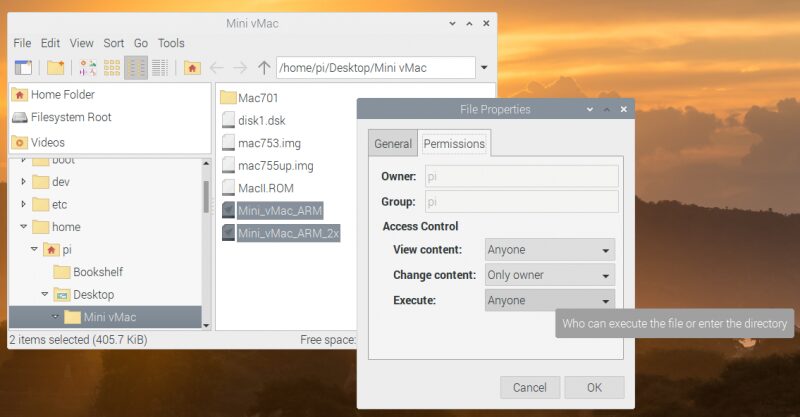
1. Make these files executable. Select Mini_vMac_ARM and Mini_vMac_ARM_2x, right-click and select properties. Choose the permissions option and change execute to Anyone. To make the setup easier, use the original resolution version for setup.
Since the setup actually changes the hard drive image, you need to set both. Upon startup, you can now start either version.
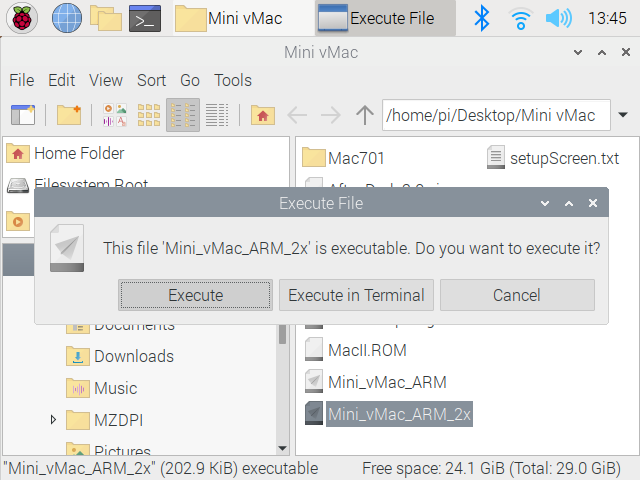
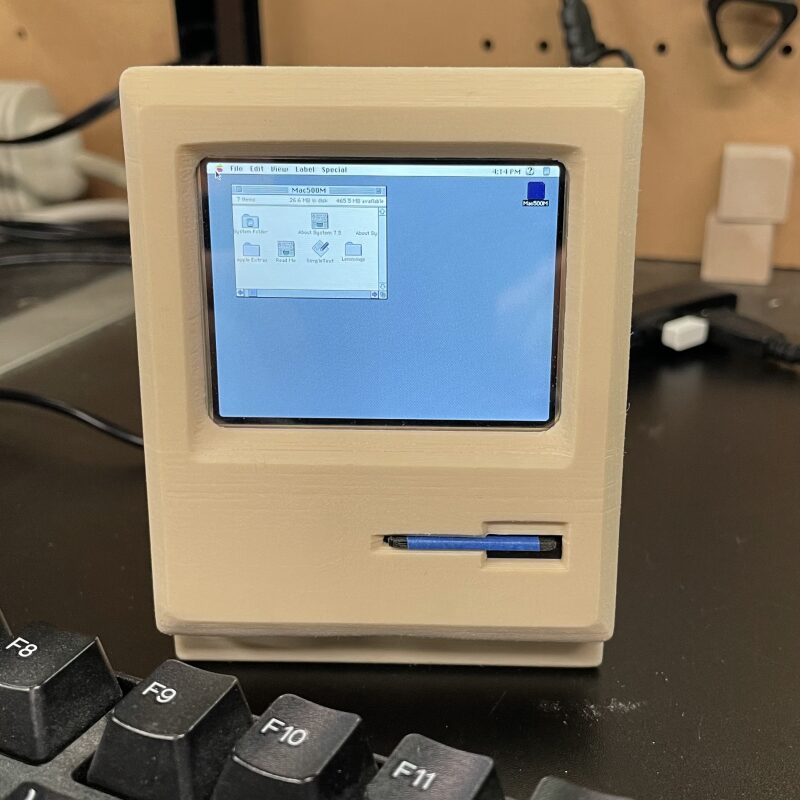
2. Double-click the Mini_vMac_ARM file and select execute. When it opens in full screen, you will see a flashing disk icon, then press Ctrl-F to exit full screen.
Please note that Mini vMac has many control options. Press Ctrl-H to bring up the options list; for details, refer to the Mini vMac documentation.
3. On the Raspberry Pi, open the Mac701 directory and drag Install 1.image into your Mini vMac window. Drag the disk onto the application and install the disk. It will start to the installation screen. On the Raspberry Pi, go back one level and drag in disk1.dsk, the screen will show updates and will install on Mac500M, please select install.
4. When prompted, drag in each disk Install 2.image, Tidbits.image, Printing.image, Fonts.image, and finally drag into Install 1.image again. Once done, exit the installation and restart.
5. When completed, you will see a flashing disk icon. Please drag in disk1.dsk to continue installing system 7.0.1. Finally, success!
Note: When shutting down/exiting, always go to the menu “Special” and select “Shut Down”.
System Upgrade (Optional)
The currently running system is already Mac System 7.0.1.
If you need to upgrade to System 7.5.3, please drag in mac753.img. When the new disk window opens, double-click the System 7.5.3 01 of 19.smi file.
The software will verify and install a virtual disk. The new disk will appear on the desktop as System 7.5 V7.5.3 CD inst; please double-click that image, open the disk, run the installer, and follow the instructions. When prompted, restart and drag in disk1.dsk.
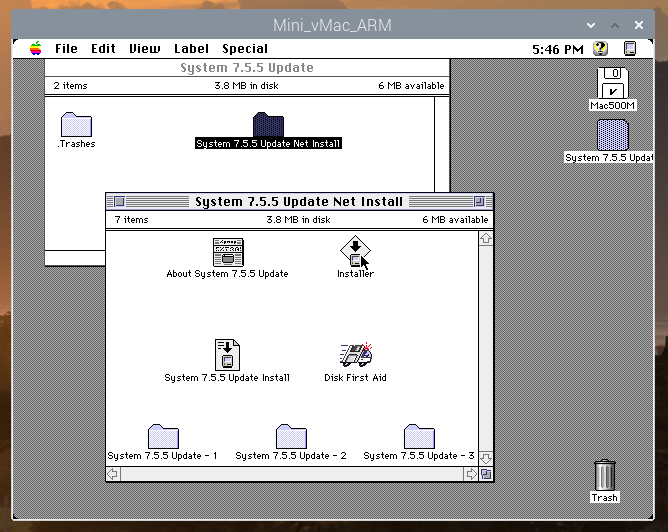
If you want to upgrade to 7.5.5, please drag in mac755up.img based on System 7.5.3. Open the disk, then double-click the System 7.7.5 Update folder, and run the installer, following the instructions.
Adding Software
The websites for the software used: Archives for Mini vMac https://sites.google.com/site/minivmacapplicationsv6/home My Abandonware Mac https://www.myabandonware.com/browse/platform/mac/ Macintosh Repository https://www.macintoshrepository.org/
There are two methods to install disks in Mini vMac.
1. You can drag .DSK or .IMG files into the window. 2. You can rename .DSK files. The disks are installed in sequence, and the emulator will look for disk images in order. When renaming the hard drive image disk1.DSK, you can see this.
It is important to note: If there is a gap in the numbers, the auto-install will stop at the gap. If you have a disk2.DSK and a disk4.DSK but no disk3.DSK, then it will stop installing at disk2.DSK. Since files can be copied from the hard drive, there is no need to install additional disks every time, so I choose the first method.
If in full screen, use Ctrl-F to exit. Drag the disk image into the application window. The disk image will appear on the desktop; to unmount, drag it to the trash.
If it’s a regular application or game, you can drag the disk icon into the hard drive. It will create a directory that matches your disk, you open that folder and double-click the application icon to run it.
As an example of a game:
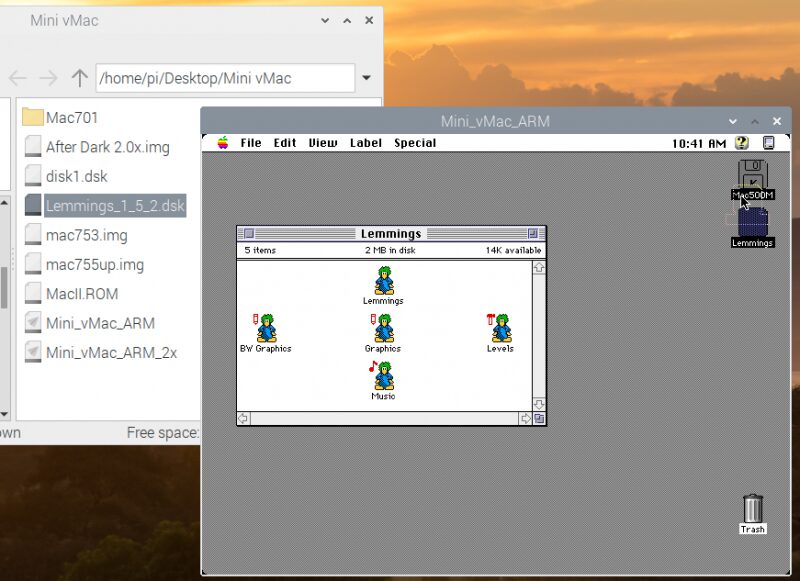
Install the game Lemmings https://www.macintoshrepository.org/software_search.php?s=lemmings&sid=&p=1
After downloading lemmings_1_5_2.zip, you can try to find .DSK or .IMG files, avoid using .SIT files.
I have unzipped the zip and dragged the disk image onto the application. Once the disk appears on the desktop, just drag that disk image onto the hard drive, and all files will be copied into a new directory on the hard drive; then open the directory and run it.
For the screensaver:
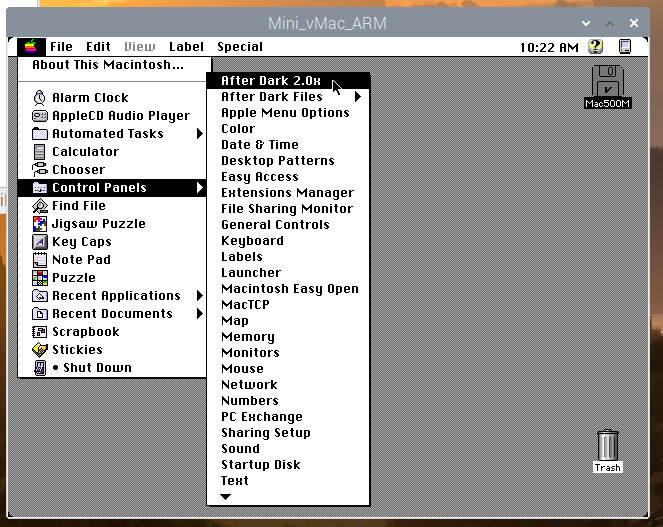
I chose After Dark https://www.macintoshrepository.org/839-after-dark-2-0 as the screensaver.
The file I selected is After Dark 2.0x (1993) emulator. You can download the DSK or IMG image zip. I have unzipped the zip and placed the .img file in the same directory as the Mini vMac application. Again, drag the disk image into the Mini vMac application, and then install the disk.
Drag the After Dark 2.0x application and support folder into the control panel directory inside the system folder. Restart and drag the disk1.dsk image back into the Mini vMac window, then set the screensaver.
If you want the Raspberry Pi to directly enter the emulator on startup, please follow step 19 of this tutorial. https://www.instructables.com/Making-a-Tiny-Mac-From-a-Raspberry-Pi-Zero/#step16
Assembling Hardware
Please remove the SD card first. If the SD card is inserted, the Raspberry Pi will not fit into the case.
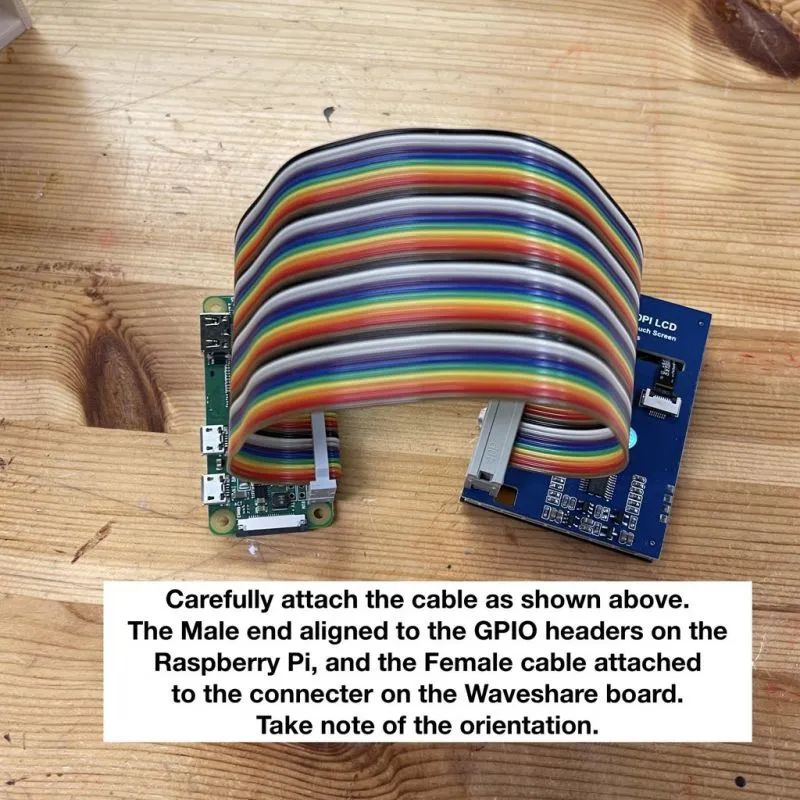
As shown, carefully install the ribbon cable. Connect the female end to the Raspberry Pi and the male end to the display. Pay attention to the direction of the cable and ensure it aligns and is fully inserted.
If it is Version One (Faux Disk), install the Raspberry Pi from the back of the case, checking that the ports are aligned. Secure the board in place, rotate the switch, and tighten from below.
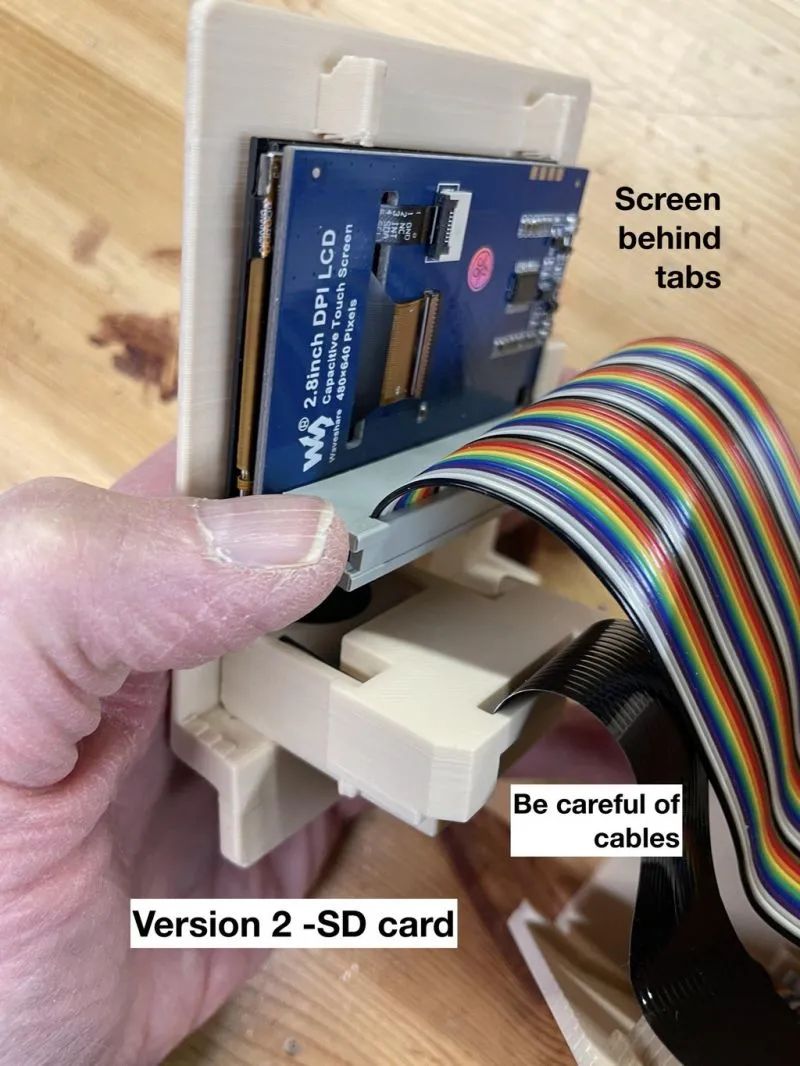
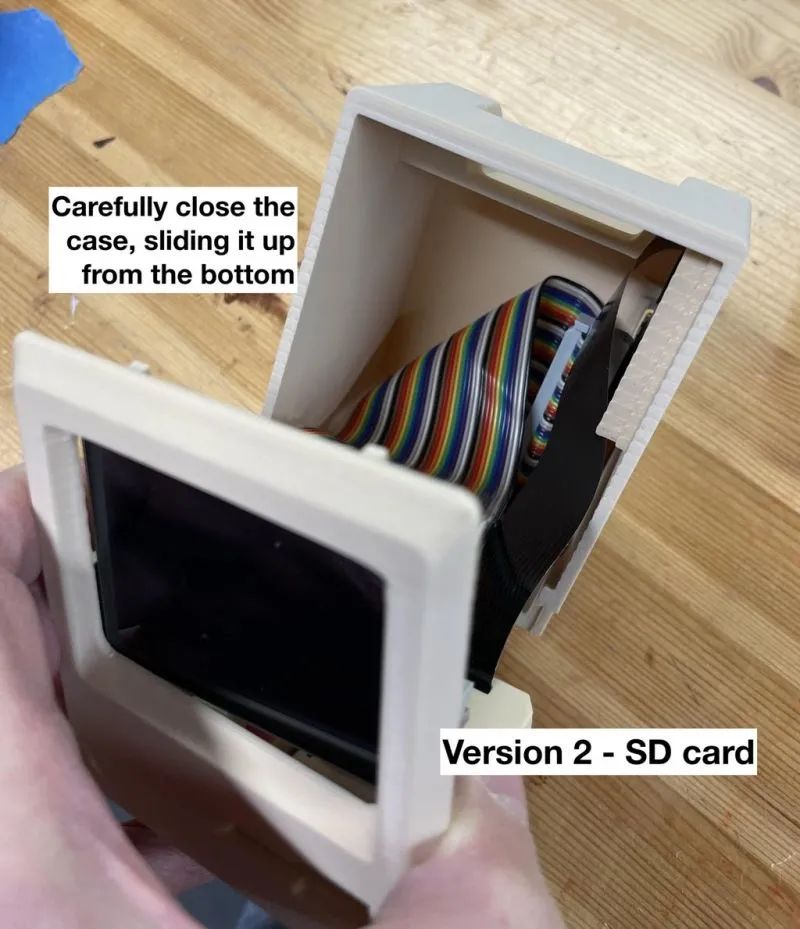
If it is Version Two (SD Card), fold the ribbon cable to install, making the motherboard vertical, folding the cable left at a 90° angle, and then folding down at a 45° angle. Carefully insert the SD card into the slot on the Raspberry Pi.
Please ensure the switch is not installed inside the shell. Install the Raspberry Pi and carefully connect the cables. Check that the ports on the back are in the correct position, then reinstall the switch, rotating and tightening it close to the board.
Both versions require the following parts to be installed:
Place the screen between the front cover and the label, with the cable direction facing up. Be careful with the cable when moving the back cover. Slide it up to the latch on the top cover. Then secure the shell of this mini computer together by screwing in the 3M X 12mm screws into the remaining holes on the left side.
Installing Display Drivers
Refer to https://www.waveshare.com/wiki/2.8inch_DPI_LCD documentation. To simplify the program, I used the config.txt file provided by sjbaird https://www.instructables.com/member/sjbaird/.
Required files: config.txt file from Waveshare’s zip file.
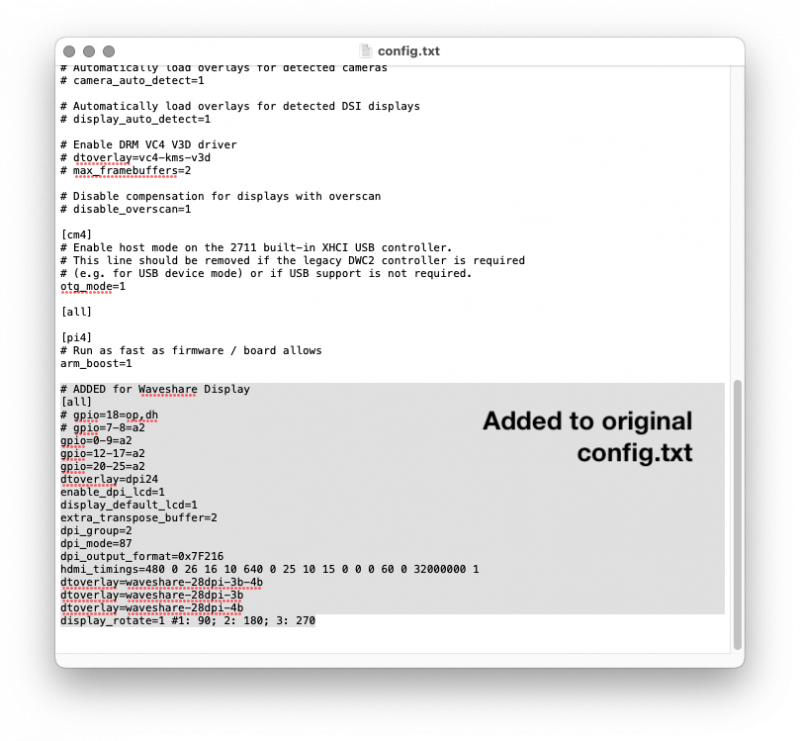
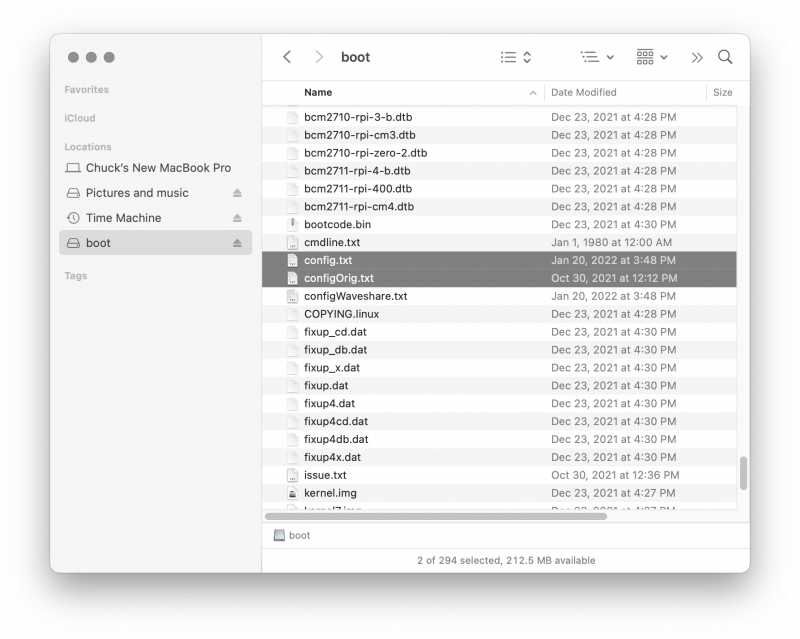
1. Insert the Raspberry Pi’s SD card into a desktop computer. You can access these files on the Raspberry Pi. In the root level, there is a file named config.txt. Copy it and rename it to configOrg.txt. As a precaution, back up the file.
2. Drag the new config.txt file into the window. When asked if you want to replace the file, please confirm. If you do not have permission, you can delete the file and add a new file. This file will tell the Raspberry Pi to use the Waveshare screen as the default screen.
3. In the root level, find the overlays directory. Open that directory and drag in three files from Waveshare’s zip: waveshare-28dpi-3b-4b.dtbo, waveshare-28dpi-3b.dtbo, and waveshare-28dpi-4b.dtbo.
4. Eject the SD card and insert it back into the Raspberry Pi.
Note: The Waveshare website instructions mention changing the touchscreen direction; I found that it indeed does not work well.
All files related to the display can be downloaded from this project repository: https://make.quwj.com/project/431
Booting Up
When the Raspberry Pi boots up, it will start to the Raspberry Pi desktop. Double-click the Mini vMac directory and execute the two files in this directory, both files start with the same hard drive image.
Starting the Mini_vMac_ARM file will run the full resolution version of 640×480.
Starting the Mini_vMac_ARM_2x file will run the resolution of 320×240 and double the pixels.
If you want your mini Mac to look more like the original Mac Plus, you can change it to the gray or black and white version in the monitor control panel.
When closing Mini vMac, be sure to go to the Special menu and select Shut Down. After returning to the Raspberry Pi OS desktop, close the Raspberry Pi as usual by selecting Logout from the Raspberry icon in the upper left corner. Choose Shut Down from the options to turn off the power of the mini Mac.
This completes the entire installation and startup process, and you can start using it.
Adding Sound (Optional)
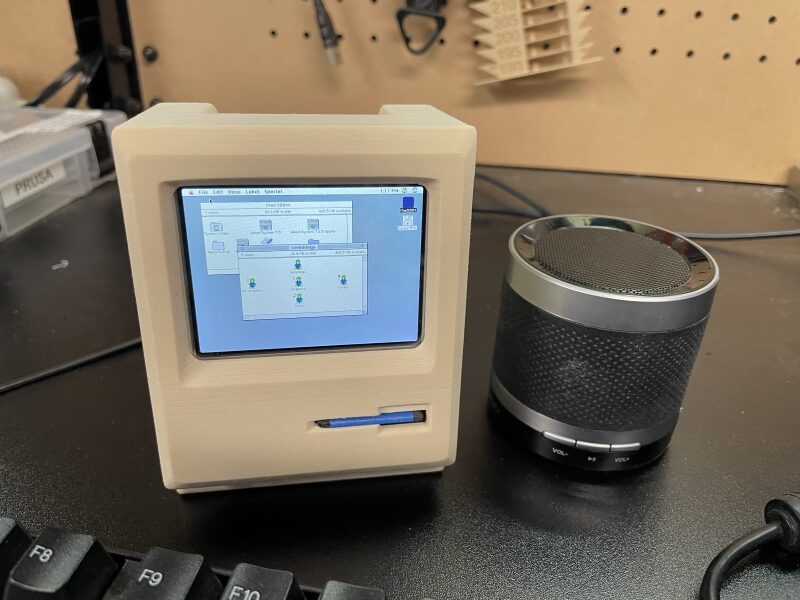
I originally wanted to use the sound card of the Raspberry Pi Zero, but ultimately decided to use the built-in Bluetooth of the Raspberry Pi. The RaspberryDIY website https://raspberrydiy.com/connect-raspberry-pi-bluetooth-speaker/ has detailed instructions on how to connect the Raspberry Pi to a Bluetooth speaker.
1. Find a Bluetooth speaker and turn on discovery mode.
2. Click the Bluetooth icon in the menu bar and select Add Device. You will get a list of available Bluetooth devices; select your speaker and choose the speaker as the output device. Click the volume icon in the menu; you need to right-click the speaker icon and then select audio output speaker (varies slightly for each Bluetooth device).
Appendix: Direct Boot on Startup
For makers who have completed the mini Mac, I will set this step as a separate part. In this step, I will set the Raspberry Pi to automatically start Mini Vmac.
In fact, there are many ways to do this. You can do it from the Raspberry Pi desktop, or use applications like Cyber Duck or use SSH from the terminal.
I chose to create a file called Launcher.desktop in the /home/pi/.config directory that runs on startup. I will demonstrate this via Cyber Duck.
Open the Raspberry Pi using Cyber Duck. You will see the directory list of /home/pi. The folder you need to access is a hidden folder. Cyber Duck allows you to view these files and directories; from the top menu, select View -> Show Hidden files, find the hidden .config directory, and open the .config directory.
Then look for the autostart directory; if it does not exist, right-click and create a new folder with the same name. Note the case sensitivity.
Open the autostart directory and right-click to view options. Select New File, name this file Launcher.desktop. Again, be mindful of case sensitivity. Then right-click the new file and select Edit With -> TextEdit. There might be different options on your computer, but they are all very simple. Add the following text to the new file.
[Desktop Entry]Name=LauncherExec="/home/pi/Desktop/Mini vMac/Mini_vMac_ARM"Type=ApplicationNote that there is a space in the directory name and that the path is in quotes; save and close the file.
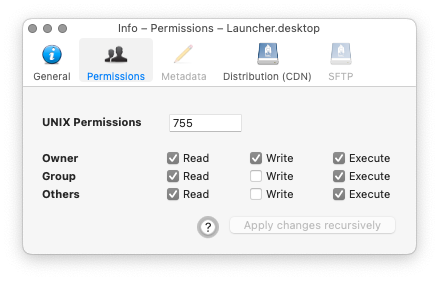
Set the new file’s permissions by right-clicking the new file and selecting Info. Choose the permissions option and check execution for all three groups.
Go to the Raspberry Pi and restart. It should now start the emulator on boot. The shutdown process is the same as usual by closing the Raspberry Pi.
You can also continue operating on the Raspberry Pi desktop. 1. Open the file explorer from the top menu.
2. If you don’t see the .config directory, select View -> Show Hidden from the file explorer menu.
3. Open the .config directory. Look for the autostart directory. If it doesn’t exist, right-click and select New Folder, naming it autostart (case-sensitive). Open the autostart directory.
4. Right-click in the directory and select New File, naming it Launcher.desktop. After creating, it may show as having no extension; we will verify the name is correct in the steps below.
5. Right-click the new Launcher.desktop file and select Open in Text Editor. Add the text above to the file, save and close.
6. Set permissions. Right-click the Launcher.desktop file and select Properties. Ensure the file name is Launcher.desktop, select the permissions tab, and select Anyone to execute, then select OK to close.
7. Double-click the new file and select Execute to test it. It should start the emulator. If not, check your steps for accuracy.
8. Exit the emulator. From the Raspberry Pi menu, select Logout, then restart.
Setting Up iUniker Screen
For those using the iUniker screen, please refer here.
1. Backup the SD card https://magpi.raspberrypi.com/articles/back-up-raspberry-pi
2. Choose the 3.5-inch 480×320 screen.
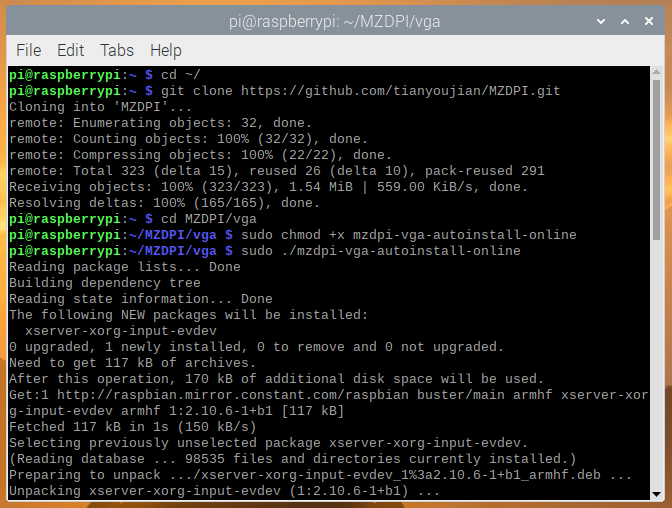
3. Software instructions https://github.com/iUniker/2.8NewDriver/blob/master/2.8%20inch%20Screen%20User%20Guide%20190320.pdf Open a new terminal window on the Raspberry Pi and enter the following:
cd ~/git clone https://github.com/tianyoujian/MZDPI.git<br>cd MZDPI/vgasudo chmod +x mzdpi-vga-autoinstall-onlinesudo ./mzdpi-vga-autoinstall-onlineAfter the installation is complete, turn off the Raspberry Pi, then install the Raspberry Pi and the screen into the shell.
Reference Links
Running Mac OS 7 on Raspberry Pi https://www.novaspirit.com/2017/03/28/running-mac-os-7-on-raspberry-pi-with-color/Early Mac Software https://sites.google.com/site/minivmacapplicationsv6/appsMini vMac Early Macintosh Emulator https://www.gryphel.com/c/minivmac/index.html The Macintosh Repository https://www.macintoshrepository.org/Macintosh ROMs http://hampa.ch/pub/software/ROM/Macintosh%2068K/iUniker Display Instructions https://github.com/iUniker/2.8NewDriver/blob/master/2.8%20inch%20Screen%20User%20Guide%20190320.pdfGryphel Mini vMac Documentation https://www.gryphel.com/c/minivmac/index.htmlMy Abandonware. – Mac https://www.myabandonware.com/browse/platform/mac/Archives for Mini vMac https://sites.google.com/site/minivmacapplicationsv6/homeMini vMac Applications http://www.toughdev.com/content/2008/06/system-7-5-5-on-mini-vmac/The Internet Archive – Software Library: Macintosh https://archive.org/details/softwarelibrary_macMacintosh Garden https://macintoshgarden.org/Vintage Macintosh Software http://vintagemacmuseum.com/resources/mac-software/
The code used in this project can be downloaded from this project repository: https://make.quwj.com/project/431
via instructables.com/Making-a-Tiny-Mac-From-a-Raspberry-Pi-Zero/
Click the links in the text to read the original article at the end

More Exciting Content