Recently, Tesla released a new demonstration video of its humanoid robot “Optimus Gen2” on X.
Compared to the earlier prototype, Optimus Gen2 seems to have made significant improvements in weight, flexibility, and other areas. Analysts believe that at the current rate of iteration, the Optimus robot may soon replace humans in many fields.
/ Author’s Introduction /
This article is adapted from the blog of forJrking, which mainly shares the relevant content of unit testing in MVI architecture, and I believe it will be helpful to everyone!
Original article address:
https://juejin.cn/post/7281080737490059299
Bugs are issues we cannot avoid at any time, so our team usually has testing processes, including self-testing during development and delivery testing. Unit testing is a powerful tool to ensure delivery quality. Let’s first see what GPT says: unit testing is a testing method used to test the smallest testable units in a program, such as the behavior of functions, methods, or classes. It aims to validate whether the behavior of the unit meets expectations and helps developers discover and fix defects early. Unit tests are typically written by developers and executed automatically using testing frameworks. Testing frameworks can provide assertion and mocking tools to simplify the testing writing process. When writing unit tests, developers should consider various scenarios and inputs as much as possible to ensure code quality and reliability.
You can think of unit testing as breaking down and testing the logic within a function method. Often, the design of unit test cases aligns with the thought process used when designing the function’s features. For example, if a function is designed to accumulate a passed number, we should consider that the input number could be negative, positive, or zero, and thus we should have three test cases for validation.Unit testing consists of three main steps:
-
Provide context: Prepare test data and test environments for use in testing. This includes creating objects, setting properties, calling methods, etc.
-
Execute test code: Execute the code to be tested, usually by calling a method or function.
-
/ Test Units in Android /
In fact, in an Android project, unit testing can be divided into instrumented testing (UI testing) and logical unit testing, usually referred to as unit testing. Generally, we write this part of the code under app/src/test. This code runs on the local machine JVM and not on the phone or emulator, so it lacks support for the Android framework and cannot test hardware-supported functions like network, Bluetooth, or Wi-Fi. Therefore, we generally need to abstract the View layer to only test whether UI methods are called, thus confirming logical correctness to complete unit testing. For instance, MVC is almost impossible to unit test. In Java, we usually cover every line of code in the entire class for unit testing, while in Kotlin, we generally cover functions as the smallest unit.
-
Add unit test dependencies. In the dependencies of build.gradle, testImplementation can separately provide dependency libraries for unit testing, and unit tests are usually assisted by Junit.
//Junit5 support
testImplementation "org.junit.jupiter:junit-jupiter-api:5.8.2"
testRuntimeOnly "org.junit.jupiter:junit-jupiter-engine:5.8.2"
testImplementation "org.junit.jupiter:junit-jupiter-params:5.8.2"
// ArchTaskExecutor
testImplementation "androidx.arch.core:core-testing:2.2.0"
// Coroutine support
testImplementation "org.jetbrains.kotlinx:kotlinx-coroutines-test:1.7.3"
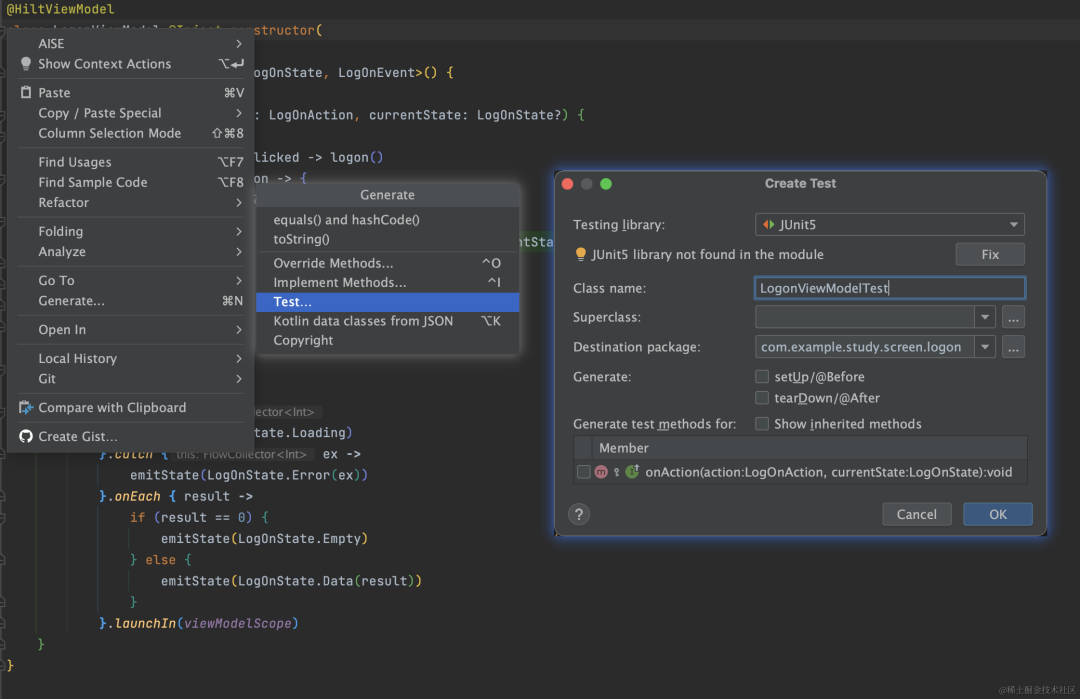
Quickly create unit tests. Use the sample code below for unit testing. You can quickly create it by selecting the method to be tested, right-clicking -> Generate -> Test -> select unit test as Junit5.
private fun logon() {
    repo.getRandomNumber()
        .onStart {
            emitState(LogOnState.Loading)
        }.catch { ex ->
            emitState(LogOnState.Error(ex))
        }.onEach { result ->
            if (result == 0) {
                emitState(LogOnState.Empty)
            } else {
                emitState(LogOnState.Data(result))
            }
        }.launchIn(viewModelScope)
}
Test cases should cover as many scenarios as possible for method parameters and return values. Here are two example cases.
Note: It is recommended to name unit test methods using the format Give xxx When xxx And xx Then xx, so that the details of the unit test case can be intuitively understood. Given provides context (prepares data); When executes test code; Then asserts test results.
internal class LogonTest {

    //case: Test if the status returns Empty when the random number is 0.
    @Test
    fun `test when getRandomNumber is zero then LogOnState_Empty`() = runTest {
        // Set the behavior of the Mock Repository object
        val repo = object : Repository(){
        override fun getRandomNumber() = flowOf(0)
        }
        // Create ViewModel object
        val viewModel = MyViewModel(repo)

        // Call logon() function
        viewModel.logon()

        // Verify if the ViewModel's state meets expectations (first is a suspending function that requires coroutine test library runTest{})
        val state = viewModel.state.first()
        assertEquals(LogOnState.Empty, state)
    }

    //case: Test if the status returns Data when the random number is not 0.
    @Test
    fun `test when getRandomNumber has value thenReturn LogOnState_Data`() {
        val repo = object : Repository(){
        override fun getRandomNumber() = flowOf(40)
        }
        val viewModel = MyViewModel(repo)
        // Call logon() function
        viewModel.logon()

        // Verify if the ViewModel's state meets expectations
        val state = viewModel.state.first()
        assertEquals(LogOnState.Data(40), state)
    }
}
Mockito is an open-source mocking framework for Java. It allows you to create mock objects using a simple API and use these objects to simulate the behavior of real objects. Mockito can be used for unit testing and integration testing, and it can be used with testing frameworks like JUnit and TestNG. Its main purpose is to facilitate the simulation of situations that do not need to be covered in the unit test or that cannot be supported by the framework API.
testImplementation "org.mockito.kotlin:mockito-kotlin:5.1.0"
//junit5 support
testImplementation "org.mockito:mockito-junit-jupiter:4.6.1"
Learn the usage with ViewModel’s parameter LogonRepo.
//Data interface
interface LogonRepo {
    val testInt: Int
    fun getRandomNumber(): Flow<int>
    suspend fun getTestInt(): Int
}

//ViewModel
class LogonViewModel constructor(
    private val repo: LogonRepo
){
    fun logon() = repo.get()...
}

//Construct ViewModel using data interface implementation
val viewModel = LogonViewModel(repo = MyLogonRepo())
</int>
Since unit tests require functions or classes to have single responsibilities to be easy to test, which is also in line with the single responsibility principle in program design. Therefore, we often abstract LogonRepo into an interface and write unit tests for the implementation class independently. Thus, we do not need to test the implementation class again in the ViewModel’s unit tests, and we can use Mockito to simulate some properties or return values of the implementation class.
//Get a mock object
val repo = mock<logonrepo>()

//mock property
whenever(mock.testInt).thenReturn(9)
println(mock.testInt) // 9

//mock method
whenever(mock.getRandomNumber()).thenReturn(flowOf(6))

//suspend method mock
wheneverBlocking { repository.getTestInt() }.doReturn(10)
//or like this
repository.stub {
    onBlocking { getTestInt() }.doReturn(10)
}
</logonrepo>
If our logic includes APIs provided by the framework, such as SharePreference, Context.getString, these framework APIs will cause runtime exceptions during unit testing. In this case, we can also use Mockito to simulate.
val mock = mock<context>()
whenever(mock.getString(R.string.app_name)).thenReturn("app-name")

val mock = mock<context>()
val mockSP = mock<sharedpreferences>()
whenever(mock.getSharedPreferences("pre", Context.MODE_PRIVATE)).thenReturn(mockSP)
whenever(mockSP.getString("app_key", "")).thenReturn("key01")
</sharedpreferences></context></context>
When the logic executes SP’s getString(“app_key”, “”) method, it retrieves the mock value key01, not the actual stored value. The whenever method is a method in the Mockito framework used to set the behavior of the mock object. In this example, we use the whenever method to set the behavior of the mock object when calling the getString method. The any() method is also a method in the Mockito framework that represents any type of parameter. Therefore, this code means that when calling the mock object’s getString method, regardless of the parameters passed in, it always returns the string “key01”. In the code below, we can see that when the parameters are “a” and “b”, the getString method returns the string “key01”.
whenever(mockSP.getString(any(), any())).thenReturn("key01")

println(mockSP.getString("a", "")) //"key01"
println(mockSP.getString("b", "")) //"key01"
Multithreading Issues in Unit Testing
In unit testing, multithreading may cause tests to fail or produce unpredictable results. Therefore, in unit testing, we need to find ways to construct a single-threaded environment, allowing the Runnable.run() of multithreading tasks to execute directly in the current thread. Let’s see how Kotlin’s coroutines and Jetpack’s ArchTaskExecutor handle this.
In Kotlin, we generally use coroutines for thread switching, so the official also provides testing helper libraries. First, runBlockingTest allows suspend functions to execute in a blocking manner in the current thread. Secondly, Dispatchers.setMain is a function in the Kotlin coroutine library that sets the current thread as the main thread, allowing testing of coroutine code in unit tests. When we use coroutines in unit tests, we need to simulate the behavior of the main thread in the test code to avoid threading issues during testing. (In the latest version 1.9.0, runBlockingTest has been changed to runTest)
//dependencies
testImplementation "org.jetbrains.kotlinx:kotlinx-coroutines-test"
//example
@Test
fun testCoroutineCode() = runBlockingTest {
    Dispatchers.setMain(TestCoroutineDispatcher())
    val result = async { myFunction() }.await()
    assertEquals("expected result", result)
    Dispatchers.resetMain()
}

suspend fun myFunction(): String {
    // some async code
    return "expected result"
}
One method in the Androidx Jetpack library, ArchTaskExecutor.getInstance().setDelegate, is used to simulate the behavior of the main thread and background threads in unit tests. This method sets a delegate to replace the default TaskExecutor, allowing control over which thread tasks are executed on. For example, the following code demonstrates how to use it in unit tests:
@Test
fun testTaskExecutor() {
    ArchTaskExecutor.getInstance().setDelegate(object : TaskExecutor() {
        override fun executeOnDiskIO(runnable: Runnable) {
            runnable.run()
        }

        override fun postToMainThread(runnable: Runnable) {
            runnable.run()
        }

        override fun isMainThread(): Boolean {
            return true
        }
    })

    // test code
    //LiveData().postValue(xxxxx)
    ArchTaskExecutor.getInstance().setDelegate(null)
}
In this example, we use the ArchTaskExecutor.getInstance().setDelegate method to set a delegate to simulate the behavior of the main thread and background threads. In the delegate, we override the executeOnDiskIO, postToMainThread, and isMainThread methods to control task execution in the current thread. In the executeOnDiskIO and postToMainThread methods, we directly call the run method to execute the task, thus avoiding threading issues during testing. In the isMainThread method, we return true, indicating that the current thread is the main thread. Finally, after the testing code is executed, we use the ArchTaskExecutor.getInstance().setDelegate(null) method to reset the delegate to the default value. This way, we can simulate the behavior of the main thread and background threads in unit tests without worrying about threading issues.
Junit5’s BeforeEach, AfterEach, and ExtendWith
Using the knowledge above, we can solve 90% of the errors in unit tests caused by threading issues, but having to write this code in each unit test method is too cumbersome. Junit also provides APIs to eliminate this repetitive code.
BeforeEach and AfterEach are annotations in the Junit 5 framework used to execute some common logic before and after each test method. These annotations can be used to perform some initialization or cleanup operations, such as initializing test data, closing database connections, etc. Here is an example:
@ExtendWith(MockitoExtension::class)
class LogonViewModelTest {

    lateinit var viewModel: LogonViewModel

    @Mock
    lateinit var repository: LogonRepo

    @BeforeEach
    fun setUp() {
        //This code is executed before each unit test
        viewModel = LogonViewModel(repository)
    }

    @AfterEach
    fun tearDown() {
        //This code is executed after each unit test
    }

    @Test
    fun `test logon`() = runTest {
        whenever { repository.getRandomNumber() } doReturn { flowOf(40) }
        viewModel.sendAction(LogOnAction.OnLogOnClicked)
        val state = viewModel.state.first()
        assertEquals(LogOnState.Data(40), state)
    }
}
The @ExtendWith annotation allows us to extend the behavior of the test class, using Mockito for simulation. In the test class, we use the @Mock annotation to create a mock instance of the LogonRepo object. In the test method, we can use the repository for testing. This allows us to use mock objects in tests without worrying about the impact of external dependencies. In addition to Mockito, there are many other extensions that can be introduced using the @ExtendWith annotation.
// junit5 CoroutineTestExtension
@OptIn(ExperimentalCoroutinesApi::class)
class CoroutineTestExtension : BeforeEachCallback, AfterEachCallback {

    override fun beforeEach(context: ExtensionContext?) {
        Dispatchers.setMain(testDispatcher)
    }

    override fun afterEach(context: ExtensionContext?) {
        Dispatchers.resetMain()
    }

    companion object {
        val testDispatcher: TestDispatcher = UnconfinedTestDispatcher()
    }
}
// junit5 InstantTaskExecutorExtension
class InstantTaskExecutorExtension : BeforeEachCallback, AfterEachCallback {
    override fun beforeEach(context: ExtensionContext) {
        ArchTaskExecutor.getInstance().setDelegate(object : TaskExecutor() {
            override fun executeOnDiskIO(runnable: Runnable) = runnable.run()
            override fun postToMainThread(runnable: Runnable) = runnable.run()
            override fun isMainThread(): Boolean = true
        })
    }
    override fun afterEach(context: ExtensionContext?) {
        ArchTaskExecutor.getInstance().setDelegate(null)
    }
}
//Usage example
@ExtendWith(
    value = [
        CoroutineTestExtension::class,
        InstantTaskExecutorExtension::class
    ]
)
class LogonViewModelTest {
    ...
}
LiveData testing requires the lifecycle, so we need to use the observeForever function.
class ShareViewModel : ViewModel() {
    val testLiveData = MutableLiveData<int>()
}

//Unit test
import org.junit.jupiter.api.Assertions
import org.junit.jupiter.api.Test

class ShareViewModelTest {
    @Test
    fun getShareContact() {
        //Give
        val viewModel = ShareViewModel()
        //When
        viewModel.testLiveData.value = 12
        val values = mutableListOf<int>()
        viewModel.testLiveData.observeForever {
            values.add(it)
        }
        //Then
        Assertions.assertEquals(12, values.first())
    }
}
</int></int>
When running, you may find an error java.lang.RuntimeException: Method getMainLooper in android.os.Looper not mocked. This is because the main thread judgment uses Android framework APIs, which require using ArchTaskExecutor.getInstance().setDelegate. Here, we need to add @ExtendWith(InstantTaskExecutorExtension::class) to the TestClass.
Using Mockito’s verify, in this test, we use the Mockito framework to create an Observer object and use the verify() method to check if the Observer object’s onChanged() method was called and whether the passed parameter was the expected value.
@ExtendWith(
    value = [
        MockitoExtension::class,
        InstantTaskExecutorExtension::class
    ]
)
internal class ShareViewModelTest {
    @Mock
    lateinit var observer: Observer<int>

    @Test
    fun testUserLiveData() {
        val viewModel = ShareViewModel()
        viewModel.testLiveData.postValue(12)
        viewModel.testLiveData.observeForever(observer)
        verify(observer).onChanged(12)
    }
}
</int>
The official provides guidance for testing Flow. Here, we provide a simple and easy-to-use wrapper for testing Flow. First, it is important to know that Flow ultimately collects data through suspend fun collect(collector: FlowCollector), which is a suspending method, so we need to use the above runTest to provide a TestScope.
/**flow testing function*/
internal fun <t> Flow<t>.toListTest(testScope: TestScope): List<t> {
    return mutableListOf<t>().also { values ->
        testScope.launchTest {
            [email protected](values)
        }
    }
}

internal fun TestScope.launchTest(block: suspend CoroutineScope.() -> Unit) =
    this.backgroundScope.launch(
        context = UnconfinedTestDispatcher(this.testScheduler),
        block = block
    )
</t></t></t></t>
Test a data stream and the state in the ViewModel.
@Test
fun testFlow() = runTest {
    val flow = (1..10).asFlow()
    val testResult = flow.toListTest(this)
    Assertions.assertEquals(1, testResult.first())
    Assertions.assertEquals(6, testResult[5])
    Assertions.assertEquals(10, testResult.last())
}

@Test
fun `test when OnLogOnClicked then LogonStateData`() = runTest {
    val states = viewModel.state.toListTest(this)
    whenever(repository.getRandomNumber()).doReturn(flowOf(40))
    viewModel.sendAction(LogOnAction.OnLogOnClicked)
    assertEquals(LogOnState.Data(40), states.first())
}
The simple examples above do not reflect the difficulty of unit testing. Many times, the complexity of the objects and functions that a class depends on during construction can affect the difficulty of writing unit tests. Why is MVI easy to test? First, let’s analyze the unit tests above. We find a characteristic: unit testing uses an input to obtain an output, and then asserts the output result. This aligns perfectly with the idea of unidirectional data flow; through previous articles and knowledge, the characteristics of MVI are unidirectional data flow; pure functional programming; observable data streams; easy to mock data, so MVI is very simple in unit testing.
class LogonTest {
    @Test
    fun `test mvi`() = runTest {
        val repo = object : Repository(){
           override fun getRandomNumber() = flowOf(40)
        }
        val viewModel = MyViewModel(repo)
        viewModel.sendAction(LogOnAction.OnLogOnClicked)
        val state = viewModel.state.first()
        assertEquals(LogOnState.Data(40), state)
    }
}
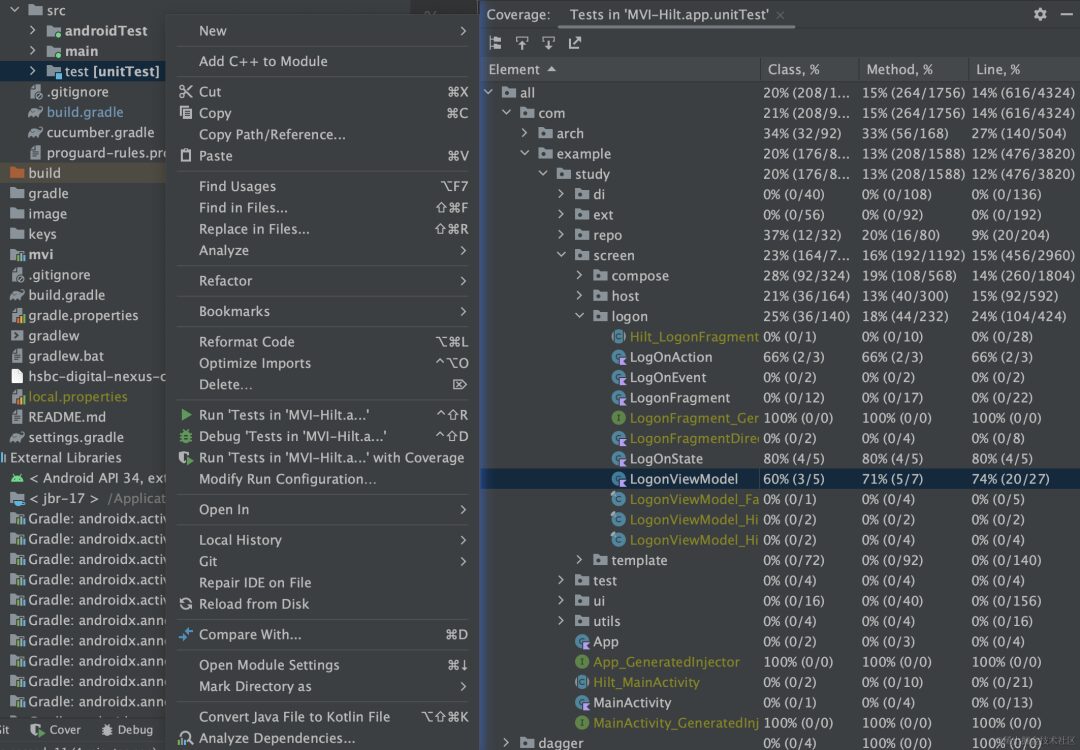
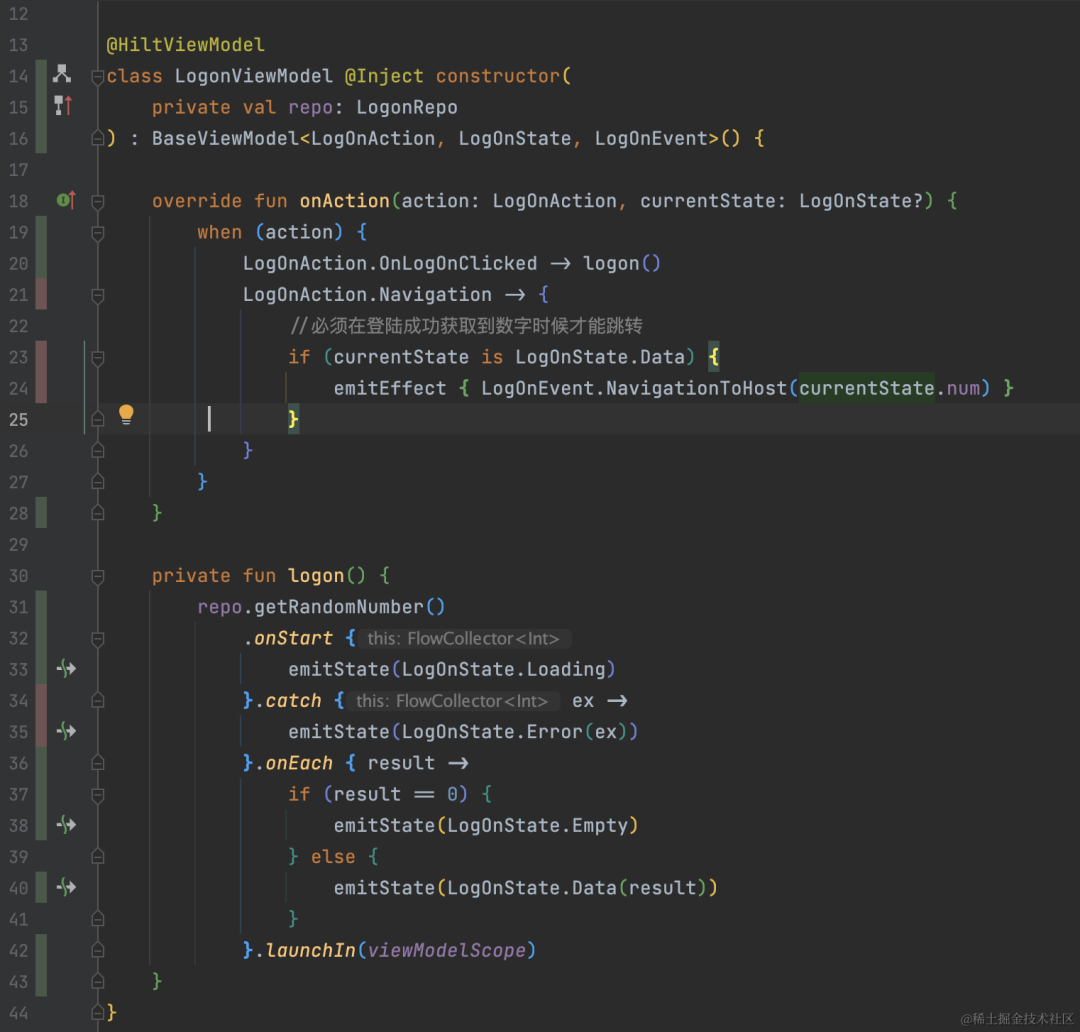
Unit test coverage refers to the percentage of code covered by test cases, which is an important indicator for checking the completeness of logic and case design in unit testing. Commonly used code coverage tools include JaCoCo and Emma. Below are the coverage reports generated by running tests in AS with coverage and the indication of line coverage in the code, where uncovered lines and conditions are indicated in red, and green indicates coverage.
Some suggestions for improving test coverage:
-
Write sufficient test cases to cover all branches and edge conditions of the code.
-
Use frameworks like Mockito to mock dependencies, making it easier to write test cases.
-
Use coverage tools to measure the percentage of code covered by test cases and modify and expand test cases as needed.
-
Use static code analysis tools to find uncovered code and write test cases to cover it.
In summary, test coverage is an important indicator that helps us determine whether test cases sufficiently cover the code. By writing enough test cases and using coverage tools, we can improve test coverage and ensure code quality and stability.
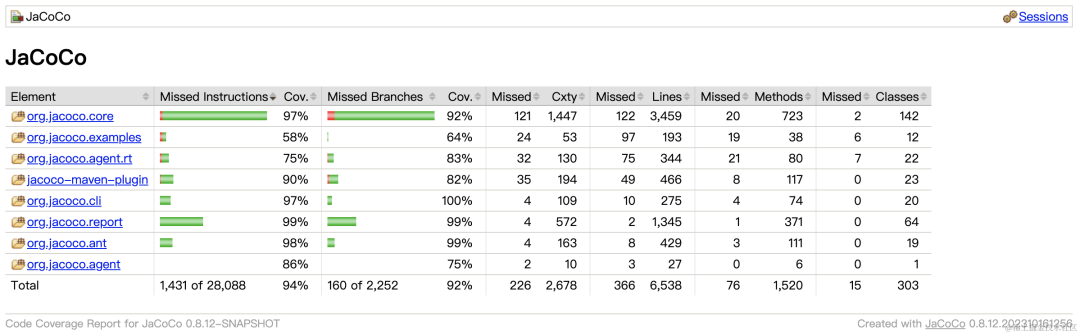
Code Quality Management with JaCoCo & SonarQube
JaCoCo is a Java code coverage library that helps developers understand which code in their codebase has been tested and which still needs testing. JaCoCo can integrate with various build tools (like Maven and Gradle) to generate code coverage reports.
SonarQube is an open-source code quality management platform that helps developers manage and improve code quality throughout the development cycle. SonarQube can integrate with various programming languages (like Java, C#, JavaScript, etc.) and provides a range of features, including code quality analysis, code coverage, code complexity, code duplication, security vulnerabilities, and more.
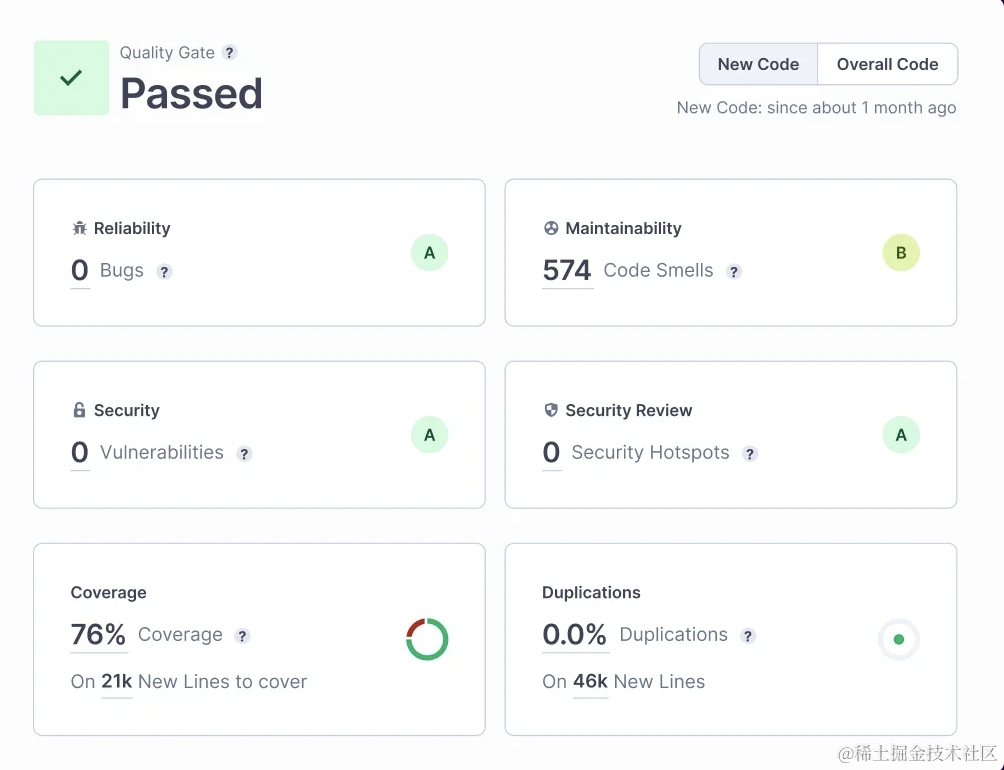
We should utilize these two tool platforms, using Gradle build tools to create a visual code coverage for Android projects. In commercial projects, JaCoCo and SonarQube are used together to improve code quality and test coverage. JaCoCo can generate test coverage reports and integrate them with SonarQube to view test coverage metrics and reports in SonarQube. SonarQube can also use the test coverage data generated by JaCoCo to calculate code coverage metrics and provide more comprehensive code quality analysis and reporting, including code complexity, code duplication, security vulnerabilities, and more.
This article mainly discusses the best practices for unit testing in the MVI architecture in Android development. It introduces how to use coverage tools to measure the percentage of code covered by test cases and provides some suggestions for improving test coverage. Through the learning in this article, we can understand how to use the MVI architecture to write easily testable Android applications and improve code quality and maintainability. Personally, through project practice, I have summarized the advantages of unit testing:
-
Improves code quality: Unit testing helps developers discover issues in the code, such as logical errors and boundary condition errors, thus improving code quality.
-
Enhances code maintainability: Unit testing helps developers better understand the functionality and implementation of the code, thus enhancing code maintainability.
-
Increases the safety of code refactoring: Unit testing helps developers discover issues while refactoring code, thus increasing the safety of refactoring.
-
Boosts development efficiency: Unit testing helps developers quickly locate and resolve issues, thus boosting development efficiency.
-
Facilitates team collaboration: Unit testing helps team members better understand the implementation and functionality of the code, thus facilitating team collaboration.
-
Reduces maintenance costs: Unit testing helps developers discover issues promptly, thus reducing maintenance costs. It checks whether newly added logic affects old logic or functionality, preventing bugs from old code being altered.
Acknowledgments
In this article, many texts were optimized and formatted with the help of ChatGPT, and many unit tests in the code were also generated directly by AI.
Recommended reading:
My new book, “The First Line of Code, 3rd Edition” has been published!
I am the init process
Introduction to HarmonyOS Application Development Knowledge
Welcome to follow my public account
Learning technology or submitting articles

Long press the image above to recognize the QR code to follow