Having read my previous articles, I believe everyone has mastered some basic command usage. Today, we will continue discussing how to manage a cluster using Linux commands. This falls under advanced Linux command techniques, where the focus is not on learning more commands but rather on combining and applying the commands we have learned previously. When you grow from being able to write just a few commands and executing them to having the ability to write a bash script with dozens or even hundreds of lines, it signifies that you have developed the capability to solve complex problems. This ability is crucial during performance testing.
1. Introduction to Cluster Environment
For this demonstration, we will use only three servers, but the scripts and problem-solving approaches we will write can be reused across many servers. During performance testing, it may be necessary to configure monitoring, install monitoring tools, and collect metrics, which could involve a large number of servers. Therefore, it is essential to understand this.

2. Looping Through IP List
In a local area network, there are many servers that need to be managed, and they can communicate with each other. We will operate them through a master server.
On the master server (192.168.21.210), we maintain a list of IP addresses saved in a file, as shown in the following image:
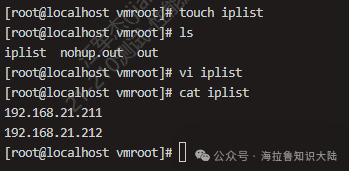
Currently, the iplist only contains two entries, but if we had a large number of machines, we could include hundreds or thousands of entries. Next, let’s consider how to loop through these IPs using shell scripting.
First, let’s try to implement the simplest program that reads these IPs from the iplist file and attempts to loop through them using a for loop. The specific program is as follows:
#!/usr/bin/env bash
readarray -t ips < iplist
for ip in "${ips[@]}"; do
    echo "$ip"
done
The first line, #!, is called Shebang. The Linux program loader analyzes the content of the Shebang to determine which program to execute the script with. Here, we want to use bash to execute this program. The readarray command is a feature that became available in bash 4.0.
The readarray command reads each line from the iplist file into the variable ips. ips is an array, and you can print all its contents using echo ${ips[@]}: @ represents all elements in the array; the $ symbol is an evaluation symbol. Without the $, ips[@] would be treated as a string rather than an expression.
The for loop iterates through each IP address in the array, and echo prints the address to the screen.
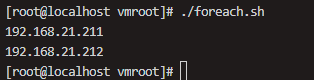
If you execute the above program using shell, it will throw an error because readarray is a feature supported only in bash 4.0 and later. We can use chmod to add execution permissions to foreach.sh and then directly execute it using bash, as shown in the following image:
3. Creating Cluster Management Account
To facilitate cluster management, it is common to use a unified username across the cluster. This account needs to maintain consistent naming across all clusters. For example, this cluster account is named jmeter.
Next, let’s explore how to create this account named jmeter, as shown in the following image:
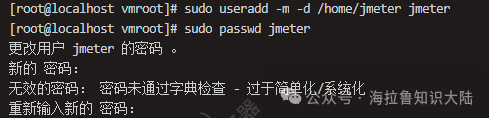
We created the jmeter account and then added jmeter to the root group. This way, jmeter has the ability to become root, and we set the initial shell for the jmeter user to bash, as shown in the following image:

Next, we edit the /etc/sudoers file to add a line jmeter ALL=(ALL) NOPASSWD:ALL, which means that the jmeter account can execute sudo commands without entering a password.
We can organize the complete process above into a command file, create_jmeter.sh:
sudo useradd -m -d /home/jmeter jmeter
sudo passwd jmeter
sudo usermod -G root jmeter
sudo usermod --shell /bin/bash jmeter
sudo cp ~/.bashrc /home/jmeter/
sudo chown jmeter.jmeter /home/jmeter/.bashrc
sudo sh -c 'echo "jmeter ALL=(ALL)  NOPASSWD:ALL" >> /etc/sudoers'
You can delete the user jmeter and clean up the last line in the /etc/sudoers file. Use the command userdel jmeter to delete the account, and then execute create_jmeter.sh to recreate the jmeter account. If the results are consistent, it indicates that the create_jmeter.sh functionality is working correctly.
Finally, we want to execute create_jmeter.sh on the other two machines. However, if we want the program to run on hundreds or thousands of machines, we need another script to copy create_jmeter.sh to the machines where it needs to be executed.
Here, we can make slight modifications to foreach.sh to distribute the create_jmeter.sh file.
#!/usr/bin/bash
readarray -t ips < iplist
for ip in ${ips[@]}do
    scp ~/remote/create_jmeter.sh root@$ip:~/create_jmeter.sh
done
In this case, we use scp to copy the file in the loop, and then execute create_jmeter.sh on each machine.
If you have a very large number of machines, the above process can still be quite tedious.
4. Establishing Cluster Permissions
Next, we need to establish permissions from 210 to 211 and 212. We will use the public key from the master server to log into each server, avoiding the need to enter a password. Now, let’s discuss how to do this:
First, we need to generate a public-private key pair on 210 using ssh-keygen, and then write the public key into the authorized_keys file of each machine that needs to be managed. As shown in the following image, we use ssh-keygen on the master server 210 to generate the public-private key pair.
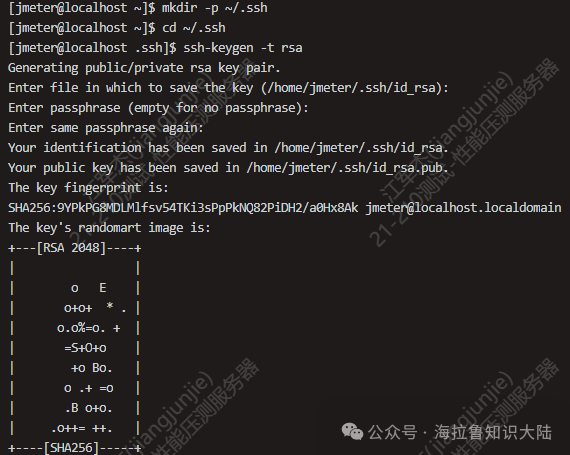
Then, use mkdir -p to create the ~/.ssh directory. The -p option ensures that the directory is created only if it does not exist, and it will not throw an error. The ~ represents the current home directory. If a file or directory name starts with a ., it indicates that it is a hidden file or directory. Typically, such files have special meanings, for example, the ~/.ssh directory contains SSH configurations.
We switch to the .ssh directory using cd and then execute ssh-keygen (pressing Enter three times). This will generate two files in the ~/.ssh directory: id_rsa.pub (the public key file) and id_rsa (the private key file). As shown in the following image:

The id_rsa.pub file contains an encrypted string, which we can copy to the corresponding user’s ~/.ssh/authorized_keys file on other machines. This way, when logging into other machines via SSH, you won’t need to re-enter the password. This passwordless public key capability can also be executed using a shell script.
We modify foreach.sh and write a transfer_key.sh to work in conjunction with foreach.sh. The content of transfer_key.sh is as follows:
foreach.sh
#!/usr/bin/bash
readarray -t ips < iplist
for ip in ${ips[@]}do
    sh ./transfer_key.sh $ip
done
transfer_key.sh
ip=$1
pubkey=$(cat ~/.ssh/id_rsa.pub)
echo "execute on .. $ip"
ssh jmeter@$ip " mkdir -p ~/.ssh
echo $pubkey  >> ~/.ssh/authorized_keys
chmod 700 ~/.ssh
chmod 600 ~/.ssh/authorized_keys"
In foreach.sh, we execute transfer_key.sh and pass the IP address as a parameter. In transfer_key.sh, we read the IP address parameter using $1, then write the public key into the variable pubkey, and log into the corresponding server to execute multiple commands. We use mkdir to check for the existence of the .ssh directory and create it if it does not exist. Finally, we append the public key to the target machine’s ~/.ssh/authorized_keys file.
The chmod 700 and chmod 600 commands are necessary because certain specific Linux versions require the .ssh directory to be readable, writable, and executable, while the authorized_keys file must be readable and writable only. To ensure security, group users and all users should not have access to this file.
We still need to enter the password twice when executing foreach.sh. After completing the above operations, we can log into these two servers without needing to enter a password.
Next, let’s try passwordless login:
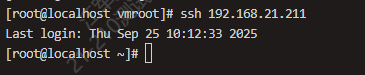
Perfect! We can log into any machine without needing to enter a username and password.
5. Installing Java Environment Locally
Before remotely deploying the Java environment, we first need to complete the installation of the Java environment locally to collect the scripts that need to be executed.
To install the Java environment, you can directly use apt to download the corresponding version of the JDK.
Then execute the following script to confirm the Java installation.
which java
java --version
If this is for a production line, it is best to follow the principle of least privilege and create another user named ujava for executing Java programs.
sudo useradd -m -d /opt/ujava ujava
sudo usermod --shell /bin/bash ujava
This created user can be set without a password since we won’t actually log into this user to perform any tasks. Next, we will configure the Java environment variables for this user.
export JAVA_HOME=/usr/local/java/jdk-11.0.26/bin/javaLinux environment variables are like globally visible data, and we use export to set them. The JAVA_HOME environment variable points to the Java installation. If you want to see all the environment variable pointers, you can use the env command.
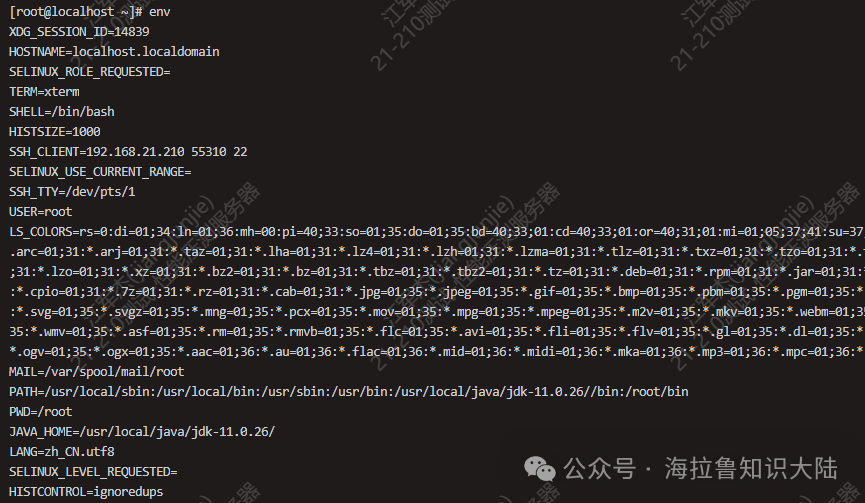
One important environment variable is PATH.

As shown in the image, we can use the shell to view the value of PATH. The directories in PATH are separated by colons (:), and each directory is where Linux looks for executable files. When a user enters a command in the command line, Linux searches for the corresponding executable file in PATH.
We do not want the JAVA_HOME configuration to disappear after a reboot, so we can add this environment variable to the ujava user’s profile. This way, it will be available whenever the user logs in.
sudo sh -c 'echo "export JAVA_HOME=/usr/local/java/jdk-11.0.26/" >> /opt/ujava/.bash_profile'By adding JAVA_HOME to bash_profile, we can use the JAVA_HOME environment variable when executing Java commands remotely in the future.
Finally, we will organize all the above commands into a single script, install_java.sh.
sudo apt -y install jdk-11.0.26
sudo useradd -m -d /opt/ujava ujava
sudo usermod --shell /bin/bash ujava
sudo sh -c 'echo "export JAVA_HOME=/usr/local/java/jdk-11.0.26/" >> /opt/ujava/.bash_profile'
The -y option after apt is to allow the execution process to proceed without prompting for confirmation.
6. Remote Installation of Java Environment
Finally, we arrive at the step of remotely installing the Java environment, where we will again use foreach.sh. To avoid modifying it each time, you might consider allowing foreach.sh to take a file parameter that specifies the script to be executed remotely.
foreach.sh
#!/usr/bin/bash
readarray -t ips < iplist
script=$1
for ip in ${ips[@]}do
    ssh $ip 'bash -s' < $script
done
The rewritten foreach will read the first execution parameter as the script file to be executed remotely. The bash -s option indicates that standard input will be used as the command input; < $script redirects the content of the script file to the standard input stream of the remote bash.
Then we execute foreach.sh install_java.sh, and after a few minutes, we can use the following script to check the installation status on both machines.
check.sh
sudo -u ujava -i /bin/bash -c 'echo $JAVA_HOME'
sudo -u ujava -i java --version
In check.sh, we switch to the ujava user to check the JAVA_HOME environment variable and the Java version.
7. Summary
What we discussed this time is just the tip of the iceberg in terms of operations and maintenance. In the process of building small tools with script files, we can see the importance of reuse. In practice, excellent performance engineers are good at accumulating and reusing knowledge. If this is your first time installing the Java environment, you can save today’s installation script in your notebook, and in the future, you can automate the process. In fact, tools and scripts are not that important; they are merely means to an end. Besides accumulation and summarization, what matters more is our mindset and the ability to research and solve problems independently.