If you bought the BBB for hardware-related projects, you will likely need to create a cape. The term cape is the official name from BBB, referring to the software and hardware peripherals of the BBB. By learning about the device tree, we understand that BBB uses capemgr and device tree to control the cape by loading a specific cape through passing the dtbo file to $SLOTS, like this:
-
echo BB-ADC > $SLOTS
However, sometimes we do not want to manually input this command every time to enable a cape; instead, we want it to start automatically on boot. This is where the content of this article comes in. To achieve automatic booting, you only need to add an EEPROM (the officially recommended model is CAT24C256) and connect it to specific pins, writing the content in the specified format. The system checks for a valid EEPROM on specific pins during startup, and if it finds one, it automatically loads the corresponding dtbo file based on the content in the EEPROM. Do you remember what we saw when we ran cat $SLOTS?
-
cat /sys/devices/bone_capemgr.*/slots
-
0: 54:PF—
-
1: 55:PF—
-
2: 56:PF—
-
3: 57:PF—
-
4: ff:P-O-L Bone-LT-eMMC-2G,00A0,Texas Instrument,BB-BONE-EMMC-2G
-
5: ff:P-O-L Bone-Black-HDMI,00A0,Texas Instrument,BB-BONELT-HDMI
Why are the first four items empty? Because they are reserved for physical capes with EEPROM. It is evident that a physical cape can have a maximum of four slots.
-
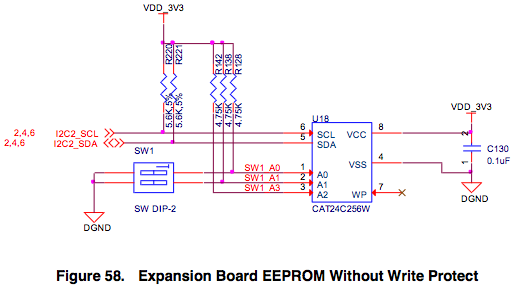
The EEPROM address must be between 0x54 and 0x57, otherwise the system will not load it. Just to clarify: regardless of the brand of EEPROM chip, their addresses are the same, with the high 4 bits being 1010, and the low 3 bits corresponding to the levels of the A2, A1, and A0 pins (some chips only have A1 and A0). Therefore, you can change the EEPROM address through external circuits. This means the EEPROM address can only be one of 0x50 to 0x57. If A2 is kept high, then only the addresses from 0x54 to 0x57 are available (this is the reason why A2 is connected to high in the EEPROM circuit in the SRM (official BBB reference manual).
-
The EEPROM must be connected to the BBB’s I2C2_SCL and I2C2_SDA pins (which appear in the system as i2c-1). This is because the default function of these two pins is I2C. This also tells us that we should avoid permanently changing the function of these two pins in the program; otherwise, the cape cannot be loaded.
-
BBB supports a maximum of four EEPROMs connected at the same time, and their addresses must be unique.
-
If multiple EEPROMs are inserted at once, they will be read sequentially. The reading order is from 0x54 to 0x57. Why emphasize the loading order of overlays? Because once the previously loaded overlay occupies certain on-chip resources, other overlays cannot be used. For example, the LCD I want to make uses the same pins as the HDMI that is loaded by default. If the system first loads the LCD overlay, then the HDMI cannot be loaded anymore.
-
The WP pin on the EEPROM is for write protection. Once pulled high, writing will not be possible. Therefore, when making your own circuit, you can leave it floating or pull it low.
First, let’s introduce how to read and write, and then discuss what to write. First, determine the EEPROM address. Set the levels of pins A0, A1, and A2 according to the above, for example, if I ground A0 and A1 and pull A2 high, the address will be 0x54. Then operate in the command line:
-
cd /sys/bus/i2c/devices/1-0054/ # Navigate to the EEPROM directory
-
cat eeprom | hexdump -C # Read the EEPROM content and display it in character form
-
echo -e “\xaa\x55\x33\xeeA1Beaglebone LCD4 Cape\x00\x00\x00\x00\x00\x00\x00\x00\x00\x00\x00\x00\x00\x00\x00” > eeprom # Write content
-
cat eeprom | hexdump -C # Confirm if the write was successful
Characters starting with \x represent writing according to ASCII values. The above writes the official LCD4 cape’s EEPROM content. If you want to create your own LCD cape and the LCD panel parameters are the same as the official one, the system will use the same driver program, so you can directly use the above EEPROM content to load the BBB’s built-in dtbo file without rewriting the dtbo file yourself. When writing content, follow the standards in the SRM (as shown in the image below). The most important thing is to correctly write the first 6 bytes \xaa\x55\x33\xeeA1 and the version number 00A1, as well as the name of the dtbo file BB-BONE-LCD4-01. The rest, such as the number of pins, does not matter. The remaining space must be filled with \x00; using other characters will cause errors.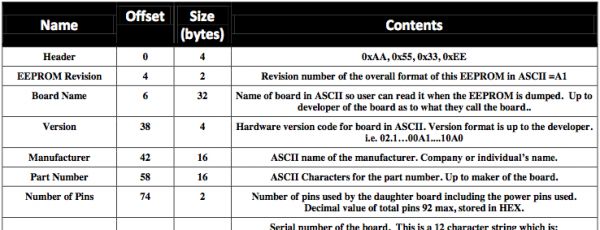
-
The file name must be in the format boardname-version.dts, for example BB-BONE-LCD4-01-00A0.dts. Here, BB-BONE-LCD4-01 is the board name, and 00A0 is the version number. (Actually, the name of the dts file does not matter; the key is that the compiled dtbo name must match it. For the sake of uniformity, we will stick to this convention).
-
The version must be in the format 00AX, where X starts from 0 and increases sequentially. Furthermore, to name it 00A1, there must be an existing 00A0! Versions cannot be skipped!
-
The dts file must contain part-number and version, and their contents must match the file name! The part-number is the board name.
-
The compiled dtbo file must be placed in the /lib/firmware/ directory to be loaded.
OK, the above introduces all the general content of capes. Specific capes that require loading specific drivers will involve how to write the dts file and configure the drivers, which will not be discussed here.
Actually, you can also achieve automatic loading of dtbo files by modifying the uEnv.txt file without using EEPROM. After connecting the BBB via USB, a drive letter will appear on the computer, containing a file named uEnv.txt. Through it, you can set which dtbo files to load or prevent from loading at system startup. For example, if I want to load BB-ADC at system startup, we can open it and add the following line:
-
optargs=quiet capemgr.enable_partno=BB-ADC
Then safely eject this drive and restart the BBB. We know that the BBB will automatically load HDMI at startup, and HDMI shares some pins with LCD. If we want to load the LCD cape after startup by inserting it and running echo BB-BONE-LCD4-01 > $SLOTS, it will prompt you that the File exists because HDMI has already loaded, and those pins cannot be modified anymore. But we can configure uEnv.txt to prevent HDMI from loading automatically at startup by adding a line:
-
optargs=quiet capemgr.disable_partno=BB-BONELT-HDMI,BB-BONELT-HDMIN
That’s it. Note that if you want to achieve both tasks above, i.e., disable HDMI and load ADC, you cannot simply write those two lines; they should be merged into one line:
-
optargs=quiet capemgr.disable_partno=BB-BONELT-HDMI,BB-BONELT-HDMIN capemgr.enable_partno=BB-ADC
Otherwise, it will fail. Therefore, the significance of using EEPROM lies in convenience. You do not need to configure anything; just plug it in and it works. If you enjoy tinkering, there are many ways to achieve this.
The method of modifying uEnv.txt mentioned above is actually quite similar to using EEPROM—if one doesn’t work, neither will the other! In the June version of the Angstrom system (check which version of the system your BBB is running by entering uname -a in the terminal), there is a bug. If you compile your own dtbo file, it will not automatically load even if placed in the /lib/firmware directory (the ones originally in /lib/firmware can load because they are compiled into the kernel). Therefore, unless you compile the system yourself, you cannot use this method to automatically load your cape at startup. As I just mentioned, using uEnv.txt is similar to using EEPROM… so it doesn’t work either. The September version of the Angstrom system slightly modified this bug, but it is still not very usable—during the loading of the cape step, the system will pause for 60 seconds before continuing… Originally, Angstrom was known for its fast startup speed, taking only 10 seconds. This delay has significantly hampered its performance. (Moreover, the September version of the Angstrom system introduced a new bug—the pointer of the LCD resistive touch screen will drift! If you want to solve this problem yourself, you still need to recompile the system—not everyone has the patience to play with compiling systems! Therefore, even though it is a new system, I still decisively use the June version, at least the touch screen works fine.) In summary, regardless of which version of the Angstrom system, the EEPROM and uEnv.txt methods are not very effective. Below, I will introduce a completely different approach: using systemd. Step by step guide:Step 1. Create a new file in the /etc/systemd/system directory named mystartup.service (the name can be customized), with the following content:
-
[Unit]
-
Description=My script
-
[Service]
-
ExecStart=/home/root/mystartup.sh
-
[Install]
-
WantedBy=multi-user.target
Description is a comment for your reference and can be written freely. mystartup.sh is the script that will be executed automatically at startup.
Note: Do not write it as ExecStart=/bin/sh /path/to/script.sh; just write it exactly as given above.Step 2.Then create a mystartup.sh file in the /home/root directory with the following content:
-
#!/bin/sh
-
echo BB-YOUR-CAPE > /sys/devices/bone_capemgr.8/slots
Note: 1. This must be a sh script; it cannot be a bash script. 2. The sh script cannot use wildcards like bone_capemgr.*; it must be bone_capemgr.8 or .9 (depending on your system). 3. Of course, the dtbo files must still be placed in /lib/firmware.Step 3. Finally, execute the command:
-
systemctl enable myscript.service
Then you can reboot the BBB and see that the dtbo has been successfully loaded. If you execute dmesg | grep capemgr, you will find that the loading time of the dtbo is different from that of the EEPROM or uEnv.txt, which is similar to the effect of manually entering the echo command after startup.
I certainly recommend the sixth method. Until a better solution is found, this will be the method I adopt for my Development Kit in the future. If you want to use my Kit, I suggest mastering this little trick. Finally, this sentence is for those who can understand it; if you cannot, there’s no need to delve into it: crontab @reboot does not work well in BBB’s Angstrom, so don’t try it. It seems to be killed by the system.
Recommended Reading
Tutorial | Understand STM32 Encoder in One Article
Revealed | Entering the World of Hash Tables
Tutorial | Want to Improve Multimeter Accuracy? A Few Resistors Can Do It
Tutorial | Discussing Phase-Locked Loops—Overview of Design Steps
Tutorial | Discussing Phase-Locked Loops—Frequency Synthesizers
Tutorial | Discussing Phase-Locked Loops—Frequency Demodulation Circuits
Tutorial | Discussing Phase-Locked Loops—Carrier Synchronization Circuits
Tutorial | Four Fundamental Causes of Clock Jitter and Three Ways to View It
Tutorial | Do Not Underestimate Brushed DC Motors (Part 1)
Tutorial | Do Not Underestimate Brushed DC Motors (Part 2)
Tutorial | How to Start Power Supply Design, Understand It Instantly!
Tutorial | A Tip for Handling MSP432 Debug Errors and Chip Failures
Add WeChat ID:helloeeworld as a friend, and note EEWORLD Forum Account + Profession and Interested Direction. After review, you will be added to the WeChat group established in different fields.