Continuing to fill the gaps, we have already written three articles about wireless communication with Arduino:
-
Wireless Communication 1: 433MHz RF Wireless Radio Frequency
-
Wireless Communication 2: nRF24L01 Module
-
Wireless Communication 3: HC05/HC06 Classic Bluetooth BT Module
Today we introduce another method of Bluetooth communication–BLE (Bluetooth Low Energy).
What is BLE
In “Wireless Communication 3: HC05/HC06 Classic Bluetooth BT Module” we mentioned the difference between classic Bluetooth BT and Bluetooth Low Energy BLE. As the name suggests, low energy Bluetooth aims for extremely low power consumption. Its main application scenarios are short-distance, low data transmission scenarios, unlike classic Bluetooth which needs to maintain a connection during communication. BLE can establish a connection only during data transmission, entering sleep mode during idle time to save energy, which allows BLE communication power consumption to be very low, potentially only one percent of classic Bluetooth’s power consumption.

BLE not only supports point-to-point transmission but also supports broadcast mode and can form a Mesh network.

BLE’s characteristics make it very suitable for small devices that rely on battery power for long periods and only occasionally send small amounts of data. Examples include health bands, tracking tags, IoT sensors, etc.
BLE Server and Client
In BLE communication mode, there are two types of devices: BLE Server and BLE Client. During communication, the BLE Server sends signals that can be discovered by nearby BLE Clients. A BLE Client can connect to a specific Server and then read the signal data sent by the Server.

BLE Data Structure: GATT
Understanding BLE communication also requires several concepts, the most important being GATT, which stands for Generic Attributes. It can be simply understood as the basic data structure for BLE Bluetooth communication.

BLE Service
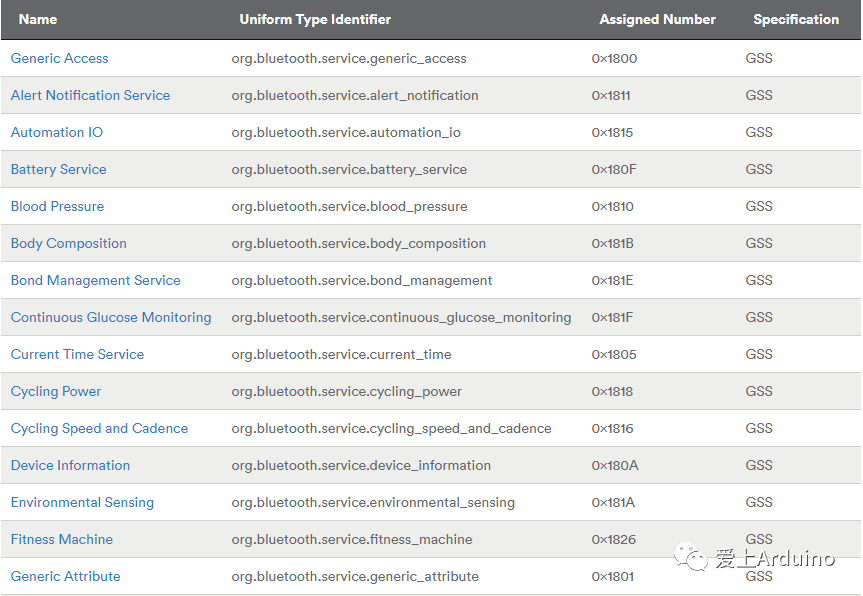
At the top level of the GATT structure is the Profile, which contains at least one BLE Service. Typically, a BLE device contains multiple Services. These BLE Services are not arbitrarily set but are uniformly defined by the Bluetooth Special Interest Group for standardization. For example, there are Services for displaying battery levels, heart rate, blood pressure, weight, etc.
BLE Characteristic
Each Service contains one or more Characteristics, which include the declaration, data value, and descriptor. These characteristics can fully describe how a Characteristic is used, with common operations such as:
-
Broadcast
-
Read
-
Write without response
-
Write
-
Notify
-
Indicate
-
Authenticated Signed Writes
-
Extended Properties
UUID
In BLE GATT, each Service, Characteristic, and Descriptor has a specific 128-bit UUID representation, similar to the following string of numbers:
0x0000xxxx-0000-1000-8000-00805F9B34FB
To simplify, the Bluetooth Special Interest Group defines a 16-bit UUID to replace the ‘x’ part of the basic UUID above. For example, the heart rate measurement characteristic uses 0X2A37 as its 16-bit UUID, thus its complete 128-bit UUID is:
0x00002A37-0000-1000-8000-00805F9B34FB
It is worth noting that the basic UUIDs used by the Bluetooth Special Interest Group cannot be used for any custom attributes, services, and characteristics. Additionally, for custom UUIDs, a complete 128-bit UUID must be used.
How to Develop BLE Applications with Arduino IDE
When developing BLE applications in the Arduino development environment, we generally have two options:
-
Use an Arduino development board with a BLE module, similar to classic Bluetooth HC05/HC06 modules, there is also the popular HM-10 module for low energy Bluetooth, which is based on TI’s CC2540/CC2541 BLE 4.0 module. The Arduino development board communicates with HM-10 via serial communication to send AT commands to set parameters and send/receive data.

-
Use development boards like ESP32 that come with BLE functionality and can be developed with Arduino IDE. ESP32 not only has built-in WiFi but also has dual-mode Bluetooth (classic Bluetooth BT and Bluetooth Low Energy BLE), small size and affordable price.

If you choose the first option, there are many tutorials online about using Arduino with the HM-10 module, which we won’t cover here. In the following practice, we will use ESP32 as our development platform.
Create BLE Server using ESP32
Before using the ESP32 development board, we need to make Arduino IDE support the ESP32 development board. New users can refer to the “Installing ESP32 Plugin” section in the article “ESP32-CAM Build Low-Cost Network Monitoring Camera”.
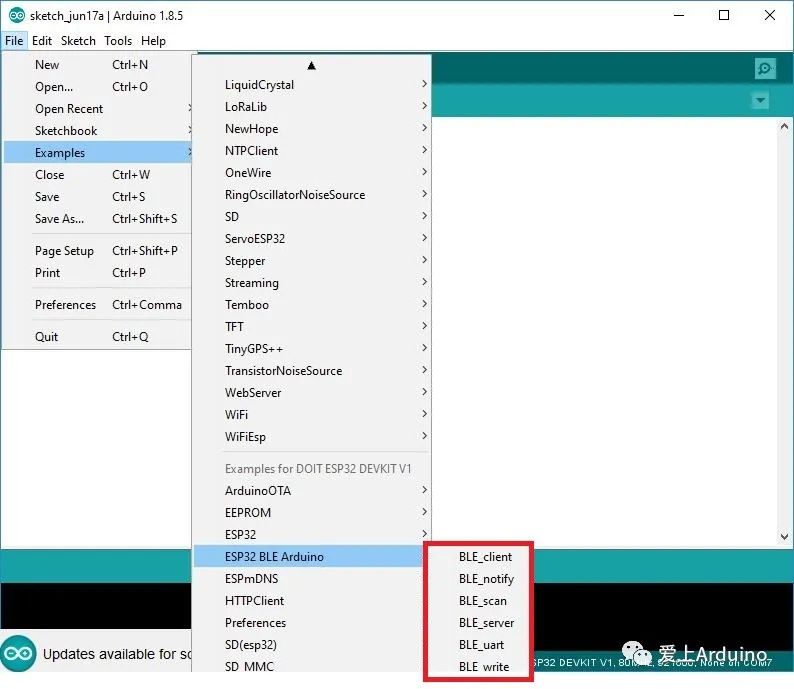
After successful installation, select DOIT DEVKIT V1 board type, open the Arduino IDE’s File->Examples, and we can see several BLE-related examples. We open BLE_server or copy the following code into the IDE:
/*
    Based on Neil Kolban example for IDF: https://github.com/nkolban/esp32-snippets/blob/master/cpp_utils/tests/BLE%20Tests/SampleServer.cpp
    Ported to Arduino ESP32 by Evandro Copercini
    updates by chegewara
*/
#include <BLEDevice.h>
#include <BLEUtils.h>
#include <BLEServer.h>

// See the following for generating UUIDs:
// https://www.uuidgenerator.net/

#define SERVICE_UUID        "4fafc201-1fb5-459e-8fcc-c5c9c331914b"
#define CHARACTERISTIC_UUID "beb5483e-36e1-4688-b7f5-ea07361b26a8"

void setup() {
  Serial.begin(115200);
  Serial.println("Starting BLE work!");

  BLEDevice::init("MyESP32");
  BLEServer *pServer = BLEDevice::createServer();
  BLEService *pService = pServer->createService(SERVICE_UUID);
  BLECharacteristic *pCharacteristic = pService->createCharacteristic(
                                         CHARACTERISTIC_UUID,
                                         BLECharacteristic::PROPERTY_READ |
                                         BLECharacteristic::PROPERTY_WRITE
                                       );

  pCharacteristic->setValue("Hello World says Neil");
  pService->start();
  // BLEAdvertising *pAdvertising = pServer->getAdvertising();  // this still is working for backward compatibility
  BLEAdvertising *pAdvertising = BLEDevice::getAdvertising();
  pAdvertising->addServiceUUID(SERVICE_UUID);
  pAdvertising->setScanResponse(true);
  pAdvertising->setMinPreferred(0x06);  // functions that help with iPhone connections issue
  pAdvertising->setMinPreferred(0x12);
  BLEDevice::startAdvertising();
  Serial.println("Characteristic defined! Now you can read it in your phone!");
}

void loop() {
  // put your main code here, to run repeatedly:
  delay(2000);
}
Let’s go through the code and explain it:
#include <BLEDevice.h>
#include <BLEUtils.h>
#include <BLEServer.h>
At the beginning, we import some necessary BLE-related library files.
#define SERVICE_UUID "4fafc201-1fb5-459e-8fcc-c5c9c331914b"
#define CHARACTERISTIC_UUID "beb5483e-36e1-4688-b7f5-ea07361b26a8"
Then we need to define the UUID codes for the Service and Characteristic. Since we are defining custom services and characteristics here, we cannot use UUIDs that conflict with those specified by the Bluetooth Special Interest Group, and we must use complete 128-bit UUIDs. To make it easier, we can use some online random UUID generator services:
https://www.uuidgenerator.net/
In setup(), we establish serial communication with a baud rate of 115200. Then we create a BLE device, passing in the device name, which can be arbitrary.
BLEDevice::init("BLE Device name");
Next, we need to set the device mode to BLE Server:
BLEServer *pServer = BLEDevice::createServer();
Next, add a Service to this Server, passing in the Service UUID we set earlier:
BLEService *pService = pServer->createService(SERVICE_UUID);
Then create a Characteristic for this Service. Here, in addition to passing in the UUID, we also declare the read and write properties of this Characteristic, which in this example are both readable and writable:
BLECharacteristic *pCharacteristic = pService->createCharacteristic(
                                     CHARACTERISTIC_UUID,
                                     BLECharacteristic::PROPERTY_READ |
                                     BLECharacteristic::PROPERTY_WRITE
                                     );
Then give the Characteristic an initial value. This value can be read and modified by the client.
pCharacteristic->setValue("Hello World says Neil");
Finally, we start this Service and begin advertising. This way, this Server can be scanned by BLE clients.
BLEAdvertising *pAdvertising = pServer->getAdvertising();
pAdvertising->start();
Thus, a simple BLE Server has been successfully created, and you can compile and upload it, making it very simple.
BLE Client Side
After creating the BLE Server, we need a Client to connect to the Server and read and write data. In BLE applications, the Client is often a mobile phone, but it can also be another microcontroller.
Below we will demonstrate these two methods.
Method 1: Microcontroller
If using a microcontroller as the BLE Client, you also need to pair it with a BLE module or a microcontroller with built-in BLE functionality. Here we will demonstrate using another ESP32.
We open the Arduino IDE File->Examples and find the BLE_client example:
/**
 * A BLE client example that is rich in capabilities.
 */

#include "BLEDevice.h"
//#include "BLEScan.h"

// The remote service we wish to connect to.
static BLEUUID serviceUUID("4fafc201-1fb5-459e-8fcc-c5c9c331914b");
// The characteristic of the remote service we are interested in.
static BLEUUID    charUUID("beb5483e-36e1-4688-b7f5-ea07361b26a8");

static BLEAddress *pServerAddress;
static boolean doConnect = false;
static boolean connected = false;
static BLERemoteCharacteristic* pRemoteCharacteristic;

static void notifyCallback(
  BLERemoteCharacteristic* pBLERemoteCharacteristic,
  uint8_t* pData,
  size_t length,
  bool isNotify) {
    Serial.print("Notify callback for characteristic ");
    Serial.print(pBLERemoteCharacteristic->getUUID().toString().c_str());
    Serial.print(" of data length ");
    Serial.println(length);
}

bool connectToServer(BLEAddress pAddress) {
    Serial.print("Forming a connection to ");
    Serial.println(pAddress.toString().c_str());

    BLEClient*  pClient  = BLEDevice::createClient();
    Serial.println(" - Created client");

    // Connect to the remove BLE Server.
    pClient->connect(pAddress);
    Serial.println(" - Connected to server");

    // Obtain a reference to the service we are after in the remote BLE server.
    BLERemoteService* pRemoteService = pClient->getService(serviceUUID);
    if (pRemoteService == nullptr) {
      Serial.print("Failed to find our service UUID: ");
      Serial.println(serviceUUID.toString().c_str());
      return false;
    }
    Serial.println(" - Found our service");


    // Obtain a reference to the characteristic in the service of the remote BLE server.
    pRemoteCharacteristic = pRemoteService->getCharacteristic(charUUID);
    if (pRemoteCharacteristic == nullptr) {
      Serial.print("Failed to find our characteristic UUID: ");
      Serial.println(charUUID.toString().c_str());
      return false;
    }
    Serial.println(" - Found our characteristic");

    // Read the value of the characteristic.
    std::string value = pRemoteCharacteristic->readValue();
    Serial.print("The characteristic value was: ");
    Serial.println(value.c_str());

    pRemoteCharacteristic->registerForNotify(notifyCallback);
}
/**
 * Scan for BLE servers and find the first one that advertises the service we are looking for.
 */
class MyAdvertisedDeviceCallbacks: public BLEAdvertisedDeviceCallbacks {
 /**
   * Called for each advertising BLE server.
   */
  void onResult(BLEAdvertisedDevice advertisedDevice) {
    Serial.print("BLE Advertised Device found: ");
    Serial.println(advertisedDevice.toString().c_str());

    // We have found a device, let us now see if it contains the service we are looking for.
    if (advertisedDevice.haveServiceUUID() && advertisedDevice.getServiceUUID().equals(serviceUUID)) {

      //
      Serial.print("Found our device!  address: ");
      advertisedDevice.getScan()->stop();

      pServerAddress = new BLEAddress(advertisedDevice.getAddress());
      doConnect = true;

    } // Found our server
  } // onResult
}; // MyAdvertisedDeviceCallbacks

void setup() {
  Serial.begin(115200);
  Serial.println("Starting Arduino BLE Client application...");
  BLEDevice::init("");

  // Retrieve a Scanner and set the callback we want to use to be informed when we
  // have detected a new device.  Specify that we want active scanning and start the
  // scan to run for 30 seconds.
  BLEScan* pBLEScan = BLEDevice::getScan();
  pBLEScan->setAdvertisedDeviceCallbacks(new MyAdvertisedDeviceCallbacks());
  pBLEScan->setActiveScan(true);
  pBLEScan->start(30);
} // End of setup.

// This is the Arduino main loop function.
void loop() {

  // If the flag "doConnect" is true then we have scanned for and found the desired
  // BLE Server with which we wish to connect.  Now we connect to it.  Once we are
  // connected we set the connected flag to be true.
  if (doConnect == true) {
    if (connectToServer(*pServerAddress)) {
      Serial.println("We are now connected to the BLE Server.");
      connected = true;
    } else {
      Serial.println("We have failed to connect to the server; there is nothing more we will do.");
    }
    doConnect = false;
  }

  // If we are connected to a peer BLE Server, update the characteristic each time we are reached
  // with the current time since boot.
  if (connected) {
    String newValue = "Time since boot: " + String(millis()/1000);
    Serial.println("Setting new characteristic value to \"" + newValue + "\"");

    // Set the characteristic's value to be the array of bytes that is actually a string.
    pRemoteCharacteristic->writeValue(newValue.c_str(), newValue.length());
  }

  delay(1000); // Delay a second between loops.
} // End of loop
The Client side code is slightly more complex, but it is not difficult to understand in relation to the Server side. In setup(), we create a BLE device and enable scan mode to scan all nearby BLE Servers.
When a Server is found, we compare the Service and Characteristic UUIDs in the Callback function. If they match, scanning stops. In the loop() function, we continuously check the connection status and update the BLE Server’s characteristic value each time.

The BLE_Client example demonstrates the basic operations of how a client scans for a server, connects, compares UUIDs, reads, and modifies characteristic values.
Method 2: Mobile Client
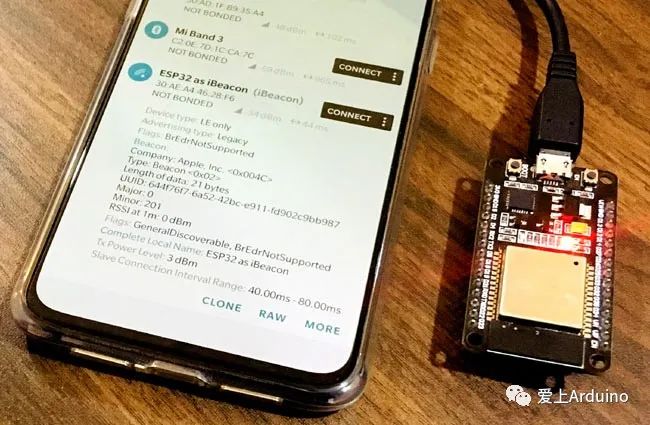
The mobile client paired with the BLE server is a more common pairing, but how mobile apps call the system Bluetooth interface involves more mobile programming: for Android systems, you need to understand Java and Android SDK, and for Apple systems, you need to understand Objective-C/Swift and iOS’s underlying… In short, it is another field. If you are interested, you can explore it on your own; there are many tutorials available online for Bluetooth app development. Here, we will use the BLE debugging app officially launched by Nordic Semiconductor–nRF Connect to see how a mobile BLE Client can view the ESP32 BLE Server we created earlier.
First, we search, download, and install nRF Connect from the Apple Store or third-party Android stores.

After opening the app, we can search for nearby BLE devices, of course, the phone’s Bluetooth function and related permissions must be enabled in the settings; otherwise, the app will give a red prompt.

After scanning, the app will list all nearby BLE devices, find our self-named BLE Server and click Connect.

After a successful connection, it will jump to the device page, which lists all the Services, Characteristics, and corresponding UUIDs of this Server in detail. We can expand to see the custom characteristic values and can directly modify this value through the app.

Conclusion
We briefly introduced the differences between Bluetooth Low Energy BLE and classic Bluetooth BT, the data structure of BLE, and how to create BLE servers and clients using ESP32. Thus, the upper and lower parts of Bluetooth communication are complete. In the next article in this series, I will continue to introduce another “half of the territory” in Arduino wireless communication – WiFi communication.
Related Articles:
-
Wireless Communication 1: 433MHz RF Wireless Radio Frequency
-
Wireless Communication 2: nRF24L01 Module
-
Wireless Communication 3: HC05/HC06 Classic Bluetooth BT Module