WeChat Official Account: Programming Those Years Follow to learn more tutorials and questions or suggestions, please leave a message to the official account;
Simple Configuration of CSI Camera on Raspberry Pi
This article discusses how to properly install the CSI camera on the Raspberry Pi and some basic configurations and simple usage.
Test Environment
Hardware: Raspberry Pi 3B/3B+ System: Raspberry Debian 9 / Debian 10
Hardware Connection
1. Find the CSI interface (The CSI interface of Raspberry Pi 3B is located between the HDMI interface and the audio port), you need to lift the CSI interface cover, as shown below:

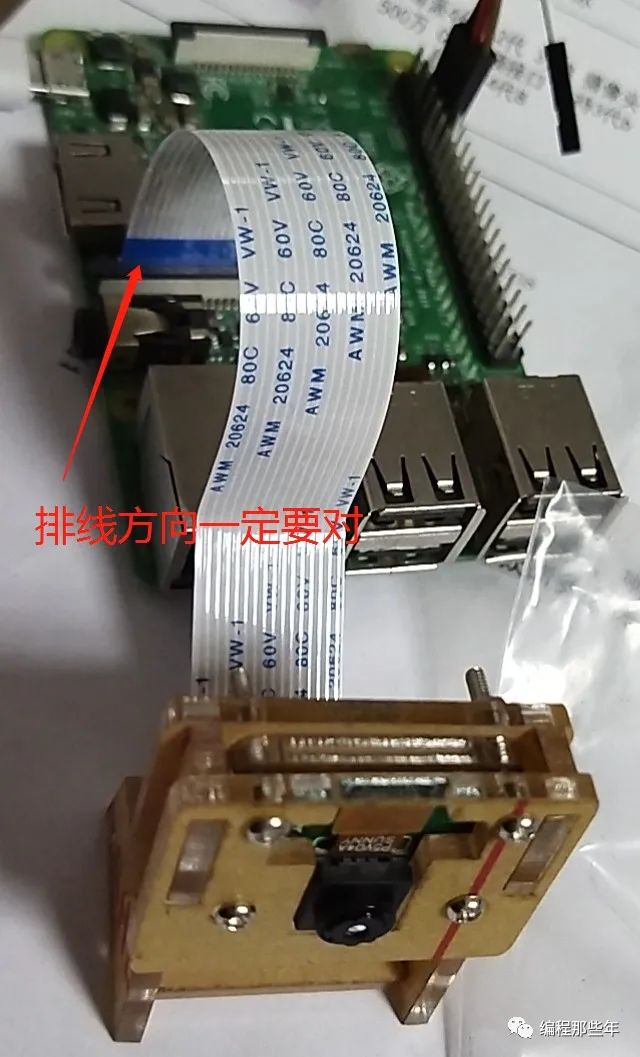
2. Insert the camera ribbon cable into the CSI interface. Remember, the side with the blue tape should face the audio port or network card direction, confirm the direction and insert the cable tightly, then press down the cover, as shown below:

The effect of the installation is roughly as follows:
Enable the Camera
1. First, use the “ls” command to check if the vchiq device node exists:
linux@ubuntu:~$ ls /dev
pi@raspberrypi:~ $ ls  /dev/
autofs           disk       gpiomem  loop3             mmcblk0             ptmx   ram15  random   stdout  tty15  tty23  tty31  tty4   tty48  tty56  tty7       vchiq   vcs6   vcsa7
block            dri        hwrng    loop4             mmcblk0p1           pts    ram2   raw      tty     tty16  tty24  tty32  tty40  tty49  tty57  tty8       vcio    vcs7   vcsm
btrfs-control    fb0        initctl  loop5             mmcblk0p2           ram0   ram3   rfkill   tty0    tty17  tty25  tty33  tty41  tty5   tty58  tty9       vc-mem  vcsa   vhci
bus              fd         input    loop6             mqueue              ram1   ram4   serial0  tty1    tty18  tty26  tty34  tty42  tty50  tty59  ttyAMA0    vcs     vcsa1  watchdog
cachefiles       full       kmsg     loop7             net                 ram10  ram5   serial1  tty10   tty19  tty27  tty35  tty43  tty51  tty6   ttyprintk  vcs1    vcsa2  watchdog0
char             fuse       log      loop-control      network_latency     ram11  ram6   shm      tty11   tty2   tty28  tty36  tty44  tty52  tty60  ttyS0      vcs2    vcsa3  zero
console          gpiochip0  loop0    mapper            network_throughput  ram12  ram7   snd      tty12   tty20  tty29  tty37  tty45  tty53  tty61  uhid       vcs3    vcsa4
cpu_dma_latency  gpiochip1  loop1    mem               null                ram13  ram8   stderr   tty13   tty21  tty3   tty38  tty46  tty54  tty62  uinput     vcs4    vcsa5
cuse             gpiochip2  loop2    memory_bandwidth  ppp                 ram14  ram9   stdin    tty14   tty22  tty30  tty39  tty47  tty55  tty63  urandom    vcs5    vcsa6
pi@raspberrypi:~ $
If it does not exist, there may be a problem with the kernel or hardware, you can try re-flashing the system or replacing the hardware.
2. Run “vcgencmd get_camera” to check if the current camera is available:
pi@raspberrypi:~$ vcgencmd get_camera
supported=1 detected=1
If detected=0, it means the camera module is not connected properly, check the hardware again. If detected=1, it means the CSI camera is connected properly. supported=1 means the camera is enabled and can be used. supported=1 means the CSI camera is not enabled. You need to enable the camera module.
3. Run “sudo raspi-config” command to enable the Raspberry Pi CSI camera
pi@raspberrypi:~ $ sudo raspi-config


Then restart the Raspberry Pi.
Add UVC Driver
Some programs use V4L2 programming and will access the /dev/videoX device, so you need to add the UVC driver. For Raspberry Pi 3B/3B+, you can add the bcm2835-v4l2 driver as follows:
pi@raspberrypi:~$ vim.tiny /etc/modules
# /etc/modules: kernel modules to load at boot time.
#
# This file contains the names of kernel modules that should be loaded
# at boot time, one per line. Lines beginning with "#" are ignored.

i2c-dev
bcm2835-v4l2
Then restart to see the videoX (X is a number, such as 0) driver in the /dev/ directory.
Use raspistill Command to Take Photos
Run “raspistill -o image.jpg” to successfully take a photo and save it, for more parameters use raspistill –help.
pi@raspberrypi:~ $ raspistill -o image.jpg
Transfer the image.jpg picture to the Windows desktop to open, and you can see the effect of the photo, such as:

More References
【Raspberry Pi】Linux Kernel Compilation
【Raspberry Pi】Quickly Expand Your SD Card
【Raspberry Pi】Configure Serial Login
【Raspberry Pi】Enable SSH Service on the System
【Raspberry Pi】Configure Wireless Network (WiFi)
