The Raspberry Pi system is based on the Debian system, so the configuration of the Raspberry Pi system is no different from that of the Debian system. Replace the apt source [^1]
# Backup the current apt source
cp /etc/apt/sources.list  /etc/apt/sources.list.bak

# Change to use Aliyun's source
cat > /etc/apt/sources.list << EOF
deb https://mirrors.aliyun.com/debian/ bookworm main contrib non-free non-free-firmware
deb-src https://mirrors.aliyun.com/debian/ bookworm main contrib non-free non-free-firmware

deb https://mirrors.aliyun.com/debian/ bookworm-updates main contrib non-free non-free-firmware
deb-src https://mirrors.aliyun.com/debian/ bookworm-updates main contrib non-free non-free-firmware

deb https://mirrors.aliyun.com/debian/ bookworm-backports main contrib non-free non-free-firmware
deb-src https://mirrors.aliyun.com/debian/ bookworm-backports main contrib non-free non-free-firmware

deb https://mirrors.aliyun.com/debian-security/ bookworm-security main contrib non-free non-free-firmware
deb-src https://mirrors.aliyun.com/debian-security/ bookworm-security main contrib non-free non-free-firmware
EOF

apt update

apt upgrade -y
Install UFW [^2]
UFW is a command-line tool for managing iptables firewalls on Linux, based on iptables but easier to use. If you expose your server to the public internet, it’s best to use a firewall to restrict external network access and enhance server security. Installation can be done using <span>apt</span> for one-click installation:
sudo apt install ufw -y
Enable UFW
After installation, UFW is disabled by default and needs to be manually enabled. However, before enabling it, allow the use of SSH on port 22:
sudo ufw allow ssh
Then enable UFW:
sudo ufw enable
Check UFW Status
You can use the following command to check the status of UFW and list all UFW rules:
$ sudo ufw status

Status: active

To                         Action      From
--                         ------      ----
22/tcp                     ALLOW       Anywhere
80/tcp                     ALLOW       Anywhere
443                        ALLOW       Anywhere
22000/tcp                  ALLOW       Anywhere
8384/tcp                   ALLOW       Anywhere
21027/udp                  ALLOW       Anywhere
22/tcp (v6)                ALLOW       Anywhere (v6)
80/tcp (v6)                ALLOW       Anywhere (v6)
443 (v6)                   ALLOW       Anywhere (v6)
22000/tcp (v6)             ALLOW       Anywhere (v6)
8384/tcp (v6)              ALLOW       Anywhere (v6)
21027/udp (v6)             ALLOW       Anywhere (v6)
If you want to see detailed status, you can use:
sudo ufw status verbose
Add Rules
Allow Incoming (allow)
By default, no allowance means denial (incoming). Use <span>ufw allow <port></span> to add allowed access ports or protocols.
# Many common services are already defined in the `ufw` configuration file, you can directly use the service name
# ssh is configured in /etc/ufw/applications.d/openssh-server, corresponding to port 22
sudo ufw allow ssh

# Allow port 80
sudo ufw allow http

# Allow port 443
sudo ufw allow https

# Allow specific port
sudo ufw allow 1234

# Allow specific port and protocol
sudo ufw allow 1234/tcp
sudo ufw allow 1234/udp

# Allow multiple port numbers
# Allow ports 80 and 443
sudo ufw allow 80,443/tcp
# Allow ports from 3000 to 3100
sudo ufw allow 3000:3100/tcp

# Allow specific source IP
sudo ufw allow from 192.168.1.100

# Allow specific source IP to access a specific port
sudo ufw allow from 192.168.1.100 to any port 3306

# Allow a specific subnet to access
sudo ufw allow from 192.168.1.0/24 to any port 22

# Allow specific source IP, local IP, local port
sudo ufw allow from <sourceIP> to <localIP> port <localPortNumber>

# Allow traffic on a specific interface
sudo ufw allow in on eth0 to any port 80
Deny Access (deny)
Use <span>ufw deny <port></span> to add denied incoming ports and protocols, similar to adding allows.
Delete Rules
First, use <span>ufw status</span> to view the rules, then use <span>ufw delete [rule] <port></span> to delete a rule.
sudo ufw delete allow 2333/tcp
If you have many rules, use the <span>numbered</span> parameter to add a number to each rule.
Then use <span>ufw delete <number></span> to delete a rule.
worker@pi:~ $ sudo ufw status numbered
Status: active

     To                         Action      From
     --                         ------      ----
[ 1] 22/tcp                     ALLOW IN    Anywhere
[ 2] 80/tcp                     ALLOW IN    Anywhere
[ 3] 443                        ALLOW IN    Anywhere
[ 4] 1234/tcp                   ALLOW IN    Anywhere

worker@pi:~ $ sudo ufw delete 4  #Delete the 4th rule above
Deleting:
 allow 1234/tcp
Proceed with operation (y|n)? y  #Finally, it will ask you whether to proceed with the operation
Mount exFAT
To mount exFAT formatted hard drives in Linux, you need to first install <span>exfat-fuse</span>:
sudo apt install exfat-fuse
Then use <span>lsblk</span> to list all available block devices:
root@pi:~ $ lsblk
NAME        MAJ:MIN RM  SIZE RO TYPE MOUNTPOINTS
sda           8:0    0  3.6T  0 disk
├─sda1        8:1    0   16M  0 part
└─sda2        8:2    0  3.6T  0 part /mnt/ugreen
mmcblk0     179:0    0 59.5G  0 disk
├─mmcblk0p1 179:1    0  512M  0 part /boot/firmware
└─mmcblk0p2 179:2    0   59G  0 part /
Based on the capacity, we can determine that <span>sda2</span> is our external hard drive.
# Create a mount point
# Choose or create a directory as the mount point. For example:
sudo mkdir /mnt/ugreen

# Use the following command to mount the hard drive:
sudo mount -t exfat /dev/sda2 /mnt/ugreen
sudo mount -t exfat -o rw,uid=1000,gid=1000,umask=000 /dev/sda2 /mnt/ugreen

sudo umount /mnt/ugreen
Auto Mount
sudo vi /etc/fstab
/dev/sda2  /mnt/ugreen  exfat  defaults,umask=000  0  0
/dev/sda2  /mnt/ugreen  exfat  rw,uid=1000,gid=1000,umask=000  0  0
NGINX
Installation
sudo apt install -y nginx
Uninstall
If you need to uninstall NGINX:
sudo apt remove --purge nginx nginx-common -y
sudo apt autoremove -y
Manage NGINX Service
Start NGINX
sudo systemctl start nginx
Stop NGINX
nginx -s stop
# Or
sudo systemctl stop nginx
Restart NGINX
sudo systemctl restart nginx
Reload Configuration (without stopping the service)
sudo nginx -s reload
# Or
sudo systemctl reload nginx
Set to Start on Boot
sudo systemctl enable nginx
Configure NGINX
The main configuration file for NGINX is located at:
-
Main configuration file: <span>/etc/nginx/nginx.conf</span> -
Site configuration file directory: <span>/etc/nginx/sites-available/</span> -
Enabled site link directory: <span>/etc/nginx/sites-enabled/</span>
Create Configuration File
For example, create a site configuration file <span>/etc/nginx/sites-available/my_site</span>:
sudo vi /etc/nginx/sites-available/my_site
Add the following content:
server {
    listen 80;
    server_name example.com;

    root /var/www/html;
    index index.html index.htm;

    location / {
        try_files $uri $uri/ =404;
    }
}
Enable Site
sudo ln -s /etc/nginx/sites-available/my_site /etc/nginx/sites-enabled/
You can also directly create the configuration file under <span>/etc/nginx/sites-enabled/</span>.
Test Configuration File for Correctness
sudo nginx -t
Reload NGINX
sudo nginx -s reload
Alist
Installation
curl -fsSL "https://alist.nn.ci/v3.sh" | bash -s install

Alist installed successfully!

Access address: http://YOUR_IP:5244/

Configuration file path: /opt/alist/data/config.json
---------How to get the password?--------
First, cd to the directory where alist is located:
cd /opt/alist
Set a random new password:
./alist admin random
Or set a new password manually:
./alist admin set NEW_PASSWORD
----------------------------
Starting service

Check status: systemctl status alist
Start service: systemctl start alist
Restart service: systemctl restart alist
Stop service: systemctl stop alist

Reminder: If the port cannot be accessed normally, please check the server security group, local firewall, and Alist status
-
The default port number is <span>5244</span>, which can be modified in<span>/opt/alist/data/config.json</span>, and restart alist. -
Use <span>ufw allow 5244/tcp</span>to allow external access to this port. If using nginx as a reverse proxy, you need to allow port 80.
Set User Password
According to the prompt during alist installation, set the password:
cd /opt/alist
./alist admin set 123456
Alist Using NGINX
mkdir -p /home/app/nginx/log

cat > /etc/nginx/sites-enabled/alist.svc.conf << EOF
server {
    listen 80;
    listen [::]:80;
    server_name alist.svc

    access_log /home/app/nginx/log/alist-srv.access.log main;
    error_log  /home/app/nginx/log/alist-srv.error.log  warn;


 location / {
   proxy_set_header X-Forwarded-For $proxy_add_x_forwarded_for;
   proxy_set_header X-Forwarded-Proto $scheme;
   proxy_set_header Host $host:$server_port;
   proxy_set_header X-Real-IP $remote_addr;
   proxy_set_header Range $http_range;
   proxy_set_header If-Range $http_if_range;
   proxy_redirect off;
   proxy_pass http://127.0.0.1:5244;

   # the max size of file to upload
   client_max_body_size 20000m;
 }
}

EOF


sudo nginx -s reload

cat > /etc/nginx/sites-enabled/syncthing.svc.conf << EOF
server {
    listen       80;
    listen  [::]:80;
    server_name  syncthing.svc

    access_log   /home/app/nginx/log/syncthing-srv.access.log main;
    error_log    /home/app/nginx/log/syncthing-srv.error.log  warn;


 location / {
   proxy_set_header X-Forwarded-For $proxy_add_x_forwarded_for;
   proxy_set_header X-Forwarded-Proto $scheme;
   proxy_set_header Host $host:$server_port;
   proxy_set_header X-Real-IP $remote_addr;
   proxy_set_header Range $http_range;
     proxy_set_header If-Range $http_if_range;
   proxy_redirect off;
   proxy_pass http://127.0.0.1:8384;

   # the max size of file to upload
   client_max_body_size 20000m;
 }
}
EOF
Local Domain Name Resolution
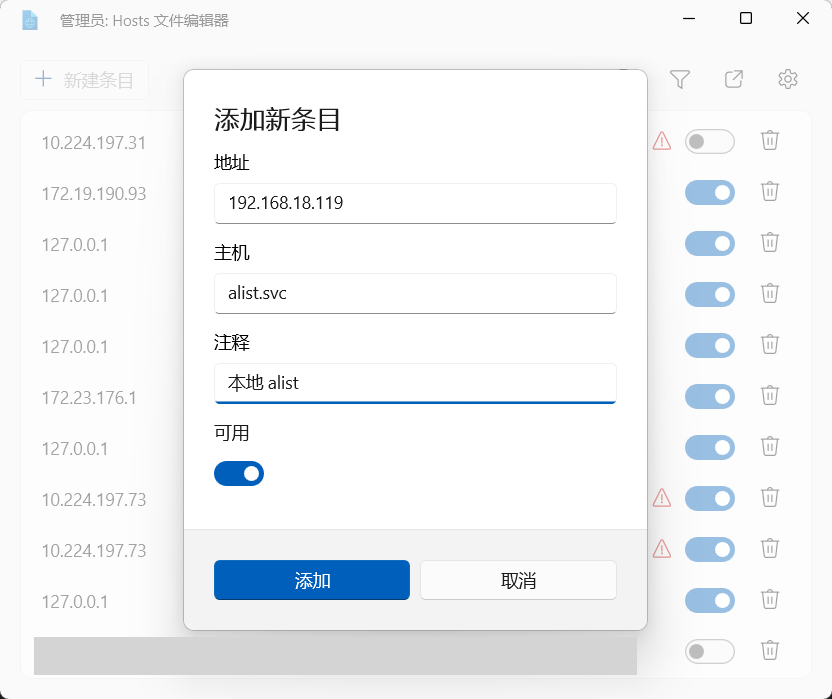
<span>.svc</span> is not a public domain name and has no public resolution, so local configuration resolution information is required. Use PowerToys to open the Hosts File Editor, add the corresponding IP for alist.svc, and then you can access <span>http://alist.svc/</span>.
Syncthing
Installation
Method 1
Directly use apt to install, but due to network issues, it may fail.
echo "deb https://apt.syncthing.net/ syncthing stable" | sudo tee /etc/apt/sources.list.d/syncthing.list

curl -s https://syncthing.net/release-key.txt | sudo apt-key add -

sudo apt update

sudo apt install syncthing
sudo systemctl enable [email protected]
Method 2
First, download the tar package locally:
wget https://github.com/syncthing/syncthing/releases/download/v1.28.1/syncthing-linux-arm64-v1.28.1.tar.gz
Then upload the tar package to the Raspberry Pi and extract it:
tar -xvzf syncthing-linux-arm64-v1.28.1.tar.gz
cd syncthing-linux-arm64-v1.28.1

sudo cp syncthing /usr/local/bin/
sudo chmod +x /usr/local/bin/syncthing
syncthing --version

cat > /etc/systemd/system/syncthing.service << EOF
[Unit]
Description=Syncthing service
Wants=network.target
After=network.target network.service


[Service]
ExecStart=/usr/local/bin/syncthing -no-browser
Restart=on-failure
User=<user-name>
Group=<user-name-group>

# Hardening
ProtectSystem=full
PrivateTmp=true
SystemCallArchitectures=native
MemoryDenyWriteExecute=true
NoNewPrivileges=true


[Install]
WantedBy=multi-user.target
EOF


sudo systemctl enable syncthing
sudo systemctl start syncthing
sudo systemctl status syncthing
Firewall
Syncthing requires the following three ports by default:
-
Sync port (TCP): 22000 (for file synchronization between devices) -
Local web interface (TCP): 8384 (for accessing the management interface) -
Global discovery service (UDP): 21027 (for device discovery)
Run the following commands to allow the ports required by Syncthing:
sudo ufw allow 22000/tcp
sudo ufw allow 8384/tcp
sudo ufw allow 21027/udp
References
[^1]: Debian 12 default official source/Tsinghua source/USTC source/Tencent Cloud source/Aliyun source/Linode source sources.list – AIT Wang: https://wph.im/272.html
[^2]: Install and configure UFW (simple firewall) on Debian/Ubuntu: https://kejixiaoxin.org/?p=174
[^3]:Install Docker Engine on Debian: https://docs.docker.com/engine/install/debian/