Following the previous article titled “Renesas RA8 Series Tutorial | Configuration of RA8 Serial Output Based on e2s“, today we will teach you how to quickly set up a FreeRTOS project.In the past, software tools were not as mature, and setting up a FreeRTOS project required manual porting step by step. Many users complained that the porting process was too cumbersome.However, now, software tools have become increasingly “advanced“, and we can set up a complete project just by moving the mouse. Many people say that using configuration tools allows for a quicker start with RTOS.
There are many such software tools (for quickly generating projects) on the market. Today, we will discuss how to quickly set up a FreeRTOS project using the e2 studio development environment and the RA8D1 microcontroller, creating two threads for GPIO (LED) and UART.
Preparation Work
To develop with the RA8D1 microcontroller, you need to install the software tools in advance, as well as prepare the RA8 board and a download debugger.
01
Download and Install the Integrated Development Environment
There are many tools for developing Renesas RA8 series microcontrollers, the most common ones are:
e2 studio all-in-one service tool
RASC + Keil, or RASC + IAR
If you find it troublesome, we still recommend using the e2 studio all-in-one service tool from the Renesas official website.
02
Prepare the Hardware Board
This tutorial will use the Renesas CPKCOR_RA8D1B evaluation board, which integrates J-link, allowing us to connect to the computer with just one cable for downloading and debugging.
Quickly Set Up FreeRTOS Project with e2s
e2s is similar to the “visual configuration tools” of other MCU manufacturers, allowing you to quickly create FreeRTOS software projects with just a few mouse clicks.
01
Quickly Create FreeRTOS Project Template Based on e2s
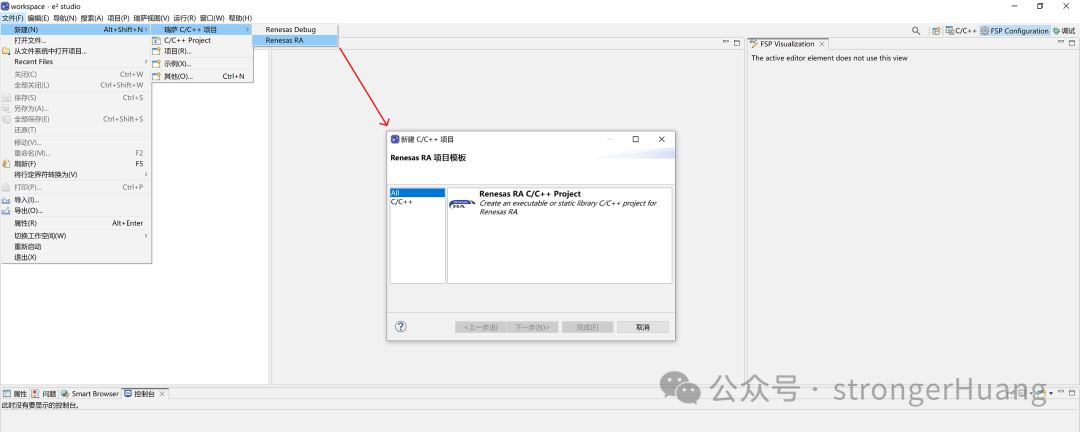
Open e2s, go to File -> New -> Renesas C/C++ Project -> Renesas RA:
 Enter the project name, for example, we enter RA8D1_RTOS:
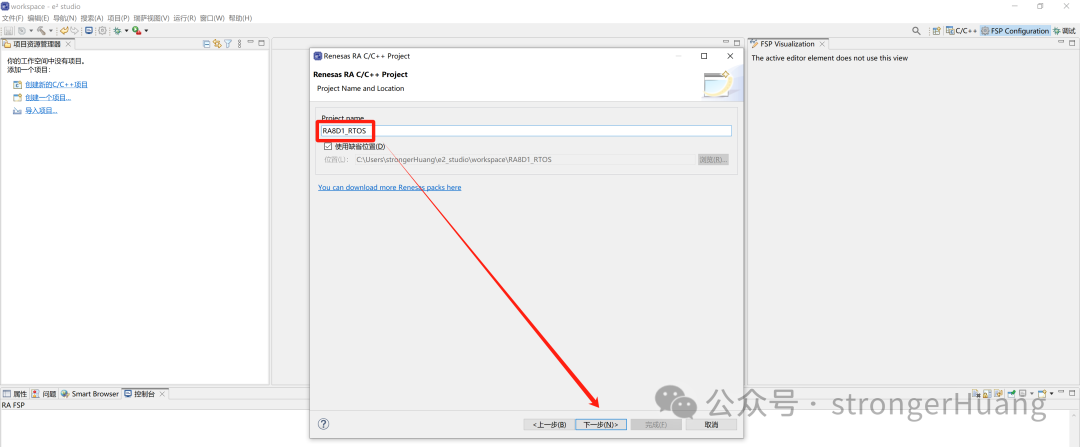 Select the microcontroller model, for example, R7FA8D1BHEC:
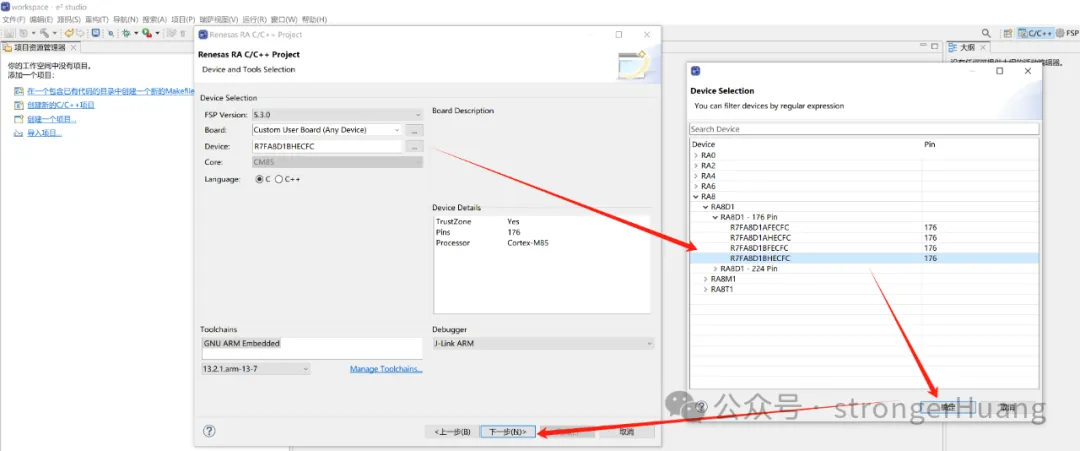
Select the TrustZone project: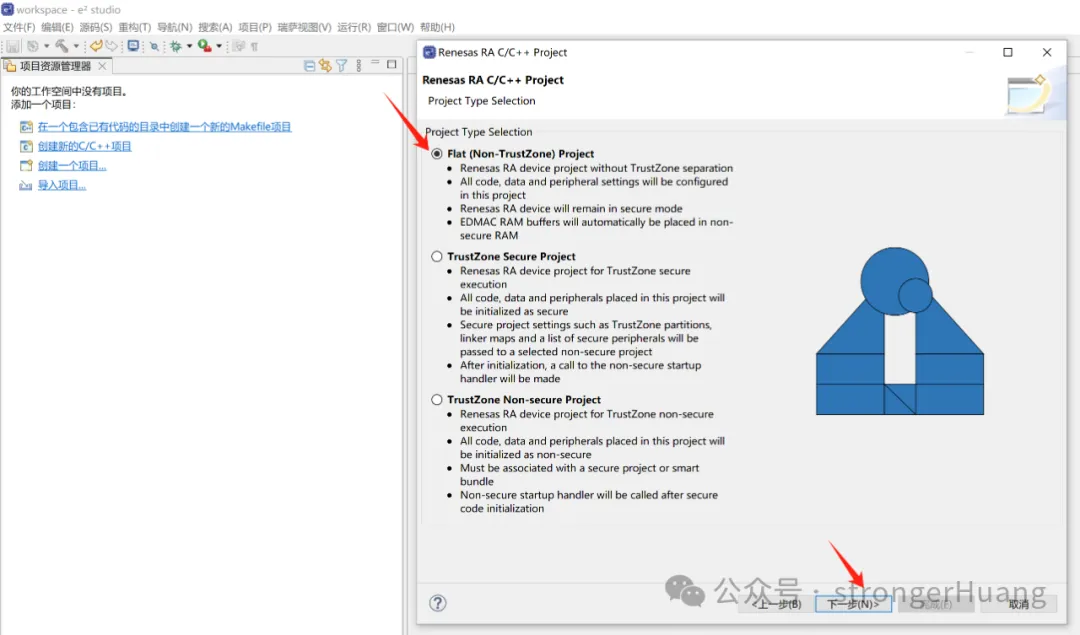 Select FreeRTOS::
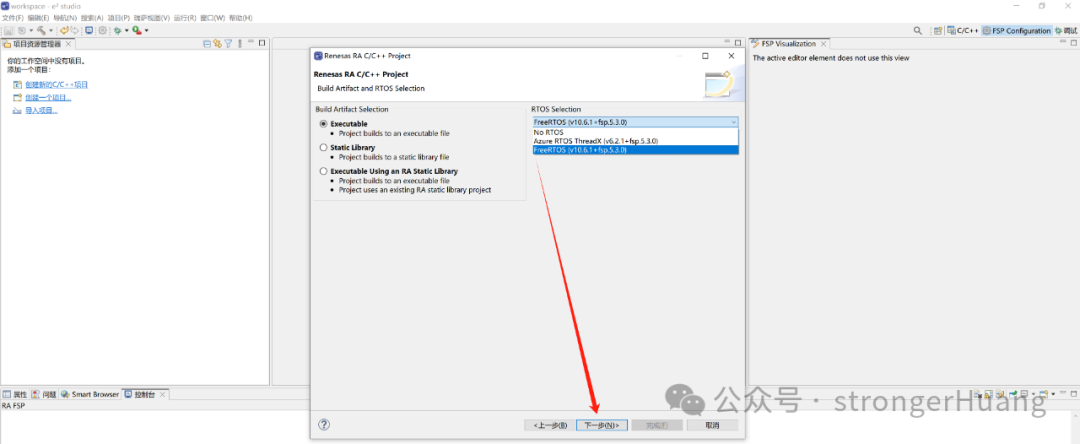 Select [FreeRTOS – Minimal – Static Allocation], then click Finish, and a FreeRTOS project template will be created.
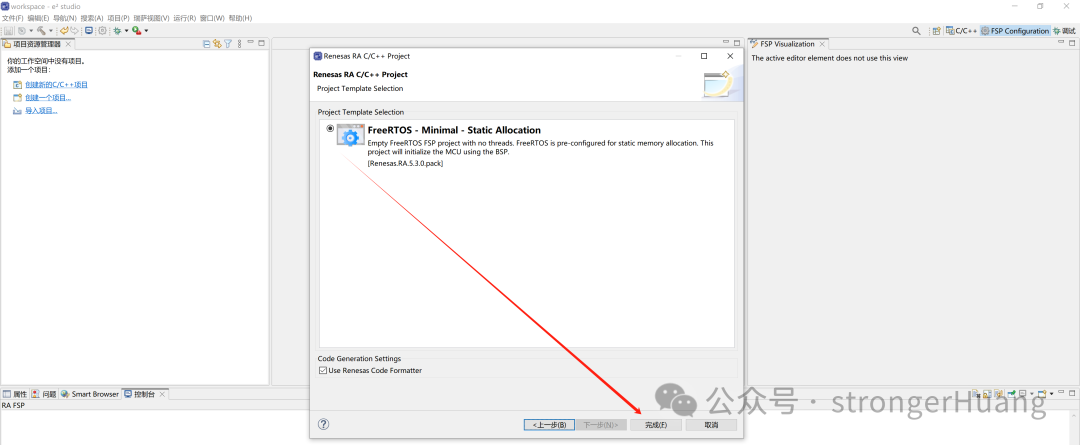
02
Configure FreeRTOS
Click on [Stacks], then click [New Thread] to create a new thread: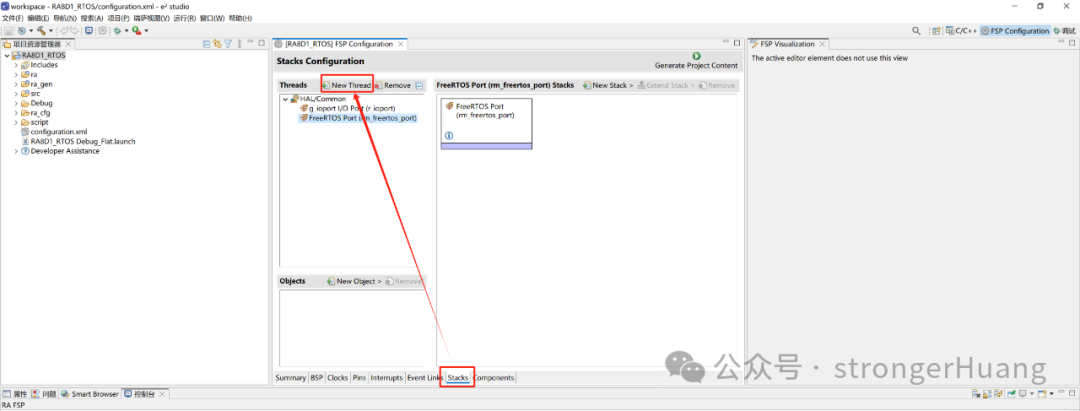 Then, select [New Thread] -> Properties, and rename it to [GPIO_Thread]
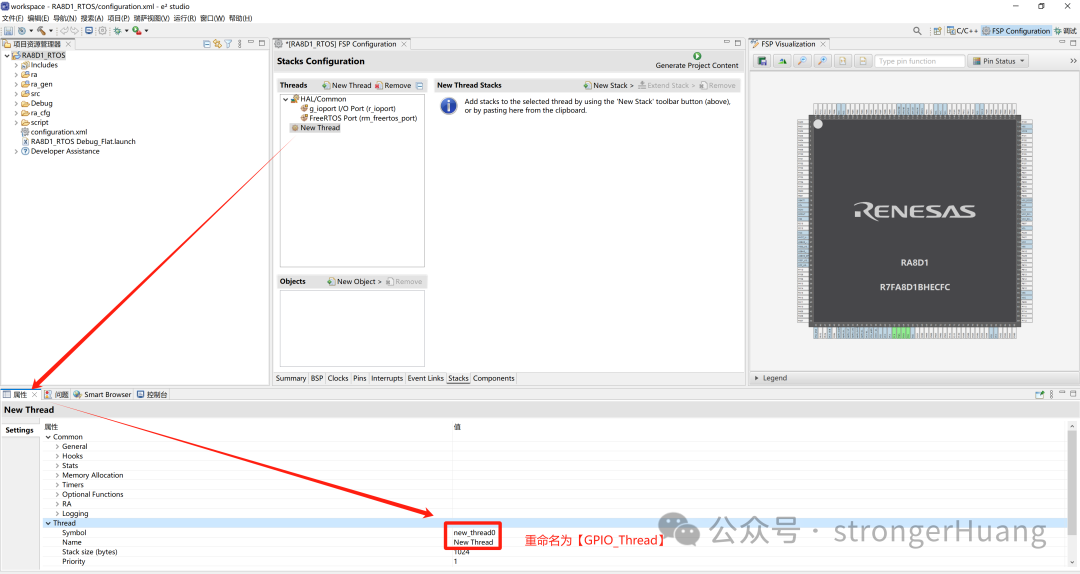
 Using the same method, we create another thread called [UART_Thread]:
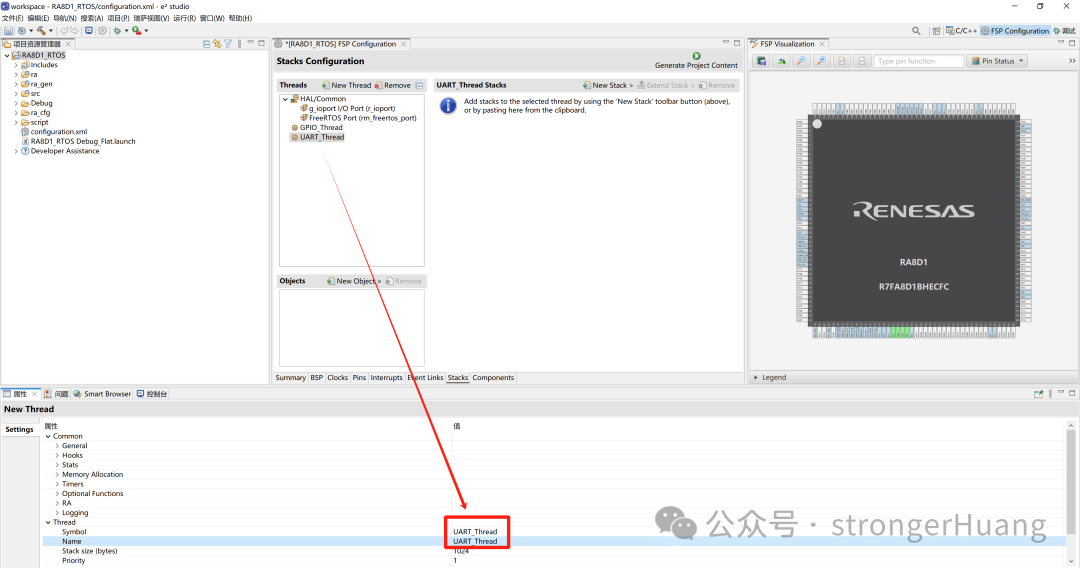 Click [Generate Project Content], and you will see that two source code files have been generated, at this point, the two FreeRTOS threads have been created.
03
Add Application Code to Threads
We have created two simple threads for GPIO and UART. For the low-level configuration of GPIO and UART, you can refer to my previous tutorials:Renesas RA8 Series Tutorial | Setting Up the Renesas RA8 Development Environment and Lighting Up an LEDRenesas RA8 Series Tutorial | Configuration of RA8 Serial Output Based on e2sHere is the application code for the GPIO (LED) thread, which makes the LED blink:
void GPIO_Thread_entry(void *pvParameters){    FSP_PARAMETER_NOT_USED (pvParameters);
    /* TODO: add your own code here */    while (1)    {        R_IOPORT_PinWrite(&g_ioport_ctrl, BSP_IO_PORT_10_PIN_01, BSP_IO_LEVEL_LOW);        vTaskDelay (500);// Delay 500ms
        R_IOPORT_PinWrite(&g_ioport_ctrl, BSP_IO_PORT_10_PIN_01, BSP_IO_LEVEL_HIGH);        vTaskDelay (500);// Delay 500ms    }}
UART thread application code, which prints the Cnt count value every second:
void UART_Thread_entry(void *pvParameters){    uint8_t Cnt = 0;
    FSP_PARAMETER_NOT_USED (pvParameters);    Debug_UART4_Init(); // SCI4 UART debugging serial port initialization    printf("Start...\r\n");
    while (1)    {        vTaskDelay (500);        Cnt++;        printf("Cnt = %d\r\n", Cnt);    }}
Finally, let’s take a look at the effect of the two threads (LED + UART) in action (video):

Need Technical Support?
If you have any questions while using Renesas MCU/MPU products, you can scan the QR code below or copy the URL into your browser to access theRenesas Technical Forum to find answers or get online technical support.

https://community-ja.renesas.com/zh/forums-groups/mcu-mpu/
Recent Events Overview
1
Guangzhou, Beijing, Suzhou are waiting for you! Renesas Industrial Ethernet Technology Day seat reservation is ongoing
——Click to reserve and seize the technical forefront on April 9 in Xi’an
2
Board Evaluation | RA4L1 Function Evaluation Event is now open
——Registration deadline: April 3
1
END
1
Recommended Reading

Renesas RA8 Series Tutorial | Configuration of RA8 Serial Output Based on e2s
Renesas RA8 Series Tutorial | Introduction to RA8 Series Microcontrollers

Renesas RA8 Series Tutorial | Description of RA8 Microcontroller SysTick Usage