This article combines the Renesas e2 studio tool and the CPKCOR_RA8D1B evaluation board to explain how to implement IO interrupt configuration for the Renesas RA8D1 microcontroller.
We will implement a simple function: configure an LED toggle (on/off) and a button (Key) interrupt, where pressing the button once toggles the LED.
Preparation
To develop with the RA8D1 microcontroller, you need to have the software tools installed in advance, as well as prepare the RA8 board and download debugger.
1
Download and Install the Integrated Development Environment
There are many tools available for developing Renesas RA8 series microcontrollers, the most common ones are:
-
e2 studio all-in-one service tool
-
RASC+Keil or RASC+IAR
It is recommended to use the e2 studio all-in-one service tool from the Renesas official website. You can refer to my previous article:
Renesas RA8 Series Tutorial | Setting Up the Renesas RA8 Development Environment and Lighting Up an LED
2
Prepare the Hardware Board
This tutorial uses the Renesas CPKCOR_RA8D1B evaluation board, which integrates a J-link, allowing us to connect to the computer with just one cable for downloading and debugging.
Configuring Button Interrupt in e2s
e2 studio can be understood as an all-in-one service tool that includes microcontroller low-level configuration tools, editors, compilers, debuggers, and more. It is similar to the “visual configuration tools” of other MCU manufacturers, allowing you to quickly create Renesas microcontroller software projects with just a few mouse clicks.
We will configure an LED toggle (on/off) and a button (Key) interrupt: pressing the button once toggles the LED.
1
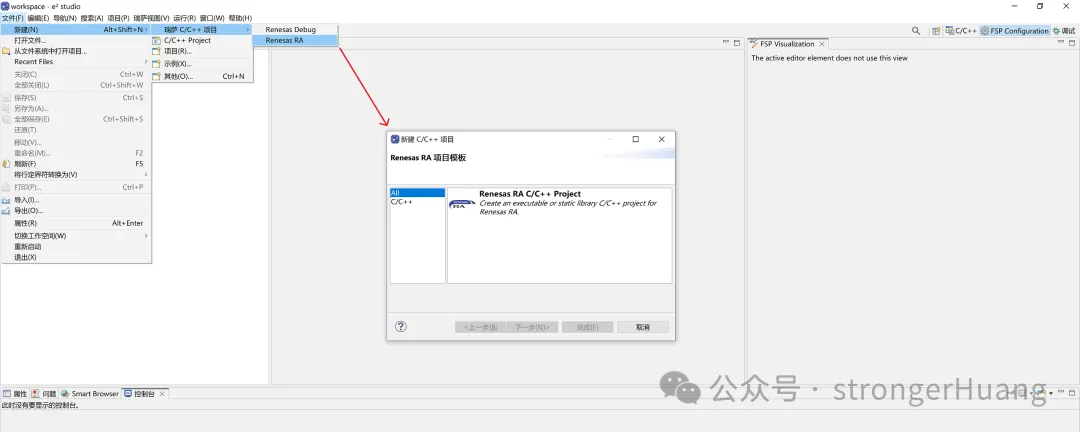
Quickly Create a Software Project Template Based on e2s
Open e2s, go to File -> New -> Renesas C/C++ Project -> Renesas RA:
 Enter the project name, for example, we input RA8D1_KEY:
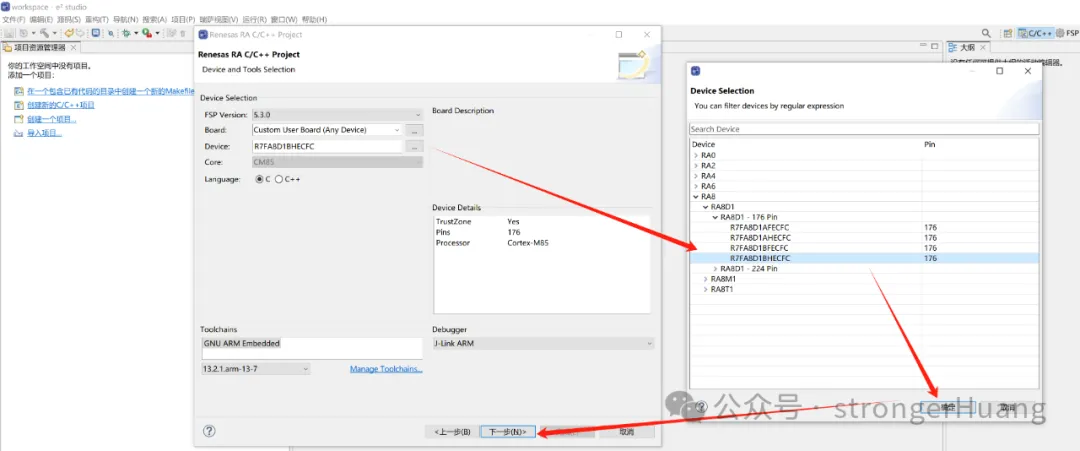
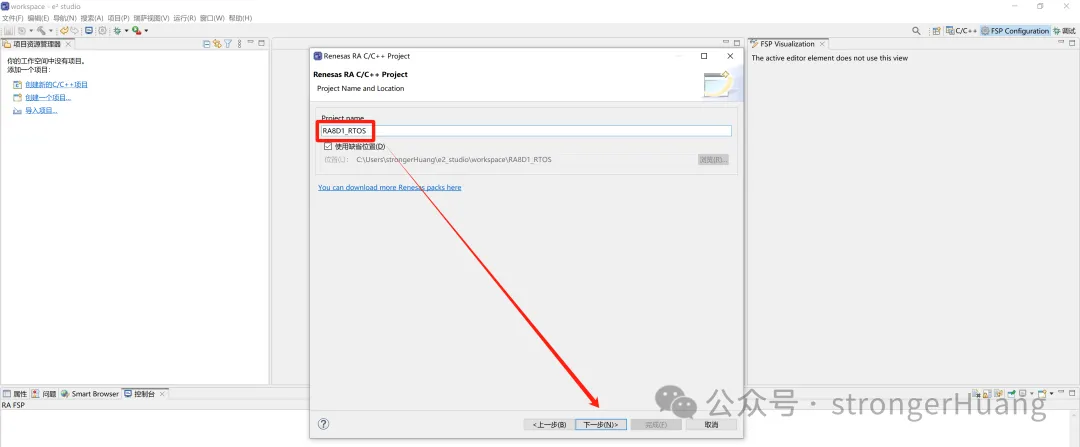 Choose the microcontroller model, for example, R7FA8D1BHEC:
Choose Non-TrustZone project: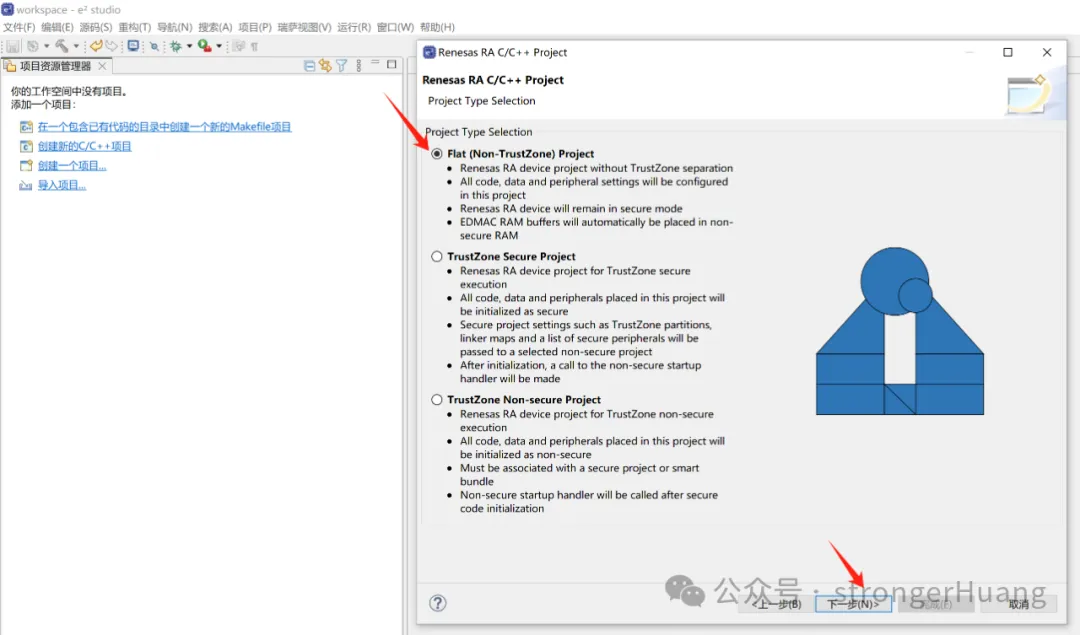 Select Executable::
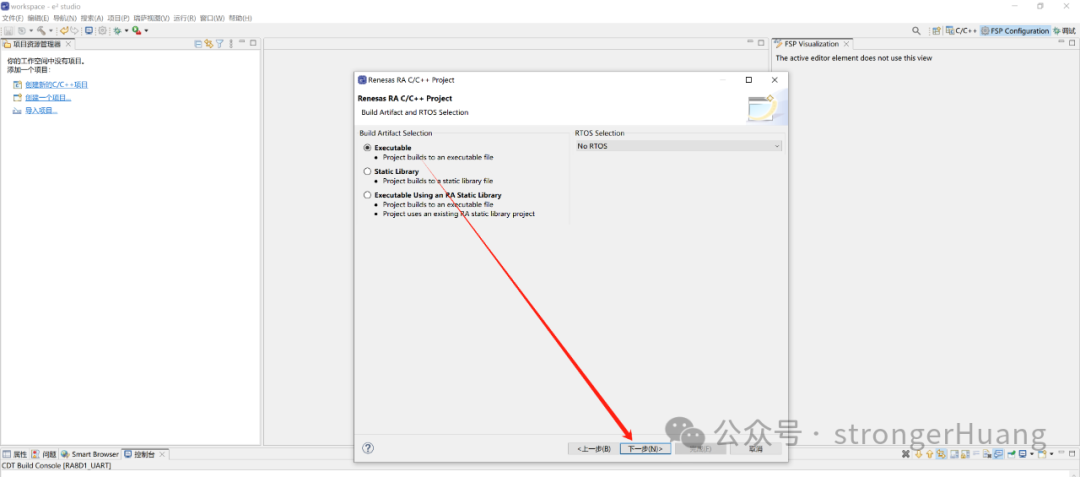 Select 【Bare Metal-Minimal】, then click Finish, and a project template will be created.
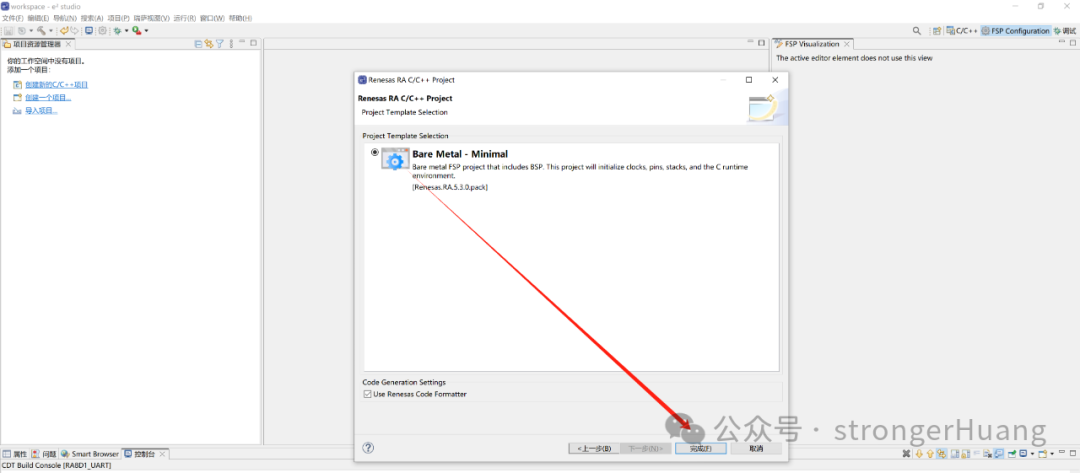
2
Configure LED + KEY Interrupt
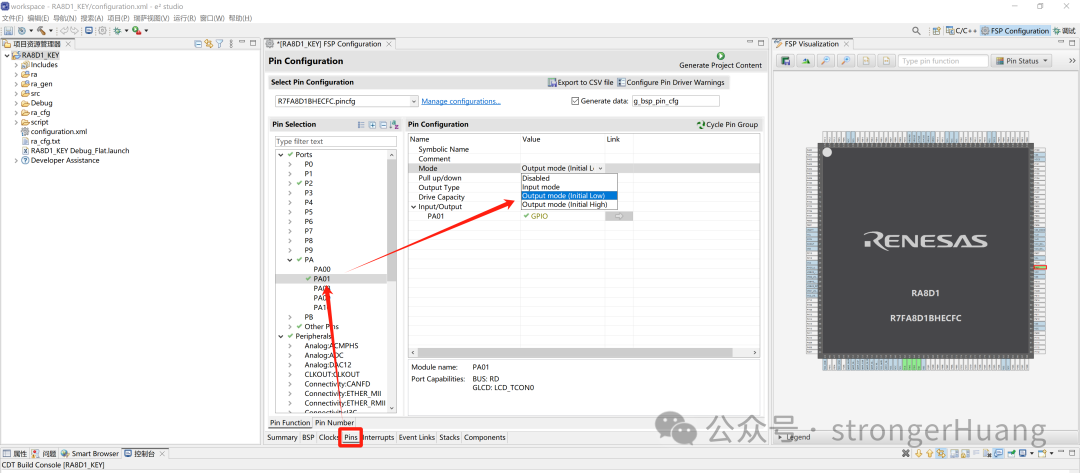
In the 【Pins】 option, select the LED pin, here we use PA01, and configure it as output mode.
 Then, in the IRQ section, select the corresponding interrupt number; we use P008 as the button interrupt, which is IRQ12.
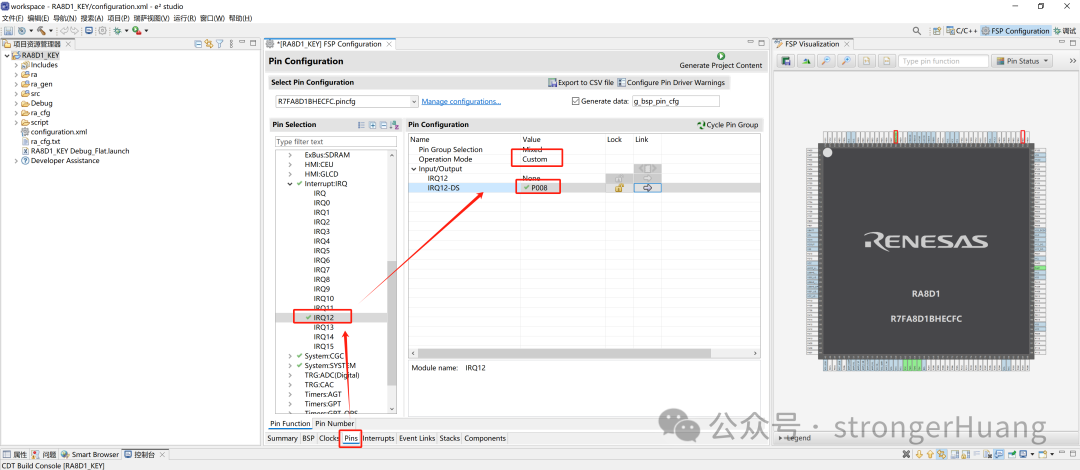 In the 【Stacks】 option, add a new Stack -> Input -> External IRQ::
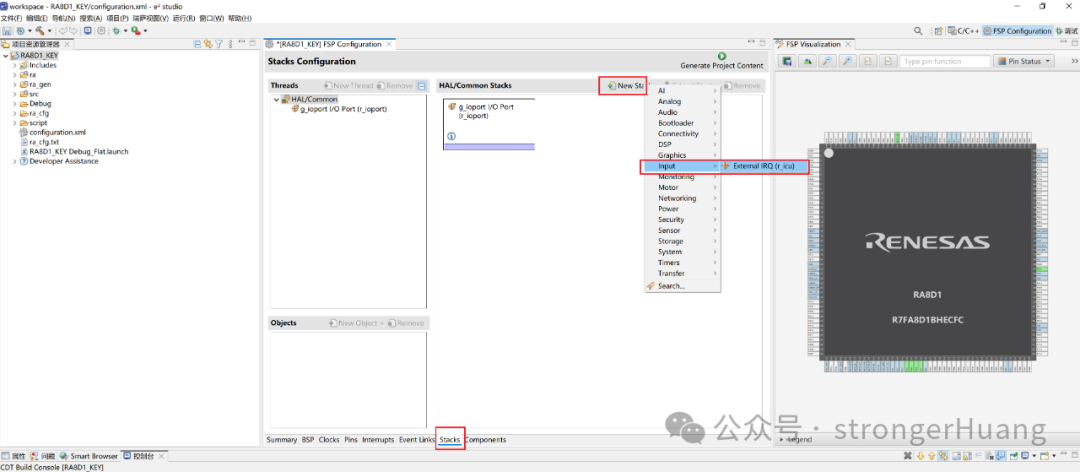 Then, set the corresponding properties:
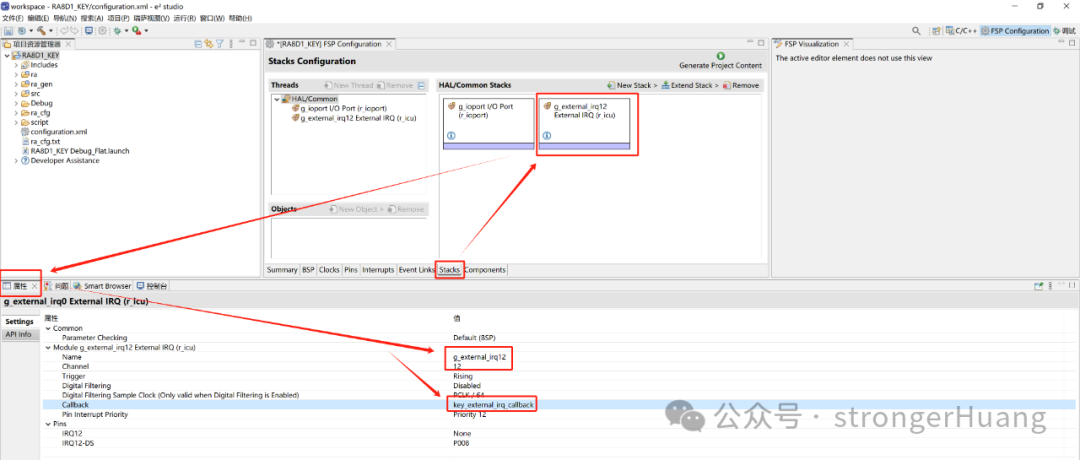
3
Add Code to Implement Button Interrupt Functionality
Here, we only need to add a small amount of code in the built-in hal_entry.c source file to implement the button interrupt:When the button KEY is pressed, the LED toggles.
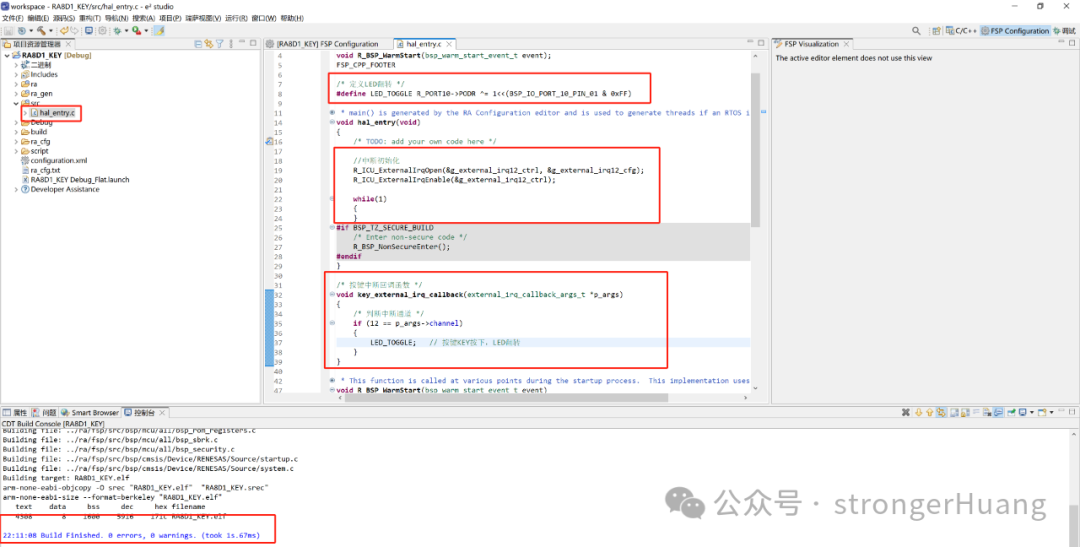
#include "hal_data.h"
FSP_CPP_HEADERvoid R_BSP_WarmStart(bsp_warm_start_event_t event);FSP_CPP_FOOTER
/* Define LED toggle */#define LED_TOGGLE R_PORT10->PODR ^= 1<<(BSP_IO_PORT_10_PIN_01 & 0xFF)
/*******************************************************************************************************************//** * main() is generated by the RA Configuration editor and is used to generate threads if an RTOS is used.  This function * is called by main() when no RTOS is used. **********************************************************************************************************************/void hal_entry(void){    /* TODO: add your own code here */
    // Interrupt initialization    R_ICU_ExternalIrqOpen(&g_external_irq12_ctrl, &g_external_irq12_cfg);
    R_ICU_ExternalIrqEnable(&g_external_irq12_ctrl);
    while(1)    {    }
#if BSP_TZ_SECURE_BUILD    /* Enter non-secure code */    R_BSP_NonSecureEnter();#endif}
/* Button interrupt callback function */void key_external_irq_callback(external_irq_callback_args_t *p_args){    /* Check interrupt channel */    if (12 == p_args->channel)    {        LED_TOGGLE;   // When button KEY is pressed, the LED toggles    }}
Implementation Effect:Finally, isn’t this configuration simpler compared to the previous method of step-by-step code transplantation?

Need Technical Support?
If you have any questions while using Renesas MCU/MPU products, you can scan the QR code below or copy the URL into your browser to access theRenesas Technical Forum for answers or online technical support.

https://community-ja.renesas.com/zh/forums-groups/mcu-mpu/
To Be Continued
Recommended Reading

Renesas RA8 Series Tutorial | Introduction to the RA8 Series Microcontroller

Renesas RA8 Series Tutorial | Description of RA8 Microcontroller SysTick Usage

Renesas RA8 Series Tutorial | Method to Run RTOS on RA8 Based on e2s