

Streamlined Version: Conclusion First
If you need the performance of Raspberry Pi 5 but want a more compact form factor, then CM5 is for you. Otherwise, just choose Raspberry Pi 5 directly.
Advantages
-
Basically compatible with CM4 products -
Stronger performance than CM4 -
Same size as CM4 -
CM5 IO board provides almost all necessary functions -
Passive cooler performs well -
GPIO functionality is consistent with Raspberry Pi 5 -
Excellent NVMe speed -
eMMC speed comparable to PCIe Gen 2
Disadvantages
-
Camera and touch display temporarily require additional configuration -
CM5 with eMMC cannot boot from microSD -
Metal case’s cooling fan is incompatible with passive cooler
Main Content
Unknowingly, it has been four years since the sudden release of Raspberry Pi CM4. During the peak of the pandemic, when shortages were widespread, CM4 brought a new look and functionality to the Raspberry Pi compute module series.
Just last week, CM5 finally arrived!
Raspberry Pi CM5 comes in various models.
Prices range from $45 (about £42.70) for the 2GB memory, no Wi-Fi, and onboard eMMC storage model, to $95 (about £90) for the 8GB memory, 64GB eMMC, and Wi-Fi model.


In this issue, we are reviewing the $130 Raspberry Pi CM5 development kit, which includes:
-
Raspberry Pi CM5 itself (4GB RAM, 32GB eMMC, Wi-Fi) -
Raspberry Pi CM5 IO board -
Raspberry Pi CM5 IO case -
Raspberry Pi CM5 cooler -
Raspberry Pi antenna kit -
Raspberry Pi 27W USB Type-C PD power supply -
2 Raspberry Pi HDMI cables -
Raspberry Pi USB-A to USB-C cable
This kit includes almost everything we need to start developing projects and products based on Raspberry Pi CM5.

Attentive readers may have noticed that Eben Upton, the CEO and co-founder of Raspberry Pi, stated, “The 16GB SDRAM model is expected to be released in 2025.” As of the writing of this article, we have not received more information, but the thought of a 16GB Raspberry Pi CM5 is still quite exciting.
Is Raspberry Pi CM5 suitable for your next project? Or should you continue using Compute Module 4? Let’s find out!
Raspberry Pi CM5 Specifications
-
SoC: BCM2712, Quad-core Arm Cortex-A76 64-bit CPU, 2.4 GHz -
GPU: VideoCore VII, supports OpenGL ES 3.1 and Vulkan 1.2, 800 MHz -
Display: Supports 2 4K 60Hz HDMI outputs (HDR supported) via IO board -
RAM: 2GB, 4GB, or 8GB LPDDR4X-4267 SDRAM -
Storage: 0GB (Lite version) or 16GB, 32GB, 64GB eMMC; supports microSD card (SDR104 compatible); supports M.2 NVMe SSD via M.2 HAT -
GPIO: 40-pin Raspberry Pi HAT compatible interface provided via IO board -
USB: 1 USB 2.0, 2 USB 3.0 (simultaneously 5Gbps) -
Connectors: All provided via IO board, including 2 4-channel MIPI camera/display interfaces, M.2 PCIe Gen 2.0 x1 interface -
Network: Provided via IO board -
Wi-Fi/Bluetooth: 2.4GHz/5GHz IEEE 802.11 b/g/n/ac wireless, Bluetooth 5.0/BLE -
Power button: Provided via IO board -
Power supply: USB-C 5V 5A; GPIO 5V -
Dimensions: 55mm × 40mm × 4.7mm
Raspberry Pi CM5 Design and Compatibility with CM4


Sharp-eyed friends may have noticed that CM5 and 4 have the same appearance and interfaces. Early compute modules used interfaces similar to laptop memory sticks (DDR2-SODIMM), but starting with 4, they switched to a new dedicated interface, making it more convenient to connect to expansion boards.
Compute modules essentially hide all the interfaces of Raspberry Pi, leaving only one large interface. What are the benefits of this? For example, if the product you are making does not require an Ethernet interface, you can omit it; you can use whatever interfaces you need, which is very flexible. Because of this convenience, compute modules are used in various products, from TVs to cameras, from home theaters to electric vehicle charging stations, with a wide range of applications.
CM5 comes in several models, some with built-in storage and some without; some with wireless and Bluetooth, and some without. Why so many options? Because some industrial applications may not need wireless functionality, and it may even interfere with other devices. Some users may prefer to use SD cards to install the system, so there are versions without built-in storage. However, note that versions with built-in storage cannot use SD cards, just like 4.


Since the interfaces of 5 and 4 are the same, can 5 use 4’s accessories? I tried a few:


-
Waveshare’s CM4-NANO-B board: completely fine, all functions work. -
Sourcekit’s PiTray Mini: no, completely unresponsive. -
Cytron’s CM4 Maker Board: works, and can be paired with high-capacity SSDs, quite good.
Overall, CM5 can basically use 4’s accessories, but it is not 100% compatible. If you want to buy accessories for 4 to use with 5, it’s best to confirm compatibility first to avoid wasting money.
Various Models of Raspberry Pi CM5
Like 4, CM5 has various models with different memory, storage, and wireless options, with prices ranging from $45 for the 2GB memory no eMMC and Wi-Fi model to $95 for the 8GB memory, 64GB eMMC, and wireless model.
Raspberry Pi CM5 No Wi-Fi Version
| RAM | eMMC | MSRP (excluding sales tax) |
|---|---|---|
| 2GB | 0GB (Lite) | $45 |
| 2GB | 16GB | $50 |
| 2GB | 32GB | $55 |
| 2GB | 64GB | $60 |
| 4GB | 0GB (Lite) | $55 |
| 4GB | 16GB | $60 |
| 4GB | 32GB | $65 |
| 4GB | 64GB | $70 |
| 8GB | 0GB (Lite) | $75 |
| 8GB | 16GB | $80 |
| 8GB | 32GB | $85 |
| 8GB | 64GB | $90 |
Raspberry Pi CM5 with Wi-Fi Version
| RAM | eMMC | MSRP (excluding sales tax) |
|---|---|---|
| 2GB | 0GB (Lite) | $50 |
| 2GB | 16GB | $55 |
| 2GB | 32GB | $60 |
| 2GB | 64GB | $65 |
| 4GB | 0GB (Lite) | $60 |
| 4GB | 16GB | $65 |
| 4GB | 32GB | $70 |
| 4GB | 64GB | $75 |
| 8GB | 0GB (Lite) | $80 |
| 8GB | 16GB | $85 |
| 8GB | 32GB | $90 |
| 8GB | 64GB | $95 |
Can CM5 be Overclocked?
Some friends asked, can we overclock CM5?
Of course!
It is essentially a small Raspberry Pi 5. Specifically, the CM5 uses the same D0 chip as the Raspberry Pi 5’s 2GB version. However, many unused parts of the BCM2712 chip, known as “dark silicon,” have been removed. According to Jeff Geerling, this cost-optimized version reduces the chip area by 33%. The D0 chip no longer has a built-in Ethernet MAC, as this function is now handled by the RP1 “southbridge” chip. This also means that the D0 chip consumes less power, but does this affect overclocking?
Actually, it has little impact, but overclocking usually requires luck and patience. I successfully overclocked CM5 to 3GHz, but it required a slight increase in voltage, which is not recommended for beginners. At 3GHz CPU and 1GHz GPU, CM5 runs stably but generates a lot of heat.
Interestingly, the randomly included $5 passive cooler performs better than the fan cooling. Why? Because when using a fan for cooling, there is no heatsink to draw the heat away from the chip (SoC). Although the chip has a heat spreader (IHS), it is still not enough to cool the entire chip. Can we use both a fan and a heatsink at the same time? No, because the fan is 2mm thicker. The best solution would be to use a shorter heatsink than the one currently used.
Performance and Power Consumption of Raspberry Pi CM5


I tested the performance of Raspberry Pi CM5 under two cooling configurations: one with a passive cooler and the other with active fan cooling. These two methods cannot be used simultaneously, as the fan will interfere with the heatsink. I tried to remove the screws of the fan to leave 2mm of space, but the fan casing still touches the heatsink.
I tested the CM5 under both cooling configurations at standard 2.4GHz and overclocked to 3GHz. Let’s take a look at the specific data.

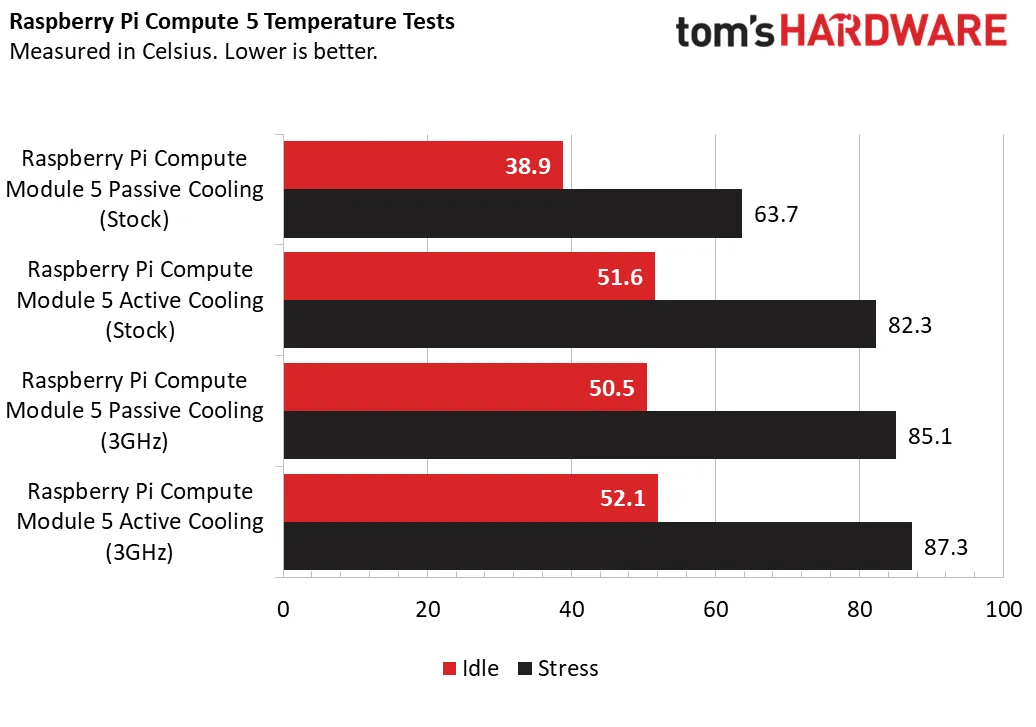
With passive cooling, the idle temperature of CM5 at standard speed (non-overclocked) is 38.9 degrees Celsius, with a power consumption of 2.65 watts. After a 5-minute stress test, the temperature rises to 63.7 degrees Celsius, and power consumption increases to 6.66 watts. The CPU temperature is far below the 80 degrees Celsius throttling point.
After overclocking to 3GHz, the idle temperature is 50.5 degrees Celsius, with power consumption still at 2.65 watts. During the stress test, the CPU temperature soared to 85.1 degrees Celsius, indeed triggering throttling! To cool down, the CPU automatically reduces its speed in an attempt to bring the temperature below the throttling point.
With active fan cooling, the fan is about 10mm away from the chip heat spreader. At standard speed, the idle temperature of CM5 is 51.6 degrees Celsius, with power consumption still at 2.65 watts. During the stress test, the chip temperature reached 82.3 degrees Celsius, again triggering throttling. Power consumption is 8 watts.
After overclocking to 3GHz, the CPU idle temperature is 52.1 degrees Celsius, with power consumption at 2.8 watts. During the stress test, the CPU temperature soared to 87.3 degrees Celsius (the highest temperature in our tests), with power consumption reaching 10.99 watts.
At standard speed (non-overclocked), CM5 can run normally with passive cooling, but if you are designing products with it, you must consider cooling issues! The performance of active fan cooling was somewhat disappointing. The fan is very quiet and only starts when the CPU temperature exceeds 60 degrees Celsius, but due to the fan being too far from the chip and the incompatibility with the heatsink, the chip temperature rises too quickly. To achieve optimal cooling, we really need a combination of a low-profile heatsink and active cooling.
Performance of Raspberry Pi CM5 eMMC and NVMe SSD

In simple terms, the eMMC performance of CM5 is comparable to the speed of PCIe Gen 2 NVMe SSDs. This is much faster than the best micro SD cards, but still only half the speed of PCIe Gen 3. I tested the boot time and bandwidth of eMMC and NVMe SSDs, then compared the results with the 4GB version of Raspberry Pi 5 (which I explained the reason for in the tests).
| Device | Boot Time (seconds) | Read Speed (MB/s) | Write Speed (MB/s) |
|---|---|---|---|
| Raspberry Pi CM5 eMMC | 17.59 | 343 | 106.3 |
| Raspberry Pi CM5 NVMe (Gen 3) | 17.39 | 768 | 703 |
| Raspberry Pi 5 4GB A2 micro SD card | 20.84 | 93.5 | 30.8 |
Boot time is fast! The benchmark tests used the Raspberry Pi 5’s 32GB A4 micro SD card, running the latest Raspberry Pi operating system. Why use Raspberry Pi 5? Because the Raspberry Pi CM5 with eMMC, like the previous 4, cannot boot from the micro SD card (the silkscreen on the CM5IO circuit board even indicates this above the micro SD card slot).
Models without eMMC can boot from the micro SD card, but we did not have such a model for testing. I confirmed with Raspberry Pi’s Chief Technology Officer, Gordon Hollingworth, that the CM5 with eMMC cannot boot from the micro SD card. So Raspberry Pi 5 is the best alternative. Alright, now that we’ve covered this, let’s discuss boot times.

The boot time of the micro SD card is 20.84 seconds, which is not bad, indicating that the new A2 micro SD card is a good choice. The boot times of eMMC and NVMe are surprisingly similar — eMMC took 17.59 seconds, while NVMe (Gen 3) took 17.39 seconds.

I used the dd command to read the contents of the 32GB eMMC to <span>/dev/null</span> to see how fast the read speed was. The result reached a decent 343 MB/s. I did the same test on a Raspberry Pi branded 256GB NVMe SSD running on PCIe Gen 3, which achieved a speed of 768 MB/s. If you are looking for extreme performance, then NVMe SSDs are the best choice. But if you plan to design products with CM5, the read speed of eMMC is already fast enough.

So how about the write speeds of eMMC and NVMe? I tested the sequential write speeds using the Raspberry Pi diagnostic tool as a benchmark. The write speed of eMMC is 106.3MB/s, which is decent, but PCIe Gen 3 NVMe SSD’s 703 MB/s completely outpaces it.
How do these speeds compare to the Raspberry Pi branded A2 micro SD card? The Raspberry Pi branded 32GB A2 micro SD card we tested had a read speed of 93.5 MB/s and a sequential write speed of only 30.8 MB/s. Considering the cost and ease of use, this is already quite good, but only useful if your CM5 does not have eMMC.
After all these tests, it seems that eMMC strikes the best balance between performance and form factor. With eMMC, we can have a fast storage device within the compact form of CM5. For those of us designing products based on CM5, this is the best choice. If faster storage is needed, then Raspberry Pi’s recent attempts in PCIe storage are now bearing fruit, and we may have a powerful ARM desktop computer with a new form factor.
Raspberry Pi 5 CM5 IO Expansion Board

Every compute module comes with a development board, commonly referred to as the IO board. I have been collecting a bunch since the beginning, and now I have another $20 Raspberry Pi CM5 IO board. The IO board is where you design and test products based on compute modules before creating custom PCBs.
The IO board provides everything you need to build your project. It features dual camera/display interfaces (with openings on the case to connect externally), a full 40-pin GPIO for manually enabling/disabling functions (camera, eMMC, USB OTG, and EEPROM), and a mounting location for CM5. Interestingly, the CM5 IO board has an M.2 NVMe interface for SSDs and other PCIe-based add-ons, such as the Hailo-8L AI accelerator used in the Raspberry Pi AI kit. There is also a connector for a cooling fan that is compatible with the pins of the official active cooler, but there is no place to install the cooler. Instead, the fan connects to the top of the case.
On the front of the IO board, there are two full-sized HDMI ports, Gigabit Ethernet, two USB 3.0 ports, a USB Type-C power connector, and a micro SD card slot (for non-eMMC CM5). The back has the aforementioned dual camera/display connectors and a power button. You can also connect your own power button to the J2 connector, which is useful for extending connections.


This IO board is somewhat different from previous ones because it can be fitted into an optional $15 metal case. It looks like an industrial control box, but this is the first time a compute module has its own case, and it looks quite nice. Well, I probably wouldn’t place it in a prominent position in my living room, but it looks very “professional” for office/studio/industrial use. We can install the included Wi-Fi/Bluetooth antenna on the case and use the active cooling fan (even though it is mounted quite far from the SoC).
GPIO on Raspberry Pi CM5 IO Board

The GPIO (General Purpose Input Output) pins on Raspberry Pi are where we interact with electronic components and build projects. Over the past decade, I have completed many projects using Raspberry Pi’s GPIO pins and Python. With the release of Raspberry Pi 5 and its RP1 chip, the way we interact with GPIO has changed, which may not be good in the short term, but hopefully will improve in the long run. We no longer directly “bit manipulate” GPIO in memory, but now have a formal interface for using GPIO. However, this has posed problems for some libraries that rely on the old interaction method (like RPi.GPIO).
How important is RPi.GPIO? Very important! It is the foundation for many Python modules, and the best Raspberry Pi expansion boards (HAT) rely on it. This brings a lot of work for Python software maintainers, who also face another obstacle.
Python guideline PEP668 now requires us to use virtual environments to manage Python code to avoid interfering with the underlying operating system’s Python installation. This is a good habit, and I personally have adopted it as well. But the combination of RP1 and PEP668 poses challenges for Python software maintainers, who still face issues when running code on Raspberry Pi 5.
Raspberry Pi Camera and Touch Display 2

The dual MIPI connectors on the CM5 IO board are dual-purpose. They can connect two cameras, two touch displays, or one camera and one touch display. These connectors and cables are exactly the same as those on the Raspberry Pi 5, so there’s no need to purchase any adapters. Just connect them properly, lock them in place, and adjust the <span>config.txt</span> file to get started.
I spent some time with Raspberry Pi engineers to identify a user error (my fault) and figure out the correct configuration details. But once adjusted, everything runs smoothly. Ordinary users should not encounter this issue; I consider myself a cautionary tale. A fix has now been submitted on GitHub to address this issue.
Who is Raspberry Pi CM5 Suitable For?

Like previous compute modules, they are ultimately designed for makers and developers who want Raspberry Pi performance in a smaller size. They are typically used in industrial and consumer electronics products, but the maker community also widely adopts them for various projects.
With CM4, we have already seen AI-driven bird cameras, NAS, and even handheld retro gaming devices. All of these can be made with CM5. If you have the capability to design PCBs, then CM5 can be used with the new Raspberry Pi Touch Display 2 to create a portable Pi tablet.
In Conclusion

The Raspberry Pi compute module series is a streamlined version of Raspberry Pi 5, condensing powerful performance into a compact package designed for embedded projects. This is not a board suitable for everyone, but for those who want Raspberry Pi 5 performance in a smaller space and are willing to design their own circuit boards (or wait for others to design), this is a powerful platform for developing various innovative projects and products.
Original Author: Tom’s Hardware
Original Link: https://www.tomshardware.com/raspberry-pi/raspberry-pi-compute-module-5-review
Translation first published in: DF Maker Community
Please indicate the source when reprinting
Hardware Arsenal

Long press to scan the code for details👆

DFRobot Official Brand Store https://dfrobot.taobao.com/
DFRobot Official Flagship Store https://dfrobot.jd.com/
If you have anything to say, feel free to leave a message!
Previous Project Review

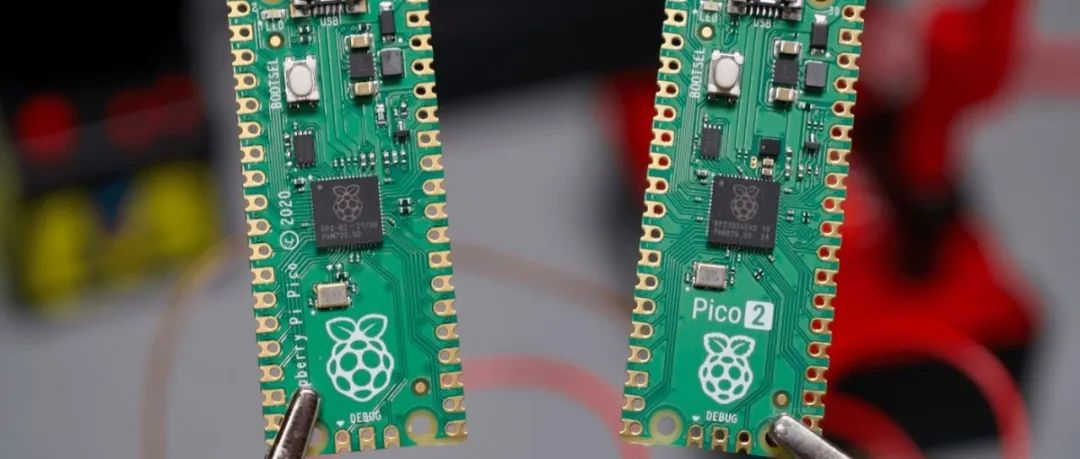
Raspberry Pi Pico 2 W Review: RP2350 Wireless Version is Here!
Raspberry Pi has adopted RISC-V, everything you want to know about the new Raspberry Pi Pico 2 is here!

Make a portable retro gaming machine with Raspberry Pi Zero 2W and cardboard

Holographic projector based on Raspberry Pi

Make a mini PS5 with Raspberry Pi 4

DIY Boston Dynamics robot dog with Raspberry Pi, saving you $500,000
Click to read👆