Python is one of the most popular programming languages today, applicable in various fields such as web development, data analysis, artificial intelligence, scientific computing, desktop applications, game development, and more. One of Python’s main features is its rich library support (including built-in libraries and third-party libraries), allowing us to create powerful applications without having to write code from scratch. Python is not only powerful but also relatively simple compared to other programming languages, requiring no prior programming experience to learn and use, making it extremely beginner-friendly. Now, let’s dive into the colorful world of Python programming.
By | Dreamfly
Setting Up the Python Programming Environment
Python is an interpreted language, which means it uses an interpreter to execute code, eliminating the need for compilation steps required in languages like C or C++. This allows users to run code directly from the source, making it easier to write and debug. To master Python programming, we must first set up the necessary tools and programming environment.
First, visit the official Python download page at https://www.python.org/downloads, and click the “Download Python 3.11.2” button to enter the download page (this number will change with version upgrades). Find the download link suitable for your system; for example, I am using a 64-bit Windows system, so I choose to download the “Windows installer (64-bit)”. Double-click the downloaded EXE executable file to start the Python installation wizard (Figure 1).
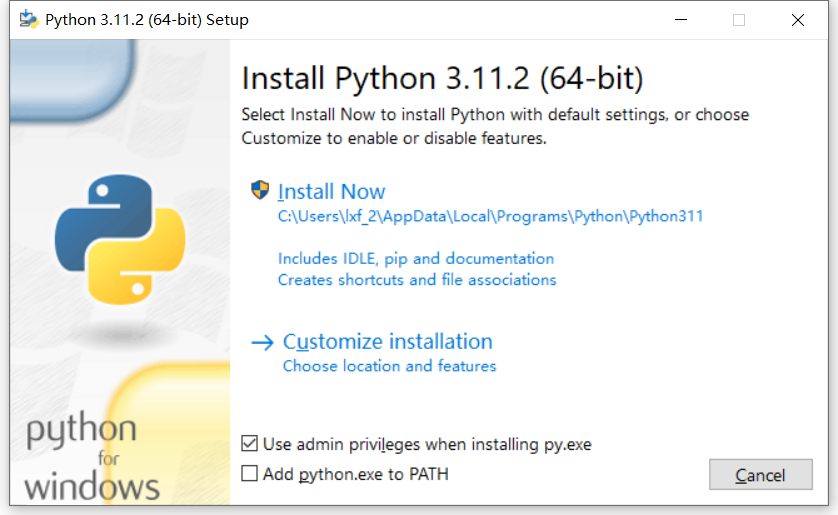
Figure 1 Python Installation Wizard
Check the “Add python.exe to PATH” option, so you won’t have to manually add the Python program to the system path later. Click “Install Now” to automatically install. If you do not wish to install it to the default C drive, you can click “Customize installation” to customize the installation options, following the wizard’s prompts step by step (Figure 2).
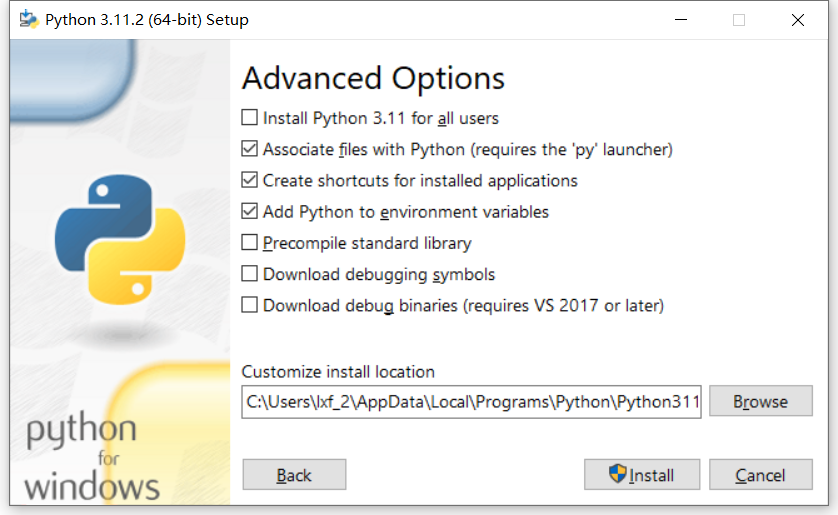
Figure 2 Python Custom Installation
As a beginner, you can choose the default installation options. After successful installation, for Windows systems, there will be a prompt to “Disable path length limit”. This is because Windows has a certain limit on the length of file paths (Figure 3). Clicking to disable this limit can avoid debugging issues when dealing with long file paths, but it may also lead to compatibility issues with older versions of Windows 10. For us beginners, we can temporarily skip this option, as it can be modified later in the registry if needed.
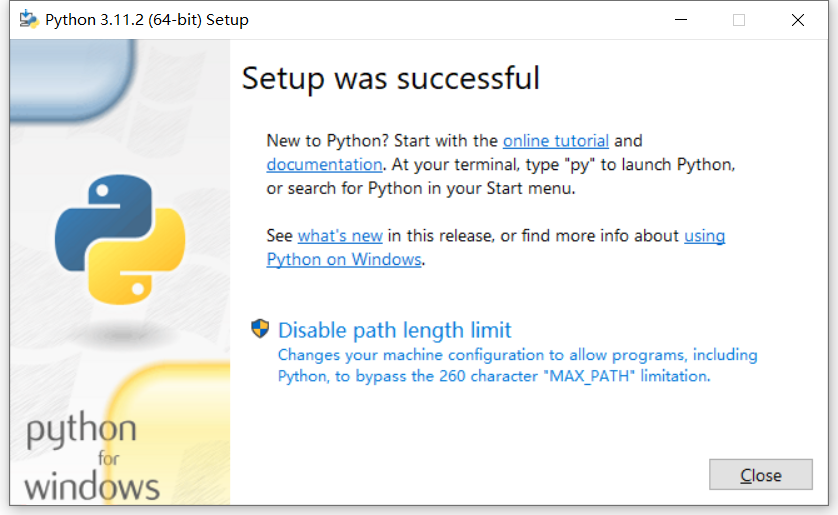
Figure 3 Successful Python Installation Screen
Click the “Close” button to close the installation wizard. Now let’s test whether Python is installed successfully. Press Win+R to open the Run dialog, type “cmd” and press Enter to open the command prompt window, then type “python” and press Enter. If you can see the Python version and other information, and the prompt changes to “>>>”, it indicates that the installation was successful. At this point, you can enter a test code:
print(“Hi, welcome to the world of Python!”)
Press Enter to execute, and you should see the message “Hi, welcome to the world of Python!”. Almost every programming language tutorial showcases a “hello, world!” program; while it may be cliché, it must be said that Python’s implementation is so simple. Next, execute the code “exit()” to exit the Python environment, completing this phase of testing (Figure 4).
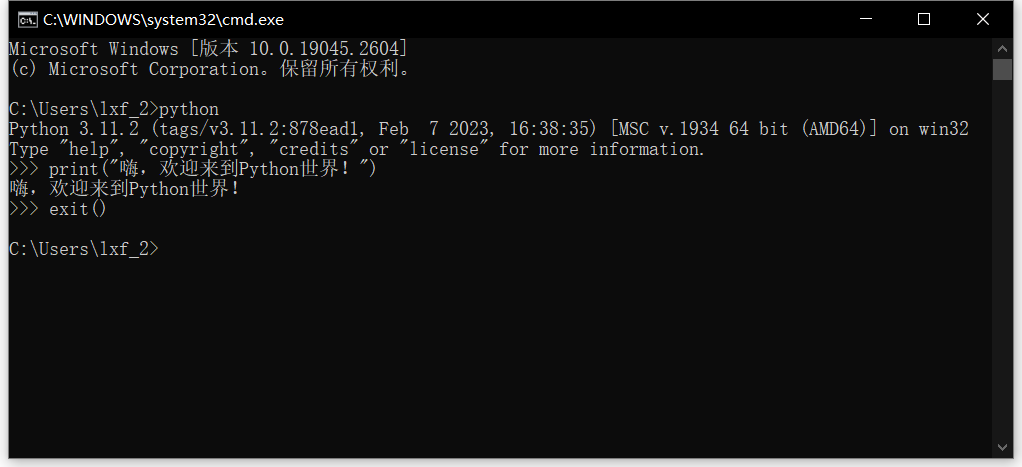
Figure 4 Python’s “hello, world!” Program Example
The command prompt interface is too simple; we can try the built-in IDLE interactive development environment. Click the system “Start” button, and at the top of the Start menu under “Recently Added”, you will see the “IDLE (Python 3.11 64-bit)” program, click to open it.
IDLE distinguishes code and execution results with different colors, making it clear. Especially convenient is that when we type a function, it intelligently displays parameter hints to assist us in entering code, which is very convenient (Figure 5).
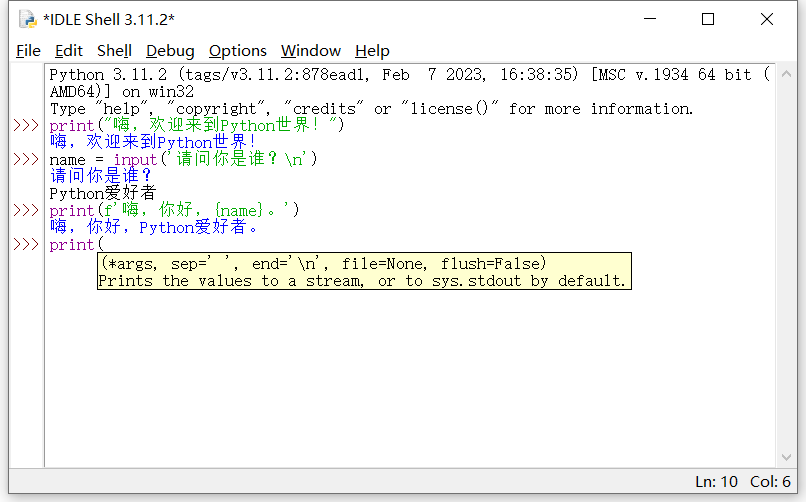
Figure 5 Python’s IDLE Interactive Development Environment
In addition to executing code line by line interactively, IDLE can also execute Python program files with the .py extension. Let’s do a test. First, click the menu command “File→New File” to open IDLE’s code editor, and enter the following code:
# Python 3: Display Fibonacci sequence within n numbers
def fib(n):
a, b = 0, 1
while a < n:
print(a, end=’ ‘)
a, b = b, a+b
print()
fib(1000)
The code explanation: The text after “#” indicates a comment, which is a note for programmers regarding the code, and the Python interpreter will automatically ignore this line. The following “def fib(n):” defines a function named “fib” and the indented lines of code that follow are the content of that function, which mainly consists of a “while” loop that repeatedly calculates using the Fibonacci sequence formula, and the results are displayed using the “print()” function, with the parameter “end=’ ‘” indicating how many spaces to add after each number to separate them (the print function will frequently appear in later examples). Of course, the function definition only indicates what the function can do; it must be called to actually run, which is the purpose of the last line of code “fib(1000)”, passing the parameter “1000” to calculate the Fibonacci sequence within that range (Figure 6).
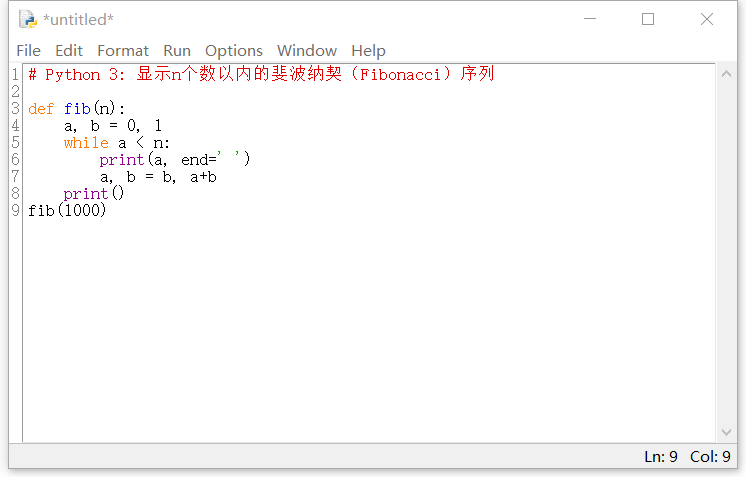
Figure 6 Fibonacci Sequence Calculation
For beginners, this code may be hard to understand, but that’s exactly what we will cover later. Now press Ctrl+S to save, and in the save dialog, enter the filename (we will name it “Fibonacci”), and you do not need to manually add the .py suffix; it will be added automatically (Figure 7).
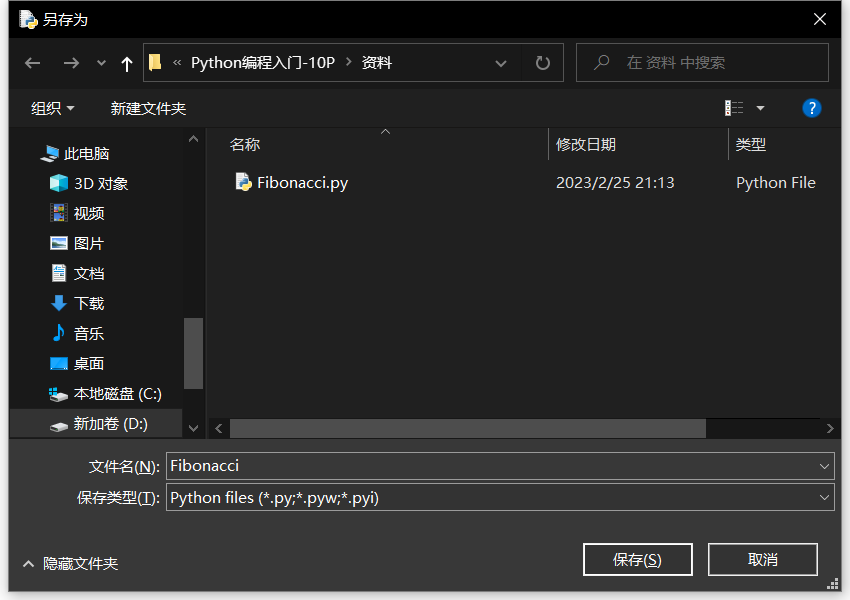
Figure 7 Saving Python Program File
After saving, click the menu command “Run→Run Module” in the code editor, or simply press F5 to run the code. Next time in IDLE, you can always execute the menu command “File→Open” to open the “Fibonacci.py” file and press F5 to run it (Figure 8).
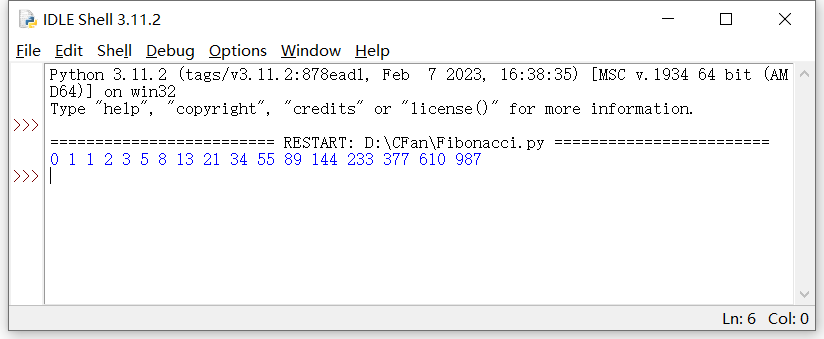
Figure 8 Output Result of Fibonacci Sequence Calculation Program
PyCharm – A Great Companion for Python Development
IDE stands for Integrated Development Environment, which is primarily used to assist in program development. Python does not necessarily require an IDE, as it can be written in any text editor and run from the command line. However, an IDE can provide many auxiliary functions, such as code debugging, intelligent completion, and syntax highlighting. In addition, IDEs can also offer refactoring, code navigation, and project management tools, which can help us write Python code faster and easier, and make debugging and maintaining code more convenient.
Python developers have various IDEs available, and PyCharm is a great choice that can make the Python development process easier and more efficient. Notably, PyCharm offers a powerful community version that is free to use and has free support available online.
First, visit the PyCharm homepage at https://www.jetbrains.com/pycharm, click the “DOWNLOAD” button to enter the download section. Under the “Windows” tab, you will see two versions: “Professional” and “Community”, with the community version being free. Click the “Download” button under it to download. Comparatively, the community version lacks support for scientific tools, web development, web frameworks, remote development, databases, etc., but this does not significantly affect a beginner (Figure 9).
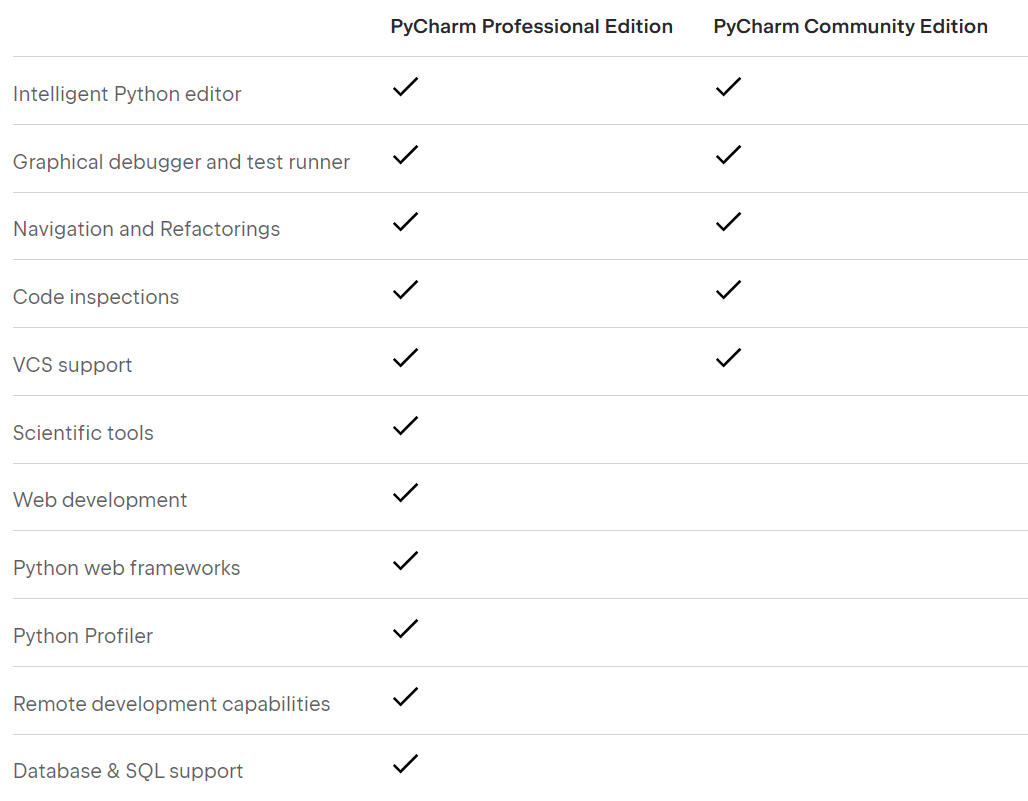
Figure 9 Comparison of PyCharm Professional and Community Versions
Double-click the downloaded EXE file to start the installation wizard, click the “Next” button to proceed, and follow the prompts to choose the installation location, create shortcuts, and associate .py files, finally clicking “Install” to complete the installation. After installation, you will need to restart the system (Figure 10).
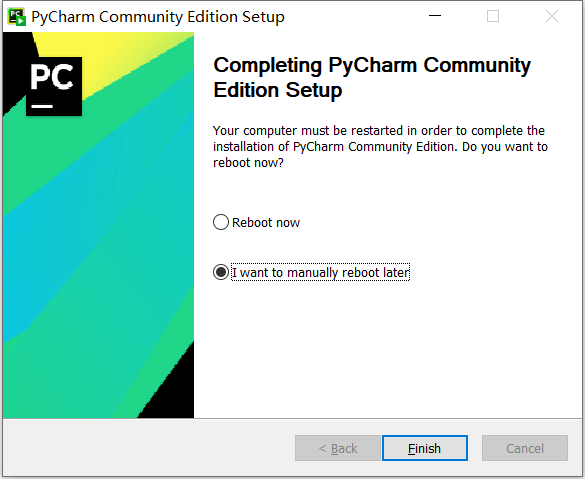
Figure 10 PyCharm Community Edition Installation Wizard
After restarting the system, click the “Start” button, and in the top of the Start menu under “Recently Added”, click “PyCharm Community Edition 2022.3.2” to launch PyCharm. The first time you use PyCharm, you will need to perform some setup. First, the user agreement will be displayed, and you must check “I confirm that I have read and accept the terms of this User Agreement” to continue. Click the “Continue” button to enter the data sharing page. If you do not want your data to be collected, you can click the “Don’t Send” button to continue, leading you to the PyCharm welcome interface (Figure 11).
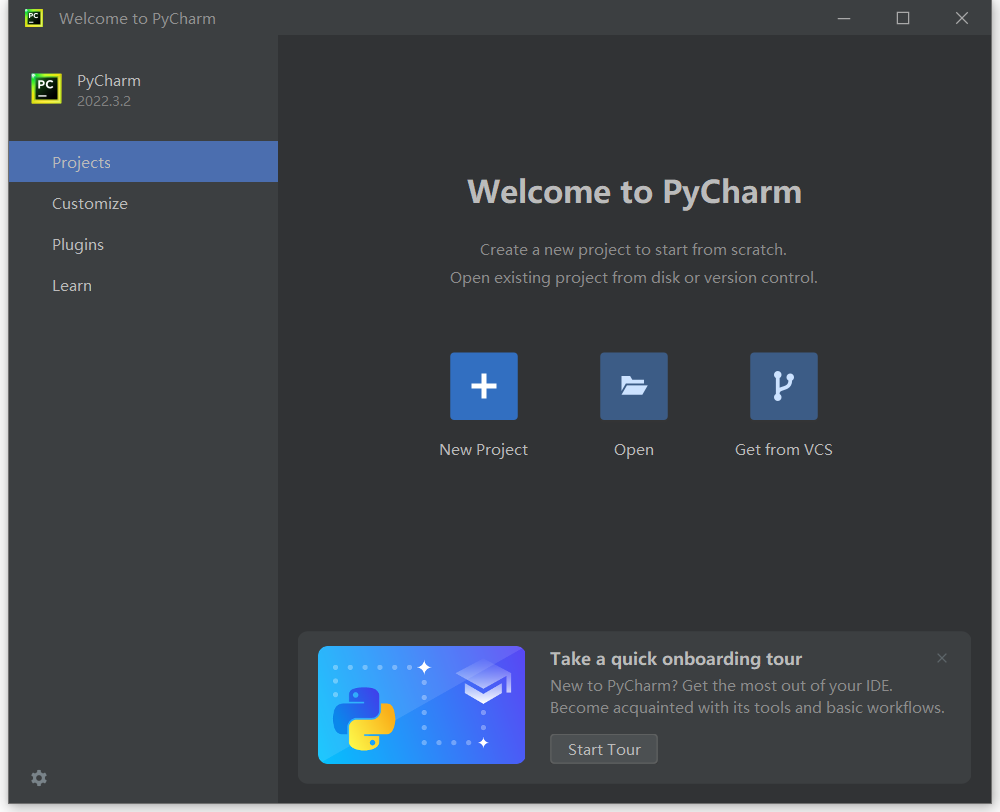
Figure 11 PyCharm Welcome Interface
In the “Projects” tab, click the “New Project” button to create a new project, and then set the save location and name for the new project (Location). Additionally, we need to select a Python interpreter for PyCharm. In this example, I checked the “New environment using” option and selected “Virtualenv”, and you can see that the interpreter being used is the Python.exe we installed earlier (Figure 12).
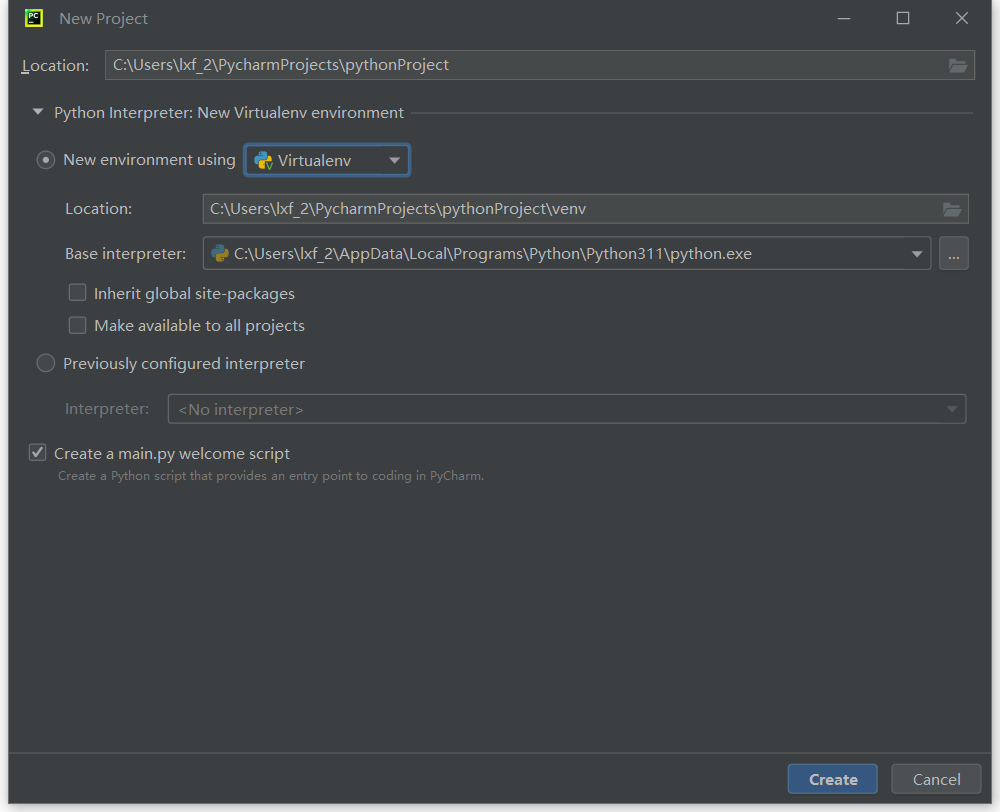
Figure 12 PyCharm New Project Window
After completing the setup, click the “Create” button to enter the main interface of PyCharm. You will see that a Python file named “main.py” containing multiple lines of code has been automatically generated in the new project, because in this example, I checked the “Create a main.py welcome script” option in the new project window. Click the menu command “Run→Run ‘main.py'” or press Shift+F10, and the program will run in real-time at the bottom of the main interface (Figure 13).
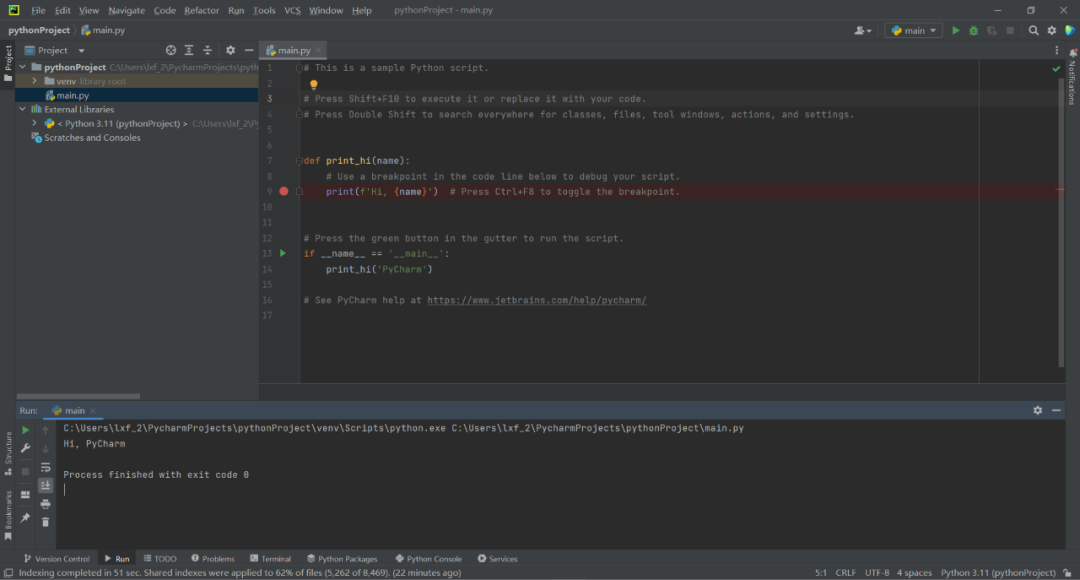
Figure 13 PyCharm Document with Preset Files
You can add new files in this project. Click the menu command “File→New” to open the new file dialog, where you can choose from various file types, such as web files, resource files, etc. Here, I choose to create a Python file (Figure 14).
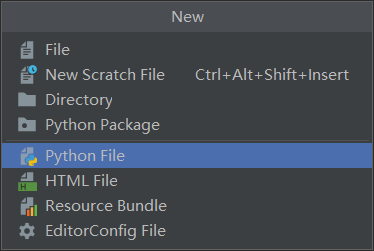
Figure 14 PyCharm Can Create Various Types of Files
Next, give the new file a name. Let’s continue with the Fibonacci sequence example, so we will name the file “Fibonacci”. Press Enter to return to the main interface, enter the Fibonacci sequence example code from earlier, and then click the menu command “Run→Run”. In the pop-up window, click the newly created “Fibonacci.py” to run it and display the running results at the bottom of the main interface. When manually entering code, you can clearly feel the powerful features of PyCharm’s intelligent prompts, auto-completion, code checks, and quick fixes, which can greatly improve work efficiency (Figure 15).
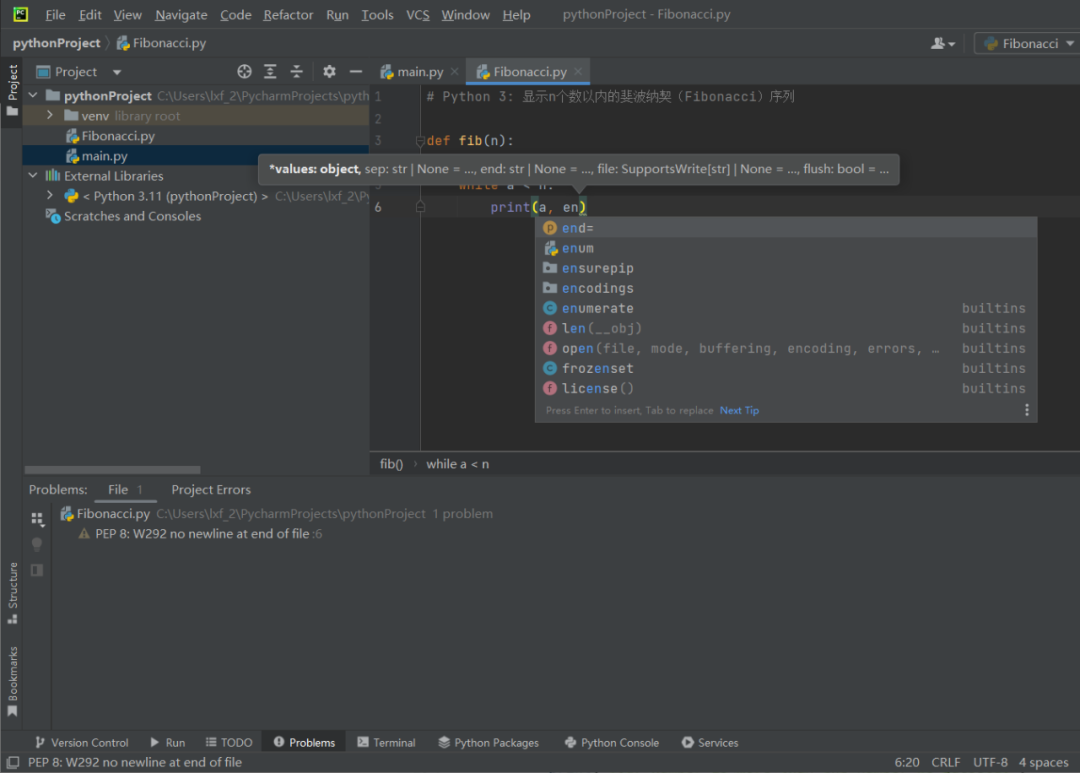
Figure 15 PyCharm’s Intelligent Prompts and Auto-completion Features
PyCharm is feature-rich, and it’s hard to explain everything in a short article. For now, we just need to understand its basic usage. Next, we will focus on analyzing Python syntax and program structure.
Python Data Types and Data Structures
In computer science, there is a famous formula: Computer Program = Data Structure + Algorithm. This formula indicates that data structure is the core of a program, while algorithms are the steps to solve problems. Therefore, when learning a programming language, it is essential to understand its data types and data structures.
Python supports various data types and data structures, each with different properties and characteristics, suitable for different tasks. Below is an introduction to commonly used data types and data structures in Python.
Common Simple Data Types in Python include: (Figure 16)
1. Integer Type (int)
The integer type is one of the most basic data types in Python. It represents integer values, which can be positive, negative, or zero. In Python, integers have no size limit.
2. Float Type (float)
The float type represents real numbers, which are numbers containing a decimal point. In Python, floats also have no size limit.
3. Boolean Type (bool)
The boolean type represents two values: true and false, denoted by True and False respectively. Boolean types are typically used in conditional statements and loop control.
4. String Type (str)
The string type represents text, which is a sequence of characters. Strings can be represented using single quotes, double quotes, or triple quotes. Triple quotes can encompass multi-line text. Strings in Python are immutable, meaning once a string is created, its value cannot be modified.
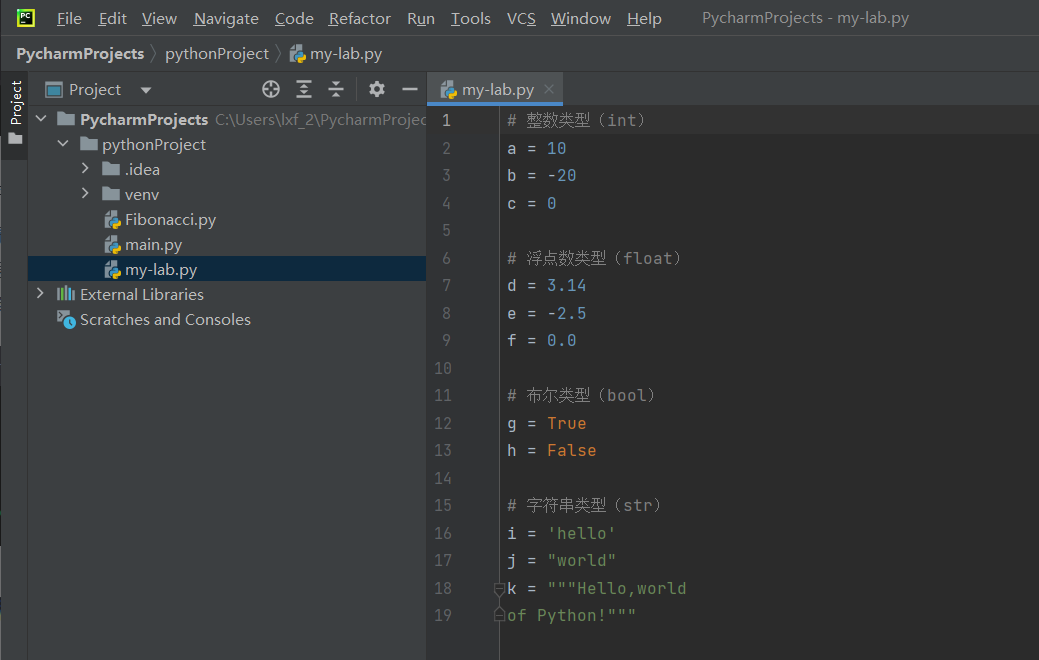
Figure 16 Examples of Common Data Types in Python
Common Data Structures in Python include: (Figure 17)
1. List (list)
The list is one of the most commonly used data structures in Python. It is an ordered, mutable collection. The elements in a list can be of different data types. You can access and modify the elements in a list using indexing and other operations. Lists are represented using square brackets “[]”.
2. Tuple (tuple)
The tuple is another ordered collection, but it is immutable. The elements in a tuple can be of different data types. Unlike lists, tuples cannot be modified. Tuples are represented using parentheses “()”.
3. Set (set)
A set can contain different elements; it is unordered and has no duplicate values. Sets can be used for set operations such as union, intersection, and difference. Sets are represented using curly braces “{}”.
4. Dictionary (dict)
A dictionary is a mapping type in Python; it is an unordered collection of key-value pairs with no duplicate values. Each key must be unique, but values can be repeated. You can access and modify values in a dictionary using keys. Dictionaries are also represented using curly braces “{}”, but the data is in the form of key-value pairs.
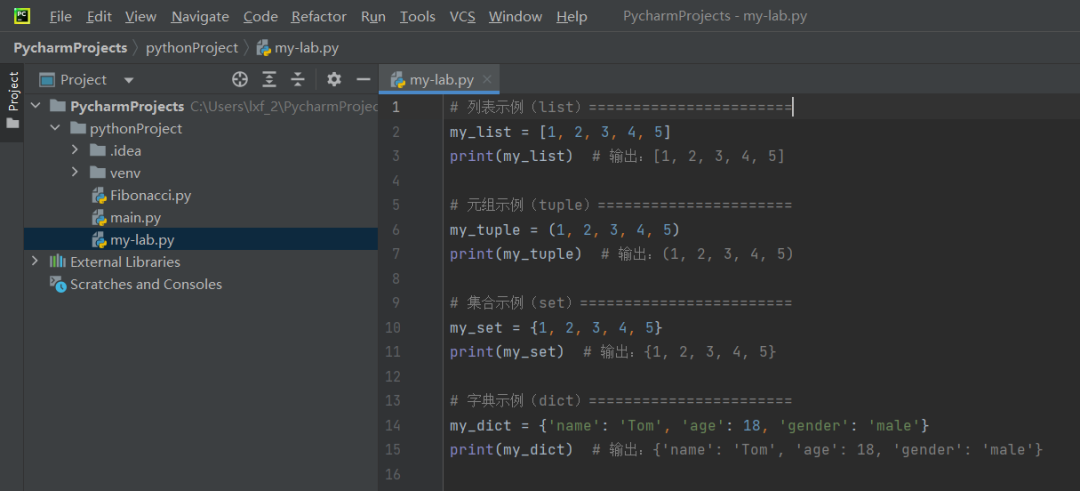
Figure 17 Examples of Common Data Structures in Python
The above are just the most basic and commonly used data types and data structures in Python. In addition, Python also has other data types such as bytes, bytearray, memoryview, range, and NoneType, among others, which will not be detailed here. Familiarizing yourself with these data types and data structures’ characteristics and usages will help you write better Python programs.
Python Variables and Assignments
As mentioned earlier, a computer program consists of data and algorithms. When a program runs, its associated data is loaded into memory. Memory is like a large warehouse divided into small storage rooms. When a program needs to use a storage room, it must first declare it, indicating that it will occupy that room and label it. In programming terms, this means declaring a “variable”. After declaring a variable, you can store various items (data) in it, which is referred to as “assignment”. This operation is achieved using the equals sign “=”, where the left side is the variable name and the right side is the data assigned to that variable. The following code shows several assignment methods in Python:
x = 1
x += 1
x, y, z = 1, 2, “Hello!”
x = y = z = 99.9
The first method is basic assignment, using “=” to assign a value to a variable.
The second method is incremental assignment, which adds a value to the existing value of the variable. Assuming the initial value of variable x is 1, then “x += 2” will change x’s value to 1 plus 2 equals 3. This is actually a compound assignment operator; if you change the plus sign before the equals sign to a minus (x -= 2), x will be assigned a value of 1 minus 2 equals “-1”. If you change the plus sign to a multiplication sign (x *= 2), it will yield 1 times 2 equals 2, and so on.
The third method is multiple assignment; if you need to assign values to many variables, you can place them on one line separated by commas, with the corresponding values also separated by commas on the right side of the equals sign.
The fourth method is chained assignment, applicable for assigning the same data to multiple variables simultaneously.
Theoretically, variable names can consist of any characters, but Python does have certain restrictions on variable naming. The rules state that variable names can only consist of letters, numbers, and underscores, and cannot start with a number. Additionally, variable names cannot be Python keywords. For example, “num_01” is a valid variable name, while “01_num” is invalid. Similarly, “my_var_name” is valid, while “my var name” with a space is invalid. Also, reserved keywords like “if”, “while”, and “for” cannot be used as variable names. Another point to note about Python variable names is that they are case-sensitive; “mytime” and “myTime” are actually two different variables.
Variables also have an important attribute, which is the variable’s type, which determines what kind of data the variable can store. The variable type corresponds to the various data types mentioned earlier. The so-called boolean type (bool), integer type (int), float type (float), string type (str), etc., are merely illustrative terms that define how much space the variable occupies. For instance, a boolean variable occupies 1 bit of space, while an integer variable requires 8 bits (1 byte) of space. In other programming languages like C++ and Java, declaring a variable requires explicitly stating its data type, while Python skips this step, directly determining the variable’s type based on the assigned data. For example, “x = 1” automatically sets x as an integer type, while “x = 99.9” sets x as a float type.
Python Expressions and Operators
If variables are the “vocabulary” of a program, then expressions are the “sentences”. No matter how rich the vocabulary, it is meaningless if it is not organized into sentences. In Python, an expression is a combination of operators, operands (variables and values), and function calls used to compute a certain value. Expressions are always evaluated and return a result.
Operators are important elements that make up expressions; they act as glue that connects data together, serving as the “executor” of algorithms, operating on variables and values. Python’s operators can be broadly classified into the following seven categories.
1. Arithmetic Operators: These operators perform basic arithmetic operations, such as addition (+), subtraction (-), multiplication (*), division (/), modulo (%), and exponentiation (**). In the following code, two integer variables a and b are declared and assigned values, and then arithmetic operations such as addition, division, and modulo are performed sequentially, with the results printed using the print function (see the subsequent comment statements).
# Arithmetic operators
a = 5
b = 2
print(a + b) # Output: 7
print(a / b) # Output: 2.5
print(a % b) # Output: 1
2. Comparison Operators: These operators compare two values and return a boolean value (True or False). They include equal to (==), not equal to (!=), greater than (>), less than (<), greater than or equal to (>=), and less than or equal to (<=). In the following code, two integer variables x and y are declared and assigned values, and then comparisons such as greater than and equal to are performed, with the results indicating that x is greater than y, which is true, thus returning True, while x == y is clearly false, returning False.
# Comparison operators
x = 10
y = 5
print(x > y) # Output: True
print(x == y) # Output: False
3. Logical Operators: These operators perform logical operations on boolean values. They include logical AND, logical OR, and logical NOT. In the following code, two boolean variables a and b are declared, assigned values of True and False respectively. It is logically impossible for the same thing to be both true and false at the same time, so the logical AND operation “a and b” returns False. Conversely, a statement can either be true or false, so the logical OR operation “(a or b)” returns True.
# Logical operators
a = True
b = False
print(a and b) # Output: False
print(a or b) # Output: True
4. Bitwise Operators: These operators perform bit operations on binary values. They include bitwise AND (&), bitwise OR (|), bitwise XOR (^), bitwise NOT (~), left shift (<<), and right shift (>>). In the following code, two integer variables x and y are declared, but their values are given in binary, so the numbers are prefixed with “0b”. For instance, the binary 1010 equals the decimal 10, and binary 1100 equals decimal 12. The last two lines of code perform bitwise AND and OR operations on the two variables, yielding results of 8 and 14 respectively.
# Bitwise operators
x = 0b1010 # Binary representation of 10
y = 0b1100 # Binary representation of 12
print(x & y) # Output: 0b100 (binary representation of 8)
print(x | y) # Output: 0b1110 (binary representation of 14)
5. Assignment Operators: These operators assign values to variables. This has been detailed earlier, and will not be repeated here; below is a simple example of incremental assignment, where “a += 2” means adding 2 to the existing value of 5, resulting in 7.
# Assignment operators
a = 5
a += 2
print(a) # Output: 7
6. Identity Operators: These operators compare the storage units (memory addresses) of two identifiers to determine whether they reference the same object (x is y), similar to id(x) == id(y). If they reference the same object, it returns True; otherwise, it returns False. Conversely, it checks whether two identifiers reference different objects (x is not y). In the following code, a list variable is declared, and then its address is assigned to variable y, meaning both variables actually point to the same memory address, so the identity operation “x is y” returns True. However, variable z, although also a list with the same values as x, does not occupy the same memory address, so “x is z” returns False.
# Identity operators
x = [1, 2, 3]
y = x
z = [1, 2, 3]
print(x is y) # True
print(x is z) # False
7. Membership Operators: These operators check whether a value is a member of a sequence or set, including in and not in. In the following code, the “in” operator indicates that 2 is a member of the list numbers, and the “not in” operator indicates that 6 is not a member of the list numbers; both statements are correct, so both return True.
# Membership operators
numbers = [1, 2, 3, 4, 5]
print(2 in numbers) # Output: True
print(6 not in numbers) # Output: True
In addition to the above operators and expressions, Python also has string expressions, function call expressions, and expressions for performing operations on lists, tuples, and dictionaries. Each type of expression has its own characteristics, and understanding how they work is crucial for writing effective code.
Expressions are used for calculations, but controlling the flow and logic of these calculations to implement specific algorithms requires control statements. Like other programming languages, Python’s control statements mainly fall into three categories: sequential statements, conditional statements (if statements), and loop statements (for and while statements). Sequential statements are relatively easy to understand, meaning executing code commands in order from top to bottom; most of our previous examples are sequential statements. Next, we will focus on conditional statements and loop statements.
Conditional Statements
Conditional statements are used to determine the execution path of a program based on certain conditions, typically implementing branching choices. Its basic syntax is as follows:
if condition:
# If condition is True, execute the statements here
elif condition2:
# If condition is False but condition2 is True, execute the statements here
else:
# If all previous conditions are False, execute the statements here
Python’s conditional statements use the keywords if, elif, and else, where the if statement is mandatory, while elif and else are optional. The conditions in the conditional statements can be any expressions that return boolean values, such as comparison operations, logical operations, or function calls.
Below is a simple example demonstrating how to use conditional statements to determine whether a number is positive, negative, or zero:
num = 5
if num > 0:
print(“This number is positive”)
elif num == 0:
print(“This number is zero”)
else:
print(“This number is negative”)
In this example, if num is greater than 0, it prints “This number is positive”; otherwise, if num equals 0, it prints “This number is zero”; when num is less than 0, it prints “This number is negative”.
Note that indentation is very important in Python, as it is the way to distinguish code blocks. Each code block in the conditional statements must be indented by the same number of spaces, usually four spaces.
Loop Statements
Loop statements are used to repeatedly execute a block of code. Python provides two types of loop statements: for loops and while loops.
The for loop is used to iterate over each element in a sequence (such as lists, tuples, strings, etc.). The basic syntax of a for loop is as follows:
for variable in sequence:
# Execute loop body code here
Where variable is a variable name used to store the current element being iterated over in the sequence; sequence can be a list, tuple, string, etc. The for loop will iterate through each element in the sequence, assigning it to the variable, and then executing the loop body code until all elements have been traversed.
Below is a simple example demonstrating how to use a for loop to iterate over a list:
numbers = [1, 2, 3, 4, 5]
for num in numbers:
print(num)
In this example, we define a list called numbers, and then use a for loop to iterate over each element in the list, assigning it to the variable num, and finally printing the value of num (Figure 18).
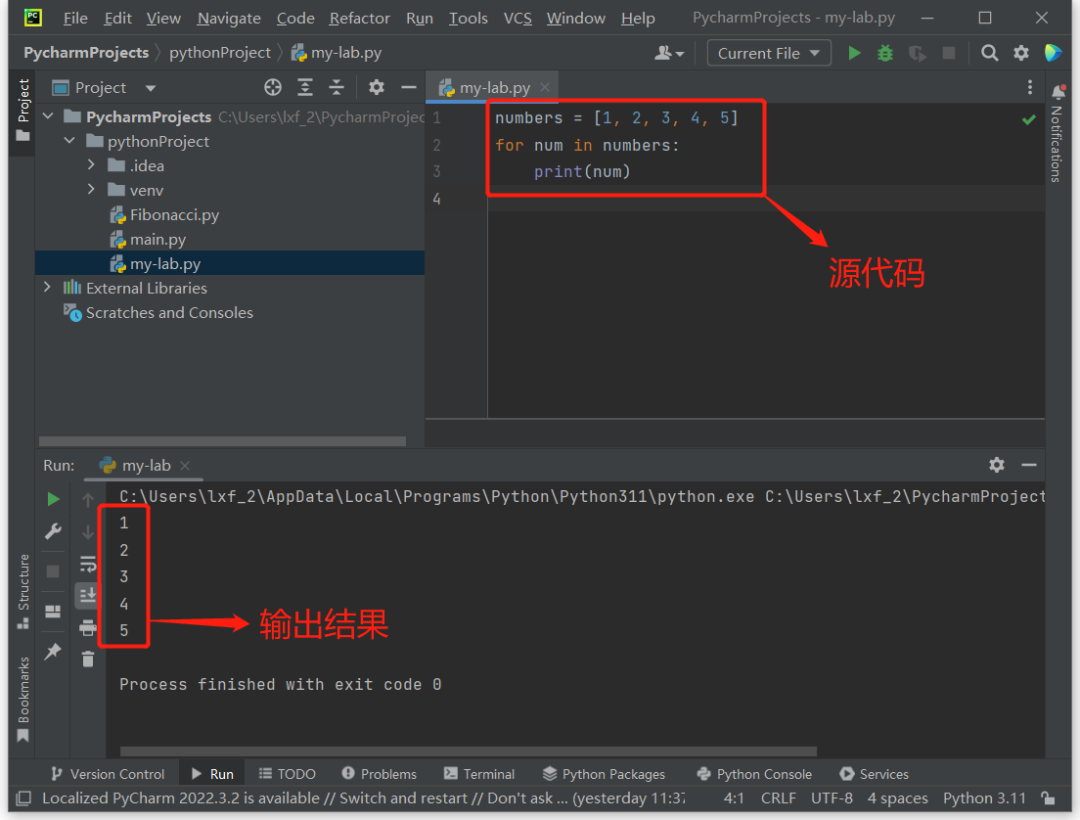
Figure 18 Output After Iterating Over the List Using a for Loop
The while loop repeatedly executes a block of code until a specified condition is no longer satisfied. The basic syntax of a while loop is as follows:
while condition:
# Execute loop body code here
Where condition is an expression that returns a boolean value. As long as the condition is True, the while loop will continuously execute the loop body code until the condition becomes False.
Below is an example demonstrating how to use a while loop to calculate the sum of numbers from 1 to 10:
total = 0
i = 1
while i <= 10:
total += i
i += 1
print(“The sum of numbers from 1 to 10 is:”, total)
In this example, we define the variables total and i, and then use a while loop to repeatedly execute the code that calculates the sum of numbers from 1 to 10 until i is greater than 10, finally printing the result (Figure 19).
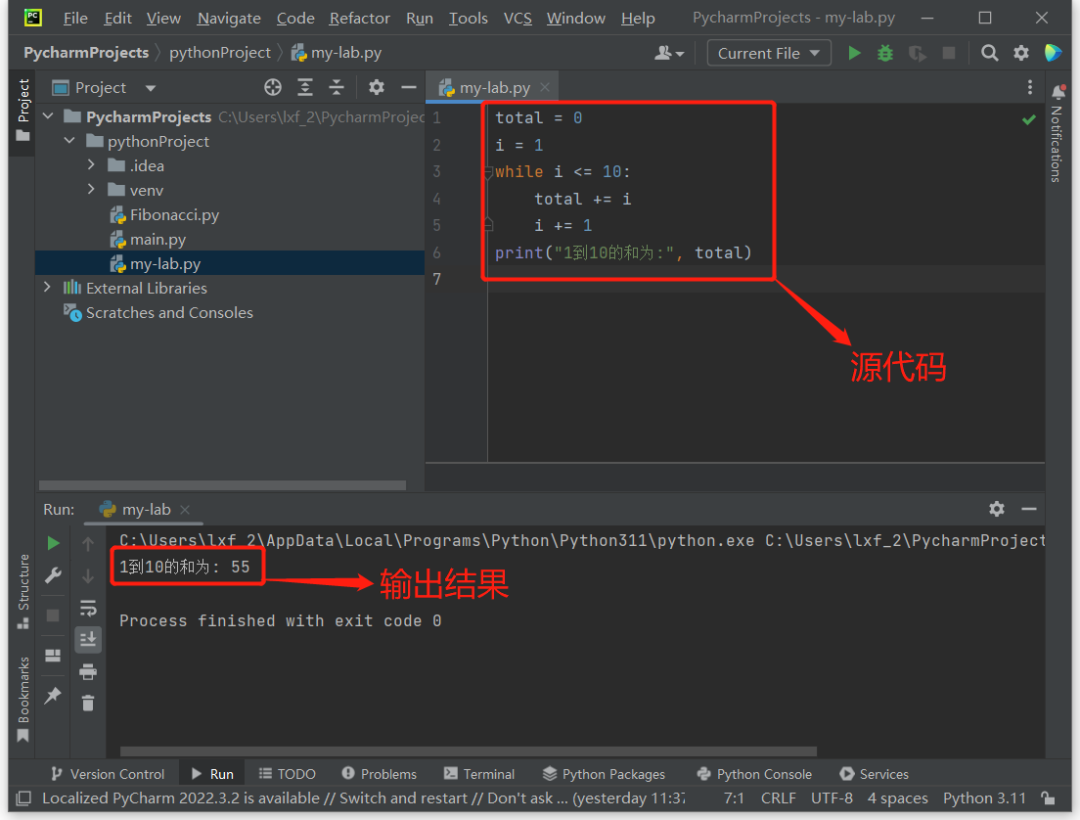
Figure 19 While Loop Demonstration
Defining and Calling Functions in Python
A function is a block of code that performs a specific task and can be reused, thereby enhancing the reusability and readability of the code. In Python, a function is typically defined in the following format:
def function_name(parameters):
“””
Docstring: Description of the function’s purpose and parameters.
“””
# Code block to be executed
return value # Optional
In the above definition, def is the keyword for defining a function; function_name is the name of the function, which can consist of letters, numbers, and underscores; parameters are the function’s parameters, which are optional and can be zero or more; the Docstring is the documentation string of the function, describing its purpose and parameters, which is also optional; return is the return value of the function, which is likewise optional.
Below is a simple example of a Python function:
def greet(name):
“””
This function expresses a welcome to the person passed as a parameter.
“””
print(“Hi, ” + name + “, welcome!”)
greet(“Han Meimei”)
This example defines a function named greet, which has one parameter name used to pass a name to the function. The body of the function contains a print statement that prints the greeting along with the passed name. After defining the function, it must be called to execute, hence the last line of code is a function call statement that passes the name “Han Meimei” (Figure 20).
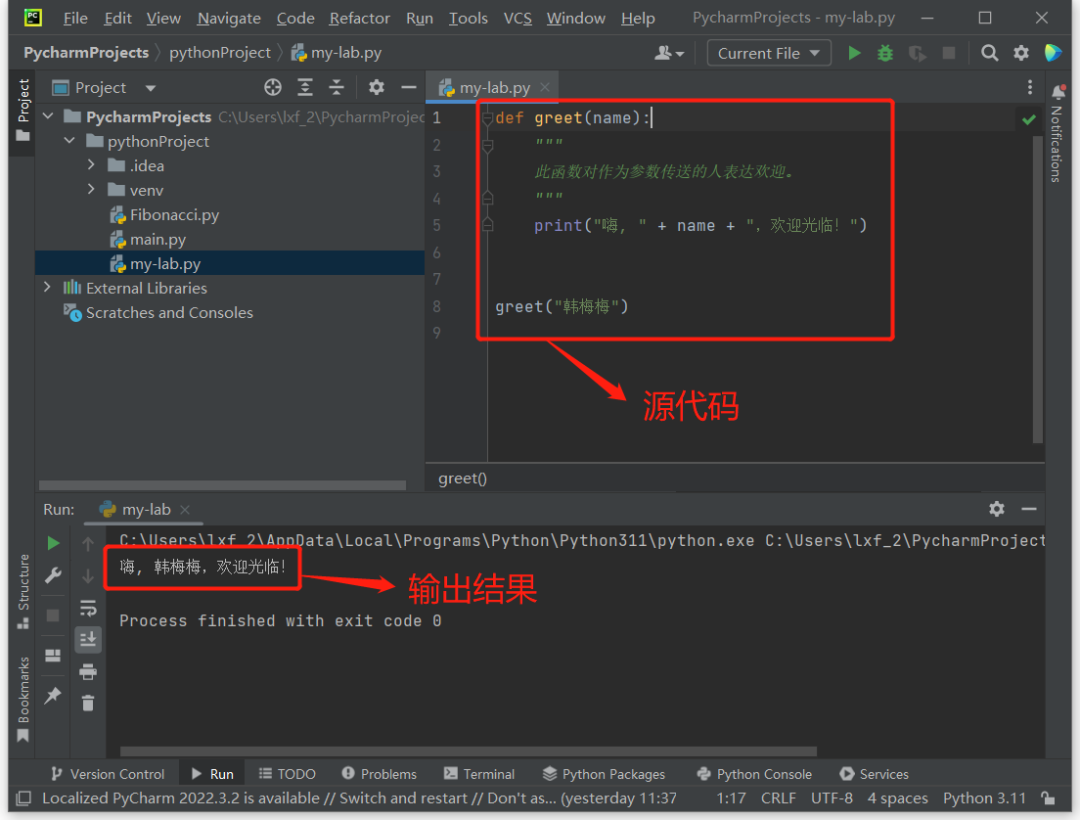
Figure 20 Definition and Call of Python Function
This is just a simple example; functions can perform more complex tasks. One of the advantages of functions is that they help you organize code into smaller, more manageable modules, breaking the code into maintainable parts. Functions can also use the return statement to return values, allowing the computation results to be passed back to the calling code.
Structure of Python Programs
Having learned the basics of Python, let’s now take a look at what a complete Python program file looks like. Generally speaking, the structure of a Python program typically consists of the following parts:
1. Importing Modules: At the beginning of the program, we usually need to import the modules we want to use. These modules can include Python’s built-in modules as well as third-party libraries and custom modules. For example:
import math
import numpy as np
from my_module import my_function
2. Global Variables and Constants: At the top of the program, we often define some global variables and constants that can be accessed anywhere in the program. For example:
PI = 3.14159
name = “John”
3. Function Definitions: Various functions are typically defined in the middle of the program to perform specific tasks.
4. Main Program Code: The main program code is usually written at the bottom of the program to execute the main functionality. The main program code can call imported modules, global variables, constants, and defined functions. For example:
import math
PI = 3.14159
def area_of_circle(radius):
return PI * radius ** 2
def main():
r = 5
area = area_of_circle(r)
print(“The area of the circle with radius”, r, “is”, area)
if __name__ == ‘__main__’:
main()
This example defines a function to calculate the area of a circle called area_of_circle(), and then uses that function in the main program code to calculate the area of the circle and output the result.
Note that in this example, we use the statement “if __name__ == ‘__main__’:” to check if the current module is being run as the main program. If the module is run as the main program, it will execute the main() function; otherwise, it will ignore it. This statement is often used to prevent executing unnecessary code when a module is imported.
In summary, writing the structure of a Python program in a standardized way helps make the code easier to read, understand, and maintain. For larger projects, more complex program structures and specific organization methods may be required, such as using object-oriented programming.
Practical Application of Python Programming
One of the advantages of using Python is the availability of numerous third-party libraries, allowing us to create very professional applications without starting from scratch. In the following practical application, we will process an Excel spreadsheet using Python and third-party libraries.
Suppose we have an original Excel file recording the exam scores of all students in the class, including each person’s name, student ID, and scores in various subjects (Figure 21). Now, due to some requirement, we need to extract the “Name” and “Chinese Score” columns and save them as a new Excel file.
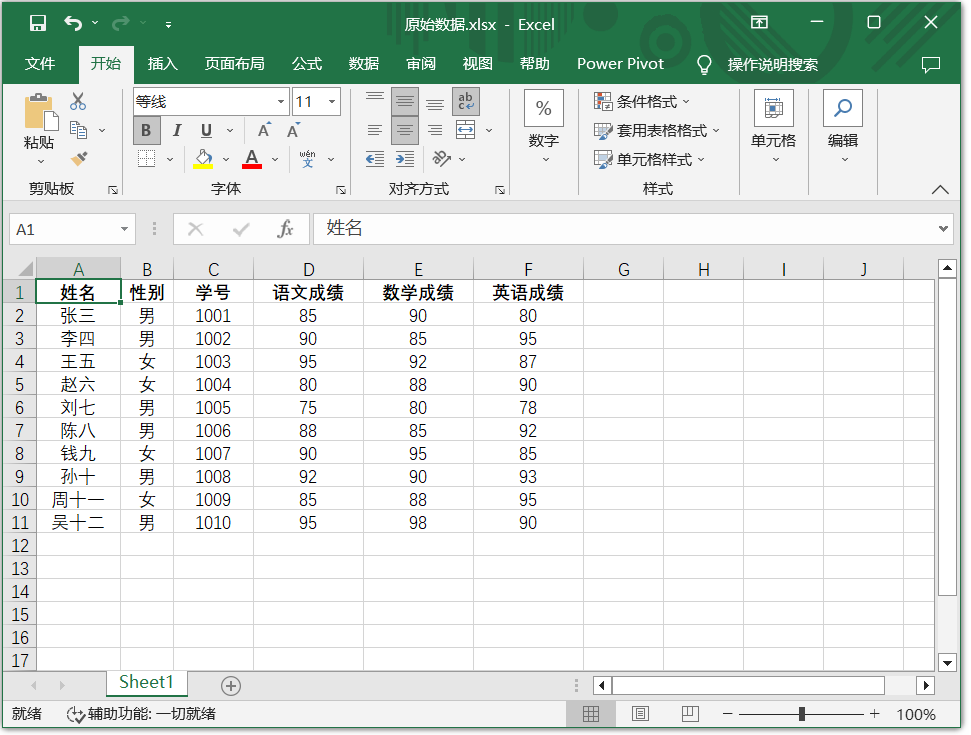
Figure 21 Student Score Data
There are several third-party libraries available for processing Excel files, and here we will use Openpyxl. Before starting, please install it; the operation is very simple. Open the Windows command prompt window and execute the command “pip install openpyxl” (Figure 22).
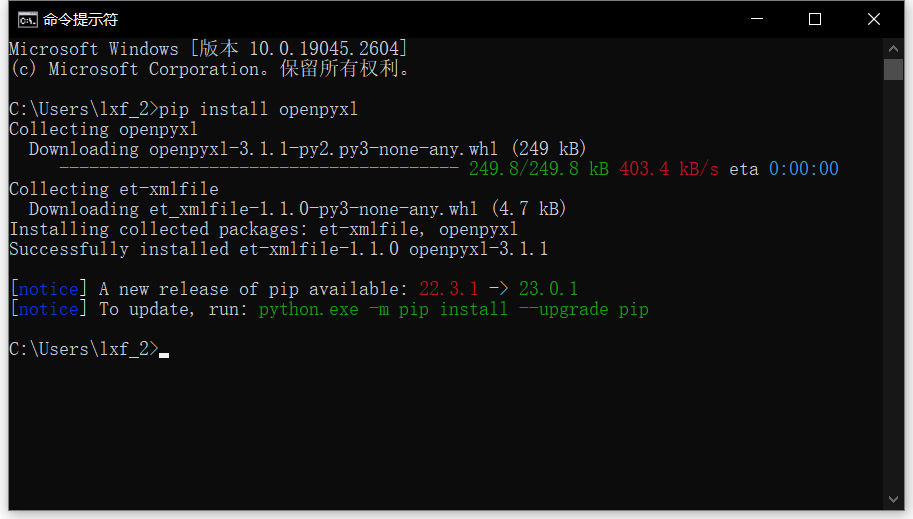
Figure 22 Installing Python Third-party Library via pip Command
We can also install this library in PyCharm. Click the “Python Packages” option at the bottom of the window to open a panel, then enter “openpyxl” in the search box, and click the “Install package” button on the right to install it (Figure 23).
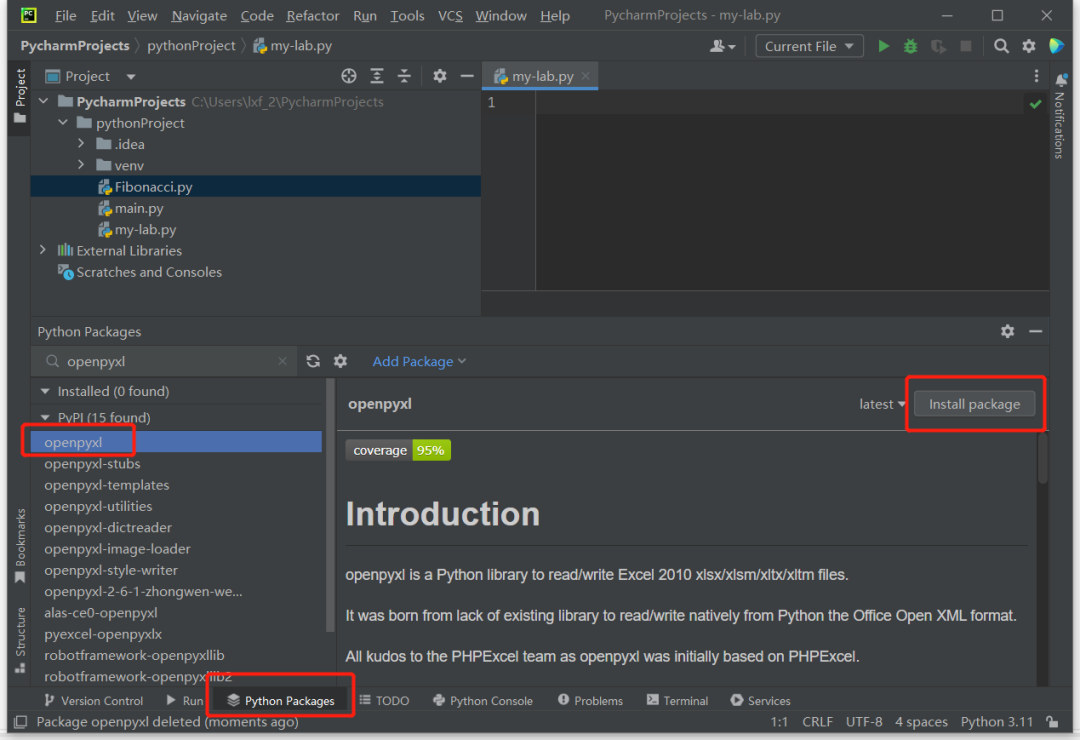
Figure 23 Installing Openpyxl Library in PyCharm
Note that the Openpyxl library only supports .xlsx format Excel files and does not support older .xls files. With everything ready, we can now write a Python program in PyCharm:
import openpyxl
# Open the original Excel spreadsheet file
workbook = openpyxl.load_workbook(‘original_data.xlsx’)
# Select the first worksheet in the original Excel spreadsheet
worksheet = workbook.active
# Create a new workbook
new_workbook = openpyxl.Workbook()
# Select the first worksheet in the new workbook
new_worksheet = new_workbook.active
# Extract the “Name” and “Chinese Score” columns from the original Excel spreadsheet and add them to the new worksheet
for row in worksheet.iter_rows(values_only=True):
name, score = row[0], row[3]
new_worksheet.append([name, score])
# Save the new workbook to an Excel file
new_workbook.save(‘Name_and_Chinese_Score.xlsx’)
The above program first imports the Openpyxl library using the statement “import openpyxl”, then uses the “openpyxl.load_workbook()” function to open the original Excel spreadsheet file, which returns a Workbook object stored in the variable workbook. Next, it uses “workbook.active” to select the first worksheet in the original Excel spreadsheet, which will serve as the data source for the program.
Then, it uses the “openpyxl.Workbook()” function to create a new workbook, returning a Workbook object stored in the variable new_workbook. It uses “new_workbook.active” to select the first worksheet in the new workbook, which will serve as the data target for the program.
Next, it uses the “worksheet.iter_rows()” function to iterate through each row of data in the original Excel spreadsheet, where “values_only=True” indicates that only the values of the cells are returned. During each iteration, it uses “row[0]” and “row[3]” to extract the “Name” and “Chinese Score” columns from the current row, storing them in the variables name and score respectively. Finally, it uses the “new_worksheet.append()” function to write the name and score to the new worksheet.
Finally, it uses the “new_workbook.save()” function to save the data in the new workbook to an Excel file named “Name_and_Chinese_Score.xlsx”.
Place the original data Excel file and the Python program file in the same folder, press Shift+F10 to run the program, and you will save a new Excel file containing only the “Name” and “Chinese Score” columns in that folder (Figure 24).
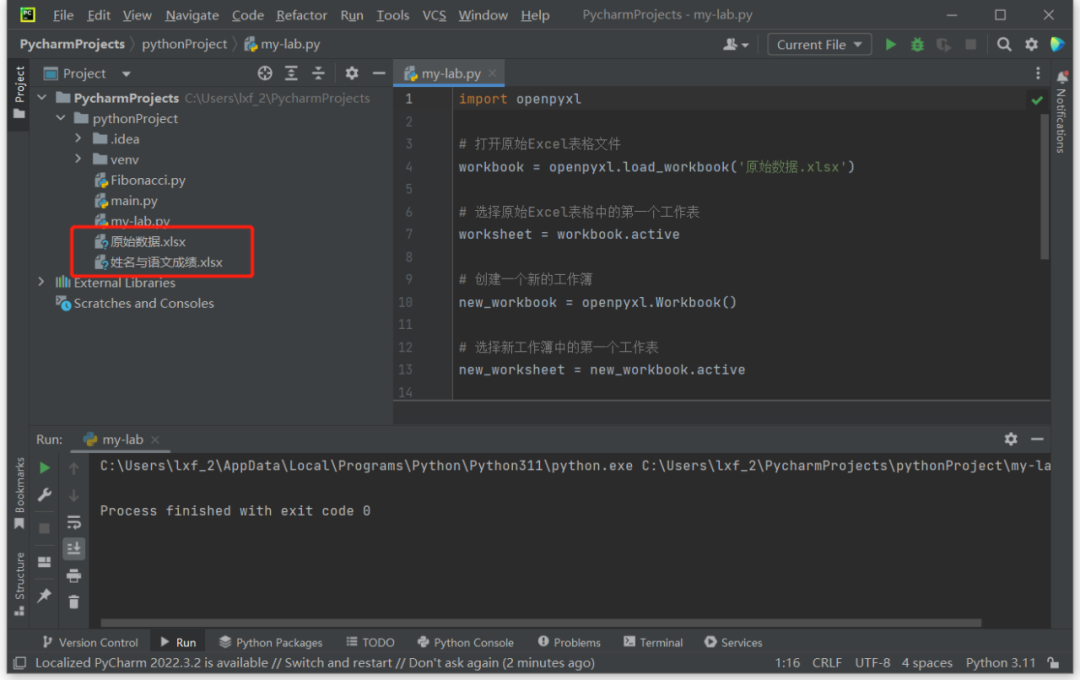
Figure 24 Running the Program to Obtain a New Excel File
Of course, the content of Python programming is rich, and it is impossible to cover everything in one article. If this article can provide some help in learning Python, I will be satisfied.
CF
Original article published in the December 15, 2022 issue of “Computer Enthusiast” No. 24
END
More exciting content, stay tuned…