Under normal circumstances, the Linux protocol for module docking is the USB protocol. The module can be used directly after being inserted into the Linux device via USB, and the system will detect the device’s identifiers: PID VID.
However, in practical applications, there are often novice friends asking:
Linux is really unfriendly to novice users. Is there a good solution?
Today, I would like to share my personal collection of practical tips—compiling Linux for the Raspberry Pi. Once compiled, the Hezhong development board can be directly used by plugging it into the Raspberry Pi and connecting it to the computer, which is extremely convenient.
This article takes the Raspberry Pi as an example; other boards with Linux systems can generally follow this operation.
1
Burning the Image
1.1 Burning Software
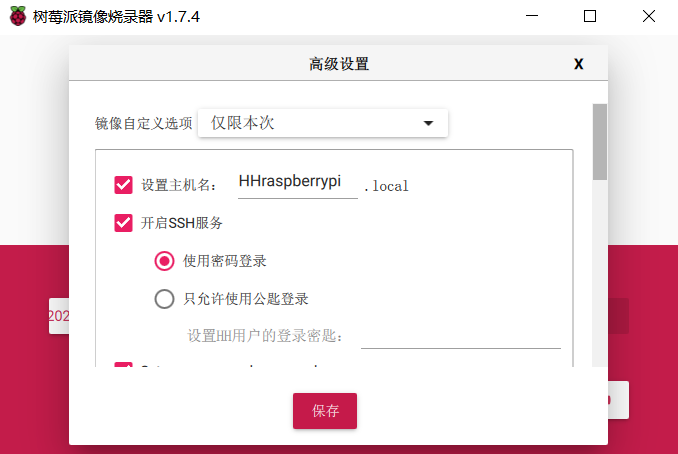
It is recommended to use the official Raspberry Pi tool, which can directly set up SSH and the name of the Raspberry Pi in the router’s backend.
Official latest download address:https://www.raspberrypi.com/software/

The username and password for logging in above can also be set once.
1.2 Downloading the Image File
1.2.1 Image File Download Address
For the image file, it is recommended to use the 32-bit version, but the 64-bit version can also be used.
Note: If you want to use a graphical interface, please choosethe desktop version of the image file when downloading. It is best to choose the version with common software,and it is advisable to use the 32-bit version, as I have not successfully compiled the 64-bit version.
Image file download address:https://www.raspberrypi.com/software/operating-systems/
1.2.2 High-Speed Download Tool
If the download progress is slow, you can first download a tool called Motrix and then open the download link with it.
Motrix download address:
https://motrix.app/zh-CN/
1.3 Burning Process
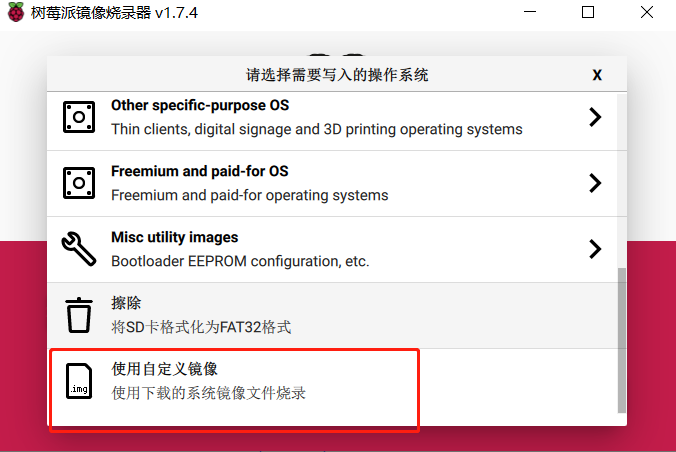
After the download is complete, selectUse Custom Image, then insert the SD card and start burning.
Special Reminder:It is best to use an SD card of 32G or more; 16G is also acceptable, but it is best to choose a faster SD card since the burning, writing, and the entire compilation process will be completed on the SD card.
2
Remote Control
2.1 SSH Method
After burning is complete, the SD card will be divided into two partitions:one is a system partition that cannot be opened, and the other is a file system partition that can be opened.
If you did not enable SSH in the official burning tool beforehand, you need to open that file system partition with your computer and create a new file named SSH, without any file name suffix.
After creating the file, insert the memory card into the Raspberry Pi, connect it to the router with an Ethernet cable, and power it on.The recommended power supply for the Raspberry Pi is 5V3A(Note: If the power supply is less than this and you have a lot of devices connected, including a screen, it may cause instability leading to module restarts, etc.).
Next, open your router’s management interface and find the Raspberry Pi. If you set the Raspberry Pi’s name in the previous step, it should be relatively easy to find. If not, the default name for the Raspberry Pi israspberry, and the default password for the root user is also raspberry.If you plan to use the Raspberry Pi long-term, it is recommended to assign a static IP.
The management interface on my side looks like this:

Xshell and Xftp download address:www.xshell.com
Open Xshell, create a new login interface, select the IP of the Raspberry Pi that you see in the router’s backend, and use the username and password that you set with the image burning software.
If not set, the username is root, and the password is raspberry. If you really can’t log in, it is recommended to re-burn and set it again (Xshell and Xftp are paired software, it is recommended to download both at once).
After logging in, it is recommended to use the command sudo passwd to change the root user password to something you can remember.
Common Linux Commands:
ls (display the subfolders and files in the current folder)
cd ./etc (enter the etc folder) cd ../ or cd .. (go to the parent directory)
su (enter superuser; the password to enter is the superuser password, as the root user password is random each time Linux starts, so you need to use the sudo passwd command to set a memorable password)
sudo apt install LS (download a package manager called LS; if you don’t know what a package manager is, you can think of it like an app on your phone)
2.1.1 VNC Remote Desktop
If you don’t like the command line method, you can also use VNC remote desktop (similar to the Sunflower software on PC).
Note: If you want to use VNC, you must choose the desktop version of the image file during the image download step, preferably with common software included.
PC-side VNC download:
https://www.realvnc.com/
3
Direct Screen Control
You can also connect a screen, and all input and output can be completed using a keyboard and mouse (Note: If you want to use a screen, you must choose the desktop version of the image file during the image download step, preferably with common software included).
The advantage is that it is visual and makes it easier to operate folders.
The downside is that when you modify driver files graphically, you may encounter read-only files, and modifications may fail, requiring you to use the command line to enter the root user to grant the file/folder 777 permissions (chmod -R 777 linux).
4
Changing Sources for Raspberry Pi
Because the Raspberry Pi uses foreign sources by default, downloading things can be slow, and various tools and package management needed during code compilation can be slow, so you can use mirror sources like Tsinghua/Alibaba/USTC.
For users using SSH, enter uname -m in the command line; for users using VNC and direct desktop, open the command line terminal and enter uname -m as well.
Then follow this guide:
https://mirrors.tuna.tsinghua.edu.cn/help/raspbian/
After changing the source, you can try entering:
sudo apt-get update — (update the package management)
apt-get upgrade — (update already installed software packages)
apt-get dist-upgrade — (update dependencies)
Possible Issues When Changing Sources:
If an error occurs stating that some key cannot be found, copy the string of numbers after the key in the error message, and replace the key in the command with yours. If multiple keys are reported, set them multiple times.
5
Compiling the Kernel
Compilation can be done locally or cross-compiled, both methods are viable. Local compilation means the Raspberry Pi compiles itself, while cross-compilation means using another machine with higher performance than the Raspberry Pi (like your computer) to compile the driver, then replacing the compiled kernel onto the SD card, and inserting the SD card back into the Raspberry Pi.
This article will only explain the local compilation method:
5.1 Local Compilation
The advantage of local compilation is that it does not require too many commands, making it user-friendly for novice players.
The downside is that it is limited by the weak performance of the Raspberry Pi, and the compilation speed can be painfully slow. If all four cores are enabled, it takes about one to two hours to compile once.If you use the default compilation command and only enable one core, I have tried it once, and it took more than 4 hours.
5.1.1 Downloading the Linux Kernel Source Code
Open the command line, navigate to the desired directory, such as the desktop or download folder, and create a new directory if necessary. Remember not to use Chinese characters, then use the following command to download the latest kernel for the Raspberry Pi.
git clone –depth=1https://hub.fantasygmm.top/raspberrypi/linux
-depth=1 means a shallow clone, only cloning the current project’s code without historical modification records. The common git clone is a deep clone, which includes all operations from the initialization of this repository.
We only need to learn/compile the current version of the kernel and do not need to see those things. If we clone everything, it will be about 3G, and downloading it without a proxy will take forever, and even with a free proxy, most have a maximum repository limit of 2G.
The original repository is below, directly clone this repository, which is very slow, so I used the proxy path provided by a helpful group member. The detailed command will be mentioned later, so I won’t elaborate here.
Raspberry Pi Linux Repository:
https://github.com/raspberrypi/linux
5.1.2 Modifying the Corresponding Driver Files
If you are using the SSH method, you can use the nano editor to modify files. Remember to enter su to become a superuser first; otherwise, the modifications may not succeed. (Note: If you have encountered Linux in college, you should know the VI and VIM editors, both of which can be used; the nano editor is a bit more convenient.)
The specific commands are as follows:
cd linux –enter the directory of the downloaded kernel source code
5.1.2.1 Modifying the option.c File
sudo nano drivers/usb/serial/option.c — use the nano editor to open the option.c file
Remember: When entering the file, do not use the mouse to scroll up and down; use the keyboard’s up and down keys! Using the mouse will result in a bunch of ^H^L being input into the corresponding file.
Modifications needed in the option.c file:
First Modification:
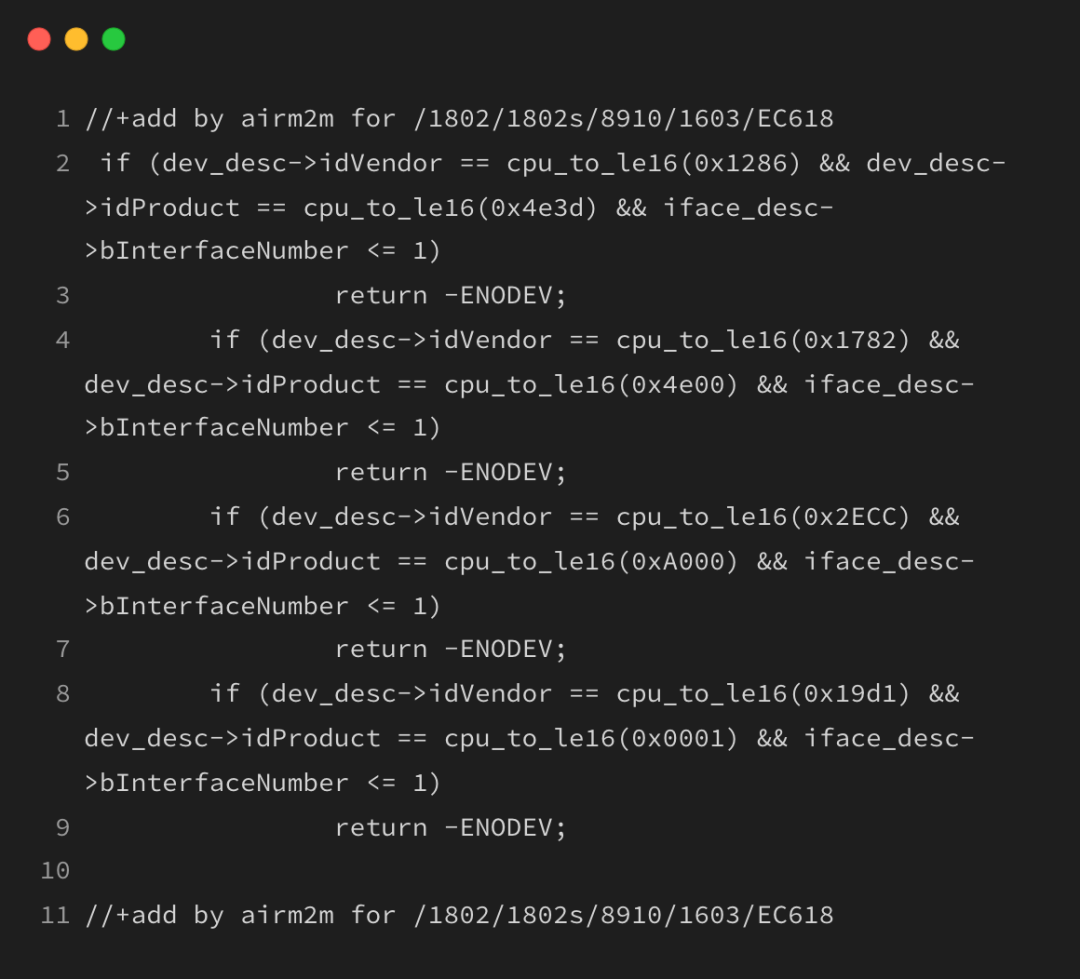
Under the function static const struct usb_device_id option_ids[], add the following line under the “{“.
//+add by airm2m for 8910/1603/1802s/1802/EC618
//1802 and 1802S series
{ USB_DEVICE(0x1286, 0x4e3d) },
//8910 series(724UG/720UH/720UG/722UG/820UG/600UG)
{ USB_DEVICE(0x1782, 0x4e00) },
//1603 series(722CS/724CS/722CE/724CE)
{ USB_DEVICE(0x2ECC, 0xA000) },
//618 series(780E/780EX/780EG/600E/780EA/600EA/700E)
{ USB_DEVICE(0x19d1, 0x0001) },
//+add by airm2m for 8910/1603/1802s/1802/EC618
Second Modification:
Under the function static struct usb_serial_driver option_lport_device, add a line under the last line, .resume = usb_wwan_resume.
//+add by airm2m for 8910/1603/1802s/1802/EC618
.reset_resume = usb_wwan_resume,
//+add by airm2m for 8910/1603/1802s/1802/EC618
Third Modification:
Under the line struct usb_interface_descriptor, add a line.
struct usb_device_descriptor *dev_desc = & serial->dev->descriptor;
Fourth Modification:
Under the line if (iface_desc->bINterfaceClass until return -ENODEV;, add the following lines:
After completing the modifications, use ctrl+o to save the changes and ctrl+x to exit the file editor.
5.1.2.2 Modifying the usb_wwan.c File
Use the command:sudo nano drivers/usb/serial/usb_wwan.c — use the nano editor to open the usb_wwan.c file.
There is only one modification needed in this file:
Under the function static struct urb *usb_wwan_setup_urb, add the following lines after if (intfdata->use_zlp to PACKET;
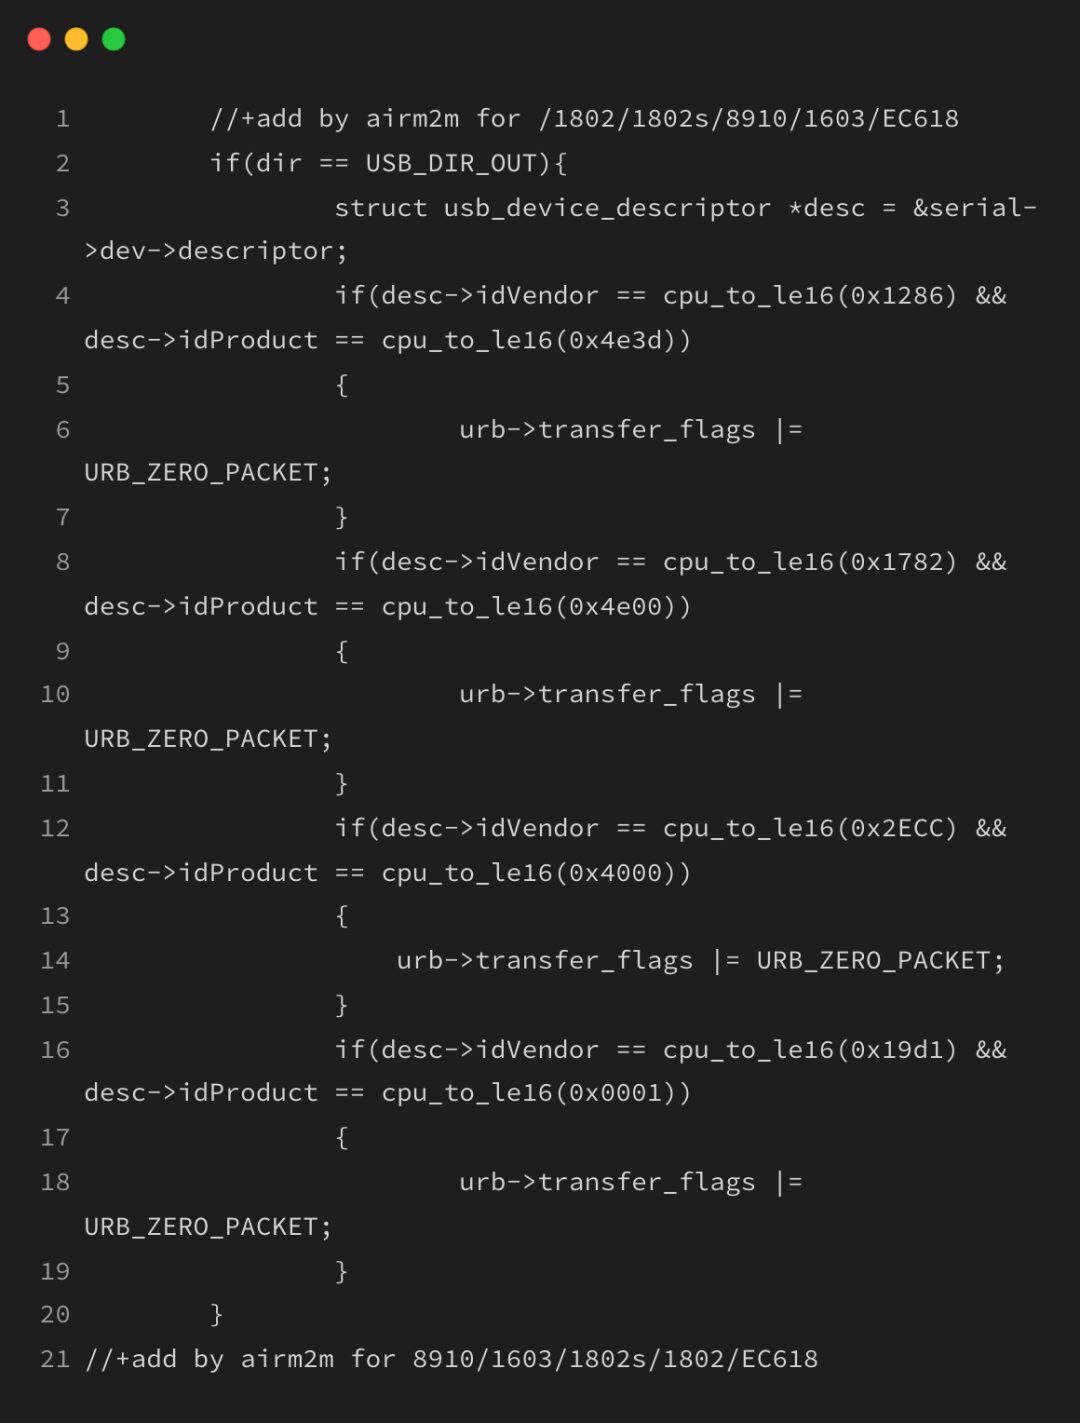
After completing the modifications, use ctrl+o to save the changes and ctrl+x to exit the file editor.
Now that the driver modifications are complete, you can enter the kernel editing interface,mainly to configure features that are not enabled by default, such as ECM/PPP.
5.1.3 Preparing for Compilation Before Code Modifications
First, install Git and the build dependencies:
sudo apt install git bc bison flex libssl-dev make
Make sure you know the version of the Raspberry Pi you have and whether the downloaded system version is 32-bit or 64-bit,and choose the corresponding command below.
If you are already in the Linux directory, you do not need to run the first command cd linux.
1)ForRaspberry Pi 1, Zero, and Zero W, as well as Raspberry Pi Compute Module 1, the default (32-bit only) build configuration:
cd linux
KERNEL=kernel
make bcmrpi_defconfig
2)ForRaspberry Pi 2, 3, 3+, and Zero 2 W, as well as Raspberry Pi Compute Module 3 and 3+, the default 32-bit build configuration:
cd linux
KERNEL=kernel7
make bcm2709_defconfig
3)ForRaspberry Pi 4 and 400, as well as Raspberry Pi Compute Module 4,the default 32-bit build configuration:
cd linux
KERNEL=kernel7l
make bcm2711_defconfig
4)ForRaspberry Pi 3, 3+, 4, 400, and Zero 2 W, as well as Raspberry Pi Compute Module 3, 3+, and 4,the default 64-bit build configuration:
cd linux
KERNEL=kernel8
make bcm2711_defconfig
If any of the above commands report an error, you can search for solutions online or consult the Hezhong FAE.
5.1.4 Kernel Configuration
In the Linux path, enter:
make menuconfig
Enter the kernel configuration interface; if you cannot enter, first check whether your current user is a superuser. If not, enter su to become a superuser;then try config again.
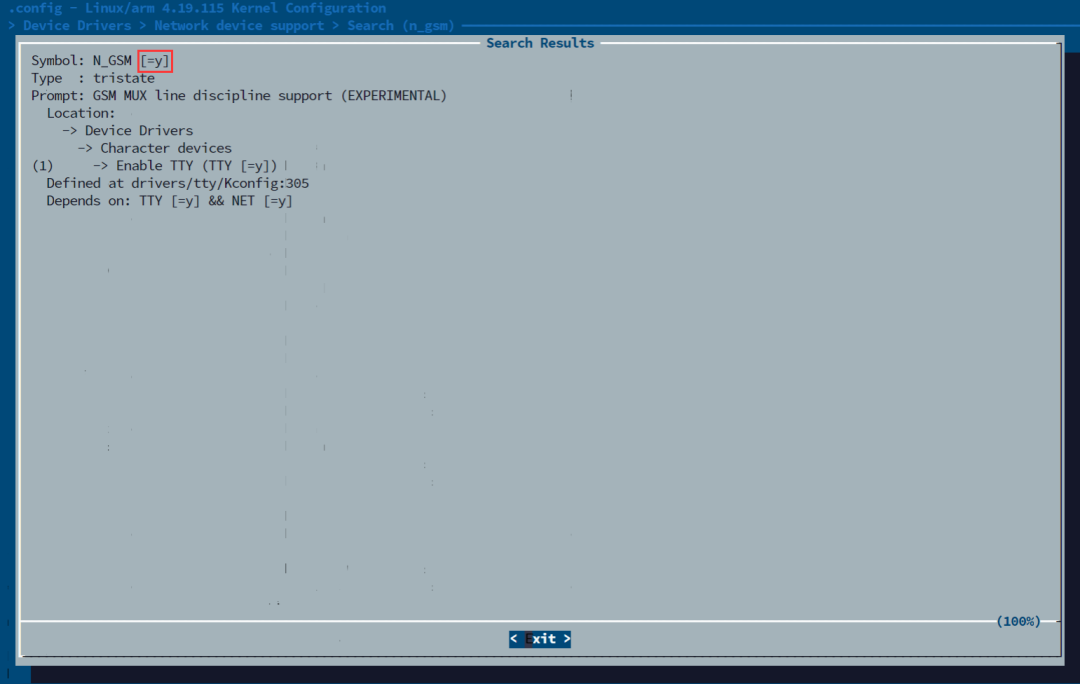
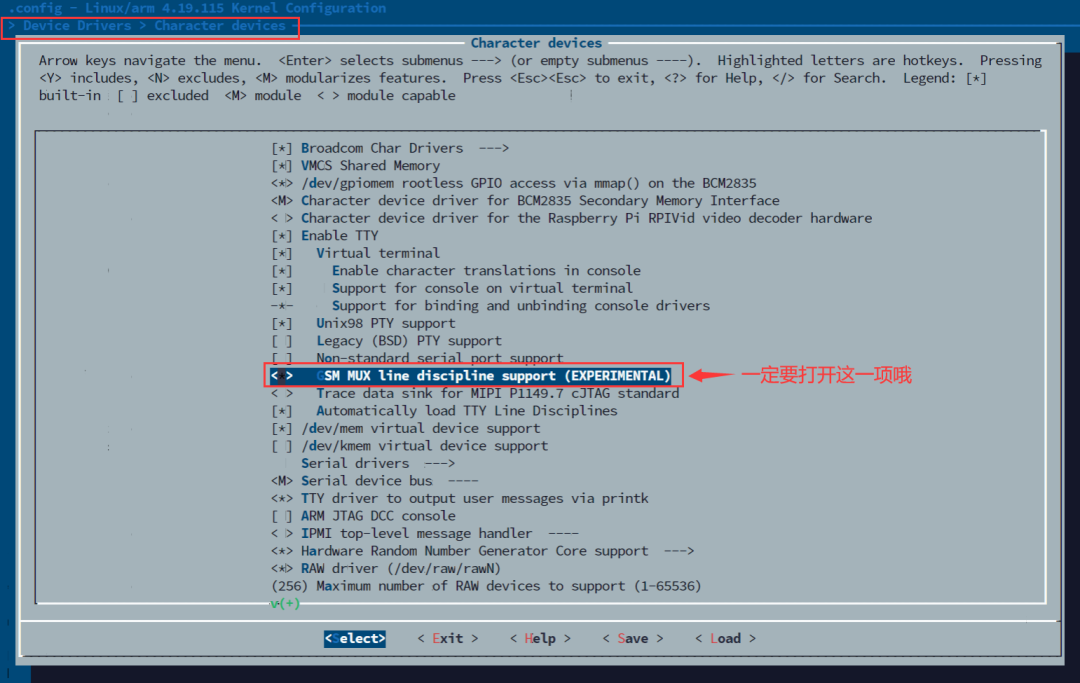
In the kernel configuration interface, press “/” to search for the place you want to change. For example, when searching for RNDIS, if there are many related configuration items, you can scroll through the results to ensure that the options related to RNDIS are set to y or m:

The paths of the related configuration items are written below:

ECM/PPP/CMUX works similarly; for CMUX, be sure to search for N_GSM:
Once you have configured one item, press the left and right buttons to select Save to save the configuration. After checking all options, press the left button to select Exit until you reach a dialog box asking if you want to save; choose yes to complete the configuration work.
5.1.5 Building the Kernel
Generate and install the kernel, modules, and device tree blob. This step may take a long time, depending on the Raspberry Pi model you are using.
For 32-bit kernel:
sudo make V=1 -j4 zImage modules dtbs
sudo make modules_install
sudo cp arch/arm/boot/dts/*.dtb /boot/
sudo cp arch/arm/boot/dts/overlays/*.dtb* /boot/overlays/
sudo cp arch/arm/boot/dts/overlays/README /boot/overlays/
sudo cp arch/arm/boot/zImage /boot/$KERNEL.img
For 64-bit kernel:
make V=1 -j4 Image.gz modules dtbs
sudo make modules_install
sudo cp arch/arm64/boot/dts/broadcom/*.dtb /boot/
sudo cp arch/arm64/boot/dts/overlays/*.dtb* /boot/overlays/
sudo cp arch/arm64/boot/dts/overlays/README /boot/overlays/
sudo cp arch/arm64/boot/Image.gz /boot/$KERNEL.img
Note 2: -j4 indicates that 4 cores will be started for compilation.
Remember to attach a fan to the Raspberry Pi for cooling, as it can get very hot.

Once all projects are completed, restart your Raspberry Pi, and it should run your newly compiled kernel!
reboot– reboot command
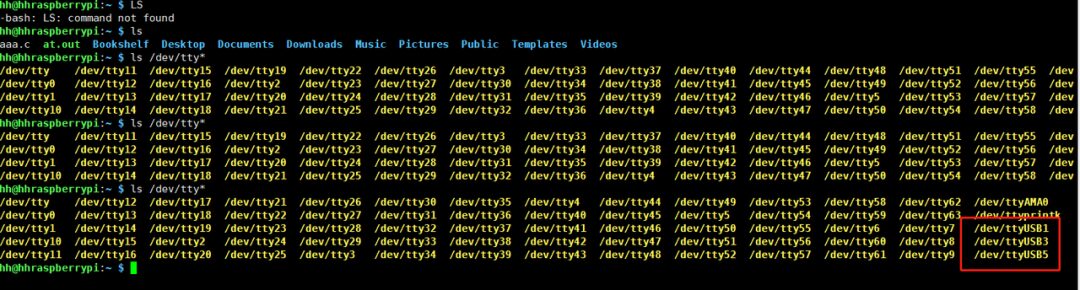
Insert the Hezhong Air724/Air780E/1802/1603 series board into the Raspberry Pi, power it on, and enter:
ls /dev/ttyUSB*
or
ls /dev/tty*
You should see three ports:

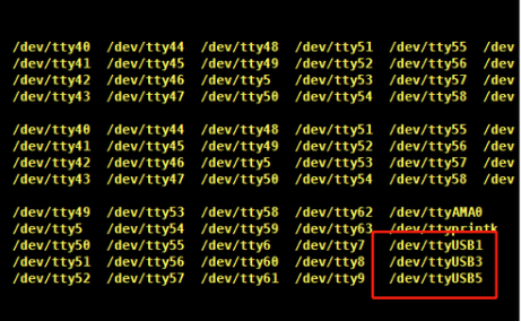
Note 1:These three ports are assigned by Linux itself; the port numbers may not be fixed. If you want to fix the port numbers, you can use the solutions mentioned in this link:
https://doc.openluat.com/article/2080/0
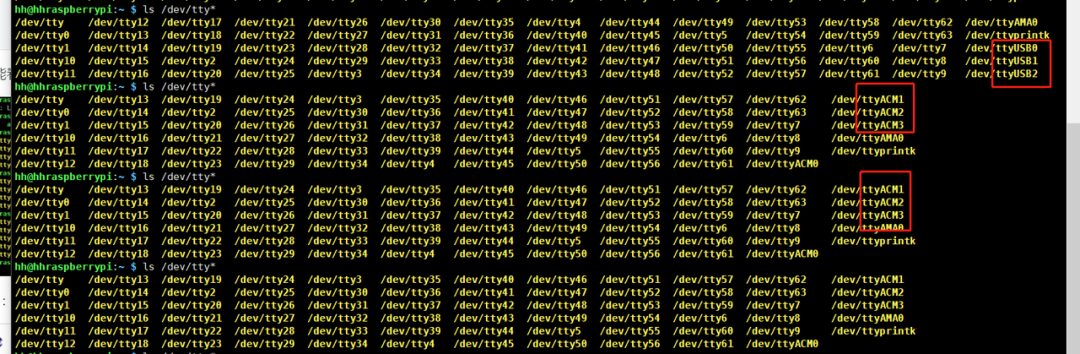
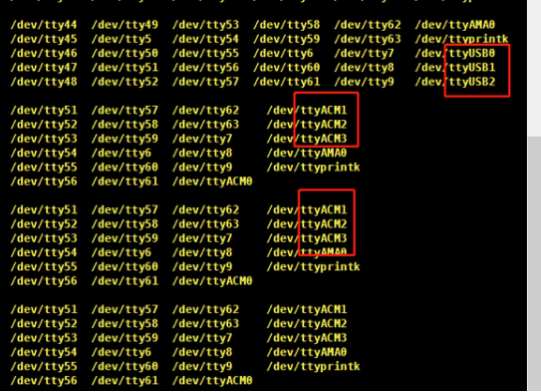
Note 2:The 618 may appear as a port not named ttyUSB; it may be called ttyACM or something else:

There are many serial debugging tools available for Linux, the most well-known being minicom. The simple usage method is as follows:
apt install minicom
minicom -D /dev/ttyUSB0
I personally find it not very user-friendly, so I useour own serial tool, and the usage method is as follows:
https://doc.openluat.com/article/645/0
gcc sendat.c -o at.out
After compilation, an executable file named at.out will be generated in the directory. Usage example:
./at.out /dev/ttyUSB1 — use the serial tool to open ttyUSB1, just write the port number here
5.2 Possible Issues After Compilation
5.2.1 Unable to Find Port
If lsusb can display the corresponding module’s PID VID but cannot find those virtual serial ports.
Solution: Send the command
1)8910 SeriesAir724UG/720UH/720UG/722UG/820UG/600UG… send this:
echo 1782 4e00>/sys/bus/usb-serial/drivers/ option1/new_id
echo 19d1 0001 > /sys/bus/usb-serial/drivers/option1/new_id
Then check for the port again. If you can find it, it proves that the PID VID modification was unsuccessful, and you need to start over from 5.1.1.
If lsusb cannot find the corresponding port, first check if the module has voltage on vdd_ext when powered on. If not, connect powerkey to ground and supply power of 4V to vbat; if there is voltage, it is recommended to expose vbus, DM, DP, and gnd with four wires and connect a USB cable to a Win10 computer. After the module is powered on, check if there are three ports on the Win10 computer.
5.2.2 Abnormal Port Display
If the port displayed by lsusb is 17d1 0001 instead of 19d1 0001.
Solution:17D1 0001 is the port number displayed by the 618 module after entering boot in Linux; usually, rebooting the 618 module can resolve this.
If after rebooting it still displays 17D1 0001, it indicates that the vdd_ext pin and the uboot pin are shorted together, or the uboot pin is connected to another high-level pin, such as 3.3V or the vbat pin.
—
The methods for compiling Raspberry Pi Linux and using the Hezhong series modules will be shared here~
If you have any questions in IoT development, feel free to contact Hezhong for discussion!

▼ Contact Hezhong’s Marketing Department Head ▼

Scan the QR code to add friends on WeChat/Enterprise WeChat
▼ Learn More About Hezhong ▼
TuGe and Hezhong strategic cooperation, empowering Cat.1 modules to go overseasLow power consumption testing artifact—Hezhong power consumption analyzer
Advancing to 2 microamps! The development history of Hezhong’s low power consumption
