The scientific steps of PLC programming are actually quite simple, but many engineers often overlook many details thinking they are simple. Ignoring details will inevitably lead to problems later. To avoid future issues, one must strictly adhere to the rules; just like in PLC programming, there are its own rules.
Step 1: Read the Product Manual
This first step seems simple, but many engineers fail to do it.
Carefully reading the manual is the first step in programming. First, you should read the safety rules to understand which actuators may cause harm to people, which components are most likely to collide, and how to resolve dangers when they occur; these critical issues are all in the safety rules. Reading the product manual is essential.
Additionally, the characteristics, usage, and debugging methods of each component of the equipment are also in the manual. If you don’t read it, even if the program is correct, if the components are not debugged properly, the equipment will still not work. Furthermore, all circuit diagrams, pneumatic and hydraulic circuit diagrams, and assembly diagrams are also in the manual, and you need to read it to know what modifications each component can undergo.
Step 2: Check I/O According to the Manual
Checking I/O, commonly known as “point checking.” There are many methods to check I/O, but you must check them in the order provided by the manual, ensuring absolute safety during the check.
When checking input points, the input signals are generally various sensors, such as capacitive, inductive, photoelectric, piezoresistive, ultrasonic, magnetic, and limit switch sensors. Checking these components is relatively simple; place the workpiece on the station according to the component instructions or move the actuator to check if the sensor has a signal. Of course, the detection methods may vary depending on the specific equipment.
However, extra caution is required when checking output signals. If it’s an electrically driven product, the actuator’s driver must be powered under safe conditions, especially ensuring that the equipment won’t collide, to check if the actuator can move. If it’s a hydraulic or pneumatic actuator, similarly, the directional valve should be powered manually under safe conditions to control the actuator. Regardless of the actuator’s driving method, when checking output signals, safety for both the equipment and personnel must be ensured. It’s important to note that not all equipment’s actuators can be powered for testing, so sometimes individual output signals may not be manually tested.
Whether it’s input or output devices, when the sensor has a signal or the actuator’s driver is powered, you must also check if the I/O module indicator lights on the PLC are lit. In many devices, input and output signals are connected to the PLC via terminal blocks. Sometimes the terminal block indicator lights may show a signal, but it does not guarantee that the corresponding address on the PLC has a signal due to internal disconnections in the connecting wires. This point must be especially noted.
After measuring the input and output signals, you should also record the measured addresses to ensure that the signal addresses match those in the manual. If there are discrepancies, measure the device addresses again. If multiple measurements still do not match, contact the equipment manufacturer, as it cannot be guaranteed that the addresses provided by the manufacturer are correct.
Step 3: Open the Programming Software, Configure Hardware, and Write I/O Addresses in the Symbol Table
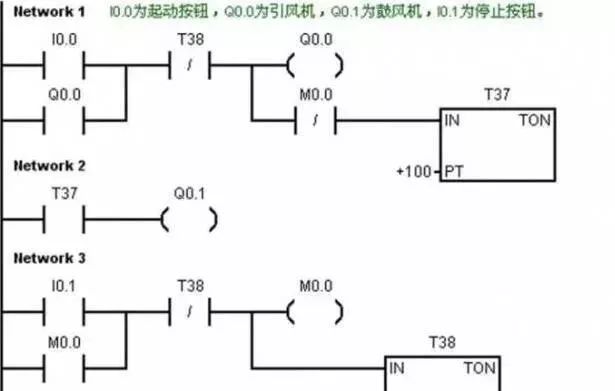
Different PLCs use different programming software. However, for any type of software, the first step before programming is to configure the hardware, establishing the hardware configuration and corresponding communication configuration based on the actual PLC type. After completing the hardware configuration, write the I/O addresses recorded on paper into the software’s symbol table. Due to different software, the definition of the symbol table may vary, but most software has this functionality, and this step is crucial. When writing the symbol table, not only should the absolute addresses of the device inputs and outputs be written correctly, but it’s also best to name each address and add comments, which will be very convenient for subsequent programming. There’s no need to look up absolute addresses each time during programming; just fill in the named names. Of course, this also depends on whether the software has this function.
Step 4: Write the Program Flowchart
Before programming, be sure to write the program flowchart on draft paper. A complete program should include the main program, stop program, emergency stop program, reset program, etc. If the software allows, each program should be written in “blocks,” meaning one program is one block, and ultimately each block is called as needed.
PLC is best at handling sequential control, and the main flow is the core of sequential control. It’s crucial to ensure that the established flow is correct, and it should be carefully checked on draft paper. If there are issues with the main flow, when the program is executed by the PLC, collisions may occur, damaging the equipment or endangering personnel.
Step 5: Write the Program in the Software
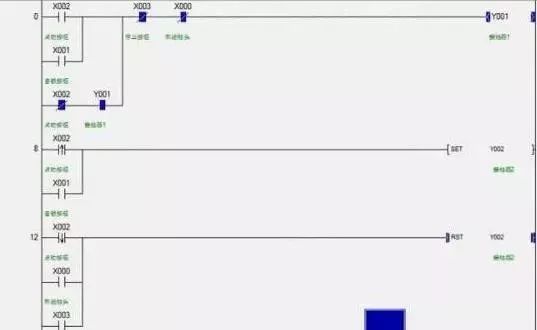
Once you ensure that the main flow is correct, you can write the program in the software. Additionally, pay attention to the correctness of the stop, emergency stop, and reset programs, especially the stop and emergency stop programs, as they are the most critical programs related to personnel and equipment safety and must not be underestimated. You must ensure that under any circumstances, as long as the stop or emergency stop program is executed, the equipment will not cause harm to personnel. It is recommended to follow the WeChat account for technical training.
Step 6: Debug the Program
This step can be divided into two aspects.
1. If conditions permit, or if your logical ability is strong, you can first use the software’s simulation function for testing. However, many complex programs are difficult to verify correctness through software simulation.
2. Download the program to the PLC for online debugging. If the equipment does not move or abnormal situations arise during operation, do not modify the program immediately; it’s likely that the sensors have not been debugged properly. Ensure that the sensors are correct before modifying the program.
Step 7: After Debugging, Edit the Program Again
In the previous debugging step, since modifications were made to the program, it is necessary to check or edit the program again, then download the final program to the PLC.
Step 8: Save the Program
In this step, one issue to note is where to save the program? On the PC hard drive? Flash storage? External hard drive? Of course, none of these are acceptable, as all these storage devices may get infected with viruses. Therefore, the program must and can only be burned to a CD. Additionally, there is another issue: which program to burn? Previously, we have downloaded the final debugged and modified program to the PLC. If the PLC executes that program without errors, then upload that program to the PC and burn it to a CD. All of the above is for safety.
Step 9: Fill Out the Report
After completing the programming, you should fill out the final debugging report, recording the problems encountered and some difficult issues with the program. Because over time, you may forget some techniques in the program, this also facilitates other colleagues to understand the program you wrote.
Source: World Advanced Manufacturing Technology Forum
Disclaimer:This article is a network reprint, and the copyright belongs to the original author.However, due to numerous reprints, it is impossible to confirm the true original author, so only the source of the reprint is marked.If the videos, images, or texts used in this article involve copyright issues, please inform us immediately, and we will confirm the copyright based on the materials you provide and pay remuneration according to national standards or delete the content immediately!The content of this article reflects the original author’s views and does not represent the views of this public account or its responsibility for its authenticity.