I am Lao Wen, an embedded engineer who loves learning.Follow me to become even better together!
1. Introduction to key_board
The key_board is designed for compact and multifunctional key support in microcontrollers. The software adopts a layered approach and is platform-independent. Users only need to provide basic information about the keys and functions to read/write IO levels, making it very easy to port. It supports multiple matrix keyboards and multiple single IO controlled keyboards.
Currently, it has implemented features such as press trigger, release trigger, long press auto trigger, long press release trigger, multi-click trigger, and continuous trigger, which can be freely combined (supporting both the same and different timelines for states). More features will be added in the future.
2. Usage Instructions
- Initialize the relevant hardware resources.
- Provide a 1ms timer for periodic calls to the ‘key_check’ function.
- Provide the description of the keys and functions to read/write IO.
- Register the keyboard with the system.
- Refer to the provided STM32 example for specific operations.
- Since the program uses heap memory by default, if the program runs abnormally, try increasing your program’s heap space or register a debug interface to check the reason.
- For more detailed usage tutorials, refer to the detailed usage instructions or the provided STM32 examples.
3. Supported Keyboards
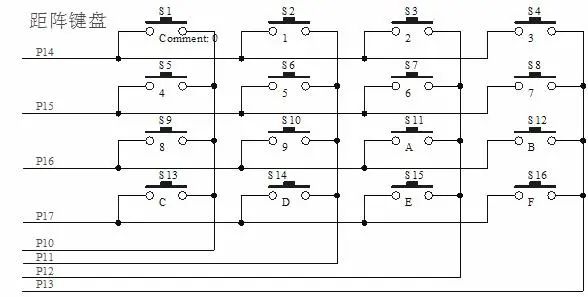
- Matrix Keyboard
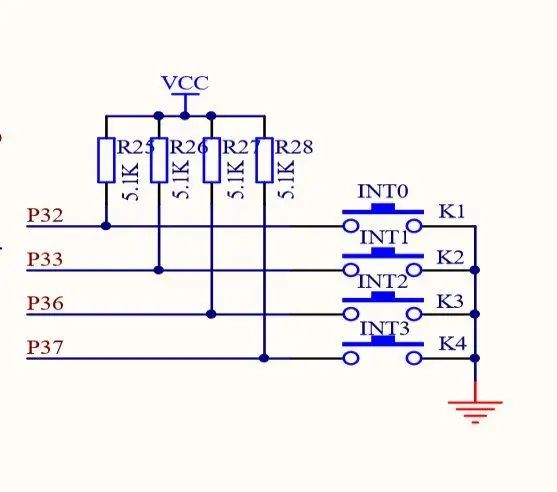
- Single IO Key
4. Detailed Usage Instructions
Place key_board.c, key_board.h, and key_board_config.h into the key_board folder and include them in your project, adding the header file path.
Basic Function Porting (Taking STM32 Matrix Keyboard as an Example)
First, a usable timer is needed (if you do not want to use a timer, you can directly place it in the main loop, but this is not recommended as it will lead to inaccurate timing). It is fixed to trigger every 1ms;
Prepare the basic information of the keys to be detected, refer to the struct key_pin_t structure in the key_board_sample.c file, for example:
struct key_pin_t {
    GPIO_TypeDef *port;     // Key port number
    uint16_t pin;           // Key pin number
    GPIO_PinState valid;    // Valid level for the key (i.e., level when the key is pressed)
    GPIO_PinState invalid;  // Invalid level for the key (i.e., level when the key is idle)
    /*
    You can add your other parameters
    */
};
Define the information of the keys to be detected, refer to the const struct key_pin_t key_pin_sig[] structure array in the key_board_sample.c file, corresponding header file is key_board_sample.h, for example:
// Global variable
const struct key_pin_t key_pin_sig[] = {
    {
        .port = KEY_PORT_J12,
        .pin = KEY_PIN_J12,
        .valid = KEY_PRESS_LEVEL_J12,
        .invalid = KEY_RELEASE_LEVEL_J12
    },
    {
        .port = KEY_PORT_J34,
        .pin = KEY_PIN_J34,
        .valid = KEY_PRESS_LEVEL_J34,
        .invalid = KEY_RELEASE_LEVEL_J34
    },
    {
        .port = KEY_PORT_J56,
        .pin = KEY_PIN_J56,
        .valid = KEY_PRESS_LEVEL_J56,
        .invalid = KEY_RELEASE_LEVEL_J56
    },
};
If it is a matrix keyboard, you also need to define the relevant information for controlling IO, refer to the const struct key_pin_t key_pin_ctrl[] structure array in the key_board_sample.c file, corresponding header file is key_board_sample.h, for example:
const struct key_pin_t key_pin_ctrl[] = {
    {
        .port = KEY_PORT_J135,
        .pin = KEY_PIN_J135,
        .valid = KEY_CTL_LINE_ENABLE,
        .invalid = KEY_CTL_LINE_DISABLE
    },
    {
        .port = KEY_PORT_J246,
        .pin = KEY_PIN_J246,
        .valid = KEY_CTL_LINE_ENABLE,
        .invalid = KEY_CTL_LINE_DISABLE
    },
};
Implement the function to read the level of the key IO, refer to the pin_level_get function in the key_board_sample.c file, for example:
static inline bool pin_level_get(const void *desc)
{
    struct key_pin_t *pdesc;

    pdesc = (struct key_pin_t *)desc;
    return HAL_GPIO_ReadPin(pdesc->port, pdesc->pin) == pdesc->valid;
}
If it is a matrix keyboard, you also need to implement the function to write the level of the key IO, refer to the pin_level_set function in the key_board_sample.c file, for example:
static inline void pin_level_set(const void *desc, bool flag)
{
    struct key_pin_t *pdesc;

    pdesc = (struct key_pin_t *)desc;
    HAL_GPIO_WritePin(pdesc->port, pdesc->pin, flag ? pdesc->valid : pdesc->invalid);
}
Define the key ID and function structure struct key_public_sig_t, refer to the const struct key_public_sig_t key_public_sig[] structure array in the key_board_sample.c file, corresponding header file is key_board.h, for example:
const struct key_public_sig_t key_public_sig[] = {
    KEY_PUBLIC_SIG_DEF(KEY_UP, &key_pin_sig[0], pin_level_get, KEY_FLAG_NONE),
    KEY_PUBLIC_SIG_DEF(KEY_LEFT, &key_pin_sig[1], pin_level_get, KEY_FLAG_NONE),
    KEY_PUBLIC_SIG_DEF(KEY_DOWN, &key_pin_sig[2], pin_level_get, KEY_FLAG_NONE),
    // The following three keys are extended due to the use of a matrix keyboard
    KEY_PUBLIC_SIG_DEF(KEY_ENTER, &key_pin_sig[0], pin_level_get, KEY_FLAG_NONE),
    KEY_PUBLIC_SIG_DEF(KEY_RIGHT, &key_pin_sig[1], pin_level_get, KEY_FLAG_NONE),
    KEY_PUBLIC_SIG_DEF(KEY_EXIT, &key_pin_sig[2], pin_level_get, KEY_FLAG_NONE),
};
If it is a matrix keyboard, you also need to define the control IO ID and function structure struct key_public_ctrl_t, refer to the const struct key_public_ctrl_t key_public_ctrl[] structure array in the key_board_sample.c file, corresponding header file is key_board.h, for example:
const struct key_public_ctrl_t key_public_ctrl[] = {
    KEY_PUBLIC_CTRL_DEF(&key_pin_ctrl[0], pin_level_set),
    KEY_PUBLIC_CTRL_DEF(&key_pin_ctrl[1], pin_level_set),
};
Initialize the keyboard, refer to the GPIO_Key_Board_Init function in the key_board_sample.c file, for example:
void GPIO_Key_Board_Init(void)
{
    // Initialize hardware IO
    GPIO_InitTypeDef GPIO_InitStruct;
    unsigned int i;

    RCC_KEY_BOARD_CLK_ENABLE();

    GPIO_InitStruct.Pull  = GPIO_PULLUP;
    GPIO_InitStruct.Mode  = GPIO_MODE_INPUT;
    for(i = 0;i < ARRAY_SIZE(key_pin_sig);i++)
    {
        GPIO_InitStruct.Pin   = key_pin_sig[i].pin;
        HAL_GPIO_Init(key_pin_sig[i].port, &GPIO_InitStruct);
    }

    GPIO_InitStruct.Speed = GPIO_SPEED_FREQ_LOW;
    GPIO_InitStruct.Pull  = GPIO_NOPULL;
    GPIO_InitStruct.Mode  = GPIO_MODE_OUTPUT_PP;
    for(i = 0;i < ARRAY_SIZE(key_pin_ctrl);i++)
    {
        GPIO_InitStruct.Pin   = key_pin_ctrl[i].pin;
        HAL_GPIO_Init(key_pin_ctrl[i].port, &GPIO_InitStruct);
    }

    // Initialize keyboard
    key_board_init();
    // Register keyboard with the system (matrix keyboard)
    key_board_register(KEY_BOARD_MATRIX, key_public_sig, ARRAY_SIZE(key_public_sig), key_public_ctrl, ARRAY_SIZE(key_public_ctrl));
}
Main process pseudo-code framework, for more examples refer to the main_test.c file:
int main(void)
{
    // Initialize hardware IO and register keyboard
    GPIO_Key_Board_Init();
    // Initialize timer for key scanning (1ms)
    init_tmr();

    for(;;)
    {
        if(key_check_state(KEY_UP, KEY_RELEASE))
        {
            PRINTF("KEY_UP KEY_RELEASE\r\n");
        }
        if(key_check_state(KEY_UP, KEY_PRESS))
        {
            PRINTF("KEY_UP KEY_PRESS\r\n");
        }
    }
}

// Timer expiration callback processing function
void tmr_irq_callback(void)
{
    // Call the core function for key scanning
    key_check();
}
5. Using Extended Functionality for Long Press
First, ensure that the macro KEY_LONG_SUPPORT in the key_board_config.h file is enabled and that the value of the macro KEY_DEFAULT_LONG_TRRIGER_TIME is set correctly;
To set the key function, long press detection is required, for example:
KEY_PUBLIC_SIG_DEF(KEY_UP, &key_pin_sig[0], pin_level_get, KEY_FLAG_PRESS_LONG | KEY_FLAG_RELEASE_LONG)
Usage example:
if(key_check_state(KEY_UP, KEY_PRESS_LONG))
{
    PRINTF("KEY_UP KEY_PRESS_LONG\r\n");
}
if(key_check_state(KEY_UP, KEY_RELEASE_LONG))
{
    PRINTF("KEY_UP KEY_RELEASE_LONG\r\n");
}
6. Using Extended Functionality for Continuous Press
First, ensure that the macro KEY_CONTINUOUS_SUPPORT in the key_board_config.h file is enabled and that the values of the macros KEY_DEFAULT_CONTINUOUS_INIT_TRRIGER_TIME and KEY_DEFAULT_CONTINUOUS_PERIOD_TRRIGER_TIME are set correctly;
To set the key function, continuous press detection is required, for example:
KEY_PUBLIC_SIG_DEF(KEY_UP, &key_pin_sig[0], pin_level_get, KEY_FLAG_PRESS_CONTINUOUS)
Usage example:
if(key_check_state(KEY_UP, KEY_PRESS_CONTINUOUS))
{
    PRINTF("KEY_UP KEY_PRESS_CONTINUOUS\r\n");
}
7. Using Extended Functionality for Multi-Click
First, ensure that the macro KEY_MULTI_SUPPORT in the key_board_config.h file is enabled and that the value of the macro KEY_DEFAULT_MULTI_INTERVAL_TIME is set correctly;
To set the key function, multi-click detection is required, for example:
KEY_PUBLIC_SIG_DEF(KEY_UP, &key_pin_sig[0], pin_level_get, KEY_FLAG_PRESS_MULTI | KEY_FLAG_RELEASE_MULTI)
Usage example:
unsigned int res;
res = key_check_state(KEY_UP, KEY_PRESS_MULTI);
if(res)
{
    PRINTF("KEY_UP KEY_PRESS_MULTI:%d\r\n", res);
}
res = key_check_state(KEY_UP, KEY_RELEASE_MULTI);
if(res)
{
    PRINTF("KEY_UP KEY_RELEASE_MULTI:%d\r\n", res);
}
8. Using Extended Functionality for Combined States (Same Timeline)
Thanks to user Shi Yuhu for the feedback, the previous incorrect usage case has been corrected.
Usage example:
unsigned int key_down_release_long, key_up_release_long;
key_down_release_long = key_check_state(KEY_DOWN, KEY_RELEASE_LONG);
key_up_release_long = key_check_state(KEY_UP, KEY_RELEASE_LONG);
if(key_down_release_long && key_up_release_long)
{
    PRINTF("KEY_DOWN KEY_RELEASE_LONG && KEY_UP KEY_RELEASE_LONG\n");
}
9. Using Extended Functionality for Combined States (Different Timelines)
First, ensure that the macro KEY_COMBINE_SUPPORT in the key_board_config.h file is enabled and that the value of the macro KEY_DEFAULT_COMBINE_INTERVAL_TIME is set correctly;
Usage example:
// Used to save the registered combined state ID
static unsigned int test_id1, test_id2;

// Define the states to be detected
const struct key_combine_t test_combine1[] = {
    { .id = KEY_UP,     .state = KEY_PRESS },
    { .id = KEY_DOWN,   .state = KEY_PRESS_LONG },
    { .id = KEY_UP,     .state = KEY_PRESS },
};
// Register combined state
test_id1 = key_combine_register(test_combine1, ARRAY_SIZE(test_combine1));

const struct key_combine_t test_combine2[] = {
    { .id = KEY_UP,     .state = KEY_PRESS },
    { .id = KEY_DOWN,   .state = KEY_PRESS },
    { .id = KEY_UP,     .state = KEY_PRESS },
    { .id = KEY_DOWN,   .state = KEY_PRESS },
};
test_id2 = key_combine_register(test_combine2, ARRAY_SIZE(test_combine2));

if(key_check_combine_state(test_id1))
{
    PRINTF("combine test_id1\r\n");
}

if(key_check_combine_state(test_id2))
{
    PRINTF("combine test_id2\r\n");
}
This article is sourced from the internet, free to convey knowledge, copyright belongs to the original author. If there are copyright issues, please contact me for deletion.
-END-
Previous Recommendations: Click the image to jump to read

Embedded C Programming, is pointer difficult?
Embedded Programming, how to implement state machine design using C language?
How to write highly readable embedded C code?