
Typically, when we write programs, we follow this pattern: executing one function after another in a logical sequence.

If the logic is very complex and involves many modules, then this sequential execution code can become quite bulky, with tight coupling between modules. In the Linux kernel, with various peripheral drivers, it is almost impossible to execute in a sequential logical manner.
The kernel code can be so extensive yet organized, effectively separating various layers and modules, while a large amount of code is logically organized together. This has a crucial role in the initcall.
By mimicking this approach, we can ultimately clear the code in the main function shown in the image, separate this logic, and achieve the same functionality.
To realize this functionality, some background knowledge is needed:
1. Organization of program code
2. Knowledge related to linker scripts.
3. Application of function pointers.

1. Code organization, as shown in the image, we need to know where the variables a, b, and function pointers f, f2 are stored in the program’s segments. You can refer to this article on STM32 startup code implementation | C language. The aforementioned a, f are stored in the bss segment, while b, f2 are stored in the data segment, as they have been given initial values. Implementing this initcall will place the data that needs to be automatically initialized into a custom segment, such as .initcall.
To place data into specific segments, we need to use the attribute((section)) keyword to change the data storage segment.
The current program compilation utilizes these segments, with the exception of .isr_vector, which is also added; the rest are defaults from the compiler.
First, add segment code:

Of course, this is not enough; we also need to tell the linker (LD) to link the .initcall segment into the program, so this modification is necessary.

This segment is aligned to 8 bytes, defining two global variables, and links these data in order from 0-5. With these two modifications, let’s take a look at the status of each segment in the program.
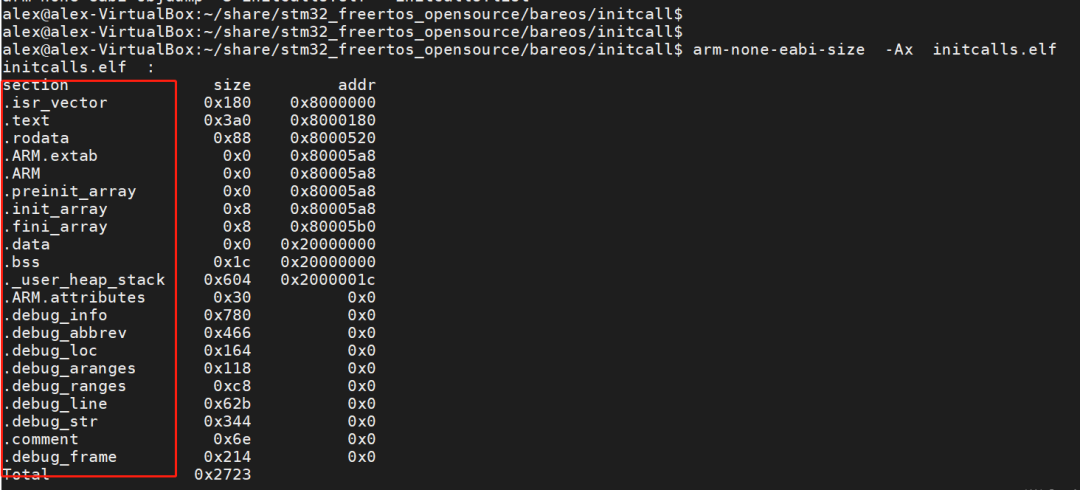
As shown in the image:

The newly added red box indicates the .initcalls segment, which totals 8 bytes, starting from 0x80005a8.
Now let’s examine the specifics of this segment using the readelf tool.

It matches the size tool above, while the address in the green box is SystemInit(0x08000231, little-endian).

Thus, by using attribute and modifying the linker script, we have placed the function pointer variables into the .initcall segment.
How do we call this function? Similar to the initialization of data segment data, we traverse this segment, retrieve the function address, forcibly convert the address in the segment to a function pointer, and then directly call it.


The implemented image shows that the function address is retrieved from the .initcall segment and called directly. It is very easy to confuse the function’s address with that of the function pointer variable.
Modifying the code this way allows for automatic initialization functions to be called, but writing a long line such as static initcall_t __ attribute__(( __ used__,__ section__(“.initcall.0.init”))) every time is not comfortable. In the Linux kernel, macros are used for modifications.
This is similar.

Add macros to execute according to the program’s logical sequence:
0. low_level_init, for example, to initialize the basic system clock
1. arch_init, for example, to initialize CPU architecture and NVIC.
2. dev_init, for peripheral module initialization, such as i2c, flash, spi, etc.
3. board_init, to set specific hardware board settings.
4. os_init, for operating system settings like file systems, network stacks, etc.
5. app_init, to finally run user programs.
Modify your own program to use macros instead. By doing this, calling do_initcalls will execute in order from 0, 1 to 5.


Finally, let’s take a look at the initcall segment:


Now, as long as you add similar to dev_init(), app_init() for automatic initialization functions, they will be automatically called without needing to execute each one sequentially in the main function.
For example, the initialization controlled by i2c is placed in dev_init, and many i2c slaves are connected below. Each slave can be initialized using app_init, even if a new one comes along, it can also be initialized with app_init without changing the original, achieving a high degree of separation between modules.
This successfully simulates the Linux kernel initialization, and finally, the library is included.
https://gitee.com/android_life/stm32_freertos_opensource/tree/master/bareos/initcall
Those interested can take a look, as well as follow and share.
Original: https://www.toutiao.com/a6906858875912307203/?log_from=16f51be0430a9_1647178471075
———— END ————

● Column “Embedded Tools”
● Column “Embedded Development”
● Column “Keil Tutorials”
● Selected Tutorials for Embedded Column
Follow the public account reply “Join Group” to join the technical exchange group according to the rules, reply “1024” to see more content.


Click “Read Original” to see more shares.