Introduction
What are bad sectors? They refer to areas on a disk drive or flash memory that cannot be read or written to, usually due to permanent physical damage on the disk surface or failure of flash memory transistors.
If the number of bad sectors increases, it can severely impact the performance of the storage device, reduce storage capacity, and may even lead to complete hardware failure.
Additionally, once bad blocks are detected, you should consider replacing the disk drive or marking the bad blocks as unusable.
Therefore, this article[1] will introduce some methods to help you check for bad sectors on Linux disk drives or flash memory using various disk scanning tools. The specific methods are as follows:
badblocks
- Use the
<span>badblocks</span>tool to check for bad sectors
<span>badblocks</span> can scan storage devices such as hard drives or external drives to find bad sectors. Devices are typically displayed in file form, such as /dev/sdc or /dev/sda.
- Step 1: List all disks and partitions First, use the
<span>fdisk</span>command with superuser privileges to view all disk drives or flash memory and their partition information:
sudo fdisk -l
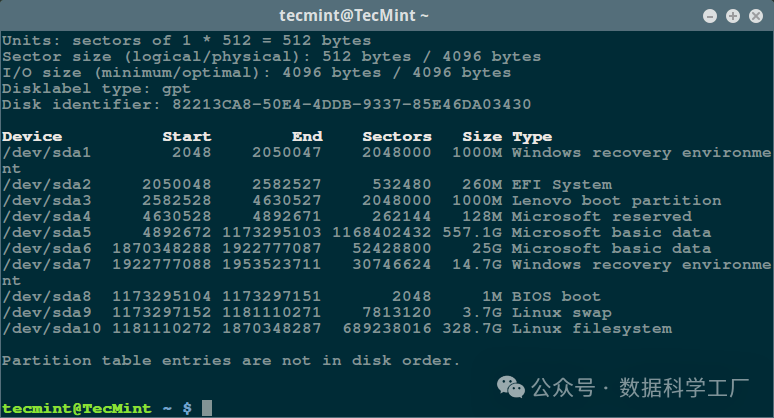
This will help you determine the correct device name for scanning.
- Step 2: Then scan your Linux disk drive for bad sectors/blocks:
sudo badblocks -v /dev/sda10 > badsectors.txt
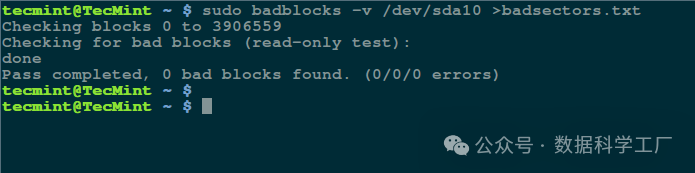
In the command mentioned above, <span>badblocks</span> is checking the device /dev/sda10 (make sure to replace it with your actual device name), and the -v parameter allows it to display detailed information during the operation. The results will be saved to the badsectors.txt file through output redirection.
If bad sectors are found in the disk drive, you need to unmount the disk first, and then follow the steps below to inform the operating system not to write to these reported sectors.
- Step 3: Mark bad sectors as unusable You need to use the e2fsck (for ext2/ext3/ext4 file systems) or fsck command, combined with the badsectors.txt file and the device file, as follows.
- For ext2/ext3/ext4 file systems:
sudo e2fsck -l badsectors.txt /dev/sda10
- For other file systems:
sudo fsck -l badsectors.txt /dev/sda10
Smartmontools
- Use
<span>Smartmontools</span>to check disk health (recommended)
This method is more suitable for modern disks (including ATA/SATA and SCSI/SAS hard drives as well as solid-state drives), as these disks come with a built-in S.M.A.R.T (Self-Monitoring, Analysis, and Reporting Technology) system. This system can detect, report, and log the health status of the disk, helping you to detect potential hardware failures in advance.
- Step 1: Install
<span>smartmontools</span>on Linux by running the following commands
sudo apt install smartmontools  #For Debian-based
sudo dnf install smartmontools  #For RHEL-based
- Step 2: Perform a health check with smartctl
After installation, you can use smartctl, which controls the built-in S.M.A.R.T system of the disk. You can view its manual or help page as follows:
man smartctl
smartctl -h
- Step 3: Run a basic health test
Next, run the smartctl command and specify the specific device you want to check. In the command, use the -H or –health flag to display the overall health self-test results of the S.M.A.R.T system.
sudo smartctl -H /dev/sda10

The result above shows that your hard drive is currently in good condition and is not expected to experience hardware failure at this time.
Conclusion
In this article, we introduced how to detect and handle bad sectors on Linux disks using <span>badblocks</span> and <span>smartmontools</span>. Monitoring the health of storage devices is very important, and these tools make the process straightforward.
Discussion Group
❝
QQ: 941844452, feel free to interact, provide suggestions, or discuss business cooperation. There is also a discussion group (with resources), welcome to join!


Still troubled by cell type annotation? Try mLLMCelltype!
It is recommended for bioinformatics professionals to bookmark it! (Single-cell nanny tutorial collection)
Single-cell trajectory analysis tutorial (long article + code)
3D genome: Hi-C differential analysis (1)
Please give a thumbs up! Feel free to share!
Reference[1]
Source: https://www.tecmint.com/check-linux-hard-disk-bad-sectors-bad-blocks/