Backing up is like insurance; you don’t need it every day, but when disaster strikes, such as accidental file deletion, disk failure, or ransomware attacks, being unprepared can be devastating. This is why a smart backup plan is essential.
In this practice, I will show you how to schedule incremental backups using rsync and cron.
What is Incremental Backup?
Incremental backup means you only back up the files that have changed since the last backup. Therefore, you don’t need to copy all files every time (which can be time-consuming and take up a lot of space), but only save the newly added or updated files.
For example, if you have a folder with 1000 files, and only 20 of them have changed today, the incremental backup will skip the 980 unchanged files and only back up the 20 files that have actually changed. This method is efficient and very suitable for daily backups.
Why Use rsync?

rsync is a powerful and reliable tool for copying files and directories in Linux systems. What makes rsync unique is its ability to only synchronize the differences between the source and destination directories.
It supports local operations (between two folders on the same system) or remote operations (connecting to another server via SSH). Additionally, it preserves file permissions, timestamps, symbolic links, and even supports deleting files that have been removed, making it fast and flexible, and it is pre-installed in most Linux distributions.
If rsync is not installed, you can obtain it with the following commands:
# Check if installed (most mainstream systems come pre-installed)
rsync --version

sudo apt install rsync       # Debian/Ubuntu
sudo yum install rsync       # CentOS/RHEL
Core Advantages:✅ Incremental Synchronization|Only transfer changed files, speed improvement of 90%✅ Resume Support|Automatically resumes after network interruption✅ Mirror Deletion|Files deleted on the source are synchronized and cleaned up on the backup side (<span>--delete</span>)✅ Metadata Preservation|Perfectly clone permissions/timestamps/symlinks
Backup Plan
Assuming you have some important files stored in the <span>/home/oneh/documents/</span> directory, and you want to back them up to the <span>/backup/documents/</span> directory. Write a simple shell script that uses the rsync command to copy the changed files to the backup directory. Then, use a cron job to run this script every day at 2:00 AM.
Step 1: Write the Backup Script
First, we create a shell script to perform the backup operation and write the following script content.
sudo vi /usr/local/bin/rsync-backup.sh
# Script Content========0
#!/bin/bash
# Name: /usr/local/bin/rsync-backup.sh
# Function: Incremental Backup + Logging

SOURCE="/home/oneh/documents/" # Important data source
DEST="/backup/documents/" # Backup target path
LOGFILE="/var/log/rsync-backup.log" # Log file path
DATE=$(date +"%Y-%m-%d %H:%M:%S") # Backup time

# Core command (archive mode + delete sync + log output)
rsync -av --delete "$SOURCE" "$DEST" >> "$LOGFILE" 2>&1
echo "Backup completed at $DATE" >> "$LOGFILE"
# Script Content========1
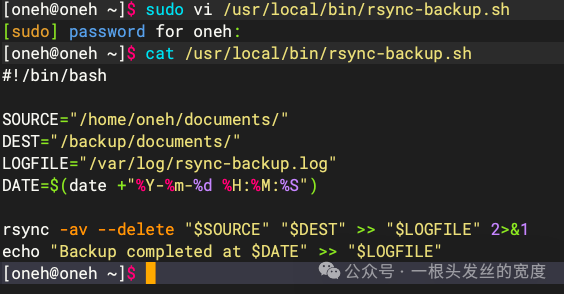
This script instructs rsync to synchronize files from the source directory to the destination directory.<span>-a</span> option indicates it runs in archive mode, preserving permissions and metadata.
<span>-v</span> option makes the output more verbose (so we can log what is happening), while the <span>--delete</span> option removes files from the backup if they no longer exist in the source directory. All output is written to the log file <span>/var/log/rsync-backup.log</span> for later inspection in case of any issues.
Make the script executable:
sudo chmod +x /usr/local/bin/rsync-backup.sh
Step 2: Schedule the Script with Cron
We need to ensure the backup script runs automatically every day at 2 AM, so we need to edit the cron job by entering:
crontab -e # Edit cron jobs
Add the following content at the bottom (since there are no cron jobs, the file content is originally empty):
# Add the following content (run daily at 2:00 AM)
0 2 * * * /usr/local/bin/rsync-backup.sh
Confirm the cron job has been added:
crontab -l # View task list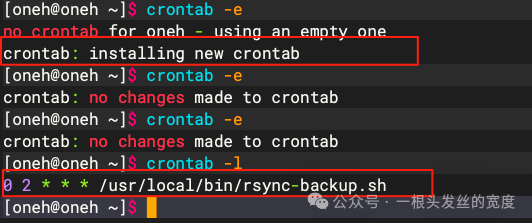
Step 3: Test the Backup Setup
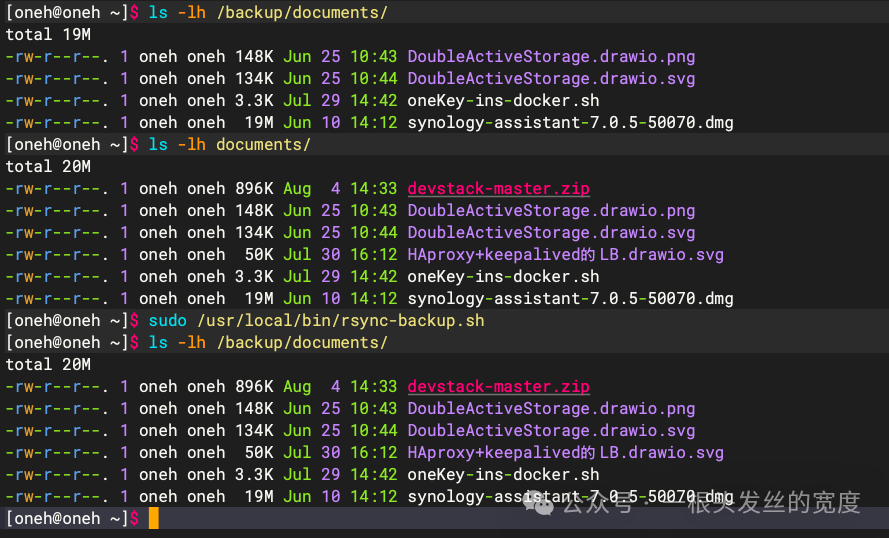
Before letting the system run backups automatically, it is crucial to manually test the script to ensure everything works as expected. This will help your cron discover any path issues, permission errors, or typos before running silently in the background.
First, manually run the backup script, which will immediately trigger the backup process.
sudo /usr/local/bin/rsync-backup.sh
After the script completes, check the backup directory to confirm that the files have been copied correctly:
ls -lh /backup/documents/
Check the log file to ensure there were no errors during the script execution and that the backup time was recorded:
cat /var/log/rsync-backup.log
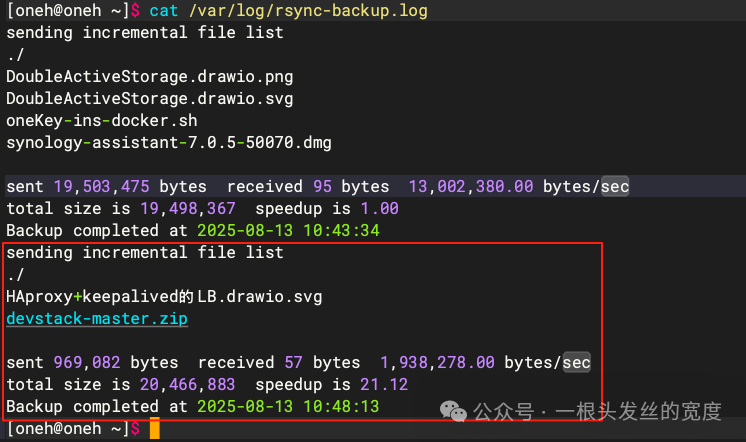
The above image confirms that the script executed correctly as expected, not only copying the files but also logging the event with a timestamp.
Step 4: Create Daily Snapshot Backups
If you want to go a step further and create snapshot backups of the data daily (instead of just creating a backup folder), you can use the <span>--link-dest</span> option in rsync, which allows you to create hard link backups, essentially creating new folders that look like complete backups but only take up space for the changed files.
On the first day, create the initial full backup:
sudo rsync -a /home/oneh/documents/ /backup/daily.0/
On the next day, create an incremental backup referencing the previous day’s folder:
sudo rsync -a --link-dest=/backup/daily.0/ /home/oneh/documents/ /backup/daily.1/
Unchanged files will be hard linked, saving space. You can even use a simple script to rotate these folders, renaming the old ones daily and creating a new snapshot.
Here is a basic rotation script for 7 days:
#!/bin/bash

rm -rf /backup/daily.7
mv /backup/daily.6 /backup/daily.7
mv /backup/daily.5 /backup/daily.6
mv /backup/daily.4 /backup/daily.5
mv /backup/daily.3 /backup/daily.4
mv /backup/daily.2 /backup/daily.3
mv /backup/daily.1 /backup/daily.2
mv /backup/daily.0 /backup/daily.1

rsync -a --delete --link-dest=/backup/daily.1 /home/oneh/documents/ /backup/daily.0/
Schedule this script with cron, just like the basic backup script. For example, to run it daily at 2:00 AM:
0 2 * * * /usr/local/bin/daily-rsync-rotate.sh
Backing Up Data to a Remote Server
If you want to back up data to another machine (like a backup server), you can use rsync over SSH, but make sure to configure SSH keys for passwordless login, then run a command like the following:
# 1. Generate SSH keys (passwordless login)
ssh-keygen -t ed25519
ssh-copy-id user@backup-server

# 2. Remote sync command (encrypted transfer)
rsync -av -e ssh /home/oneh/documents/ oneh@backup-server:/backup/oneh/
You can add the above command to a script or create a separate script for remote backups.
Avoid Pitfalls Guide
- First Execution:Be sure to manually run
<span>sudo /usr/local/bin/rsync-backup.sh</span>to test path permissions - Space Monitoring:Add
<span>df -h >> $LOGFILE</span>to the script to log disk usage - Email Alerts:Add at the end of the cron job
<span>&& echo "Success" | mail -s "Backup Report" [email protected]</span> - Recovery Drills:Randomly restore files every quarter to verify backup validity
Conclusion:
No matter how small the data, it deserves to be backed up, and no matter how busy the schedule, it should be automated. This zero-cost solution has protected a large amount of my personal data for 10 years, surviving 3 hard drive failures with 0 losses.For a tech person, the greatest romance is to write security into the code.
Recommended Reading:👉 1.In-Depth Analysis of Debian 13 “Trixie”: 15 Disruptive Innovations Reshaping the Linux Ecosystem👉 2.Deploying OpenStack Practically Using DevStack on Ubuntu 24.04👉 3.Simple Configuration of High Availability HAProxy Using Keepalived on Debian