This project implements a simple web chat interface where users can input messages in a text box and send them by clicking the send button or pressing the enter key. The bot generates replies based on keyword matching with the content of the user’s messages.
—— Wen Qingzhou

Keyword Reply Bot | Python Full-Stack
1
Effect Demonstration
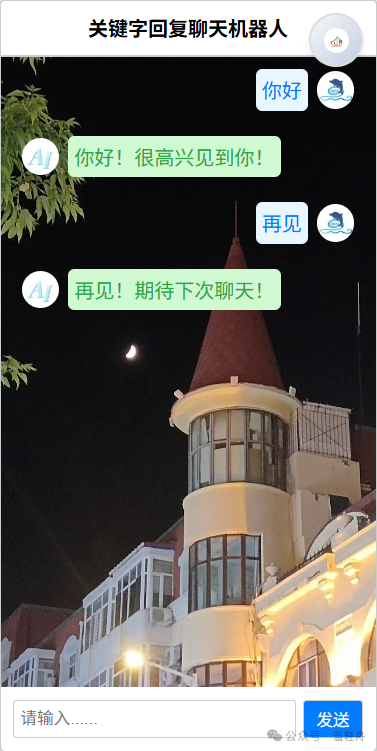


2
Source Code Sharing
HTML Code
<!DOCTYPE html><html lang="en"><head> <meta charset="UTF-8"> <meta name="viewport" content="width=device-width, initial-scale=1.0"> <title>AI Chat Bot</title> <link rel="stylesheet" href="{{ url_for('static', filename='styles.css') }}"></head><body> <div class="chat-container"> <div class="chat-title"> Keyword Reply Chat Bot <div class="upload-button-container"> <label class="upload-button"> <img src="{{ url_for('static', filename='背景上传按钮.jpg') }}" alt="Upload Background"> <input type="file" id="uploadInput" style="display: none;" accept="image/*"> </label> </div> </div> <div class="chat-window-wrapper"> <img id="chatBackground" alt="Background Image"> <div class="chat-window" id="chatWindow"> </div> </div> <div class="input-container"> <input type="text" id="userInput" placeholder="Please enter..."> <button id="sendButton">Send</button> </div> </div> <script> const USER_AVATAR_URL = "{{ url_for('static', filename='用户头像.jpg') }}"; const AI_AVATAR_URL = "{{ url_for('static', filename='AI头像.jpg') }}"; </script> <script src="{{ url_for('static', filename='scripts.js') }}"></script></body></html>

CSS Code
body { font-family: Arial, sans-serif; display: flex; justify-content: center; align-items: center; height: 100vh; margin: 0; background-color: #f0f0f0; overflow: hidden;}.chat-container { width: 300px; height: 600px; border: 2px solid #ccc; border-radius: 5px; background-color: #fff; display: flex; flex-direction: column; position: relative; overflow: hidden;}.chat-title { text-align: center; padding: 10px; font-weight: bold; border-bottom: 2px solid #ccc; display: flex; justify-content: center; align-items: center; z-index: 2; position: relative; background-color: #fff;}.upload-button-container { position: absolute; top: 10px; right: 10px; z-index: 3;}.upload-button { width: 40px; height: 40px; border: 2px solid #ddd; border-radius: 50%; background: linear-gradient(135deg, #f5f7fa, #c3cfe2); display: flex; justify-content: center; align-items: center; cursor: pointer; box-shadow: 0 4px 6px rgba(0, 0, 0, 0.1); transition: all 0.3s ease;}.upload-button:hover { background: linear-gradient(135deg, #e0eafc, #cfdef3); box-shadow: 0 6px 10px rgba(0, 0, 0, 0.15); transform: scale(1.1); -webkit-transform: scale(1.1); -moz-transform: scale(1.1); -o-transform: scale(1.1);}.upload-button img { width: 20px; height: 20px; border-radius: 50%;}.chat-window-wrapper { flex: 1; position: relative; overflow: hidden;}#chatBackground { position: absolute; top: 0; left: 0; width: 100%; height: 100%; z-index: 0; object-fit: cover; display: none;}.chat-window { position: relative; z-index: 1; height: 100%; padding: 10px; overflow-y: auto;}.chat-window div { display: flex; margin-bottom: 10px;}.user-message { justify-content: flex-end; color: #007bff;}.bot-message { justify-content: flex-start; color: #28a745;}.message-content { display: flex; align-items: center;}.message-content img { width: 30px; height: 30px; border-radius: 50%; margin-right: 7px; margin-left: 7px;}.message-text { max-width: 200px; padding: 5px; border-radius: 5px; word-wrap: break-word; white-space: normal;}.user-message .message-text { background-color: #e9f5ff;}.bot-message .message-text { background-color: #d1f9d1;}.input-container { display: flex; padding: 10px; z-index: 2; position: relative;}#userInput { flex: 1; padding: 5px; border: 1px solid #ccc; border-radius: 3px;}#sendButton { padding: 5px 10px; margin-left: 5px; border: 1px solid #ccc; background-color: #007bff; color: #fff; border-radius: 3px; cursor: pointer;}

JavaScript Code
document.addEventListener('DOMContentLoaded', () => { const chatWindow = document.getElementById('chatWindow'); const userInput = document.getElementById('userInput'); const sendButton = document.getElementById('sendButton'); const uploadInput = document.getElementById('uploadInput'); const chatBackground = document.getElementById('chatBackground'); sendButton.addEventListener('click', () => sendMessage('user')); userInput.addEventListener('keypress', (e) => { if (e.key === 'Enter') { sendMessage('user'); } }); uploadInput.addEventListener('change', (event) => { const file = event.target.files[0]; if (file) { const reader = new FileReader(); reader.onload = (e) => { chatBackground.src = e.target.result; chatBackground.style.display = 'block'; }; reader.readAsDataURL(file); } }); function sendMessage(sender) { const userMessage = userInput.value.trim(); if (userMessage) { addMessage(userMessage, 'user'); if (sender === 'user') { fetch('/get_reply', { method: 'POST', headers: { 'Content-Type': 'application/json' }, body: JSON.stringify({ message: userMessage }) }) .then(response => response.json()) .then(data => { addMessage(data.reply, 'bot'); }); } userInput.value = ''; } } function addMessage(message, sender) { const messageElement = document.createElement('div'); messageElement.className = sender === 'user' ? 'user-message' : 'bot-message'; const messageContent = document.createElement('div'); messageContent.className = 'message-content'; const text = document.createElement('span'); text.className = 'message-text'; text.textContent = message; messageContent.appendChild(text); const avatar = document.createElement('img'); if (sender === 'user') { avatar.src = USER_AVATAR_URL; messageContent.appendChild(avatar); } else { avatar.src = AI_AVATAR_URL; messageContent.insertBefore(avatar, text); } messageElement.appendChild(messageContent); chatWindow.appendChild(messageElement); chatWindow.scrollTop = chatWindow.scrollHeight; }});

Python Code
from flask import Flask, render_template, request, jsonifyimport csvimport osapp = Flask(__name__)# Ensure static folder existsos.makedirs('static', exist_ok=True)# Load CSV response datadef load_responses(): responses = {} try: with open('responses.csv', mode='r', encoding='utf-8') as file: reader = csv.reader(file) for row in reader: if len(row) >= 2: keyword = row[0].strip().lower() response = row[1].strip() responses[keyword] = response except FileNotFoundError: # If the file does not exist, create default responses with open('responses.csv', mode='w', encoding='utf-8', newline='') as file: writer = csv.writer(file) writer.writerow(['Hello', 'Hello! Nice to meet you!']) writer.writerow(['Goodbye', 'Goodbye! Looking forward to chatting next time!']) writer.writerow(['Name', 'I am an intelligent chat bot']) responses = {'Hello': 'Hello! Nice to meet you!', 'Goodbye': 'Goodbye! Looking forward to chatting next time!', 'Name': 'I am an intelligent chat bot'} return responses# Store response dataresponses_dict = load_responses()@app.route('/')def index(): return render_template('index.html')@app.route('/get_reply', methods=['POST'])def get_reply(): data = request.get_json() user_message = data['message'].strip().lower() # Find matching keyword response bot_reply = "Sorry, I don't quite understand what you mean." for keyword in responses_dict: if keyword in user_message: bot_reply = responses_dict[keyword] break return jsonify({'reply': bot_reply})if __name__ == '__main__': app.run(host='0.0.0.0', port=5000, debug=True)3
Project Analysis
01
Folder and File Description
(1) Project Folder Structure:
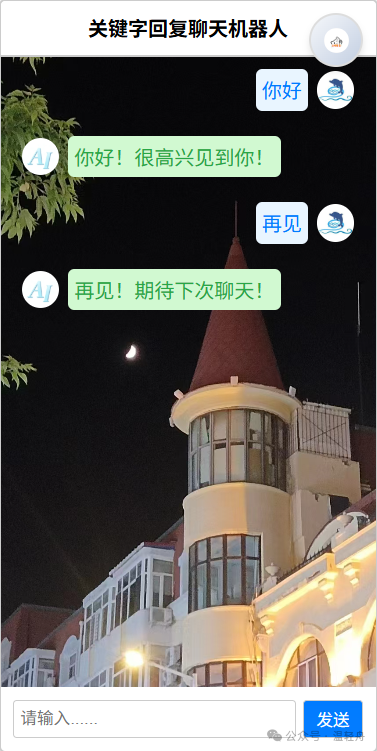
(2) File Descriptions:
-
chatbot:
Project main folder: customizable name
-
app.py:
Contains Flask application logic, handles API routes (such as getting events, adding events, deleting events, etc.) and renders the homepage
-
static folder:
Stores CSS style files (styles.css) and JavaScript script files (scripts.js)
-
templates folder:
Stores HTML template files (index.html)
-
responses.csv:
Stores response data. If the file does not exist, the application will automatically create it at startup
02
Function Description and Usage
(1) Function Description:
-
CSV file stores responses: All keywords and corresponding replies are stored in the responses.csv file
-
Automatic loading: The application automatically loads data from the CSV file at startup
-
Keyword matching: When the user sends a message, the system checks if the message contains any keywords from the CSV file
-
Default response: If no matching keywords are found, it returns the default response “Sorry, I don’t quite understand what you mean.”
-
File auto-creation: If the CSV file does not exist, the system will automatically create it and add some default responses
(2) Usage:
-
Save all files to the appropriate locations
-
Run app.py to start the Flask application
-
Access http://localhost:5000 to use the chat bot
-
To add new keyword responses, simply edit the responses.csv file and add new lines in the format “ keyword, reply content“


4
Conclusion
The above is all the code for this project, which can be copied and pasted for direct use.
You can also privately message in the background
“Chat Bot Py”
to get the download link for the source code files
The code is for learning purposes only and should not be used for commercial purposes.


—— E N D ——
Original: Wen Qingzhou
This article ends here~
Follow Zhou Zhou to open a new programming world together
Click
to
Follow
Us