This article is translated from: https://pimylifeup.com/raspberry-pi-mosquitto-mqtt-server/ with some understanding and modifications, and additional settings for enabling remote access.
Introduction to MQTT
MQTT stands for Message Queuing Telemetry Transport, a network messaging protocol commonly used for message transmission between IoT devices.
To enable our Raspberry Pi to support the MQTT protocol, we will use server software called Mosquitto.
Mosquitto is a message broker that implements multiple versions of the MQTT protocol, including the latest 5.0 version.
The working principle of the MQTT protocol allows clients to act as both publishers and subscribers. Publishers send messages to a broker that acts as an intermediary.
Subscribers connect to the MQTT broker and read messages broadcasted under specific topics.
You can use MQTT to allow multiple sensors to send their data to the MQTT broker on your Raspberry Pi, from which client devices can receive the data.
If you want to learn more about the MQTT protocol and why it is well-suited for IoT devices like the Raspberry Pi, be sure to check out the official MQTT website.
Installing Mosquitto on Raspberry Pi
1. First, ensure you have the latest system by entering the following commands:
sudo apt update
sudo apt upgrade
2. Run the installation command for Mosquitto and the Mosquitto client, which makes it convenient for connection testing on the Raspberry Pi:
sudo apt install mosquitto mosquitto-clientsDuring the installation process, the package manager will automatically configure the Mosquitto server to start at boot.
Once the installation is complete, you will have the Mosquitto MQTT broker running on your device.
3. You can use the following command to verify that it is installed and running.
sudo systemctl status mosquittoThis command will return the status of the mosquitto service.
If the service has started normally, you should see the text active (running).
Testing MQTT
Our next step will be to test whether the service is functioning properly and acting as an MQTT broker on our Raspberry Pi.
To do this, we will use the Mosquitto client installed earlier in this guide.
For this section, you will need to open two terminal sessions on your Raspberry Pi (locally or via SSH).
1. Our first task is to start the subscriber.
The subscriber will listen to the MQTT broker running on our Raspberry Pi.
We can use the Mosquitto client we previously installed for the subscriber.
In the example below, we connect to a localhost connection and wait for messages from the broker on the topic mqtt/pimylifeup.
mosquitto_sub -h localhost -t "mqtt/pimylifeup"Using the -h parameter, you can specify the hostname to connect to. In our case, we are using the local MQTT broker installed on the Raspberry Pi.
Next, we use the -t parameter to tell the Mosquitto subscriber what topic we should listen to from the MQTT broker.
For our example, we are listening to a topic named mqtt/pimylifeup.
2. Now that we have a client loaded and are listening for messages,
let’s try publishing a message to it.
We need to use the MQTT publisher client we installed on the Raspberry Pi to publish a message to the topic.
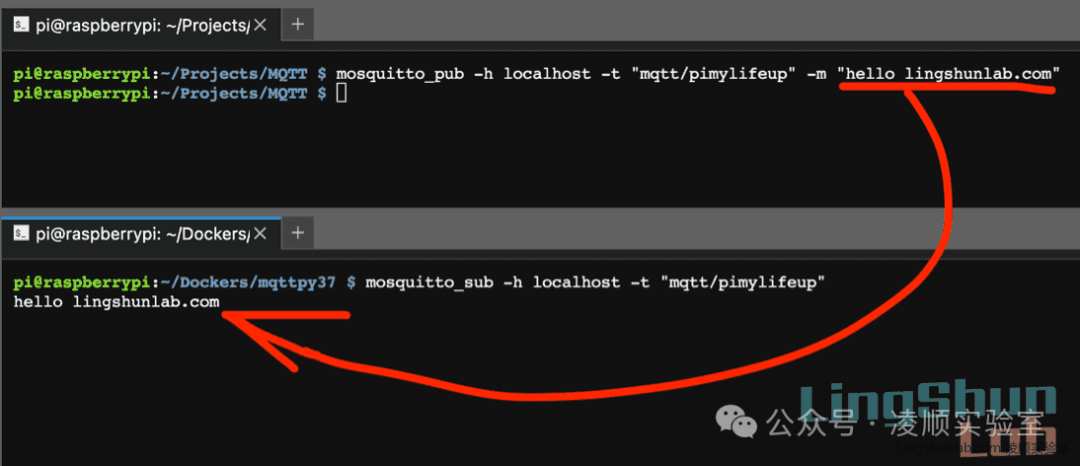
Run the following command to publish the message Hello World to the mqtt/pimylifeup topic on our localhost server.
mosquitto_pub -h localhost -t "mqtt/pimylifeup" -m "hello lingshunlab.com"The two parameters are the same as in the previous command, with -h specifying the server to connect to and -t specifying the topic to publish to.
Another parameter we are using here is the -m parameter. This parameter allows you to specify the message to be sent to the Raspberry Pi MQTT broker.
3. Back in the terminal session where you started the Mosquitto publisher,
you should now see your message appear.
So if you followed our example, you should see the following text in the command line.
hello lingshunlab.com
Test successful, MQTT server is working.
If you are using MQTT with a firewall like UFW, make sure to open port 1883.
Setting Up Remote Access (No Authentication)
To enable remote access so we can communicate with other IoT devices, we need to edit/create a configuration file.
1) Enable Remote Access for Mosquitto Broker (No Authentication)
Run the following command to open the mosquitto.conf file.
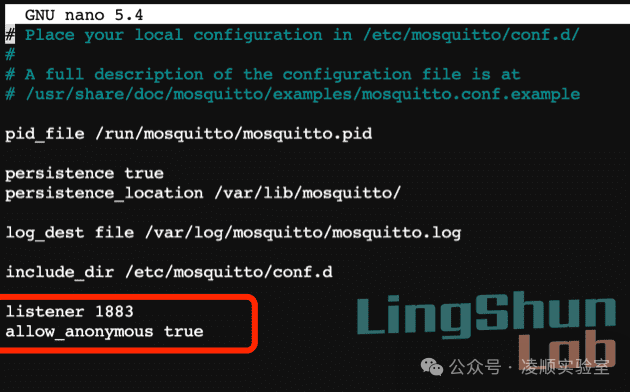
sudo nano /etc/mosquitto/mosquitto.conf2) Use the arrow keys to move to the end of the file and paste the following two lines:
listener 1883
allow_anonymous true
It should look like the following:

Save and exit.
3) Restart Mosquitto
To apply the configuration, you need to restart Mosquitto
sudo systemctl restart mosquittoOr, simply reboot the Raspberry Pi
sudo rebootNow remote hosts can access the MQTT server via the IP address.