1 Overview
This article mainly discusses how to create a project using TASKING VX-toolset for AURIX. The content covers the types of projects, adding and deleting source files, and configuring necessary project properties.
Terminology:
iLLD:Infineon Low Level Driver abbreviation, the low-level driver library from Infineon.
Autosar:Automotive Open System Architecture abbreviation, automotive open system architecture.
2 Project Creation
2.1 Project Types
To create a project, use the “New” command, which can be found in the drop-down menu of “File” in the menu bar, or by right-clicking in the project window and selecting “New.” From the right half of the image below, you can see that there are many types of projects that can be created, and a brief description is provided in the table below. Users can set them according to their actual needs.
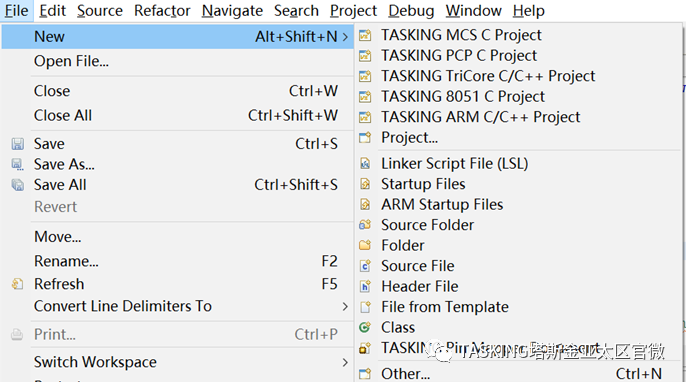
Figure 1Options for Creating a New Project
|
Serial No. |
Name |
Description |
|
1. |
MCS C Project |
Create a project for the GTM kernel |
|
2. |
PCP C Project |
Create a project for the PCP kernel |
|
3. |
TriCore C/C++ Project |
Create a project for the TriCore kernel |
|
4. |
8051 C Project |
Create a project for the SCR kernel |
|
5. |
ARM C Project |
Create a project for the HSM kernel |
|
6. |
Project |
Open the New project window and select according to your needs |
|
7. |
Linker Script Files LSL |
Create an LSL file |
|
8. |
Startup files |
Create startup files |
|
9. |
ARM Startup files |
Create startup files for the arm kernel |
|
10. |
Source Folder |
Create a folder for source files |
|
11. |
Folder |
Create a regular folder |
|
12. |
Source File |
Create a sourceC file (C orC++) |
|
13. |
Head files |
Create a header file |
|
14. |
File from Template |
Create a file based on a template |
|
15. |
Class |
Create a class that includes cpp files and header files |
|
16. |
TASKING Pin Mapper Document |
Create a pin mapper file |
|
17. |
Other |
Open the New window and select according to your needs |
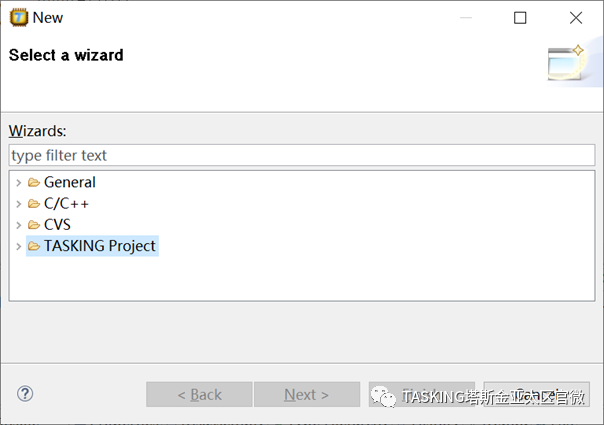
Figure2New window
The New window is divided into 4 groups, categorizing the options from the above table, except for 6 and 17, according to their groups, similar to the options in Figure1. Engineers can choose their preferred method to create a project.
2.2 Create a TriCore Project
Next, we will take the TriCore kernel project as an example to explain how to create a project. Assume the code used is iLLD, open the software, click “New”, select “TriCore C/C++ Project,” and then a window as shown in Figure3 will pop up. Fill in the name in the “Project name” field.
There are four groups of project types: “Application,” “Position Independent Module,” “Library,” and “MIL Library.”
Among them, the “Application” has three choices:
1)“Empty Project”—create a formal project using iLLD, AUTOSAR source codes, and LSL files;
2)“Hello World C Project”—A TASKING provided C demonstration project;
3)“Hello World C++ Project”—A TASKING provided C++ demonstration project.
“Position Independent Module” is an address-independent module (for detailed information, please refer to Chapter 13 of the TASKING VX-toolset for TriCore User Guide). “Library” is to create a library that packages source files into a library file. “MIL Library” is to create aMIL library that can further optimize code.
Here we choose “Application” and then “Empty Project,” fill in the project name in the “Project name” field, for example, TC387, and then click “Next” to proceed to the next step.
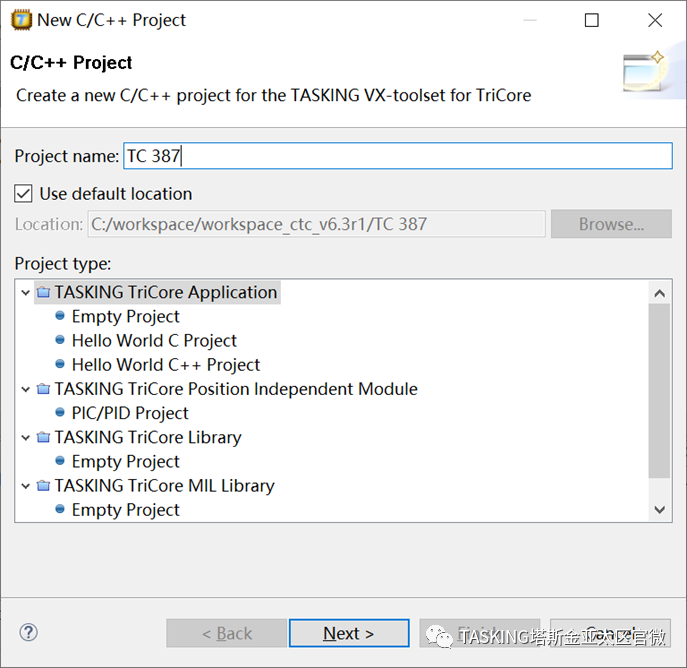
Figure3Project Creation Window
The window switches to the “Project Setting” as shown in Figure4. In this window, select the chip type in the red box Action, which has three options:
1)“Add Startup file(s) to the project”—Add TASKING built-in startup files to the project;
2)“Add linker script file to the project”—Add TASKING built-in linker script file (.lsl) to the project;
3)“Include debugger synchronization utility”—Include debugger synchronization utility.
Since the source files of “iLLD” and “AUTOSAR” already include the startup files and.lsl files, all options in “Actions” (in the red box) should be removed. Click “Next” to enter the debugger configuration interface, which can be skipped for now and set before debugging. Click “Finish” to complete the project creation. At this point, we have obtained a blank project based on TC387.
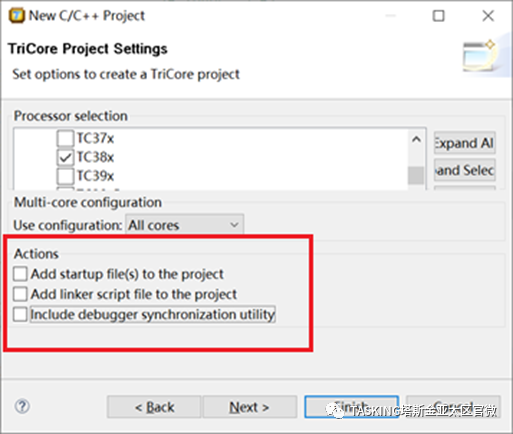
Figure4Project Settings
2.3 File Addition
At this point, this is just a blank project, and all iLLD or AUTOSAR c files, h files, and LSL files need to be copied. Then, in the newly created project in TASKING, such as TC387, right-click and select “Paste.” Alternatively, copy the files to the project directory and then right-click in the project window, selecting “Refresh” to update. At this point, the source files and lsl files have been added to the project.
2.4 Project Properties Configuration
2.4.1Necessary Configuration Items
Next, the project properties need to be configured to complete the most basic settings so that the project can compile without errors. Open “Properties” and select “C/C++ Build → Settings” to open the compiler settings options.
Note: This configuration is mandatory.
1)“Preprocessing” option, remove the options in the red box. Do not check the “Automatic inclusion of ‘.sfr’ file” option for projects of “iLLD” or “AUTOSAR MCAL”.
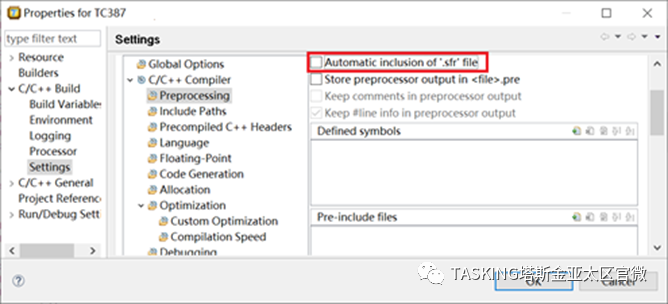
Figure5Disable Automatic Inclusion ofsfr Files
2)Select “Include Paths.” TASKING requires manually setting the path for header files. Click the button in the small red box of Figure6 to add header file paths. A small window “Add Directory” will pop up, then click “Workspace.” Select the project, expand each folder of header files, and if you have a numeric keypad, you can use the “*” key (multiplication key) to expand all at once. Ensure that no header files are missed (refer to Figure7).
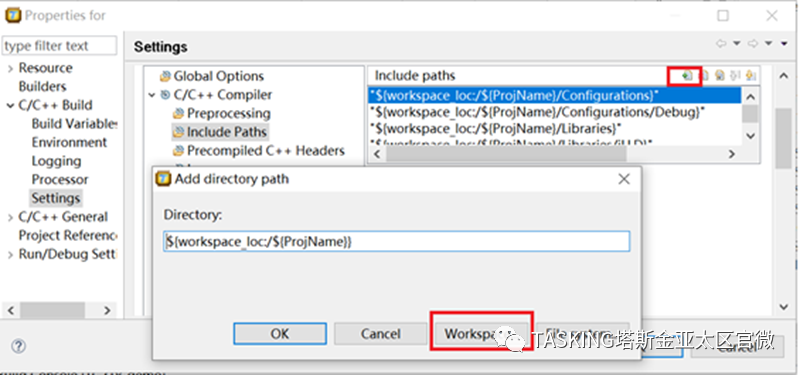
Figure 6Adding Header File Include Paths
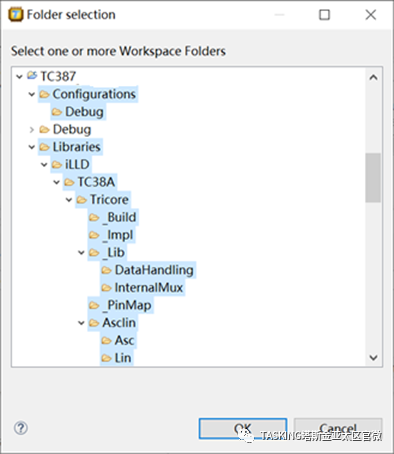
Figure 7Folder Selection
3)In the Linker option, add the script file path. Select “Script File,” click “Browse” to add the LSL file path. It is recommended to use “../” to replace the previous path after adding; for example, “../${ProjName}.lsl.” This allows automatic adaptation when the project path changes.
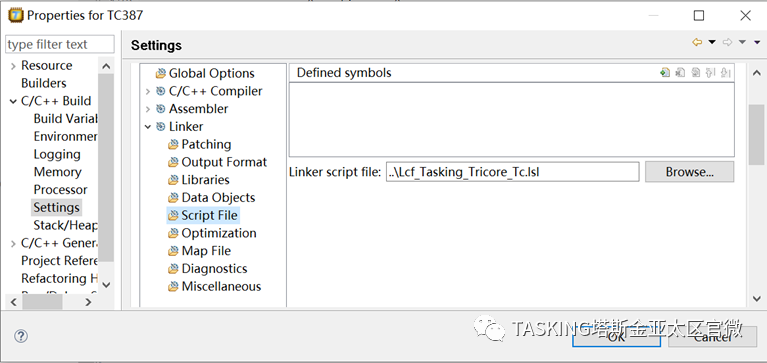
Figure8Adding LSL Files
At this point, the project can compile normally without errors.
2.4.2 Important Configuration Items
The next two configuration items do not affect whether the project can compile normally, but they are still quite important options that should be configured for every formal project.
4)In the Linker option, set the output file format. TASKING 6.3r1 supports 3 output formats: hex, S19, and bin. By default, TASKING does not enable output files. Engineers can choose the appropriate output file format based on their needs, such as the hex format (see Figure9).
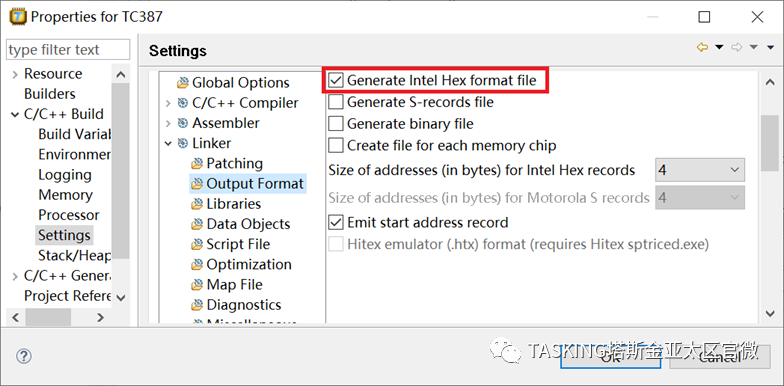
Figure9Setting Output File Format
5)In the mapfile option, check “Generate map file,” which allows the project to generate a map file after compilation, providing a means for subsequent problem analysis.
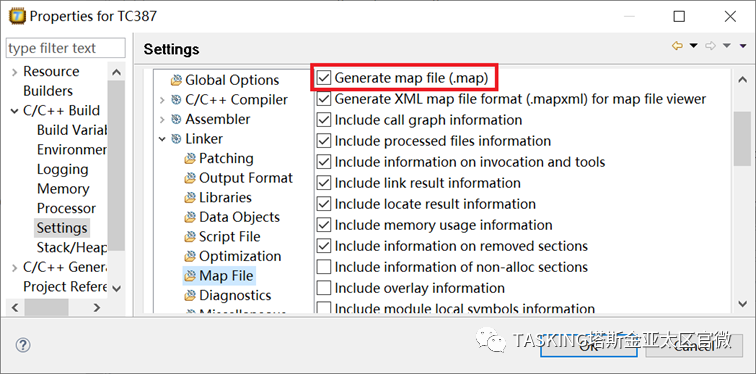
Figure 10Enabling Output Map Files
At this point, the creation of a project is basically complete, and engineers can develop code based on this and change project configuration options according to actual project needs.
3 Contact Us
If you have technical issues, please contact TASKING China, where you will receive the most professional and timely technical support.
Email: [email protected]
Official Website: www.tasking.com
Trial Application: https://www.tasking.com/trial