Follow Embedded Learning Station, bringing you more fresh hotspots every day.

🤟Tips: This article has 2485 words, estimated reading time is 15 minutes~
Connecting to a serial port allows users to control the system without a monitor. Below is how to access and use the serial console in Linux.
One of the essential elements when dealing with embedded Linux projects is accessing your device via the serial console interface. For this, the computer you are developing the embedded system on must have a serial port. However, very few computers today have serial ports, which is why we use USB to serial converters.
▋Setting Up USB to Serial Converter
Almost all USB serial converters you can find on the market can be automatically recognized by Linux. Plug any USB converter into your computer and use the dmesg command to find out the device’s filename.
dmesg
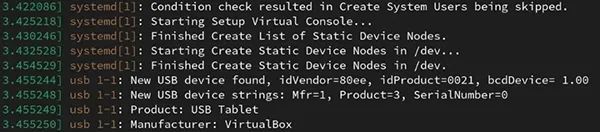
In the example above, you can see the manufacturer part showing VirtualBox because the host is running a Linux distribution on VirtualBox. Here, the manufacturer name will change based on the converter you are using. You can also see the name of the serial converter connected to the system, such as ttyUSB0.
You can use the system-recognized serial converter through the device file /dev/ttyUSB0. Depending on the distribution you are using, the device file is automatically created under the /dev directory, showing the major, minor, and device type. For USB serial converters, the naming scheme for each instance is usually ttyUSB0, ttyUSB1, and ttyUSBX.
If you remove and reinsert the USB serial converter while an application is using it, the system will issue a new number to the device.
▋Access Authorization for Serial Devices
The default access permissions for the mounted USB converter device file are usually as follows:
ls -l /dev/ttyUSB0
# Output: crw-rw—- 1 root dialout 188, 46 Jul 17 15:34 /dev/ttyUSB0
When checking the output above, you can know:
-
The letter ‘c’ at the beginning indicates that this is a character-based device.
-
The file owner is the root user, who has read and write permissions.
-
The group owner of the file is the dialout group, whose users also have read and write permissions.
-
Other users have no read or write permissions for this file.
If you are currently logged in as a normal user who is not a member of the dialout group, you will not be able to read and write to the USB serial converter. To resolve this issue, you must make the current user a member of the dialout group or edit the udev rules file on the system.
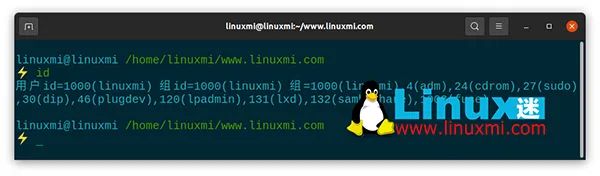
For convenience, you can use the first technique. First, use the id command to determine which groups your user belongs to:
id
Use the adduser or usermod command to add your user to the group:
# For Fedora
sudo usermod -aG dialout USERNAME
# For Debian
sudo adduser USERNAME dialout
# For Arch
sudo usermod -a -G uucp USERNAME
The group membership procedure is now complete. However, the system checks group membership information during the first login step of the graphical session and provides it to all running processes.
Therefore, you must log out of the current graphical session and log back in or restart your computer for the changes to take effect. After doing this, you will have read/write access to the serial converter device.
▋How to Connect to Serial Console in Linux
When you need to access a computer or network console, you can refer to serial console applications. Usually, you need to access it via SSH to do this. However, from both software and hardware perspectives, in some cases, you can also access the console using only the serial port.
You will find these types of examples most commonly on older computers. Here are some of the best serial console applications for you.
▶ Using Minicom
You can install Minicom on your system, which is an old but still functioning application as follows:
# On Fedora, CentOS, and RHEL
sudo yum install minicom
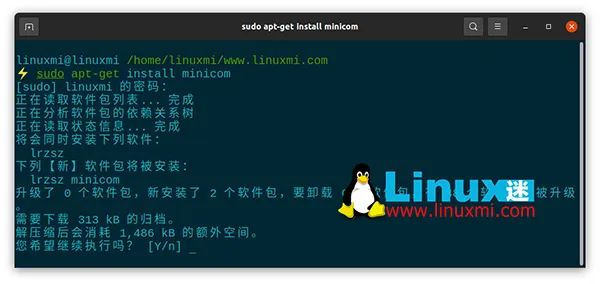
# On Debian and Ubuntu
sudo apt-get install minicom
# On Arch Linux
sudo snap install minicom
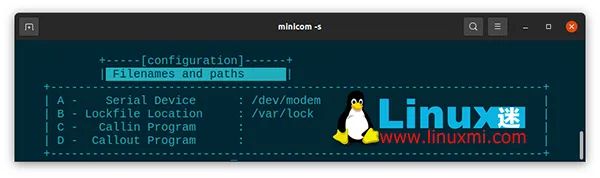
When you first start the application, it will default to trying to open a device file like /dev/modem. It terminates when it cannot find the file. To overcome this issue, you can start the application directly with the -s parameter to access the setup screen:
minicom -s
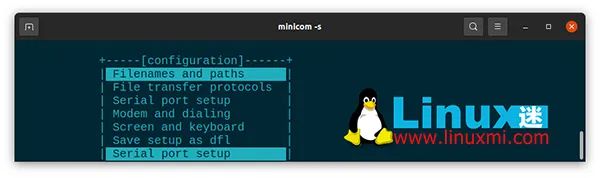
Press ‘A’ to set the device name and ‘E’ to set the serial port speed. Then when you exit with ‘Exit’, you can use the corresponding serial port.
On the application’s main screen, you can use Ctrl + A + O to return to the configuration screen, use Ctrl + A + X to exit the application, use Ctrl + A + W to activate line mode, and use other shortcuts for help Ctrl + A + Z.
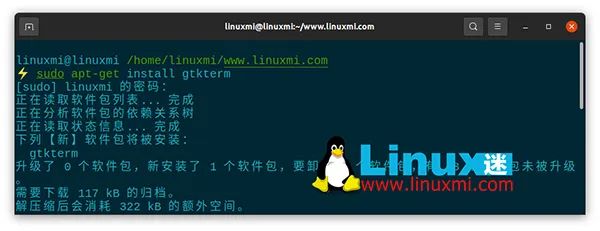
▶ Using GTKTerm
Minicom is usually used by advanced Linux users, so it is not recommended for beginners. Linux newcomers can install GTKTerm, a graphical serial terminal emulator for Linux. You can install the application on your system using the following commands:
# On Fedora, CentOS, and RHEL
sudo dnf -y install gtkterm
# On Debian and Ubuntu
sudo apt-get install gtkterm
# On Arch Linux
yay -S gtkterm
When launching the application, you must set the device name and speed parameters through the Configuration > Port menu as shown below:

Save the settings as defaults for easy future use.
▶ Using Screen
If you are familiar with the screen for multi-terminal management, you will know that you can also use it for serial access. Here are the commands to install it:
# On Fedora, CentOS, and RHEL
sudo dnf -y install screen
# On Debian, Ubuntu, and Linux Mint
sudo apt-get -y install screen
# Other distributions use Snap to install
sudo snap install screen –classic
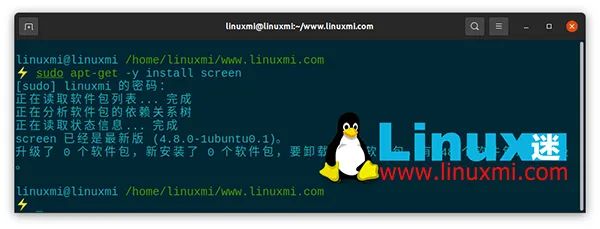
After installation, you can run the following command to connect to the serial console:
screen /dev/ttyUSB0 115200
▋Now You Can Establish Serial Port Connection on Linux
Being able to access your Linux system via the serial port is a very useful feature, especially when you do not want to connect a monitor to the SBC (Single Board Computer).
Since serial console authorization is built into the Linux kernel at compile time, you should at least have a basic understanding of the Linux kernel and how it works.
To receive related materials, please add Teacher Gu Gu’s WeChat↓